
How to make a slab foundation. Do-it-yourself slab foundation: step-by-step instructions, tips, photos. Design structure and diagram
When choosing a foundation, they are guided firstly by reliability, and secondly by cost. It would be nice if both qualities were combined, but this is not always possible. One of the most reliable foundations for building a house is a monolithic slab foundation. In some cases - on normal soils for light houses it is relatively inexpensive, but in difficult cases it can be expensive.
Scope and types
A monolithic slab for a house belongs to floating, non-buried foundations; it can also be shallow. It got its name due to the fact that a reinforced concrete base is poured under the entire area of the house, forming a large slab.
A prerequisite is the presence of a sand and gravel cushion, which redistributes the load from the house to the ground and serves as a damper during frost heaving. Often such a foundation is the only possible solution. For example, on unstable, loose soils or on clays with a large freezing depth.
The construction of a monolithic slab foundation is simple and reliable, but its production requires a large amount of reinforcement and large volumes of high-grade concrete (not lower than B30), because the entire area occupied by the building is reinforced and concreted, and with a margin for greater stability. That’s why such a foundation is considered expensive. In principle, this is true, but it must be considered. In some cases, its cost is lower than deep strip laying - due to less excavation work and less concrete.
The depth of the monolithic slab is determined depending on the weight of the house and the type of soil. With shallow depth on heaving soils in winter, the house along with the base can rise and fall. If the reinforcement and slab thickness are correctly calculated, this does not affect the integrity of the building. The plate compensates for all changes due to elastic force. In the spring, after the soil has melted, the house “sits” into place.
There are four types of slab foundations:
- Classical. A reinforced concrete slab is placed on a sand and gravel bed with or without insulation. The thickness of the concrete layer is 20-50 cm, depending on the soil and the mass of the building. The thickness of the layers of the cushion depends on the depth of the fertile layer - it must be completely removed. The resulting pit can be filled 2/3 with sand and gravel.

- Insulated Swedish stove (USH) with built-in heated floor. Firstly, it differs in that the slab formwork is permanent - made of L-shaped polystyrene foam blocks. This significantly reduces heating costs - heat loss is minimal. Also, heated floor pipes are laid on top of the insulation, reinforcement is laid on them (sometimes under them), and everything is filled with concrete, the thickness of the concrete layer is 10 cm. All communications, including water supply and sewerage, are laid at the stage of preparing the foundation - in a sand cushion. That is, after making the foundation, the heating system is ready and the engineering systems are connected. This approach allows you to speed up construction, but the foundation itself is expensive. This type of foundation requires competent engineering calculations and the same execution: you cannot make mistakes when calculating and laying communications, since alterations are impossible. Questions also arise regarding the repair of systems immured in the foundation. It is impossible, so they use expensive materials with a long warranty.

USHP - insulated Swedish stove with built-in heated floor
- Russian - a plate with stiffening ribs. To strengthen the structure for heavy houses and in difficult operating conditions (severe frost heaving), Russian scientists came up with the idea of making more massive stiffeners. They are usually installed under load-bearing walls. In this case, the complexity of the work increases - the stiffeners are installed separately, and the slab separately. But the bearing capacity of such a foundation is much higher, which makes it possible to reduce the thickness of the slab to 10-15 cm.


Construction technology of insulated slab
Energy saving is becoming a really hot topic, so few people build foundations without insulation anymore. Any slab foundation is a multi-layer structure, and in the case of insulation there are even more layers. To achieve the desired level of quality, each level must be carefully completed. Let's look at each in more detail.

Preparing the base
The dimensions of the pit for the monolithic slab must be at least 1 meter larger than the building itself. In this area, the fertile soil is completely removed. Its thickness varies in different regions - from 20-30 cm to 50 cm and more. In any case, everything is removed.

Along the edge of the pit, just below the general bottom level, drainage pipes are laid to drain surface water into drainage wells. This measure is necessary so that the walls and the foundation itself do not get wet.

The bottom is leveled, the holes are filled in, the humps are removed, everything is carefully leveled to the horizon level and compacted. Roll out onto a leveled bottom. It should cover not only the bottom, but also the walls. The canvases are spread with an overlap, the edges are glued together with reinforced tape. Geotextiles prevent plant roots from germinating and also prevent sand, which serves as a damping pad, from being washed away.

Clean, medium-grain sand is poured onto the laid geotextile. The layer of sand is 20-30 cm. It is poured in thin layers, distributed evenly and compacted layer by layer. The layer of sand that can be properly compacted with a manual vibrating plate is 8-10 cm. These are the layers that sand is laid in. It must also be laid level, in an equal layer throughout the entire pit.

The thickness of the layer can be controlled using stretched cords. They are tied to driven stakes, specially made supports - benches, to formwork installed in a level (see photo below). All cords must be in a horizontal plane. Knowing the initial distance from the bottom of the pit to the tensioned threads, you can determine the height of the poured layer.
Crushed stone is poured onto the compacted sand. Fill the entire volume at once, distributing it evenly over the site. The leveled crushed stone is compacted to a high density.

At this stage, sewer and water pipes are laid. Ditches of the required depth are dug in the already compacted crushed stone. They should be such that there is some space around the embedded elements. Pipes are laid in the ditches, filled with sand, leveled, and the sand is compacted with a shovel or board. More severe compaction may lead to cracks. That’s why the pipes are laid after compaction.
Concrete preparation
Formwork is placed around the perimeter of the pit. It is usually assembled from 40 mm thick boards or 18-21 mm plywood. The height of the formwork for a monolithic slab is the total thickness of the remaining layers. Along its edge it is convenient to control the level of concrete when pouring, so the board must be edged. To save material, you can set up the formwork only for preparation. After the concrete has set, it is dismantled and placed higher, reused to fill the main slab. But the loss of time with this approach is significant, so this is not always done.
In any case, the formwork is supported from the outside with stops and jibs. The structure must be rigid to support the mass of concrete.
A 100 mm layer of concrete is poured onto the compacted gravel. This can be low grade concrete - B7.5 - B10. Concrete preparation will be a reliable basis for laying waterproofing and insulation, and also serves to more evenly distribute the load from the house.

Waterproofing
Since the monolithic foundation slab is completely in the ground, it needs careful waterproofing. Therefore, two types of materials are usually used: coating and roll. The base is first thoroughly dust-free, then impregnated with diluted kerosene or solvent primer (and the sides of the concrete preparation are also coated). It is sold very thick and does not adhere well to concrete. As a result, the roll waterproofing adheres poorly and the foundation will get wet. When diluted, it becomes more fluid and penetrates deeper into the concrete. At the same time, it almost does not lose its properties.
When laying out rolled waterproofing, it is released 10-15 cm beyond the foundation. The panels are rolled out with an overlap, the connecting edges must be coated with bitumen mastic and pressed well. When laying out, you need to make sure that there are no creases or waves.
If the groundwater level is high, two layers of roll waterproofing may be needed. It is then rolled out crosswise and also glued onto a primer (bitumen waterproofing), but it can no longer be thinned.

Double waterproofing of a monolithic foundation slab - coating and roll
Of the rolled waterproofing materials, Gidroizol and TechnoNIKOL Technoelast EPP-4 on high-density polystyrene performed the best. Tekhnolnikol of this brand has a high tensile strength of about 60 kg, which increases the chances that it will not be damaged during further work. You shouldn’t use roofing felt, no matter how much you want to save money. In its modern version, it is too thin and brittle and quickly loses its properties. You cannot replace the waterproofing in the slab, so use the best material.
Capillary suction of moisture through the slab can also be reduced using liquid impregnations such as Betonite. It significantly reduces moisture absorption. Penetrates to a depth of 50-60 cm, so it saturates the concrete preparation through and through. The disadvantage of this material is its high price, but the properties of the material are excellent.
Insulation
To insulate the slab foundation, high-density extruded polystyrene foam is used. The thickness of the insulation layer is 10-15 cm, depending on the region (for the Middle Zone 10 cm is enough). Laying is carried out in at least two layers, overlapping the seams that form cold bridges. This requires more time, but heating costs will be lower. If the slabs have an L-shaped lock, they can be laid in one layer.

Since polystyrene foam is not friendly with petroleum products, a thick polyethylene film is spread on it, and then heat-insulating material is laid.
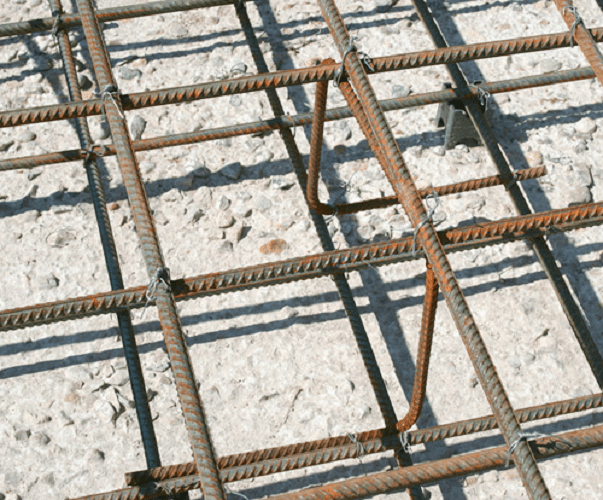
Reinforcement
For the reinforcing frame, ribbed reinforcement of class AIII, with a diameter of 12-14 mm, is used. It is laid lengthwise and crosswise, in increments of 15-30 cm, and can have one or two layers. It all depends on the type of soil and the mass of the building. All reinforcement parameters are calculated separately.
The reinforcement must be at a distance of at least 5 cm from the edge of the slab. Therefore, it is placed on special supports that provide the required clearance.

When reinforced, a cage is obtained; at each intersection, the rods are tied together with a special soft steel wire. There are also connection techniques - using plastic clamps or welding. Plastic clamps are quick to tie, but not everyone trusts them. It is not recommended to use welding, because the weld seam is the most vulnerable place to rust, and the connection is too rigid. When using wire and clamps, the entire structure can “play” a little without destroying the ligament, and when welding, such movements lead to the seam bursting. As a result, the reliability of such reinforcement is low.
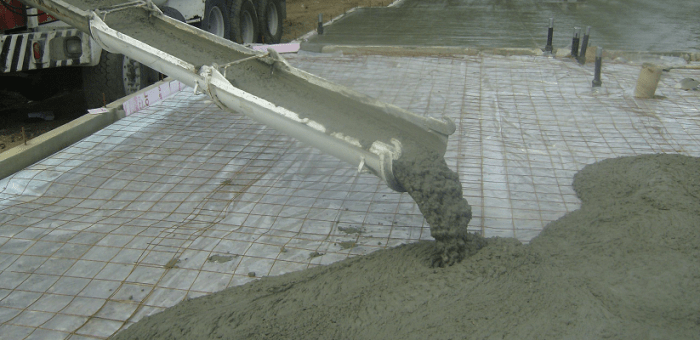
Pouring the foundation slab with concrete
The thickness of the slab is calculated for each specific case and can be from 20 cm to 50 cm. When pouring, use concrete of at least grade B30. The entire perimeter must be filled in one day, avoiding the appearance of vertical seams. Therefore, for concreting a slab foundation, ready-made concrete is most often delivered: large volumes are required within a certain period of time.

The arrival schedule of the vehicles must be calculated so that you have time to distribute the first portion and compact it. For compaction, construction deep vibrators are used, which create high-frequency vibrations. As a result, all air is removed, the concrete mixes better, becomes more fluid and plastic. The result of this treatment is not only a smooth concrete surface, but also a higher hygroscopicity class.
As a last resort, you can fill the slab in horizontal layers. Vertical division in this case is unacceptable, since cracks are likely to appear at the joints.
Curing
For the normal process of concrete hardening, a sufficient level of humidity of 90-100% and temperatures above +5°C are required. It is advisable to fill the slab in warm weather with a temperature of about +20°C. This temperature regime is optimal for the hardening process. Caring for concrete monolithic slabs consists of preventing mechanical damage and maintaining moisture.
Immediately after laying, the concrete is covered with a diaper or tarpaulin. This prevents it from heating up from the sun, and the wind does not affect it. The film is glued into large panels. The strips are laid with an overlap of 10-15 cm and taped with tape. It is desirable that there be as few unlined joints as possible, that is, the shelter should consist of one or two pieces, if one is too inconvenient. In this case, individual pieces of film overlap each other by at least half a meter.

The dimensions of the film are such that the side surface of the formwork is also covered, and a load can be placed on the edges of the film, which will prevent the wind from lifting it. Also, with a load - boards - they press the place where the two panels overlap to reduce windage; they can be spread out on the surface.
If the air temperature is above +5°C, approximately 8 hours after pouring, the concrete is watered for the first time. Irrigation should be drip, not jet. To avoid damaging the surface with drops, you can lay burlap on it or sprinkle a layer of sawdust and cover it with film on top. The covering material is watered, and it maintains the moisture content of the concrete. In any case, watering is carried out only at temperatures above +5°C.

If there is a threat of frost, the slab and formwork are additionally insulated. You can use any heat-insulating materials, both those prepared for building a house, as well as sawdust, straw and other available materials.
When to remove formwork

Differences between an insulated monolithic Swedish slab and a video about its construction
As mentioned earlier, the insulated slab under the house developed by Swedish builders is energy-saving. During its construction, permanent formwork made of extruded polystyrene foam is used. As a result, heat leakage into the ground is minimal. The second fundamental difference is the water heated floor system built into the slab.
Since engineering systems are poured deep into concrete, it requires accurate and competent calculations. High demands are also placed on execution. Even small mistakes are critical. You can make USP yourself, but it is better to order the project. See the following photo for an approximate breakdown of costs. The amounts are no longer relevant, but the percentages are correct. The cost of the foundation project is about 1%.

In the following videos you will see the stages of making a Swedish stove for a specific house. Many useful devices are described that will make work easier, and explanations are given for some of their features.
And look how the Germans pour such a slab. There are also many useful nuances.
When building a house, a slab-type foundation is built, based on the conditions of the site. This type of load-bearing foundation is used on mobile, unstable soils. As a solid field, it is used for buildings with a small area. In the cost part, it refers to expensive, but sometimes the only options for the sustainability of a building with a long service life.
Why choose a stove

The continuous contact surface increases the protection of the house from movements, subsidence, and heaving of the soil. According to SP 22.13330.2011, slab construction refers to special measures to increase stability and reduce the impact of soil on the structure being built. Strengthening the effect is achieved by partially replacing the soil underneath with your own hands with a cushion made of non-heaving materials (sand, crushed stone).
Compared to other types, the slab has maximum load-bearing capacity. Therefore, with a significant weight of the structure, it is also carried out in recessed design solutions (if conditions permit). It combines an increase in the load distribution area with a durable floor for the basement.
For foundations and structures erected on sand, sand and gravel bedding, the depth of the foundation is not standardized.
A non-buried monolithic platform is used in swampy and desert areas. Where friction piles do not provide the specified foundation parameters. In conditions where all premises are located above ground level. Where excavation work is either impossible or impractical. Embankment, undermining, and earthquake-prone areas also often have increased horizontal and vertical mobility.
You can make a foundation slab with your own hands, but it would be prudent to entrust the calculation of all indicators for a specific case to a professional.

To ensure the specified parameters of a monolithic foundation for walls, concrete should be selected based on strength, frost resistance, water resistance, and mobility. The use of sulfate-resistant grades is required when groundwater levels are high. Can be compensated for by waterproofing. Application should be done carefully, with your own hands, without skipping.
If horizontal forces in the soil have a significant influence, trapezoidal stiffening ribs are provided in the lower plane of contact with the cushion under the load-bearing walls or an increase in thickness from the center to the edge (resembles an inverted saucer) under the perimeter walls.
A house with a high base is not built on a non-buried slab.
SP 50-101-2004 Clause 8.10 “When building on heavily and excessively heaving soils, if the walls are insufficiently rigid, they should be reinforced with reinforced or reinforced concrete belts installed at the floor level and above the openings of the upper floor.”
Preparation procedure for pouring

To obtain an even quadrangular slab, perform operations in the following order:
- We are planning the site. The top fertile layer must be removed; the soil underneath is not loosened, only a horizontal plane is made along the water level. The site is marked taking into account that the resulting recess should be convenient for installing the formwork. Excessively selected soil increases the work of backfilling with your own hands. The exception is the creation of a drainage system. The distance from the future border of the walls is increased by 1 m.
- To prevent siltation of the cushion materials, which increases swelling where it should not exist, the pit is lined with geotextiles. The material is immediately covered with 10 cm of sand. For final shrinkage (without compaction), the bulk material is kept for 2-3 days.
- Communications, pipelines, cable sleeves and other technological channels are laid immediately.
Everything that was carefully calculated and done with your own hands will be reduced to zero by the work of a hammer drill or electric drill.

Thermal insulation
Climate conditions or the home owner’s decision about the need to reduce heat loss through the foundation add another layer - a polymer heat insulator. You can lay it on a cushion to completely separate the heavily frozen soil and the building. Another option is to insulate inside (on top) under the screed. Relevant for rooms where there are people.
Heat transfer can be reduced by applying insulation along the outer side surfaces of the foundation. Protect from external influences with cladding or plaster. Watch the video on how to thermally insulate a monolithic slab.
You can additionally reduce the effect of heaving forces on structures in frosty climates by making with your own hands a horizontal layer of heat-insulating boards from the wall to the side 10 m, which is protected from above by a blind area.
In the range of insulating materials, a dense polymer is chosen that is resistant to moisture and decomposition. For example, a certain brand of polystyrene foam or extruded polystyrene foam.
The thickness is sufficient within 5 ÷ 10 cm.
Reinforcement
When designing a house, the deforming loads that it will have to withstand are calculated. The tensile strength of a monolithic concrete structure is provided by the reinforcement cage.
Reinforcement material

Depending on the total weight of the house, the thickness of the foundation will be 0.2-0.4 m. We take a rod with a periodic profile Ø 12 mm or more.
Where welded connections are provided (there may be mortgages, anchors, flat steel strips for mating structures, walls), the “Weldable” brand of reinforcement is used. For do-it-yourself tying, the brand and material (composite, steel) are not important.
Assembly method
The rods are assembled into a grid with a cell of 25 cm, unless a different distance is provided for in the project. For a monolith height of up to 0.4 m, 2 meshes are required. The vertical connection is made using reinforcement fragments 100-150 mm long, cut according to the pattern.
Assembly method: knitting. Do not take risks with welding when forming the lattice. Otherwise, we will lose the ability to resist complex deformations without cracking.
The assembled lash is placed with your own hands on the prepared base using staples with a gap of 2 m between them. The separation from the sandy edge is provided by a plastic lining. Horizontal control is carried out with a level. The structure must be rigidly fixed and not move due to variable loads during pouring.
How to pour the solution correctly
In order for the house to stand on a solid monolithic foundation, it is necessary to unload the mortar in an even layer over the entire area. The number of mixers or preparations with a concrete mixer is calculated to meet this requirement. Sectional application is unacceptable due to the appearance of transverse seams, which reduce deformation resistance to loads. Watch the video on how to properly pour a monolithic slab.
Quality Improvement Techniques
Practice shows that monolithicity is achieved by performing the following operations:
- Fill evenly at several points. If the entire mass spreads from one place, then the solidification will be uneven;
- Moisten the surface of the settling foundation for the first 12-14 days;
For casting thicknesses greater than 0.4 m, this is advisable:
- Plow the first layer of concrete with your own hands to allow the air trapped by the solution stream to escape;
- Approximately on the 10th day (no more shoe marks should appear on the concrete), holes are drilled with a non-impact drill for every 6 m². They will protect the hardening mass from cracking. After complete hardening, they must be covered with mastic.
Specifics
 The experience of building a neighbor’s house with your own hands is, of course, important. But, even if the engineering and geological conditions and the design of the house coincide, there are no loads that are completely identical in magnitude and direction, the influence of neighboring buildings, or operational nuances. Make your own design calculation for this foundation.
Among all types of foundations chosen by private developers for the construction of their country houses and outbuildings, the undisputed leader in frequency of use are foundations. However, quite often the specifics of the soil at the construction site, the climate in the region, the location and dynamics of changes in underground aquifers require an excessively deep laying of the base of the strip foundation, which makes it an unprofitable solution, especially if we are talking about the construction of a relatively small in size and total mass building. We have to look for other options that are more economically justified, but at the same time not inferior in terms of load-bearing capabilities.
One such solution could be a monolithic slab poured under the entire future building. The uniform distribution of the load falling on such a foundation over the entire considerable area makes it possible to use such a scheme on soils with low bearing capacity. And the comparative simplicity of constructing such a foundation makes it completely doable on one’s own. So, the topic of this publication is a do-it-yourself foundation slab, step-by-step instructions, from calculations to practical implementation.
General information about the foundation - monolithic slab
Typical diagram of a monolithic slab foundation
A slab foundation does not require a deep location; rather, on the contrary, its load-bearing capacity and “floating” features will appear precisely when it is sufficiently close to the surface of the earth. In this case, even frost heaving of the soil will not have a destructive effect on the stability of the building - the slab itself, with its high-quality construction, together with the building erected on it, seems to “float” on the surface of the soil.
A schematic diagram of a monolithic foundation slab is shown in the illustration below:
1 – Compacted soil – the bottom of a pit dug for the foundation.
2 – A carefully compacted “cushion” of sand, sand-gravel mixture, or crushed stone, which promotes uniform distribution of loads, becomes a kind of damper that softens the effects of ground vibrations. Layer-by-layer filling and compaction of such a “pillow” is practiced, with one or another alternation of materials, or homogeneous, using ASG.
3 – A layer of geotextile (dornite), which will give the sand “cushion” a kind of “reinforcement”, will prevent it from silting or washing away on waterlogged soils. This illustration shows only one of the options for placing a geotextile layer, however, their number and position may vary, depending on specific conditions. Thus, such a layer is often placed between the surface of the compacted bottom of the pit and the first layer of sand “cushion” - to prevent the penetration of soil particles into it. A layer of geotextile also separates the sand and gravel layers of the backfill - again for reasons of reinforcement and avoiding interpenetration. In this case, the location of the gravel or crushed stone layer above the sand seems to be more optimal - because capillary “suction” of ground moisture from below is almost completely eliminated.
4 – A layer of so-called concrete preparation. This element of the overall slab foundation “pie” is often neglected for reasons of saving material and reducing the overall duration of work. Meanwhile, such concrete preparation plays a significant role - it allows you to achieve a “clear geometry” of the base for further pouring the foundation or laying insulation materials, and makes it possible to very efficiently install the hermetically sealed waterproofing required for the slab.
5 – The already mentioned layer of waterproofing, which is mandatory for such a foundation slab, protects the base of the building from moisture from below. The optimal solution is at least two layers of roll waterproofing materials on a polymer-bitumen basis.
6 – The monolithic slab itself with the calculated thickness.
7 – reinforcing belt of a concrete slab. Its classic design consists of two levels of reinforcement grids connected to each other to give the structure volume with special clamps. The arrangement of the reinforcement is planned in such a way that a layer of concrete of about 50 mm is created between the rods and the edges of the slab at the top, bottom and ends - in order to prevent the start of metal corrosion processes.
This is a general scheme, but there are several types of monolithic foundation slabs, used depending on certain specific construction features.
The easiest to implement and probably the most common option is a solid slab, the uniform thickness of which is maintained over its entire area.
Prices for PGS

This is the scheme that is most often chosen when constructing houses and outbuildings on fairly stable soil. However, it has an obvious drawback - the thickness of the slab is usually small, and is partially located below the ground level, that is, the upper edge is located close to the ground, which is not very good for wall structures. Increasing the thickness of the slab because of this is not economically feasible, which means that you can consider another option - pouring a foundation with reinforcing ribs, which have some resemblance to a strip foundation. Moreover, these ribs can be located both above and below the slab.
Thus, a kind of foundation-grillage can be obtained if, simultaneously with the slab, stiffening ribs are poured, protruding above the surface of the slab, which is obtained as a “bowl”. Such grillages are placed along the lines of construction of the load-bearing walls of the house structure - after waterproofing their horizontal surfaces, this is where the masonry begins.

A similar scheme is often practiced in cases where the useful use of a semi-basement or ground floor is planned - the slab simultaneously becomes the floor of these rooms. And from the grillages they begin laying the plinth.
If there is no desire to deepen the slab too deeply into the ground, and at the same time achieve its maximum load-bearing capacity without thickening, you can use a scheme in which the stiffeners are located facing down.

When preparing the surface, installing the formwork and reinforcing frame, deep “channels” are immediately provided, which, after pouring the slab, will turn into stiffening ribs facing the ground.
This also turns out to be a kind of “symbiosis” of slab and strip foundations. Stiffening ribs are planned under external walls and capital internal partitions. Well, if internal partitions are not provided, then the ribs should be located parallel to each other and the shorter side of the perimeter of the house, with a pitch not exceeding 3000 mm.
This scheme makes it possible to achieve serious savings in concrete, since if there are properly planned stiffening ribs, the thickness of the slab can be significantly reduced, by 100÷150 mm, without losing its load-bearing potential, and this, after all, is 1.0÷1.5 cubic meters of solution for every 10 square meters of area.
In addition, wide possibilities for insulating the foundation slab open up - the same height difference on the main surface and on the stiffeners is often accomplished by laying durable thermal insulation material, for example, extruded. By the way, this approach is the key condition for the construction of one of the improved varieties of slab foundations - the so-called “insulated Swedish slab”.
Insulated Swedish stove (USP) - the basis for houses with minimal energy consumption
The trend of building houses with minimal, zero or even negative external energy consumption, widely used in modern world construction, leads to the emergence and development of innovative technologies, which include USP. The main nuances are discussed in detail in the corresponding publication on our portal.
It makes sense to make one more remark. Slab foundations can be not only completely poured, monolithic, but also prefabricated, consisting of ready-made reinforced concrete structures laid close to each other. It would seem that this is much simpler, however, the absence of a rigid connection between adjacent slabs makes such a foundation unstable to possible ground vibrations. For this reason, such a scheme is not widely used, and is practically not used in private residential construction. The only exception may be small-sized outbuildings, the area of which is limited by the size of one standard slab, but this, as you understand, is extremely rare.
Application of slab foundation. Its main advantages and disadvantages
The use of a slab foundation will be fully justified on construction sites characterized by soils with reduced bearing capacity. It is usually resorted to where simpler schemes, such as shallow strip laying or columnar laying, are simply impossible due to the peculiarities of “geology”: the tendency of soils to frost heaving, horizontal “movements”, close proximity of aquifers, etc.

In addition, such a foundation, with careful calculations and design, can become a very reliable basis for multi-story construction. Uniform distribution of loads over a large area of the base gives very low pressure on the ground, even during the construction of massive buildings and engineering structures. True, this applies to a greater extent to construction work carried out on an industrial scale.
By the way, there is a lot of debate about the advantages and disadvantages of a slab foundation, both real and, frankly speaking, far-fetched. Let's try to list them and understand this issue a little.
What they say about merits ?
- There is a widespread belief that a monolithic slab foundation is an absolute “panacea” for all cases, that is, it can be built on any type of soil. Allegedly, such a slab of a house, even in a marshy area, will be a reliable basis for a heavy building, since due to its “buoyancy” it will vibrate along with the movements of the soil, without being subject to deformation.
It is certainly impossible to agree with this statement. Most likely, it would be more correct to say only that a slab foundation opens up expanded possibilities for construction in areas with complex soils, with insufficient load-bearing capacity for a strip foundation, and with average heaving rates.
But on obviously swampy, waterlogged soils, with the likelihood of subsidence, especially in regions with a harsh winter climate, probably only a pile foundation will become a reliable basis; over the years, piles are driven (screwed) into dense, load-bearing rocks located significantly below the freezing level.
And a slab foundation, located almost on the surface, can indeed move within certain limits along with ground vibrations, that is, “float”. But the trouble is that in areas with pronounced soil instability, these vibrations can have a very high amplitude and are applied unevenly from below to the surface of the slab. Even if the soil is absolutely homogeneous over the entire area, this unevenness is explained by banal reasons - on the south side, freezing almost always occurs to a shallower depth, and thawing in the spring occurs much faster. This means that the slab willy-nilly will experience colossal internal bending stresses.
Prices for extruded polystyrene foam
extruded polystyrene foam

As a rule, slab foundations have a very significant margin of safety, and perhaps the slab itself will withstand such loads without cracking, but small linear deformations are quite likely. They will certainly be transferred to the walls, and in addition, the tilt of the entire building from the vertical axis cannot be ruled out. For wooden buildings, it may not be so critical, due to a certain mobility of the structure. But the stresses on rigid stone (block) walls increase with height, that is, the lever of application of force. And it is possible that somewhere in the upper area of the wall a crack will suddenly appear and begin to expand.
So, speaking objectively, you shouldn’t overestimate the versatility of a slab foundation – that would be reckless. In any case, if there is no confidence in unconditional success, it would be more advisable to invite specialists to conduct a geological analysis of the site. In addition, it is always useful to familiarize yourself with the “history” of the use of slab foundations in the nearby area - what kind of houses were built on them and how long ago, what is the depth of the foundation and the thickness of the slab, are there any complaints about the operation, how the buildings survived seasonal ground fluctuations - these and other questions will help you make the right choice.
- Slab monolithic foundations allow the construction of large, even multi-level houses built from heavy materials.
This is true, and many multi-storey buildings in large cities are built on a similar basis. In terms of its ability to evenly distribute the load over a large area, such a foundation has no equal. Of course, all this is true with professionally carried out calculations, taking into account the characteristics of the development site, and high-quality execution.

So the common opinion that a slab foundation is suitable only for small compact houses, and that “its life is short-lived” is limited to 35–50 years - this is nothing more than fiction. We repeat - everything depends on competent professional calculations and on the quality of execution in accordance with the project.
- The construction of a slab foundation minimizes the work of digging a pit - no deep penetration into the ground is required.
If we talk about a slab located on the ground surface or with a slight recess, then this is indeed the case - only the top fertile layer of soil is removed, and the depth of the pit is largely determined by the calculated height of the sand and gravel cushion. True, if this depth is also multiplied by the entire area (and the slab must be laid wider than the future building, plus insulated blind areas), then the volume of selected soil can still be considerable. So this advantage is not very obvious - with a shallow strip foundation, sometimes it is simpler in this regard.

Well, if you plan to use a deep monolithic slab, that is, to create a house with a full-fledged basement on its basis, then you will have to dig a corresponding pit, that is, it is very difficult to do without the use of special equipment.
- The use of a slab foundation automatically solves the problem of a reliable foundation for the floors of the first (or basement) floor.
This is a really important advantage. And if, simultaneously with preparing the slab for pouring, you provide a high-quality thermal insulation belt, then the floors will also be pre-insulated. In addition, in the “insulated Swedish stove”, water heating circuits for the floors are also immediately installed.
- Work on a slab foundation cannot in any way be classified as a task of an increased category of complexity.
An ambiguous statement, with which, nevertheless, one can agree to a certain extent. Indeed, the work itself on the stove does not involve operations that require the highest qualifications of workers. Digging a pit and compacting a sand and gravel cushion, knitting a reinforcement frame, installing formwork, pouring and distributing concrete, caring for a slab that is gaining strength and other stages - all this is either understandable from the beginning, or a novice craftsman can get the hang of it in a very short time.
Another thing is that a number of operations require the use of special tools and equipment. Thus, for high-quality compaction you cannot do without a vibrating plate; for the quick and uniform production of reinforcing clamps, it will be necessary to build an appropriate device; waterproofing with rolled materials involves the use of a gas burner with a cylinder. And considering that the volume of concrete to be poured can be considerable, and it is advisable to pour the slab in one day, it is hardly worth relying on - you will have to order it for delivery.

We can say that, provided that some operations involve outside forces and resources, the owner, who has enlisted the help of friends or relatives, can easily handle the bulk of the work. True, you need to be prepared for the fact that the work ahead will be quite long, physically difficult, and sometimes even tiresome and monotonous. But for a small team of several strong men, it is doable. Of course, with strict adherence to all technological recommendations.
It is interesting that in some publications devoted to slab foundations, this is presented not as an advantage, but as a disadvantage - they say that working on such a slab is an extremely difficult task. It is possible that it is simply a matter of different evaluation criteria - from what point of view this problem is viewed.
Now let's turn our attention to flaws slab foundation:
- It is quite obvious that this type of house foundation is suitable for construction on a relatively flat area. If there is a significant difference in height in the building area, then such a scheme either becomes extremely complicated, becomes impractical, or is considered completely impossible.

- The slab must rest completely, with its entire area, on the ground - this is precisely what lies in its increased load-bearing capacity, even on not completely stable soils. And this, in turn, means that there can be no talk of any basement or cellar under the slab itself.
The only exception may be the scheme already mentioned above, in which the slab itself becomes the floor of a full-fledged basement, semi-basement or basement. It, as a rule, has upward-directed stiffening ribs - grillages, or well-thought-out reinforcement backfills, from which further construction of the buried part of the walls is already underway, by analogy with a deep strip foundation. But this type of foundation is a very expensive “pleasure” that requires highly qualified calculations and practical execution.
- The construction of a slab foundation will require advance planning and the laying of the necessary utilities, for example, water supply, and sometimes power cables.

It is unlikely that such requirements can be attributed to shortcomings - this is rather assessed only as a specific technological feature, and with well-planned work it will not particularly complicate the entire construction process.
- There is a lot of talk about the high cost of such a foundation, which can reach almost half of the entire construction estimate.
Such frightening indicators, apparently, will be valid only for the deep slab already mentioned above. If the foundation is practically not deepened, the picture is certainly not so “terrifying”.
Of course, even with a small thickness of the slab, but with a considerable total area, centimeters very quickly grow into cubic meters of concrete solution. Two-tier reinforcement will require a significant consumption of reinforcement, certainly more than when pouring a strip base. However, we must not forget that, along with the foundation slab, the developer immediately receives a finished foundation - essentially, the subfloor of the first floor, with it already well-made, and sometimes with insulation. That is, these stages of work are already falling out of the overall estimate.
So the excessively high cost is not always an obvious drawback, and the simplicity of constructing the slab largely compensates for the increased consumption of building materials.
How to calculate a monolithic slab foundation
Any foundation requires calculations, and slab foundations are no exception in this regard. True, it should be especially noted that designing such structures is still the lot of professionals, especially if it is planned to build a full-fledged country mansion.
However, sometimes you can resort to calculations yourself, for example, when constructing non-residential structures - a garage, barn, bathhouse, and utility buildings. And one of the key calculation parameters is always the thickness of the monolithic slab. Too small a thickness may not cope with bending loads; excessive thickening is a waste of effort and money.
How is the optimal slab thickness calculated?
Calculations should ideally be preceded by an analysis of the soil on the building site, since it is necessary to have an idea in advance about the bearing capacity of the layer on which the foundation slab will rest. Usually, specialists with a drilling rig are invited to do this, who make several holes, for example, in the corners and in the center of the site.

This makes it possible to evaluate the composition and thickness of the layers, the presence of “overwater”, and the location of aquifers, on the basis of which further calculations can be made.
Any of the soils is characterized by its load resistance, that is, in fact, by its bearing capacity. This parameter can be expressed in kilopascals (kPa), but for calculations in the metric system it is more convenient to use the value kilogram-force per square centimeter (kgf/cm²).
| Soil type | Design soil resistance | |
|---|---|---|
| kPa | kgf/cm² | |
| Coarse soils, gravel, crushed stone | 500÷600 | 5.0÷6.0 |
| The sands are large and gravelly | 350÷450 | 3.5÷4.5 |
| Medium sand | 250÷350 | 2.5÷3.5 |
| Dense sands of fine or silty fraction | 200÷300 | 2.0÷3.0 |
| The same sands, but of medium density | 100÷200 | 1.0÷2.0 |
| Sandy loam, hard and plastic | 200÷300 | 2.0÷3.0 |
| Loams, hard and plastic | 100÷300 | 1.0÷3.0 |
| Clays with a hard structure | 300÷600 | 3.0÷6.0 |
| Plastic clays | 100÷300 | 1.0÷3.0 |
It is clear that the distributed pressure created by the mass of the planned house (taking into account also the external loads on it) and the mass of the slab itself should not go beyond the specified limits. However, such a calculation will still not be sufficiently objective.
When calculating the required slab thickness, it is better to use the values of the optimal specific pressure on a particular soil - these indicators are determined specifically for slab foundations. The calculated value of the load from the entire structure, including the weight of the slab, should be as close as possible to the optimal value, with a possible deviation not exceeding 20÷25%.
Why is this being done? It is important not to go to two extremes. If the optimal load value is exceeded, there is a possibility that the slab will eventually begin to sink into the ground. However, no less dangerous is a significant decrease in pressure on the ground - a structure that is too light for specific conditions becomes too “floating”, that is, it can warp even with the slightest seasonal fluctuations in the ground.
Please note the following:
- The second table does not show all types of soils. The fact is that on soils with high load-bearing capacity, the construction of a slab foundation itself simply does not make much sense - you can get by with much cheaper options.
- In addition, two rows are highlighted in color in the table. In both of these cases, it is recommended to conduct an in-depth analysis of the technical and economic feasibility of constructing a slab foundation.
— In the case of sandy loams, it is possible that the construction of a conventional strip foundation may be much more profitable.
— Hard clays are singled out for the reason that the density of their structure can sometimes be deceptive. If there is a possibility of waterlogging of these layers, for example, by nearby aquifers with seasonal fluctuations in their filling, then a sharp loss of the bearing capacity of the soil cannot be ruled out. The slab, along with the building, will gradually begin to “sink.” It is worth considering the question of the possibly greater feasibility of using
So, in order to calculate the required slab thickness, you will have to determine what distributed load the building itself will exert on the base, then find the difference with the optimal pressure value, and cover the remaining “deficit” using the mass of the reinforced concrete slab. Knowing the specific density of reinforced concrete, it is easy to calculate the volume, and having the area of the slab as initial data, determine its optimal thickness. At the same time, do not forget to take into account that the slab must protrude beyond the perimeter of all walls outward by at least the amount of its calculated thickness or even more - this already depends on the features of the project.
Below the reader will be offered a calculator in which this calculation algorithm is implemented. Of course, this application cannot compete with professional programs in terms of calculation accuracy, but for “estimates” in the field of DIY construction it can provide a useful service.
The calculator assumes that the developer has design outlines for the future building, that is, it will not be difficult for him to decide on the initial data. You will need to know the material and area of the walls (minus window and door openings), the area and type of floors, the area of the roof and the steepness of its slopes (to take into account the snow load). The calculation program already includes average values of the specific gravity of building structure materials, and takes into account approximate operational loads (weight of finishing, furniture, large household units, dynamic loads from people living in the house, etc.).
How to correctly calculate the area of structures?
Since area values often appear in calculations, it is worth giving appropriate recommendations in this regard. They are presented in a special article on our portal dedicated to it, which, by the way, also contains convenient calculators.
It is best to prepare the data necessary for the calculation in advance, write it down in a separate table, and then proceed with the calculations.
Private developers, when choosing a foundation for a house or outbuildings, give preference to the strip structure as a reliable, economical and easy-to-implement option. But in some cases, the only possible solution is a monolithic slab foundation. Such a foundation is required when building on sandy soil, hard and plastic loams, and plastic clay. The design may also be in demand when constructing a building on hard and plastic sandy loams and hard clays.
Features of the slab foundation “pie”
A slab-type foundation does not require deepening - its ability to “float” and resist the forces of frost heaving is fully manifested precisely when laid on the surface.
The basic version of the foundation pie is shown in the illustration: 
Foundation layers from bottom to top:
- Compacted soil is the bottom of the prepared pit.
- Pillow - made of sand or a mixture of sand and gravel, crushed stone. It is filled in layers, leveled and compacted. The cushion dampens ground vibrations and reduces the intensity of the impact of loads from below on the foundation.
- Geotextiles. Dornit fabric protects the pillow from silting and reinforces it. Geotextiles can additionally be laid at the bottom of the pit, between layers of sand and crushed stone to increase the strength of the pie.
- Footing. A thin leveling layer of concrete on top of the cushion helps to properly waterproof the foundation and correctly install the reinforcing frame.
- Waterproofing. Waterproof material protects the reinforced concrete foundation slab from the penetration of moisture from the soil. Waterproofing of a monolithic foundation slab is traditionally performed from two or more layers of rolled bitumen material.
- Concrete slab. Actually, the foundation itself, the thickness of which depends on the magnitude of the loads on the foundation.
- Reinforcement frame. Reinforcement increases the strength of a monolithic structure, takes on tensile-compressive loads, preventing cracking of concrete.
Types of slab foundation
 There are several options for making a foundation slab. Most often it is a monolithic slab, the thickness of which is the same over the entire area. The advantages of such a base include ease of installation; the disadvantage is that the upper edge is close to the ground surface - in this case, the base of the walls may be exposed to moisture, which is harmful to building structures.
To ensure that the edge of the slab is located higher above the ground surface, you should not increase its thickness - this will significantly affect the cost of the foundation. A more practical option would be to install a slab with stiffeners.
 The monolithic structure is a flat base with reinforcing ribs protruding above the surface - it looks like a strip foundation on top of a slab. The ribs are located around the perimeter and under future load-bearing walls inside, if this is provided for by the project.
A foundation slab with upward stiffening ribs allows the construction of a building with a basement or ground floor. In this case, the monolithic structure must be buried in the ground and grillage ribs of a suitable height must be designed. Subsequently, a layer of waterproofing is laid over the ribs and wall structures are mounted.
 To increase the load-bearing capacity of the slab foundation without deepening it, a monolithic structure is made with stiffeners directed downward.
There are two options for making a monolithic slab with downward stiffening ribs:
- Stiffening ribs are formed by trenches dug in the ground below the level of pouring the reinforced concrete slab. A reinforcing frame is installed in the pits for the ribs, made as a single unit with the frame of the slab itself, after which the concrete mixture is poured.
- A pit with a flat bottom is being prepared for the slab. Polymer slab insulation is laid on the waterproofed base - stiffening ribs will form in the spaces between the “islands” of the heat insulator and the walls of the pit. Before pouring the concrete mixture, a reinforcement cage is installed.
Stiffening ribs should be located under load-bearing walls and capital internal partitions. If the project does not include partitions, but it is necessary to increase the rigidity of the slab, the downward-facing ribs should be located parallel to the short side of the building in increments of up to 3 meters.
 Laying a heat insulator, including extruded polystyrene foam, under the foundation slab not only allows you to install stiffeners of the required size, but also helps to insulate the foundation base and reduce the cost of heating the house. This type of foundation is called a “Swedish slab”. It is often supplemented with a water heating circuit.
Prefabricated slab base
 Instead of a monolithic slab foundation, in some cases a precast concrete foundation is used. Finished structures are laid close to each other. But this option can only be used on rocky soils that are not prone to heaving. In other cases, the base may deform over time under uneven heaving loads due to the lack of a rigid connection between the slabs.
A foundation made of ready-made reinforced concrete slabs is used only in the case of the construction of outbuildings, bathhouses, and small light houses. A screed is made on top of the laid slabs. The technology for installing a prefabricated foundation requires the use of special equipment for transporting and laying slabs.
Calculation of the thickness of the slab and reinforcing frame
 When installing a slab foundation with your own hands, it is important to correctly calculate the thickness of the slab. A base that is too thin will not withstand the load. Pouring an excessively thick slab will lead to unnecessary financial expenses.
Please note: each centimeter of slab thickness is 1 cubic meter of concrete mixture per 10 square meters. m area.
The calculation should be entrusted to professionals or a special program should be used. The value is calculated based on the type of soil and loads on the foundation. Therefore, it is necessary to have geological exploration data on the site and a ready-made construction project. The standard thickness of a slab foundation is 200-300 mm.
The reinforcing frame for slabs up to 150 mm thick is made of one layer of mesh, located along the central horizontal axis. For slabs of 200-300 mm, two parallel layers of mesh are required, installed with a distance of 30-50 mm from the bottom and top of the future slab. The diameter of the reinforcement is 12-16 mm, the installation pitch of the rods is 200-300 mm.
Under load-bearing walls, the installation spacing of the rods is reduced due to the sparser arrangement of the elements in the central part of the slab.
It is most convenient to calculate the number of reinforcing bars and clamps for their fastening using a specialized calculator.
DIY foundation slab: step-by-step instructions
The entire range of work on arranging the slab foundation of a house or outbuilding can be done on your own.
Preparatory stage
 The area for the foundation is cleared of debris, trees, etc., after which the future pit is marked. It is important to ensure that the stretched cords form right angles. For accuracy of geometry, the coincidence of the lengths of the diagonals of the marked rectangular section is checked.
In the marked area, it is necessary to dig a pit, taking into account the thickness of the sand-crushed stone cushion, concrete base, waterproofing and the design depth of the slab.
It is necessary to remove a layer of fertile soil with vegetation from the building site; the depth of the pit is calculated relative to the prepared surface.
The bottom of the pit should be flat and horizontal, the soil should be thoroughly compacted. The technology for constructing a slab foundation may involve the use of geotextiles to create a barrier between the soil and the sand cushion - in this case, the sand does not silt and is not washed away when flood groundwater rises. Geotextile sheets are laid with an overlap of 30 cm and overlap the walls of the pit.
Arrangement of the pillow
 Sand is evenly poured onto the bottom of the pit in a layer of 100-120 mm. Then it is moistened with water and compacted using a vibrating plate. Then, using the same principle, the next layer of sand is poured and compacted. The total thickness of the cushion must be at least 200 mm.
Common critical mistakes: using sand mixed with clay, unloading the entire volume of sand into a pit at once and then leveling it.
The sand cushion is covered with a layer of gravel or crushed stone 120-150 mm thick. You can pre-lay geotextiles so that the layers do not mix. A layer of gravel is necessary to prevent capillary suction of moisture from the soil.
At the stage of arranging the pillow, it is necessary to lay all communications that will be routed vertically through the thickness of the foundation slab.
Waterproofing
 Formwork is mounted on the finished cushion along the contour of the future slab. To provide rigidity from the outside, the formwork is supported with spacers. The structure must be sealed so that moisture does not escape from the working mixture during concreting.
After the footing has dried, waterproofing is laid from a special polymer profile membrane or two or three layers of rolled bitumen material. The waterproofing should extend onto the walls of the formwork, the edges of the panels are glued together with bitumen mastic or fused by heating with a burner.
Foundation insulation
 In regions with cold winters, thermal insulation of the foundation slab is practiced when it comes to building a residential building, where it will serve as the base of the floor. The insulation under the foundation slab is laid in an even layer if it is designed flat. When arranging a slab with stiffening ribs pointing downwards. Platforms are formed from the same insulation in the designed locations.
Reinforcement
 Installation of the reinforcement cage begins with the lower mesh. To maintain the required gap of 30 mm from the base, the reinforcement bars are placed on special plastic stands.
First of all, lay all the longitudinal rods. Then the transverse ones are attached to them using twisted wire or plastic clamps. Welding is not used - overheating of the metal at the attachment points weakens the structure.
To position the second tier of the lattice at the required height above the lower one, use “spider” stands (aka “frogs”) over the entire area (2 pieces per square meter) and U-shaped edge elements.
Concrete works
 The pouring of a monolithic foundation slab should be completed within one shift, otherwise it is impossible to achieve the required structural strength. Requirements for the working mixture:
- (strength class B22.5);
- mobility P3;
- water resistance coefficient W8 or more;
- frost resistance class F
It is necessary to provide convenient access for an automixer, and take care in advance of a concrete pump or trays for supplying the working mixture to the formwork.
The solution supplied to the formwork must be immediately distributed evenly over the entire plane. To compact concrete and eliminate air bubbles, you cannot do without a deep vibrator. The surface is leveled using a rule or using a vibrating screed.
The monolithic slab foundation should be covered with plastic film to protect it from precipitation, debris and accidental damage. After 24 hours, the concrete surface needs to be moistened with water for 5-7 days. This will prevent the top layer of the slab from drying out and cracking. After 10-15 days, you can remove the formwork - the concrete will have time to gain more than 50% strength. The construction of walls should begin no earlier than a month after pouring - the concrete must be completely mature.
 Knowing how to make a foundation slab for a house, you can save a lot of money on the construction of a summer house or country house or garage. In order for the foundation to last for decades, it is important to strictly follow the work technology and use high-quality materials.
Monolithic slab foundation technology - video
The use of a slab form as the foundation system of a building, at first glance, seems to be an obvious and simple solution to the problem of stability of the house frame on unpredictable quicksand and heaving clay. So simple that there is a huge temptation to make a slab foundation with your own hands, at your own discretion. If you delve into the reasons why some slab foundations can stand for decades, while others crack in the first winter, it is quite possible to build a simple and inexpensive version of the slab with your own hands.
You can even save on the services of a designer, but if you are interested in the result and not the process, it is still better to have a competent foundation design on hand, for which normal money was paid.
Budget option for a slab foundation, what to look for
It is clear that on complex terrain with an unclear soil composition, it is difficult to obtain a high-quality slab foundation, especially if the groundwater is close to the surface. In this case, there may be no point in taking the risk of taking on the work with your own hands; it is still better to get a competent project, referenced on the ground, and one efficient practitioner. If there is no water in the soil layer at a depth of 100-120 cm, you can rely on your own hands and head. But you definitely need practical experience; it’s good if you have materials from the construction site, real work maps and step-by-step instructions. In the process of arranging a monolithic foundation with your own hands, step-by-step photos will help you navigate even the simplest operations, such as soldering film or laying out reinforcement.
A technological map of the process of constructing a slab foundation can be given in a few lines:
- We dig a pit for the foundation, a dozen test pits to ensure that the assessment of the ground conditions and water is correct, and we level the site as much as possible for the future massif;
- Laying cushions at the bottom of the pit, installing formwork, installing waterproofing and communications, assembling the foundation reinforcement frame;
- Pouring the slab base with concrete, compacting the layer with vibrators, covering the casting with film for the first 5 days of setting;
- The field of removing formwork is finalizing the waterproofing of the slab foundation and sealing the blind area.
For your information! A budget option for a slab foundation does not mean it is of low quality; most often it is a way to save money with your own hands, using the simplest and cheapest methods.
We build a slab foundation on plain soil
It’s worth mentioning right away that a monolithic slab foundation is not a universal solution to the problem of heaving soil. But its use can significantly reduce the risk of splitting the foundation base and the building frame, thanks to the design features of the slab system:
- Firstly, the strength and stability of the foundation practically does not depend on the thickness of the concrete in the slab structure;
- Secondly, incorrectly laid and hand-tied reinforcement may not absorb bending forces at all and may not equalize stress on the slab foundation. It is this type of load that becomes the main cause of destruction of the base and walls of the building;
- Thirdly, as in most other foundation designs, stability and durability depend 50% on how effectively you did the drainage and insulation of the blind area with your own hands.
Important! As long as the loads on the body of the slab foundation are distributed evenly, even under flooding conditions the slab will stand firmly, like an armadillo. As soon as any part of the slab base is hung on a point support, even with reinforcement, the slab will crack, invisible to the eye. Frost and a layer of capillary moisture will “cut” the concrete body of the foundation like a knife.
Therefore, everything that is done with one’s own hands on a slab foundation should be aimed at ensuring equalization of loads. There simply cannot be step-by-step instructions in this matter, so many issues, especially when laying a layer of crushed stone and reinforcement, are resolved from practical experience.

Marking and cutting the foundation spot
Before marking and beating the contour of the future monolithic foundation slab on pegs, you will need to build a temporary landmark on the site plan with your own hands using ordinary sand. In practice, they usually take the silhouette of the base of the base of the slab system, increased by a meter and a half in width, and draw lines, pouring a stream of dry sand from their hands. After removing the surface layer, we mark the exact contour lines of the future foundation.
The surface under the slab foundation must be carefully planned horizontally. If the size of the slab spot is small, then you can trim and clean up the soil layer with a small tractor, and then clean it up with your own hands, guided by the level data. For large-volume slab foundations, it is more rational to use a bulldozer than to dig with your own hands; you can’t do much with a shovel.

At the next stage, without putting the matter on hold, you need to dig a trench with your own hands to a depth of at least 60-80 cm, and lead the pipe to a drainage drain outside the site. Now you can begin compacting without the risk of groundwater seepage. Soil compaction, as well as site planning, is best done with a roller or similar equipment; even with a conventional motorized rammer it is quite difficult to achieve normal compaction of 10-15 cm. If the soil is excessively wet, we pour a thin layer of fine gravel with our own hands and tamp it into the soil layer until the surface of the spot under slab concrete becomes so dense that no traces of high-heeled shoes remain on the backfill layer.

Laying layers of gravel and sand, step-by-step instructions
We lay a layer of geotextile on the compacted soil, it can be a road version or a denser one, at 150-200 g/m2. We lay the canvases on the surface with an overlap of up to 20 cm at the joints. To prevent the laid canvas from moving when sand is poured, we pin the geotextiles at the joints with staplers. To cushion the foundation, you will need to pour a layer of at least 200-250 mm thick. In order not to tear the laid fabric, we will lay out a path of boards in the center of the pit. We use gravel sand, very coarse and well washed with water. As we lay the slab foundation into the base, we level the layer and compact it. The final compaction of the layer is carried out using a vibrating machine after the layer plane has been leveled horizontally.
In a similar way, we pour gravel in a layer of at least 10-12 cm. The first layer is in the form of a small fraction of 4-20, then we pour larger crushed stone, 20-40 mm in size.
Laying waterproofing, installing formwork and reinforcement under the slab base
The waterproofing layer protects the slab foundation from capillary water and at the same time serves as a barrier to retain the concrete mixture poured into the formwork. Therefore, we roll out panels of glass roofing felt or similar rolled material with an overlap of 10 cm and be sure to glue the seams with a layer of bitumen mastic. If this is not done, the layer of “cement laitance” can lift the edges of the canvases, resulting in the formation of numerous cracks through which water can easily penetrate to the concrete. For the peripheral areas of the slab foundation, this will mean slow destruction with each frost.

Next, we assemble a simple and affordable formwork design from the prepared panels. The corners can be strengthened by stuffing horizontal spacers; the edges of the waterproofing are carefully released onto the walls in order to then secure them to the walls of the slab base.

Reinforcement of the slab foundation is carried out according to the standard scheme, in two layers of mesh obtained by tying the reinforcement with wire. For reinforcement, we take a 10-12 mm rod, the mesh window is no more than 20-25 cm. If the soil is very weak, in addition to the reinforcement, we lay a layer of four rods around the perimeter, spaced in increments of 30-35 mm, as in the video:
Thus, any settlement of the edges of the slab foundation until its final hardening will be covered by additional reinforcement. On average, one slab foundation requires at least two tons of reinforcement.
Important! The layer of concrete from the bottom and top surfaces of the slab to the reinforcement laid in the foundation body should be no more than 4-5 cm.
How to pour a slab with your own hands
For a thin slab of 200-250 mm, it is better to use high-strength concrete grades B25-B30. When buying a couple of mortar mixers, it is better not to take risks, but to purchase material for a slab foundation directly at a factory or office where it is prepared on the fly. Before pouring, we install boards and a pouring chute. It is easier to work in two pairs - one regulates the supply of concrete to the chute, the second pair spreads the pouring mixture in layers into the desired sector of the slab casting formwork.
If we assume that the purchased concrete will be, at best, grade M200, the thickness of the slab should not be increased; it is better to use plasticizing additives that stop the mixture from separating. In this case, the lack of strength of the concrete of the slab foundation will be compensated by better adhesion of the material to the reinforcement; there should be no loss of the bearing capacity of the slab base.
Conclusion
It will be possible to remove the formwork from the slab casting no earlier than after two weeks; if the weather is hot, humid, then after 10 days. Even if gaps have formed between the walls of the formwork and the concrete, the tree cannot be removed, since the processes of settlement of the soil layers under the pressure of the slab foundation system are still ongoing. With the correct selection of characteristics, the estimated 80 percent strength of the slab foundation will occur in 20-25 days.