
Vibrating table. Do-it-yourself vibration table - various manufacturing options. Tools and materials for making a vibrating table
Today, many city dwellers would probably like to have a dacha or a private house, on the territory of which there is a well-groomed lawn and attractive paths. If it is not possible to allocate an impressive amount from the budget, but there is a desire to equip the exterior of the site, then you can make a vibrating table for the production of tiles, which will create material for arranging paths.
Description of vibrating table
The described design is simple, it is simply irreplaceable for independent This device will allow you to make products of different shapes, while concrete mixture should be used as the material.
You should not assume that a vibrating table can only be purchased in specialized stores. You can make such a design yourself. The base is the top plate, which is attached to the steel base using a movable connection. Among other things, you will need a motor that will drive the surface.
As the slab vibrates, bubbles emerge from the molds filled with concrete. This is the only way to ensure the proper quality of the product. When making vibrating tables for paving slabs with your own hands, it is necessary to ensure the ideal evenness of the tabletop. It should be smooth and the motor used should provide uniform vibration.
Preparation of tools and materials

To carry out the work, you will need a steel pipe in the amount of 4 pieces, a metal sheet that will form the basis of the tabletop, as well as a metal spring - this is what will become the movable connection. The master needs a corner with dimensions of 50 x 50 mm, which can be replaced with a channel profile. Make sure you have an engine that will have the required power. When vibrating tables are made, specialists prepare a welding machine, a drill, and an angle grinder. To install the engine you will need 4 bolts.
Manufacturing technology
Despite the fact that the vibrating table is a simple design, during the work process you should be guided by the technology described below.
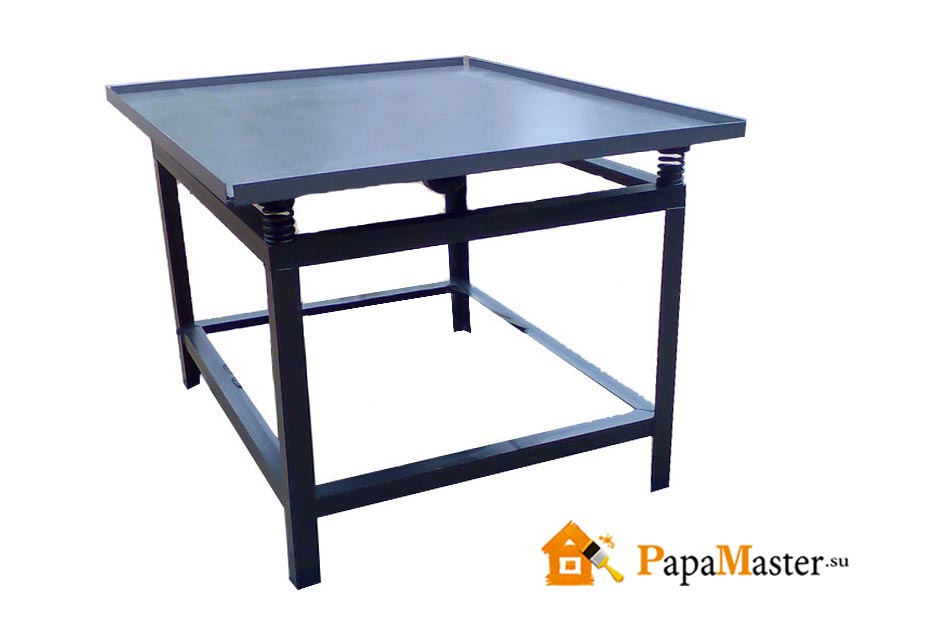
The base on which the tabletop will be fixed should be made from a corner or channel. The dimensions of the vibrating table can be completely different depending on the wishes of the master. We will take standard dimensions, which are limited to 700 x 700 mm. If you decide to use other dimensions, you must remember that they must correspond to the power of the engine used.
When making vibrating tables for paving slabs with your own hands, craftsmen use pipes that act as legs. They should be welded to the base. In order to ensure maximum stability, steel plates must be welded to the legs and reinforced with concrete. If we exclude this stage, then the table will move from place to place during use, while it will be in doubt.
It must be selected individually, but it is important to ensure ease of use with the design. Among other things, the engine must be at a certain distance from the surface of the earth. If you are making vibrating tables, springs should be welded in each corner from the central part. Parts borrowed from a moped are ideal for carrying out this work. They must first be cut in half.

A sheet of metal should be placed on top of the spring. You should use a material that has a thickness of eight millimeters or more. Bolts will be needed to secure it to the engine sheet. If you follow these recommendations, you will be able to make a table that will help you produce up to 60 square meters of products within 24 hours.
Engine selection

Before you make a vibration table with your own hands, you need to think about what kind of engine will be used. The one borrowed from the washing machine is quite suitable for this. Despite the fact that it works properly, it has a rather significant drawback, which is its fragility. Such a motor can withstand only about thirty operating cycles. After this, the axle becomes loose or the bearing jams. That is why there is an opinion expressed by home craftsmen that such engines are not able to last long under conditions of increased loads, which turn out to be a vibrating table.
As an alternative solution, you can use a 220 volt IV-99 E vibrator. It is sold in stores of relevant goods for 6,000 rubles. This design copes quite well with the tasks assigned to it.
Among other things, it is important to prepare a drawing of the vibrating table; it will help complete the work correctly.

If you draw up a similar diagram, then it should indicate the location of the AC potentiometer, which will regulate the strength of vibration. In the process of changing the voltage level, it will be possible to adjust the oscillation frequency to a specific type of solution used. However, many craftsmen, thinking about how to make a vibration table with their own hands, decide to save money by using only the engine.
Secrets of the work

It is important to make a table that is not only durable, but also sufficiently resistant to vibration. This is the only way the structure will be able to withstand the loads. The motor must be installed in a specific location. Sometimes it can only be determined experimentally. The tabletop will consist of a rectangular frame and a steel sheet. It is sometimes equipped with an additional frame on which the vibration source is mounted. Springs for a vibrating table will provide limited mobility to the tabletop, so their choice should be taken seriously.
Conclusion
In addition to the springs mentioned, it is permissible to use loops made of durable rope. Rope will also do. Four similar connections located at the corners of the base will allow the platform located on top to be centered. When choosing a vibration motor for a vibrating table, you should take into account that it should not provide an excessively strong displacement of the tabletop relative to its original position. Otherwise, there will be no way to prevent spilling of the solution that was distributed into the molds. That is why it is recommended to first consider factory models.
When you need paving slabs, you buy them or make them yourself. For independent work, special equipment is required - a vibrating table. It can be purchased in an open trading network or ordered in an online store. But if the construction budget is limited or a lot of tiles are needed for landscaping, then it is easier and more profitable to make a vibrating table with your own hands. Manufacturing instructions and assembly drawings will help you quickly master the technology.
A homemade vibrating table has a variety of purposes:
- compacting cement or asphalt concrete mixtures;
- production of paving slabs, window sills, monuments, Euro fences;
- production of cellular building blocks;
- carrying out test work.
The design of the device looks simple: a smooth steel table fixed by a movable joint on the frame, and an electric motor with an eccentric on the shaft that creates oscillatory movements. The vibration frequency reaches 3000 per minute.
According to the technology, tile molds (steel or polymer) are filled with mortar and placed on the work surface. Then turn on the unit for a certain time. Under the influence of vibrations, concrete gradually sags, becomes compacted and gets rid of air bubbles. At the end of the cycle, the engine is turned off, the molds are removed and sent to dry. The result is durable and load-resistant tiles of large and small sizes.
An electric vibrating table is the best choice for home use. Its productivity reaches 50 m2 per day. The disadvantage of such equipment can be considered dependence on power sources. In addition, it has considerable dimensions, which complicates transportation. In the production of large concrete castings, hydraulic vibrating tables are used, which do not have a spring device.
How to make a vibrating table for paving slabs yourself?
Before starting production, it is advisable to find assembly drawings of a typical unit in the technical literature or on the Internet. On the diagram you need to mark the motor mounting points, determine the dimensions of the table and components. The optimal height of the device is 0.8 m. The width and length are set based on the dimensions of the injection molds.

For work you will need the following tools and materials:
- table drawing;
- corner or channel profile;
- metal pipes;
- steel springs and “cups” for them;
- metal sheet for table top;
- vibration motor 220 V (brand IV-98 or IV-99E);
- grinder with metal discs;
- welding machine;
- electric drill;
- hardware for fixing the engine and attaching the vibration table to the floor.

Step-by-step instruction
1. Installation of the base.
- Weld a frame from equal sections of pipe, profile or angle. The dimensions can be made arbitrary, but in standard drawings they usually indicate 700x700 mm.
- Weld legs with plates to the frame, which are subsequently fixed with anchors or concrete mortar. If the vibrating table is not secured to the floor, it will move randomly during operation. For stability, the structure can be additionally weighted with an axis of reinforcing bars, welding them around the perimeter or crosswise.
- Attach “glasses” to the back of the frame in each corner and in the center. They can be made from scraps of steel pipe 60-70 mm high. The diameter should be 2-3 mm larger than the spring cross-section. Install the “glasses” exactly according to the diagram, without displacements or distortions. The efficiency of the vibrating table depends on this. If there are no “glasses”, then the springs are welded directly to the frame. In order not to look for new ones, you can use used ones. Springs from a car or moped work well, you just need to cut them in half.
2. Making a countertop.
- Weld plates on top of the springs. Lay a monolithic sheet 8-10 mm thick on them. If the metal is too thin, the working surface will quickly deform. It can be strengthened by welding the transverse corners.
- Weld sections of channel bars with frame-shaped holes to the bottom of the table. This is the base for the engine.
- Attach edges made of 50x50 mm steel angles along the perimeter of the tabletop.

3. Assembling the vibrating table.
- Fix the vibration motor on the channel frame motionlessly.
- Connect the table to the support post by welding it to the plates on the springs.
- Fix the finished vibrating table to the floor with anchors or concrete pouring.
- Start the engine and check the operation of the unit by placing a mold with tile mortar. If necessary, make adjustments to the spring stiffness and overall stability of the vibrating table.
The most difficult part of assembling a vibrating table is the correct choice of electric motor. When you plan to make small volumes of paving slabs, it is enough to buy a single-phase motor with a voltage of 220 V and a power of up to 700 W. For frequent use of the table, you will need a medium-power motor (1.2-1.5 kW), equipped with an automatic shutdown system in case of overloads or failures in the electrical network.
According to the instructions, the engine must be unbalanced. This creates a vertical vibration that is transmitted to the table and forms. If the brand you need is not available or is not affordable, you can use a motor from an old washing machine. This is a good replacement option for a vibrating table, although it is short-lived. At high rates of tile production, old motors quickly break down. After 30-35 cycles, the bearings wear out or the axle becomes detached.

The electric motor can be mounted in different ways:
- in the horizontal plane – vertical vibration is obtained;
- along the vertical axis - this ensures horizontal vibrations;
- at an angle of 45° to the tabletop - vibration of the shapes is formed in all planes.
Uneven vibration of the table with a large amplitude leads to “boiling” of the concrete and its oversaturation with air. As a result, the tiles are of poor quality with voids inside. They have poor resistance to mechanical stress and crack quickly. The selection of the optimal vibration amplitude of the table (a combination of speed and uniformity of movement) is carried out using an eccentric. A metal washer is placed on the motor shaft and a threaded hole is made on the side. The amplitude is adjusted by screwing in/unscrewing the bolt, which is then secured with a control nut.
If the vibrating table for the production of paving slabs is intended to be used in different modes, then care must be taken to install an AC potentiometer. With its help, you can change the voltage level and adjust the strength of vibrations depending on the composition of the solution.
Before starting the table, check the horizontal orientation of the work surface. If there are even slight deviations from the axis, then during vibration the tile mold will move along the table, and the solution will splash out of it.
When making the legs of a vibrating table, you should pay attention to some nuances:
- the engine must not touch the floor;
- the height of the legs must be selected so that it is convenient for the technician to maintain the installation and does not have to bend over;
- all legs must be exactly the same size.
Steel springs can be replaced with loops, which are easy to make yourself from a strong cord or rope. Such connections, located in the corners of the base, allow for good centering of the tabletop. The dimensions of the vibrating surface are determined based on production volumes. The wider the table and the more powerful the motor, the larger the tiles you can make.
In principle, all work related to the casting of elements from various building mixtures can be performed without the use of this apparatus. But its use is still highly desirable. Thanks to it, not only the decorativeness of the surfaces of these products improves, but also their quality and strength. Let's look at how this happens and how to assemble such a device yourself.
The principle of operation of the device and the list of necessary materials
The mixtures used to cast various items have too thick a consistency. That is why they are not capable, unlike more liquid solutions, of qualitatively filling various containers. When filling the molds, the mixture flows unevenly, which leads to the formation of air pockets.
The air gradually leaves these bubbles as they solidify, but the void in the body of the element remains. Thus, weak points arise in a seemingly solid product. If there is excessive load, or an accidental impact, or fall, such voids cause the entire element to break.
 vibrating table drawing
If voids form at the very bottom of the mold (where the front side of the product is usually formed), then after solidification on the surface of the element you can find recesses, depressions and pits of various sizes, which significantly spoil the appearance of the cast mold.
The use of the device in question helps to avoid these troubles due to its vibration function. Light vibration causes the mass to slowly fall down under the pressure of its own weight. During this process, the air pockets are filled with the mixture, and the air itself is expelled out.
 Drawing of a vibrating table and sand sifter
  vibrating table frame diagram
To assemble a vibrating table according to the drawing with your own hands, you must first purchase following materials(all sizes are approximate, you can either increase or decrease them according to your own needs):
1. Vibration motor.
2. Welding machine.
3. Springs – Kamaz timing belt – 4 pieces.
4. Metal sheet – 0.3x75x120 cm.
5. Profile pipes - 0.2x2x4 cm - 6 meters (for legs) 2.4 meters (for the frame under the lid).
6. Metal corners – 0.2x4 cm – 4 meters.
7. Bolts (for mounting the engine).
8. Special paint (to protect the product from corrosion).
9. Water supply metal rings – 4 pcs. (the diameter should match the diameter of the springs, or be slightly larger).
 vibrator mount
  mounting the vibrator on the tabletop
  vibrating table base
  result of the work
The issue of designing paths on a property sooner or later arises before all plot owners. The option of using paving slabs for this purpose is one of the simplest, most reliable and beautiful. Therefore, for independent production and installation, you will need instructions on how to make a vibrating table for paving slabs with your own hands. This article will discuss all the nuances of assembling the device, as well as recommendations from specialists on frame manufacturing and engine selection.
A vibrating table, or as it is also called, a vibrating press, is a special device designed for the production of paving slabs. The main advantage of this device is the ability of its working surface to perform oscillatory movements. In addition, the vibrating table can be used for other purposes, for example, for the manufacture of monuments, sections of concrete fences, etc.
As for making a vibrating table yourself, this is most often resorted to when they want to independently make paving slabs to decorate their own yard. Although in some cases this method is used to organize your own small enterprise.
Of course, using a vibrating table, you definitely won’t be able to produce on an industrial scale, but considering that it can be made from scrap materials, and with its main functions - eliminating air bubbles and compacting the composition of molds, such a device will do an excellent job.
Let us consider in as much detail as possible what is needed to make a homemade vibrating table, as well as step-by-step instructions for its manufacture.
Types of equipment for the production of paving slabs
Vibrating tables come in different varieties, and before moving on to manufacturing, you need to decide on the appropriate option and its features. So, depending on the direction of vibration, the following types of devices are distinguished:
- Models with horizontal vibration.
- Models with vertical vibration.
Devices are divided into these types depending on exactly how the rotor is located in them. At the same time, the first option (table with horizontal vibration) is more popular.
Depending on the installation method, vibrating tables can also be divided into two types: stationary and portable (mobile). But depending on the specialization of the devices, there are those that are intended for forming products, as well as those that are designed to remove the finished product from the mold using vibration.
Externally, the molding and demolding tables are practically no different, with the exception of a special attachment with holes on which the mold is installed, from which the finished product needs to be removed.
If you want to make your own machine for the production of paving slabs, it will be quite enough to make a vibrating table with horizontal vibration. In this case, you can remove the tiles in two ways: manually (usually flexible molds are used in a home workshop) or by installing a demolding attachment.
Paving slab manufacturing technology: machine operating principle
In order to understand how to properly make this or that device, you need to understand the manufacturing technology of the elements for which it is designed. Therefore, let us consider the principle of operation of the vibrating table and what each of its constituent parts is intended for.
The working surface of the table is attached to the frame using a special spring system, if we are talking about a horizontal vibration device, or with the help of suspensions, in the case of vertical devices. Due to the operation of an electric motor of calculated power, on the shaft of which there is an eccentric, the tabletop is set in motion. Due to the fact that the eccentric moves, the center of gravity changes, resulting in the desired vibration.
How to make a vibration table with your own hands: drawings and description
A general idea of the structure of the vibrating table can be obtained by reading the sketch. But to independently manufacture such a structure, you will need a full-fledged drawing that will allow you to take into account all the nuances and pre-determine the required dimensions of each of the elements.
Before you start creating a drawing, it is worth considering the two most popular options: for beginners and for masters. In the first case, the brick making press has a simpler design, but at the same time it allows you to perform the main task - forming products. Assembly, maintenance and care of such a device are quite simple and even a novice master can do it.
Helpful advice! Over time, additional functions can be added to such a simple design, such as a sand sifter. The main thing is to correctly carry out all the necessary calculations so that the addition of new functions does not cause the failure of the main elements.
More complex designs intended for craftsmen initially combine a brick press and a sand sifter. This design is more complicated to assemble, however, it is convenient in that it facilitates the process of obtaining components of the desired fraction.
Step-by-step instructions for making a vibrating table with horizontal vibration
The first thing you should pay attention to before starting work is the size of the countertop. It is believed that the minimum surface size should be 600x600, since with narrower sides, the forms will fall during movement. In addition, a narrow structure will have less stability.
Helpful advice! If, during the process of making paving slabs at home, the molds still fall off, you can try to reduce their number. This will negatively affect the performance of the device, but in this case the number of tiles damaged due to falling will be reduced.
In many ways, the size of the vibrating table is determined by the required production volume. We can say that there is a direct relationship here - the more elements must be made at a time, the larger the countertop area should be. Naturally, a large concrete block press will require a more powerful engine, and the materials from which the structure will be assembled must be very durable.
As for the height of the vibrating table, it all depends on the individual data of the person who will work at it. The standard height, optimally suitable for a person of average height, is 90-100 cm.
Important! When deciding on the height of the table, it is worth taking into account the installation method that will be used. So, for example, if a stationary device needs to be dug into the ground and cemented, then the length of the table legs must be taken into account in advance.
Materials and tools required to assemble a vibrating table: prices and characteristics
In order to assemble the structure yourself, you will need a grinder, a welding machine, a drill, as well as the ability to handle them. Let's look at the list of necessary materials that can easily be found among handheld materials.
For the countertop, you can use plywood or a sheet of metal of a suitable size. In this case, the plywood sheet should be 14 mm thick. This will allow more vibration to be transmitted due to the small thickness, but at the same time provide the necessary structural strength. In addition, in this way you can significantly reduce the noise level during operation of the device. If a metal sheet is used, then its thickness should be within 5-10 mm.
The cost of a sheet of plywood of the required thickness, made from birch veneer, will be about 650 rubles with a standard size of 1525 × 1525 mm. But a sheet of hot-rolled metal 5 mm thick will cost more, about 1000 rubles.
Helpful advice! If a metal sheet of smaller thickness is available, it can also be used by reinforcing the structure with metal corners or pipes welded in the center of the sheet and around the perimeter.
Metal corners measuring 50x50 mm. They will be required to create the edging of the tabletop and during the operation of the vibrating table will not allow the molds for the production of paving slabs to move from the surface as a result of vibration. Their cost will be about 140 rubles per 1 m.p.
Channel for mounting the motor (about 210 rubles/m.p.). It will need to be welded to the center of the back of the tabletop, pre-drilling holes that will be used for the bolts that hold the motor.
Metal pipes for table legs. Typically, elements with a thickness of 2 mm and a size of 40x40 are used for this purpose. The price will be 107 rubles per 1 m.p.
Pipes for forming the upper and lower parts of the frame. Since the main load will fall on these elements, it is worth choosing a fairly durable material - 40x20 and 2 mm thick for the upper part and at least 20x20 of the same thickness for the bottom. The cost will be 84 rubles/m.p. and 53 rub/m.p. respectively.
Metal plates that will be used as a sole for supporting legs. For this purpose, pieces of metal measuring at least 50×50 and 2 mm thick are suitable.
Related article:
Materials for manufacturing and their features. Do-it-yourself production of concrete for tiles. General tips.
You will also need a plate for installing electrical equipment and springs, which are designed to provide vibration. It is quite possible to purchase these elements at a dismantling station. Numerous reviews indicate that the ideal option is to use springs from mopeds, the cost of which with a height of 113 mm and a diameter of 54 mm will be about 500 rubles. They are installed in the corners of the table, and if the surface area is large, another one is additionally mounted in the center.
Important! If an additional spring was installed in the center of the tabletop, the motor mounting location and support configuration will be changed.
Additional aspects to consider when choosing materials for a vibrating table
In addition to the above materials, it is worth carefully selecting other components that, although not visible, largely determine the quality of the device:
- bolts for fixing the springs. This element acts as a cup for the spring, so it must have the proper strength. Sometimes pipe blanks 50-70 mm long are used for this purpose. It is important that their diameter exceeds the diameter of the spring by 5-10 mm;
- bolts and washers (usually 4 pcs.), which will be required to fix the engine;
- electrical cable, which must have a sufficient cross-section. It is also worth considering the presence of an outlet and a circuit breaker in the immediate vicinity.
Important! If the diameter of the homemade glass significantly exceeds the diameter of the spring itself, this will lead to uneven vibration. As a result, the spring will quickly wear out, and the movement of the table can more likely be called rocking than vibration.
Production of paving slabs at home: how to choose an electric motor
Let's consider the two most popular options: their cost and characteristics:
- IV-99 E with a power of 0.5 kW. Its weight is 14.5 kg, rotation speed is 3000 rpm, driving force is up to 5 kN. The device receives power from a 220 V network. You can purchase it at a price of 7,650 rubles.
- IV-98 E is a more powerful model (0.9 kW), which has a greater weight - 22.5 kg and a driving force of up to 11 kN. In this case, the rotation speed is also 3000 rpm. But the main difference between this model and the previous one is the presence of unbalances on the rotor, which rotate together with the rotor shaft. A regular 220 V network can also be used for power supply. The cost of this model is 8,540 rubles.
This will be more than enough to produce a small amount of tiles, but if you want to organize a small paving slab plant in your workshop, then it is better to pay attention to the IV-104 B model, with a power of 0.53 kW. To power it, you will need a 380 V network, but this will make it possible to achieve a driving force of 6.3 kN.
But there are cases when we are talking about making a very small amount of paving slabs for paths in the country, and purchasing a motor for this purpose is simply unjustified. In this case, craftsmen use an engine from an old washing machine or pumping station as a basis. In this case, you will have to spend much less money, paying only the turner for some alterations, if necessary.
The only significant drawback of this solution is the fragility of old engines. They are extremely rarely able to withstand more than three dozen work cycles. After this, the axle becomes loose or the bearing completely jams. Therefore, if you plan to produce a large number of tiles, it is better to purchase in advance a more durable motor that can last the required period of time.
Important! The main task of the engine is to ensure uniform vibration of the surface, since otherwise the solution may boil in the container, which will not lead to compaction, but, on the contrary, to increased fragility of the products.
Even taking into account the need to purchase all the necessary elements, making such a structure with your own hands is much cheaper than buying a vibrating table for paving slabs.
DIY vibration table for paving slabs: rules for assembling the structure
After all the necessary materials have been purchased, all that remains is to assemble the structure together. But in order for the resulting device to serve properly for many years, you must adhere to the following rules:
- All metal elements must be exposed to an anti-corrosion compound before assembly begins. This will provide them with reliable protection from rust. Primer GF-021 Lakra, which costs only 125 rubles/kg, or enamel paint is perfect for this purpose. At the same time, if you have to deal with elements that have already undergone corrosive processes, you will have to purchase a more expensive material, for example, EP-0180 primer, costing 188 rubles / kg.
- To fasten the components of the vibrating table, it is necessary to use a weld. Bolts are not used for this purpose because over time, as a result of exposure to vibration, they can become loose, which will lead to a decrease in the rigidity of the support. This solution is allowed only for collapsible structures, but in this case it is necessary to regularly tighten the bolts.
- It is very important that the motor that produces vibration does not come into contact with the ground under any circumstances. The technology for producing paving slabs does not allow this, and therefore, before starting the production of the first batch, the device must be tested by starting it up and checking the amplitude of oscillations and the stiffness of the springs.
- All support legs must be the same length. However, in order for the table to be convenient to use, you also need to make sure that the surface on which it will be installed is level. This will allow you to avoid distortions and make the process of making paving slabs for your dacha as efficient as possible. It is wise to think about attaching the table to the surface. This can be done using suitable anchors or concrete mortar.
Helpful advice! In some cases, the ideal location of the engine can be determined solely by experience. If there is something that doesn’t suit you about the operation of the brick making machine, you can experiment a little to achieve the desired effect and ease of use.
Methods for unbalancing a vibrating table motor
Depending on where exactly the engine is installed, it is necessary to unbalance the belt drive unit on the tabletop or the pulley. You can do this in several ways:
- place a round pulley on the shaft, which has a section of its circumference drilled or ground off;
- experimentally select a nut of suitable size and weight and weld it onto the pulley;
- put the coupling on the shaft, having previously welded a bolt with two nuts placed transversely onto its end. Due to the fact that the nuts can be moved along the thread, unbalancing occurs.
As you can see, making paving slabs for your dacha yourself is a completely feasible task if you spend time and effort studying the issue and assembling the necessary device. Although it should be noted that with the help of such a vibrating table it is possible to organize, for example, a small production of polymer-sand paving slabs.
Let's understand the design of a vibrating table and consider in detail the procedure for manufacturing this unit at home, which is necessary for forming concrete products.
How does a vibrating table work?
The device consists of three main parts:
- Rigid metal frame.
- Fixed on tabletop shock absorbers.
- Electromechanical vibrator.
Forms with solution are placed on the table cover, which begins to vibrate after the engine starts. After a short period of time, the mixture is compacted and freed from air, and the concrete components are evenly distributed throughout the entire volume.
Tools and materials
To make the device you will need:
- Welding inverter;
- Drill;
- Bulgarian;
- Locksmith's tool.
Materials used:
- Steel corner 50x50x4 - about 6 m;
- Rectangular pipe 20x40 – 6 m;
- Sheet metal 120x75, thickness 4–6 mm;
- Springs or rubber cushions – 4 pcs.;
- Small pieces of pipes with a diameter smaller than the internal size of the springs;
- Bolts and nuts.
Construction of the frame
The main requirement for the supporting part of the machine is strength, and there can be any way of implementation. A simple process for making a reliable base looks like this:
- Cut four table legs 75–80 cm long from a corner.
- Two blanks of 60 cm and two of 1 m are prepared from the profile pipe.
- the upper frame is made from pieces of the profile and the legs are welded.
- The lower crossbars are cut to size and connected to the table posts by welding.
- At the corners of the base, “cups” are secured for springs made from pipe scraps.
Making your own lid
The tabletop of the machine will lie on spring cushions and be supported by the sides.
Work order:
- The frame is constructed similarly to the stationary surface of the table, strengthening the structure with additional stiffening ribs.
- Arrange a platform for placing the engine based on its dimensions.
- Retaining stops - steel pipe rings - are welded at the corners.
- Sheet metal is welded onto the ribs.
Making a vibrator
The power unit is selected depending on the size of the movable tabletop - approximately 1500 W of electric motor power is needed per 1 m² of surface. Eccentrics are welded onto the motor shaft - bolts with a diameter of 12–14 mm with screw-on nuts, which subsequently regulate the vibration amplitude by moving it along the thread. An easier way is to purchase a factory-made platform-type vibration motor. Its design already provides for the possibility of changing the force of oscillatory movements.
Vibrating table assembly
The engine is screwed into place, secured with locknuts and the cover is installed on the springs. It is advisable to weld plates for anchors to the table legs. Next, assemble an electrical circuit, connecting the power cable through circuit breakers and arranging the grounding of the unit. The finished vibrating table is tested for performance, the vibration amplitude is adjusted and the stability of the structure as a whole is checked.
The described device is suitable for private households, and its engine can be used on a homemade machine in the process of concrete work.


