
How to paint a cardboard house for kids. Wooden house made of ordinary paper. Do-it-yourself pumpkin house: two options
A large and impressive craft, but what can you do for your beloved children!
Materials:
- cardboard,
- glue "Moment crystal",
- acrylic paints,
- acrylic lacquer,
- sintepon,
- fabric pieces,
- braid,
- beads,
- wooden sticks,
- tassels,
- modeling mass,
- scissors,
- wire,
- beads,
- mirror,
- beads pendants,
- wallpaper pieces,
- pencil,
- ruler,
- disposable containers,
- fantasy.
Operating procedure:
It so happened that one of the daughters fell ill with chickenpox, and I needed to keep them busy at home. Decided to do it all together house for our dolls. They made it according to the principle: I blinded him from what was. We did not have a finished box, but there was a fairly large piece of cardboard and many small pieces of various thicknesses and textures. I thought that our house would be a small one of two rooms, but no such luck: 2 young designers had their own thoughts about our house.
As a result, we began to Dollhouse in 3 floors for 5 rooms(subsequently the upper floor was divided into 2 parts and 6 rooms came out).
Layout
I cut out 1 piece from a large piece of cardboard - this is the back wall of our house and 2 side ones (see photo 1).

Then she bent 2 side walls and began to glue the floor and ceiling (photo 2).

The house has dimensions: height - 74 cm, width - 50 cm, depth - 30 cm.
I pasted over the blank of our house with pieces of wallpaper and suitable paper (see photo 3).

Outside, the house is covered with wallpaper, the roof is strips of cardboard measuring 3 cm by 31 cm, glued with an overlap.
The frames are glued from strips of cardboard.

Our house needed a variety of puppet, which we tried to make with our own hands from improvised materials. I glued everything by eye without preliminary drawings and patterns. I just cut off a cardboard rectangle and glued the necessary pieces to it. All furniture is painted with acrylic paint and covered with acrylic lacquer.
Bedroom
So, room number 1 - bedroom. It has a lot of furniture, and the first thing we start with is this. Gluing it together is quite easy, just look at photo 4.

I covered the cardboard blank with acrylic paint, after the paint dried, I varnished it, glued a soft mattress, added a few soft pillows and a bedspread.
The following pieces of furniture are a chest of drawers and a bedside table (photos 5 and 6).


The principle of their manufacture is the same - a small cardboard box, to which false boxes are glued. In the bedroom there was a place for a comfortable rocking chair (photo 7).

A large and roomy closet also found its place (photo 8).
 In photo 9, the whole room is in color.

You can also see how to make a bed for dolls (and other furniture) on the DIY channel:
common room
Room number 2 - common room to watch TV. The TV in our house is flat - a large cardboard rectangle was covered with black acrylic paint, after drying, a suitable picture was glued on and everything was covered with acrylic varnish.
The main place in this room is occupied by a spacious one; it houses a large puppet family.
The base of the sofa is a cardboard blank (photo 10).

The back and armrests are covered with paint and varnish, and the base is glued with padding polyester and fabric. The daughters already had a table - this is a wooden constructor, on which we pasted a piece of cardboard and painted everything together.
We see room number 2 in photo 11.

Video how to make a wardrobe:
On the second floor of our house there is a musical living room and a kitchen.
Living room
AT music room there is a fireplace (photo 12).

It, unlike all our furniture, is covered with cracks. At the beginning it was covered with white acrylic paint. After it dries, a layer of medium craquelure is applied. After this layer has dried, a layer of black acrylic paint is applied. After drying, the entire product is covered with matte acrylic varnish.
Since our living room is musical, then out of 6 matchboxes the piano was glued together (photo 13). It was immediately pasted over with colored paper, but the paper turned out to be of poor quality, and later it was painted, like all the furniture in the house. In addition, I glued 2 square beads to it - these are pedals.

The piano stool (photo 14) is glued from cardboard, painted and decorated with a velvet cushion.

Sofa (photo 15) and armchair (photo 16). I glued them out of cardboard and decided not to glue them with a cloth, but simply paint them with paint, my daughters helped me with this with pleasure. After applying varnish, they are very similar to leather.


The entire musical living room after painting the furniture (photo 17).

Kitchen
Room number 4 is the kitchen It is small but roomy. Kitchen set- this is a large closet in the shape of the letter L (photo 18).

The sink is a small plastic container for jam, and a faucet is molded from clay, and a small hanging cabinet:

The stove is electric with 4 burners (photo 20), its door opens.

In the kitchen we have 2 chairs (photo 21) and a table (photo 22).


Dishes were also glued from small things (photo 23).

In photo 24, our kitchen after applying paints and varnish.

On the top floor we have children's and toilet room.
Children's room
AT children's the main place is occupied by a bunk bed (photo 25).

It has soft mattresses and pillows. In the room is small table(photo 26) and chair photo 27.


There is also a cabinet for toys (photo 28).

In this room, I did not cut through the window, but simply glued the cardboard to the side wall. The room is decorated with a colored alphabet (cut out of paper packaging from a child's toy). In the photo 29 is a nursery in color.

Almost all the chandeliers in our house are glued together from disposable containers, beads, cock sticks and braid.
Only one, which is in the music room, is made of beads, wire and bead fittings.
I also glued a ladder to the house, but we still have it attached, because I'm afraid that if it is glued, it will interfere with the simultaneous play of 2 children.
Bathroom and toilet
For toilet room we needed a toilet, sink and bathtub. They needed to be made quickly and easily.
And I decided to just fashion them from the mass for modeling. What we later did with our daughters (photo 30).

They may not be perfect, but they are made together.
Our works dried for about a day. Next, we painted them with white acrylic paint and covered them with a glossy acrylic varnish. After drying, the tank turned out to be quite heavy, then I replaced it with a lighter one (cut it out of cork and painted it). To keep the sink stable on the wall, I glued a nightstand under it. The bedside table was painted like all the furniture in the house. Next, I glued the nightstand to the wall and floor of the house, and then glued the sink. A faucet (molded from modeling mass) and beads are glued to the sink. There was no finished mirror, and we also have it made of cardboard.
The toilet bowl is made of several parts - the base, cockerel sticks, a tank (made of cork), chains and beads.
All this structure is complemented by a seat - cut out of cardboard and pasted over with a plain fabric.
In photo 32, the entire toilet room is in color.

So quickly and fun from improvised materials, together with our daughters, we built our dollhouse. Such crafts always bring joy to children.
Let it be quite simple so far, but the daughters are quite happy with it and play together with pleasure.
And another video on how to make a house for dolls with your own hands from plywood:
Like the product and want to order the same from the author? Write to us.
More interesting:
See also:
Pupa Vesnyanka with a scythe
In addition to Vesnyanka in a scarf, there is also such a Ural Vesnyanka with a scythe. This folk doll is being made...
Funny dog crochet (amigurumi)
It is now difficult to imagine human life without dogs. These loyal and affectionate animals have long been...
Crochet dolls using amigurumi technique
Crochet dolls (amigurumi) Dolls are very popular among girls. In these master classes...
Knitted dogs for the New Year
New Year 2018 will be the Year of the Yellow Earth Dog in the Chinese and Japanese calendars. So just...
Dress for Elsa doll (crochet)
As promised, I am posting a master class by Elizaveta Dranichnikova on knitting a dress for Elsa doll, se...
Dear Obezyanych from jute twine
Another master class on making twine monkey from Elena Adilbekova: Dear Monkey...
Matryoshkas from felt
We are all used to the fact that nesting dolls are traditionally made of wood. But for your baby and such nesting dolls ...
Children's game "Feed the fairy-tale hero"
Children are very fond of outdoor games. Catching, kvach, freezing ... All these are fun and exciting games, t...
Doll fairy made of wool using the technique of dry felting
Fairy made of wool using the technique of dry felting In this detailed step-by-step master class, I will show how to make...
Today we will make movable "real estate",. If the kids will participate in the construction process, it's great! I will definitely name the pros of each craft. But such a characteristic as the availability of the main material, common to all "buildings".
How to do
pitched roof, thanks to the upper flaps of a large four-valve cardboard box?
Here is an easy way:

It remains to cut the windows and the door. Cover everything with pretty paper. Choose the ornament of the house at your discretion. You can take the same a photo you can come up with something of your own.
Source
Cozy play area
Now you can buy any house. But after all, it is much more interesting to do it yourself. Especially when the idea is too simple, as in this craft. And there is another plus! The building is taking shape! Need more space? Or has the baby already stopped liking the corner? It can be easily and simply removed.
Mastering:


Construction of parts - drawings and diagrams of a children's house
The difference between this craft and the previous one is that it consists of separate cut out pieces of cardboard. Therefore, they are used large boxes.
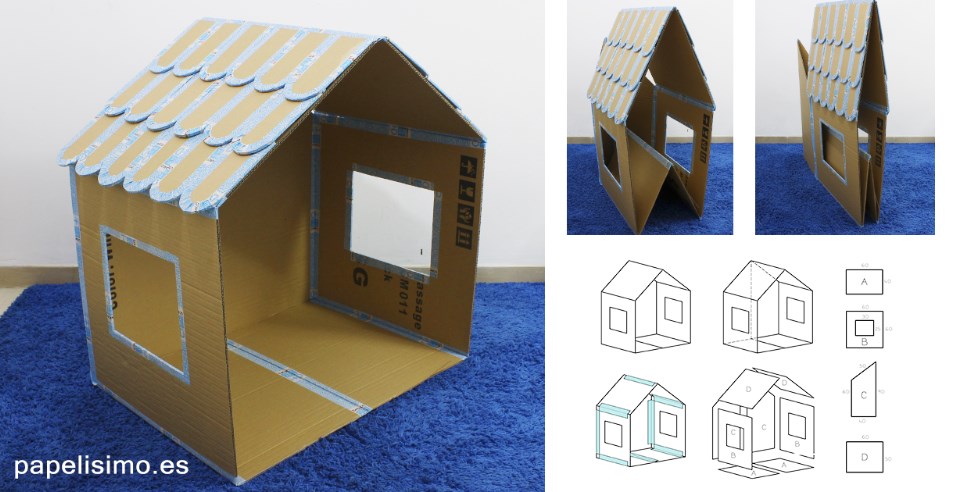
We will need: 
- 2 rectangles measuring 40 by 60 cm. This is the floor;
- 2 - 60×60. Side walls;
- 2 - 60×50. Roof;
- 2 parts measuring 40 (bottom) × 60 (side) × 50 (top) × 90 (side). Back wall;
- 36 parts 20 by 10cm. Tiling. (there are many details, so if convenient, use templates ).

Mastering:

Such a house is easy to assemble and hide, and if necessary, get it.
Form and ideas
The shape of the house depends only on the wishes of your baby. Cardboard allows you to make any, even round designs. You just need to stock up on hot glue, tape and a stationery knife. And how easy it is to dispose of a toy later! Burned and everything, there is no trash in the house!


Another simple MK with a step by step photo:
Castle for princesses
Houses may vary. For example, if you have a princess, she definitely needs a real castle!
pay attention to video
, what a huge box is needed for this design. But you can use several smaller boxes. Just connect them first, and therefore already model the “castle”.
We work:
- Tape all seams. Special attention pay the bottom and top of the box.
- Cut out the crenellated top.
- We make semicircular windows in front of the castle, and in the shape of a heart - on the sides.
- Castle gates are different from doors. To make them, cut a hole with an arch on top. But do not cut off at the bottom. We pass the tape under the gate. We carry the tape into the lock so that by pulling it, you can close the gate.
- We paste over the walls of the princess's palace with a cloth, self-adhesive film or wallpaper.
More ideas for castles - pictures increase by clicking.

What could be more interesting and exciting than making some crafts to decorate your home with your own hands? After all, what you can think of and do yourself, you can not buy in any store!
Such products serve not only as decorative elements in any apartment, creating a cozy atmosphere and mood, but also are the reason for the most exciting pastime during their creation. After all, children so love to cut and glue toys from multi-colored paper - houses, animals, rockets and ships! Adults often help them in this entertaining business and *a paper house for children* will be a universal decor for a children's room or a subject for games. At the same time, a fairly simple and very original craft - a paper house with your own hands, which you can easily make with your child, will serve as a bright decoration for the holiday and bring many pleasant moments when creating it.

It can be a snow-covered hut with a Christmas tree for the New Year or a mystical castle with ghosts and bats for a fun Halloween, a multi-colored house for dolls with bows and ruffles or an impregnable fortress for knights, or maybe a rural house with a fence and flowers, comfortably perched on the windowsill of your kitchens. After all, creating * a paper house with your own hands * you are completely immersed in the world of fantasy and become the creator of the most unthinkable ideas! Well, * how to make a paper house * so that it is unusual, bright and pleasing to the eye, we will tell you in our article.
How to make a paper house
Materials and tools:
- scheme
- cardboard (white and color)
- colored paper
- gift paper
- paints
- scissors
- pencil
Decorative elements:
- ribbons
- beads
- artificial flowers
- cones
- berries
- twigs
- moss, etc.
1. First, let's choose a scheme for the future house
The template you like can be printed on a printer or simply gently, without pressure, transferred through the monitor screen onto thin paper, after enlarging the image to the desired size. The template obtained in this way is cut out, superimposed on cardboard for the future house and completely outlined with a pencil. After the diagram is drawn, it should be carefully cut out and prepared for gluing. To do this, you need to draw the blunt side of the scissors along the fold line of the walls so that the cardboard can be easily bent and cut out doors and windows. If you have never made a paper house before, then we advise you not to be smart with complex schemes and small details, and choose a lighter version. Your paper house scheme to which is simple and understandable has every chance to turn out beautiful and original the first time. Some types of schemes for paper houses are presented below. Click to enlarge:


2. Cut out doors and windows
Doors can be opened if the opening is not completely cut or fully arched. It is the same with windows: the shutters in them can open or the window will be, according to the plan, without shutters. The finished window made of colored cardboard can also be glued separately to the wall of the house without cutting an opening. Everything here will depend on the scheme that you have chosen or made amendments to the design of the house at your own discretion. After everything necessary details cut out, you can glue the house, giving it a square shape.

3. We make a roof
The roof is glued separately. It is cut out of white or colored cardboard, folded in half and attached to the walls of the house. You can decorate it beforehand: draw a tile or make it from separate strips of colored paper, cover it with velvet paper. If a pipe is provided in the scheme, then it is also cut out, folded at the bend and glued to the roof. Smoke can be attached to the pipe. To do this, a wavy smoke is drawn on cardboard, cut out and glued at the base to the inside of the pipe.

4. We make a stand
The finished house can be glued to any stand made of cardboard, wood or plastic, pre-cut to the size of the house and decorated with a fence made of strips of colored cardboard, green paper grass, dry flowers, berries, leaves, moss. You can attach a twig to the stand with plasticine, and hang beads on it and glue flowers. It will turn out a very elegant version of the summer house.


5. Decorate the house
We bring the house, already ready and fixed on the stand, to the final. To do this, we decorate and decorate the walls, windows, roof and base of the house. If this is a New Year's option, then the roof with a chimney can be strewn with snow - with foam crumbs, having previously smeared the places with glue, cover with cotton wool, paint with white paint, depict snowflakes, make snow-covered windows. Decorate the house itself with colored tinsel and beads, attach a paper silhouette of a snowman and a Christmas tree next to it. You can use ready-made pictures for decoration or cut out figures from gift paper.


The Halloween house is made of dark cardboard, with the addition of silhouettes of ghosts and bats. Windows can be made from bright yellow or orange paper, creating the effect of light in the house. Nearby, on a stand, you can glue trees and a cardboard fence, put a black cat on the fence. You can be sure that your child with great interest and enthusiasm will help you cut out creepy characters of a fun holiday from paper!
How to make a do-it-yourself play house for children from a cardboard box? But not from a shoe box, but from a box, for example, from washing machine so that children can climb into it and play inside. We offer you simple to genius step by step instructions how to make a house out of a cardboard box.
A large cardboard box from under household appliances is an invaluable resource for games. There are hundreds of ideas for its use: from containers for storing toys, to. We already wrote what cool things you can. And today - a special master class for especially large boxes. We will learn how to make a house out of boxes with our own hands.
Children will definitely appreciate such a play space that allows you to retire even in the middle of a noisy living room. Don't forget to knock on the door if you decide to visit.
How to make a house out of boxes with your own hands
In order to make a playhouse out of a cardboard box, you will need:
- Large cardboard box.
- Stationery knife
- hot glue gun
- Quick drying acrylic paints.
Open the box and cut off the sides of the top cover as shown in the picture. Cut off the bottom of the lid completely.
.png)
Form a roof for your house from scraps of a cardboard box, and connect the parts with a glue gun.
.png)
.png)
First draw, and then cut out windows and a door with a sharp clerical knife.
.png)
Draw the cardboard on the roof of the house under the tiles. Glue cardboard architraves around windows and doors.
.png)
Make a hole in the roof and form an attic window. Secure the roof of the window with a wide adhesive tape.
.png)
Paint your house out of the box with two to three coats of quick dry acrylics. If the child is very small, it is better to pre-glue the cardboard sections with tape. so that the baby does not get scratched.

If the cardboard is thick enough, a cardboard box house can be equipped with real fittings: door handles, number plate, etc. Don't forget the curtains for the windows for an even more cozy atmosphere in the house.
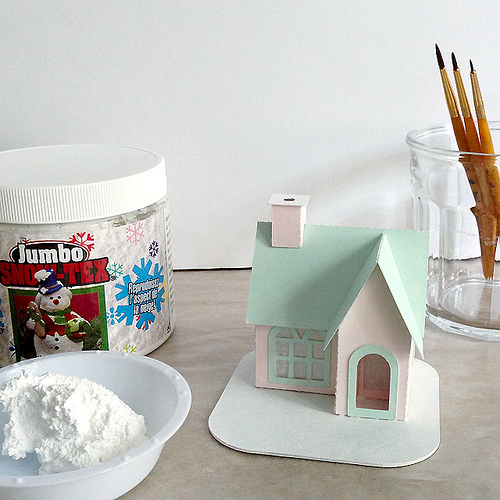
Today we will tell you about how to make a New Year's house out of cardboard with your own hands. In this we can step by step master class, scheme and template, which can be downloaded (see below).
Tools and materials Time: 4 hours Difficulty: 7/10
- 1 sheet of designer cardboard right size for the house (you can use cardboard in two colors: one color for the walls, the other for the roof and decoration of windows and doors) and 1 more sheet for the base on which the house will stand;
- a piece of transparent film to simulate glass in windows;
- a template for a New Year's house made of cardboard (you can draw it yourself or download a drawing);
- scissors;
- glue;
- white small sequins;
- flat and round brush;
- artificial snow.

Now you can even find ready-made kits for making these cute jewelry on sale, but it’s much more fun to do everything yourself from start to finish, attracting the help of kids who will definitely like this activity.

Step by step master class
Step 1
Draw or print out a template and cut out a blank for the house (walls, roof and chimney) from cardboard.

Step 2
We bend the cardboard blank along the fold lines and glue it. To make window shutters and doors look more voluminous, it is better not just to draw them on the walls, but to cut out additional details of the required shape from cardboard and stick them on. From within window openings sealed with a film imitating glass.
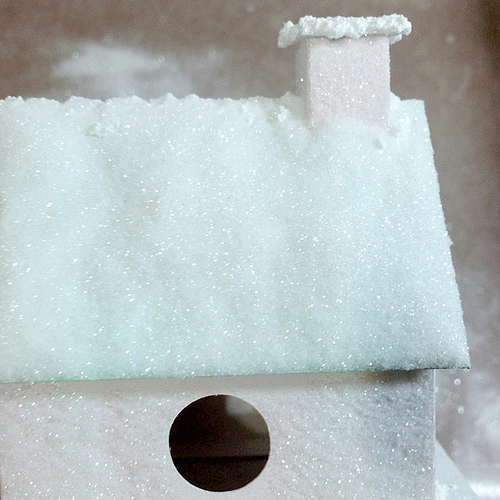
Step 3
Let's get started with the snow. A jar of artificial snow can be purchased at any craft store. In places where we will have snowdrifts, we apply a little glue and put snow in piles on top of it with a round brush, giving a realistic volume. Remember how the roofs of houses look in winter, and this will help you in your work.


Step 4
When the work with snow is completed, let the product dry thoroughly, after which we proceed to create a shining ice frost on the walls of the house. To do this, in turn, each wall using flat brush completely smear with glue and evenly sprinkle with a thin layer of white sequins. Blow off excess glitter powder.
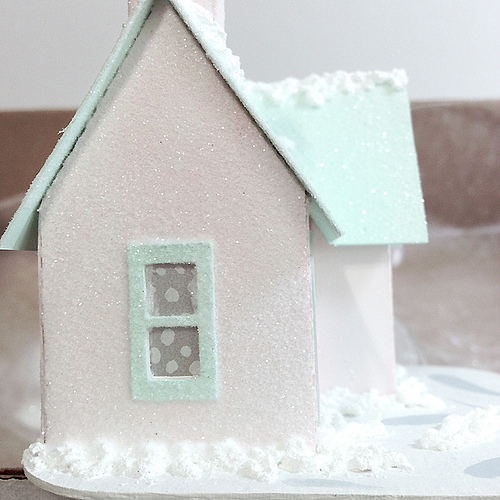
Our fabulous house-decoration is almost ready. It remains to decorate the shutters and doors to your taste, as well as glue the craft to the cardboard base.
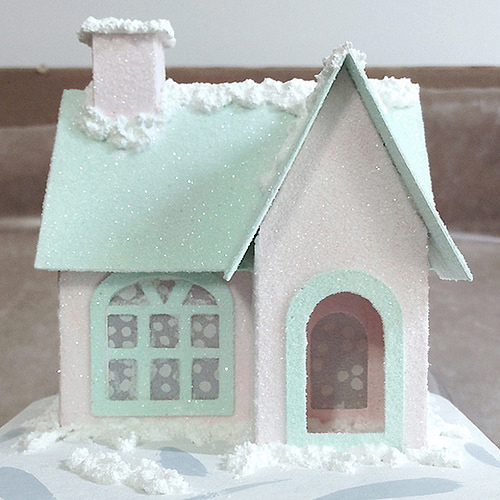
Alternatively, the house can not be glued, but simply put on top of the base, additionally decorated with homemade trees. And in the evenings, try lighting a battery-powered LED candle inside it. It looks amazing and really looks like a fairy tale!