
Do-it-yourself volumetric paintings for the interior from improvised materials. Paintings from paper flowers with their own hands Volumetric paintings in stages
Making interior paintings with your own hands is very exciting. In this case, the most affordable materials are used, such as: buttons, paper, lemon, feathers, a balloon, cupcake packaging.
DIY interior paintings
Feather painting
Feel like real contemporary artists by creating an amazing canvas. It will be light and airy, as it is created from feathers.

Here is what you will need to make such interior paintings:
- feathers;
- paint in cans;
- frame;
- big bead;
- glue;
- sheet of cardboard.

Then, on another surface, you need to paint the feathers using spray paint.

As you can see, shades of the same color look great. Therefore, you can take dark and light blue paint. Glue the feathers first outside the circle, and then make the rows closer to the center.

When this entire surface is filled, glue a large bead in the middle.

After the glue dries, you can frame the finished work and hang it in the bedroom or in the living room or present it to your loved one as a souvenir.

This picture in the interior looks great, like the following.
paper painting
Soaring butterflies will certainly cheer you up.

To create such beauty, you do not need a lot of materials. You will only need:
- colored paper in pink and white shades;
- a sheet of foam or expanded polystyrene;
- glue;
- whatman;
- scissors.

- Cut strips of the desired width from pink colored paper. The distance between the sides should be what you want to see the wingspan of this insect.
- Attach the butterfly to the beginning of the paper strip, fold the tape several times so that the insect has enough space on the square allotted to it. Outline the butterfly and cut along the contours. You will get not one, but several insects at once.
- In the same way, folding the paper sheets into a stack of squares, cut out the rest of the butterflies. Use dark pink, pink and light pink paper for this.
- With the help of double-sided tape, it is necessary to glue a sheet of polystyrene foam or polystyrene foam with whatman paper. Draw the outline of the future figure on it using a washable marker or chalk. Start gluing butterflies, filling this figure with them. When the work is completed, you can use it for its intended purpose.
Also, as in the photo shown, make the left outline of the drawing fuzzy, as if these are soaring butterflies that are gradually landing here.
Such works look especially beautiful in sunlight. You can not glue the foam, but tint it using a sponge and paint. Then glue the butterflies using double-sided tape.

You can create interior paintings by making cardboard frames with your own hands. And so that butterflies are visible on the canvas, draw their outlines on a sheet of cardboard and cut them out with a clerical knife. But the bottom of the base should be a more contrasting color so that the butterflies can be clearly seen.

You can leave them as white or paint them.
Do this fun activity with your kids. After all, they can also create original paintings with you. Each butterfly can be painted and glued to the canvas.

To make a wall panel, use heart-shaped figurines. For the following work, you don’t even need a frame, but you only need:
- double-sided cardboard;
- scissors;
- fishing line;
- bar;
- dye;
- awl.
You should have several rows of hearts. Paint the block and tie the top pieces of the lines to it.
Now you can hang such a beautiful panel above the bed in the bedroom or on the wall in another room.

The creative impulse should not be held back by the absence of some material, such as paper. If you don't have it, use read newspapers. Cut out hearts from them and glue them to the paper base, make a frame for work.

If you still have ceiling tiles, this material will make wonderful interior paintings.

For these, you will need the remnants of colored paper. By adopting the template presented above or creating your own, you will make such a cheerful panel.
Pictures from buttons and corks
The following design decisions will be prompted by waste material. After all, wine corks are usually thrown away, and a lot of interesting things can be made from them. Here is a work created on the basis of this material.

For the first picture, you need to cut each cork in half, and if you have a lot of such material, then use whole elements. On the base, first apply the contour of the future masterpiece, and then fill it with blanks. If you want the picture to take on a rainbow tone, then pre-paint them.
To get such beautiful interior paintings, you can only use:
- bottle caps;
- rope;
- awl.
The next picture does not need a frame. You simply glue rows of corks on the main surface and you can attach a postcard here to congratulate your loved one.
If you have accumulated a lot of unnecessary buttons in your household, then you can also make interior paintings from them.

For the next one, they will use:
- buttons in shades of green and brown;
- glue;
- wooden board;
- pencil.
The following will also decorate the interior.

You can lay out the first letter of the name of a loved one with buttons, stick them on the base and hand the masterpiece to him. The motive can be very different. Make the outlines of an animal or an anchor out of buttons, such works will also certainly be appreciated.
You can confess your love in the most unexpected way. Paint the wooden surface, when it dries, glue the pink heart-shaped buttons here. Seeing such a sign of attention, your dear person will certainly be delighted.

Paintings in the interior can be very different. If you want to capture the dark time of the day, then pre-paint the background with brown paint. It doesn't have to be straight. Spread the paint with a sponge, then it will turn out so mysterious.

A black marker will help to highlight the contours of the branches and trunk, and a rainbow crown can be made from buttons of various colors.
If you prefer light colors, when you take the white base, draw the trunk here with a marker or brown pencil. You can let your creative imagination run wild and lay out this part of the tree using threads of this color. Glue the buttons, which will turn into multi-colored leaves.

Nature itself will help to draw interior pictures. Check out the following cool ways to create them.
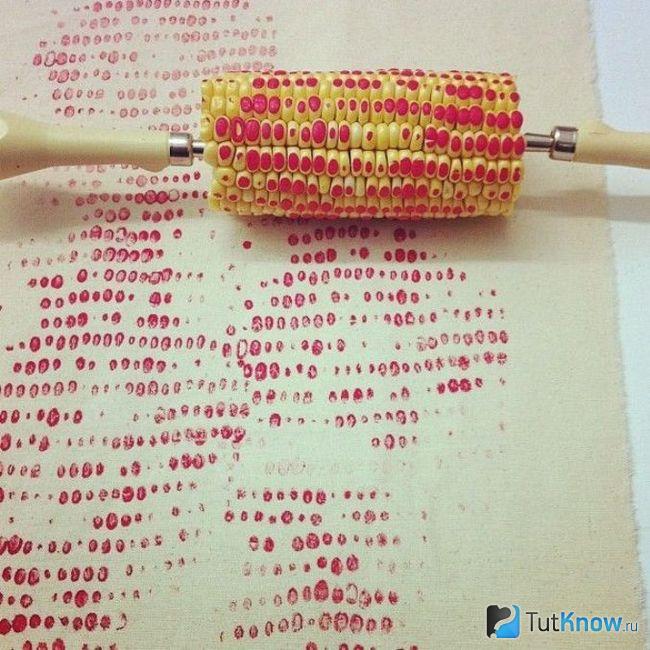
Method for printing interior paintings
It is enough to dip a chamomile or other flower into the paint, and it will make a wonderful printing tool. You will lean the plant against a white sheet of paper and create original drawings.

Lemon can be used not only for its intended purpose. Dip half of this fruit in paint and print on paper.

Such artistic therapy will certainly cheer you up. You can use a wide variety of fruits and vegetables to create interior paintings. If you have an ear of corn, then cut off a fragment of the desired length from it, prick it on both sides on forks or other sharp objects and print to your health.
If fruits and vegetables are not available or you do not want to use them to create paintings, then you can take a balloon.
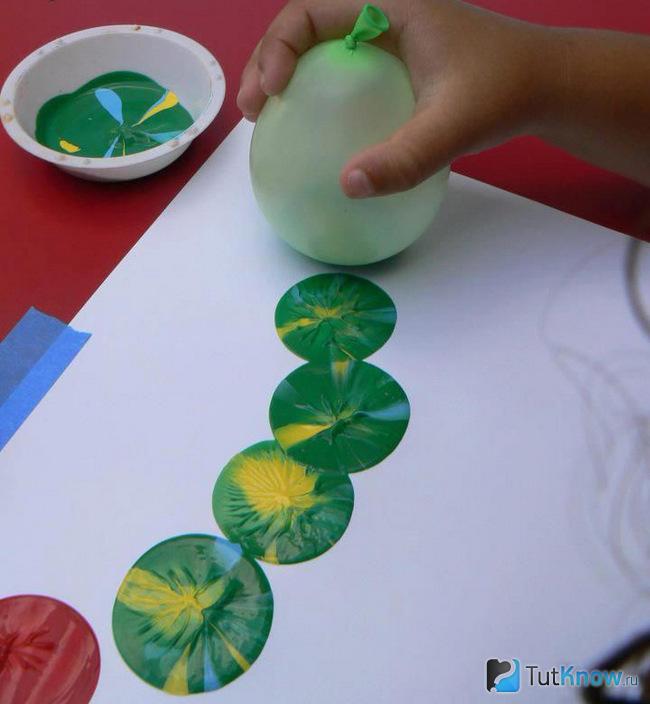
Pour paint into a bowl. And if you want the prints to be more interesting, then add paint and other shades here. Dip the ball into this mass, then lift it up and print patterns on a piece of paper that you yourself will come up with.
If you want to draw your favorite teddy bear, but you can't, then you can make a print. In order not to spoil the toy, take water-washable paint. Dip the bear here and attach it to a sheet of contrasting paper.

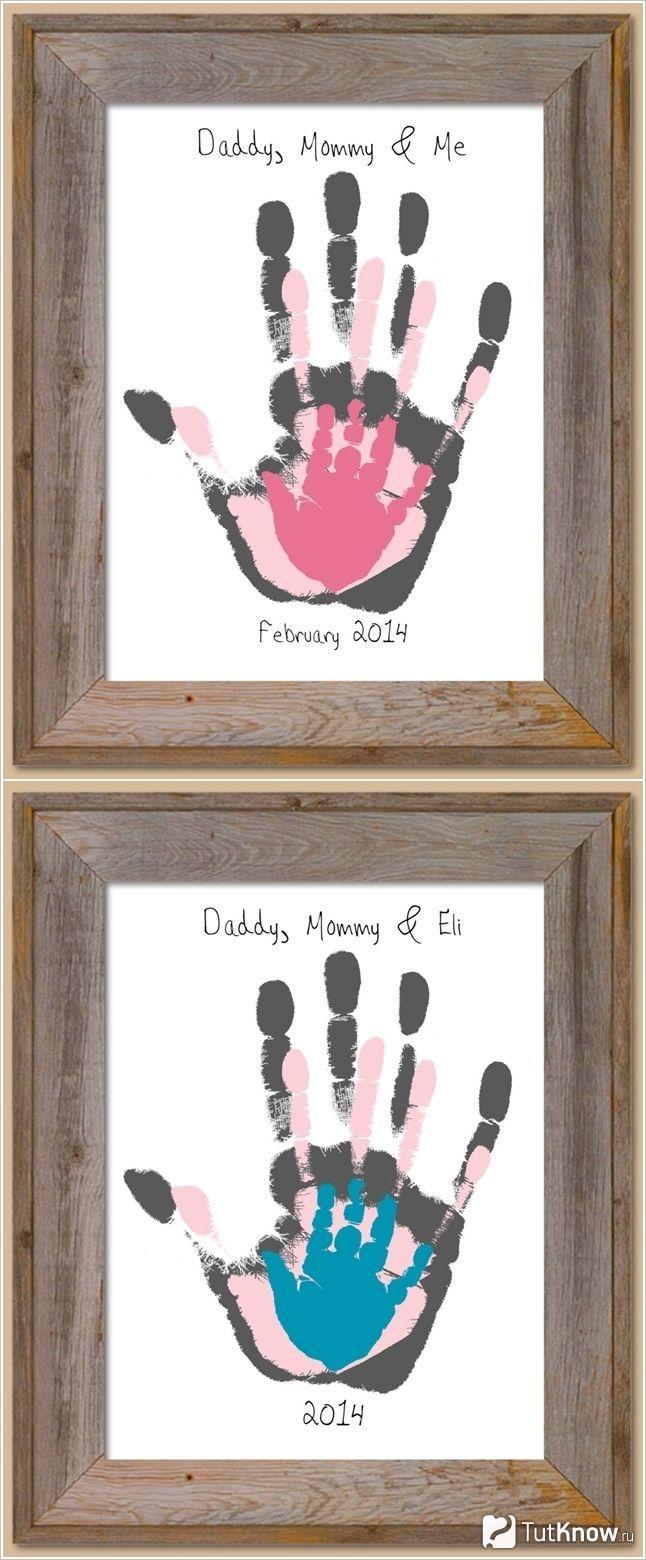
If there are no such consumables, then you can even use your own palm. Dip it in a bowl of paint and lean it against the paper base.
If you want to make a picture for memory, then invite all family members to do similar manipulations. In this case, the largest palm should be printed first, and then the next ones are arranged in decreasing order. Use different colors of ink so that each print is clearly visible.
It remains to see a few more ways that will allow you to create interior paintings. To make such masterpieces, you will need very little time.
Interior paintings on the wall in 15 minutes - master class
That is how long it will take to create the next masterpiece.
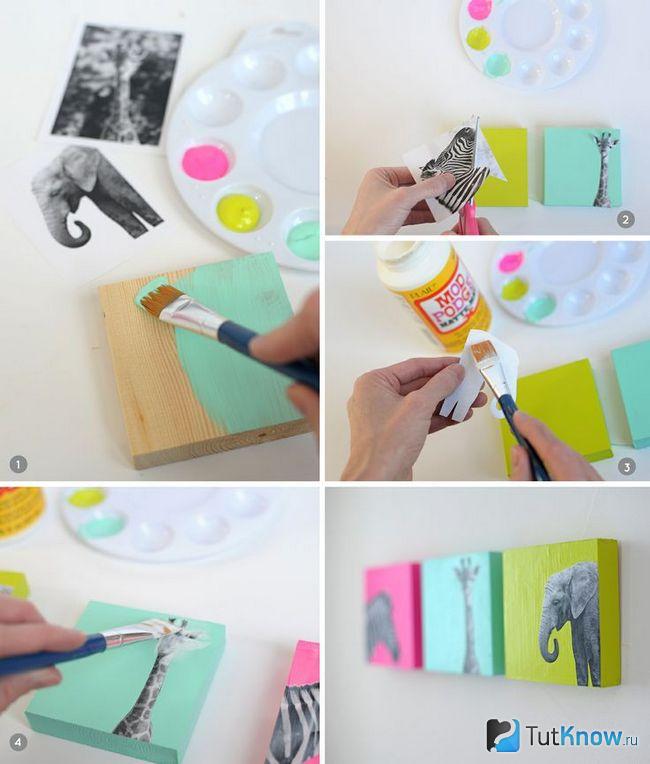
Also for the interior painting you will need:
- boards;
- dye;
- brush;
- glue;
- Pictures.
You will create the next canvas as quickly. Such works will appeal to lovers of glamour.
A step-by-step master class, detailed photos will help you quickly understand an interesting idea. First you need to prepare:
- simple pencil;
- scotch;
- glue;
- sequins.
If you don't have glitter, then you can grind up a broken Christmas ball. To do this, it is covered with a cloth and gently knocked on top with a hammer.
Remove the tape after the glue has dried. Where there was adhesive tape, you need to go through the paint using a brush. After a while, the work can be glued to the wall using double-sided tape.
If you liked these interior paintings, then create the next one almost in the same way.
For this you will need to take:
- picture;
- self-adhesive letters;
- white acrylic paint.
If you have even less time, then you can make a panel in the same minimalist traditions as Malevich's black square.

To do this, a white sheet of cardboard must be covered with black paint using a coarse brush. It remains to hang your masterpiece on the wall and wait for the approving responses of home and visiting guests.
Even the remnants of the fabric will give interesting ideas.

Wrap rectangles and squares previously cut out of cardboard with such patches. Fold back the fabric and pin here. Make a loop, hang your masterpiece with it or double-sided tape. You can create interior paintings so that you get a whole exhibition or make one or two. It all depends on the amount of free time and the availability of material.
If you have small shreds left, then you can make such a voluminous flower.

According to the template, cut out the petals for it. Slightly bending the edge of each, glue to the prepared surface. It can be a sheet of foam or cardboard with interlining wrapped in fabric. First create the outer circle of the petals, then the next, staggering them. Moving towards the center, complete your work. In the middle, the petals are slightly smaller and look up.
If there is a braid left from the needlework, it can also be put into action. See what kind of paintings in the interior you can create with it.

To do this, cut these tapes into strips of the same size and glue the end and beginning of each. Then you need to pull the resulting circles to the center from 4 sides, and you will get four-petal flowers. You can also quickly make a panel from packages of cupcakes and cookies. Glue these paper molds to the prepared surface, see how delicate and airy the picture is.

By applying a leaf template to paper, you can cut such blanks of the same size quite quickly.

It remains to glue them next to the paper branches and frame the finished work.
Here are some interesting works of art you can create in minutes from the available material. If you want to see how others make interior paintings, then your desire will be fulfilled right now.
Indulge yourself in pleasure and see how you can make a picture, the surface of which will resemble marble:
Making a three-dimensional picture with your own hands is a solution for extraordinary people who want to make their home decor individual and not keep standard drawings.
To create three-dimensional paintings for walls, a variety of materials are used, for example, a picture is made of gypsum, you can create paintings from fabric with your own hands, create three-dimensional paintings on the wall from putty, make various abstractions or applications, create a bas-relief, apply mosaics and much more. The list of drawings is large, it is important to choose the right image, and for this, photos and videos from the Internet are used, which will help determine the artistic design and choose the technique for applying drawings to the walls.
Paintings from putty
Drawing on the wall with your own hands is often done with putty, but the option is not for lazy people, but when you can create a picture, it will look beautiful, and the cost is just putty, you can use the rest after the repair.
It is not recommended to manufacture from complex paintings, it is better to make a relief drawing from a simple image, learn, and then move on to more complex paintings, this is the right plan. Surface grinding is not needed, so you can create a picture on the wall without dust. You need a spatula to work. Before making pictures from putty, preparation is carried out.
Foundation preparation
Volumetric drawings are applied to plastered and even walls, if so, then the surface is prepared as follows:
- The wall for processing is covered with a primer.
- After drying, the background is made, choosing the desired colors, the putty is applied to the base with a spatula, a roller is used to paint the base.
- Next, a picture is taken. Acrylic compositions dry quickly, which means that after a couple of hours a pattern is applied, for example, a landscape, a butterfly, a cane fruit. If the work is done by a master of art, then you can draw a stone city, spring, autumn, birds or nature.

You can transfer the drawing to the walls using a stencil, the main thing is not to select complex wall drawings so that there are no difficulties with puttying. Pictures are medium in size. There are two options for applying plaster to the wall:
| Applying plaster: | Description: |
|---|---|
| Spatula drawing: | With the help of a pencil, lines are drawn on the wall, then the spatula is placed along the line and drawn along the drawing. Excess mixture is removed with a second spatula. When the contours are dry, you can apply paint on them. Similar instructions for the rest of the lines on the wall. The volumetric picture is ready. |
| Draw through a syringe: | The needle is removed from the syringe, after filling with putty, it is reinserted. Further, the composition is squeezed out along the contours on the wall. After the main drawing, you need to make the details of the picture. When everything is dry, paint is used, which is applied with a piece of cloth or a sponge. The grooves may not be painted. When the main color dries, the second color is applied to the small details of the drawing where the brush is applied. |
A flower, a leaf of a tree and other drawings on the wall are made in the picture. If desired, you can use modeling, glue additional accessories, for example, make a frame with a baguette, use twine on canvas, decorations in the form of kanzasha, quilling, macrame and other decorations. Optionally, you can use strips of wood, moldings and other ideas.

A photo of the design of the bas-relief of the painting on the walls can be found on the net, so that it is clearer what to draw in your house, so that the interior is living and beautiful, complements the room. An inscription is also made or a letter is left as the signature of the author.
Volumetric paintings on the wall (video)
Volumetric paintings made of wood
Textured paintings on the wall made of wood look rich, but creating a three-dimensional pattern will require not only a skill, but also a lot of effort and time. The method of decorating the walls is unusual, and for work you need chisels, special knives, varnish, stain, and a wooden frame. The selected three-dimensional drawing must be transferred to the tree, and then begin to cut out the contours. From the depth of the cutout, a three-dimensional picture will be obtained. Due to the stain, an original look is obtained and the volume increases, and the finished picture is varnished to protect it.

In this case, the painting does not need additional use of accessories, you just need to cut out the drawing and hang it on the wall. This view allows you to create a modular drawing, for example, a triptych, but it is very difficult to make the desired relief. At the end, some people insert glass into the frame. Before creating volumetric paintings from wood, it is better to watch a master class on cutting wood.
Volumetric decoupage
Decoupage is the easiest type of wall decoration, in addition, this technique allows you to design not only walls, but also other surfaces, even a beginner can do the work. The main plus is the ability to make a flat element voluminous using improvised material. Creating volumetric decoupage needs the following:
- A colored paper piece specifically for decoupage, you can use foil, wallpaper or photo wallpaper.
- Glue.
- The polymeric material is clay.
- Napkin, textile, satin material.
- Brush.
- Scissors.

The step-by-step scheme of volumetric paintings for walls is as follows:
- The desired picture is cut out of paper or other material, you can use printing and print the picture.
- Further, the drawing is urinated in water and blotted with a cloth.
- Glue is applied to the reverse side and firmly glued to the wall.
- Similarly, work is carried out with other parts of the picture so that the joints match, integrity is not violated.
A three-dimensional drawing can be obtained if the image is again pasted over an already finished drawing. At the very end, varnish is applied to the drawing. You can use corrugated cardboard, plasticine, paper tapes, non-woven or vinyl wallpaper, crepe or newspaper material, making a colorful and unusual pattern. You can cover any object, for example, a bottle, doors in bathrooms or bedrooms.
Advice! You can depict a winter garden, shells, salty seas. For the kitchen, a picture of cereals, beans, or a simple cake on the wall is suitable. This is a budget design option for which you can take any home material that is at home and make the desired pattern, picture or drawing on the wall out of it.
3d paper picture
Making paintings for interior walls out of paper is the cheapest. A classic drawing can be created step by step if you prepare:
- paper.
- Scissors.
- Paints.
- Cardboard.
- frame.
- Gouache.

It is necessary to get the glass out of the frame and stick artificial or natural material on the substrate. Jeans, braid, felt or paper are used. This will be the background that the person will look at. Next, a pattern is cut out of cardboard, after which it must be folded and slowly pasted onto the site.
It will be correct to paint some elements and let them dry, then to glue them into the frame. Owls, roses, peonies are good. The picture will be complemented by lace, weaving, rhinestones, beads, embroidery, leather, thread, sand, which can be glued onto paste or PVA. The finished painting can be hung in the room in the right place to complement the style.
Using any master class, you can decorate all the walls in the house, even if the room is small, the coating is old. Any tool is good, the work is carried out for a short time and the wall partition is quickly decorated. Also, certain techniques can be used to create postcards. An excellent plan is to use not ready-made three-dimensional paintings for the walls, but puzzles that, after being assembled, are hung on the walls or foam from which the drawing is created.
Volumetric paintings for walls can be supplemented with lighting, a strip of diode tape. Volumetric drawings on the walls are suitable for any style, even if it is minimalism, where denim material looks great. In the picture you can depict your fate, if you have the skills of artistic creativity.
Photo gallery of three-dimensional paintings on the wall


Each interior should have its own zest, and often the simplest and most elegant option to bring originality to the room is a picture.
But how do you find what will decorate your bedroom, living room or other room? Most likely, for the author's work, you will have to pay a large amount of money.

But if you do not count on additional expenses, but you still want to have something original, then it is quite possible to make an interesting picture with your own hands.

However, you don't have to be good at drawing. After all, paintings in the usual sense have long been replaced by three-dimensional images on the walls, abstract ideas embodied in a variety of techniques.

DIY fabric paintings
All quality canvases are made on a fabric basis. However, the modern interpretation of such paintings changes our view of art.
Modular fabric paintings have gained great popularity. But it's not that hard to make them yourself. In stores now you can find a lot of fabrics with a very beautiful, interesting and bright print.

If you liked one of them, then you can safely buy it and make an author's decor item.

Modular picture
To create such a room decoration as a modular fabric picture, you will need a base in addition to the selected material. It can even be a door from an old cabinet or a piece of chipboard, which could well be lying around somewhere in the garage after repair.

Cut out a few pieces from the base to the size of your fabric and fit the tree with it. Make sure that the fabric is well stretched and does not form wrinkles. Your painting is almost ready. It remains only to attach the hooks for which it will be attached to the wall.
Most often, such paintings consist of three or more modules, which can be either the same size or different. Their shape can also be different.

The most common and easiest to manufacture are square and rectangular elements. But there are round, oval and other forms of modules for paintings. Frames for picture modules in this case are not needed.

Pictures from clothes
Even a T-shirt can decorate your interior. It often happens that on clothes that you have not worn for so long, and their colors are still bright, stains or holes appear. You can not throw away a seemingly spoiled thing, but make an original picture out of it.

Cut out a rectangle with the image from the clothes, glue it on paper and place it in a frame. The photo shows that such paintings depicting cartoon characters will fit perfectly into the interior of a children's room.

Embroidery
In some way, embroidery can also be attributed to fabric paintings. This method of decorating the interior is not new. Even our great-grandmothers had at least one image embroidered with their own hands in the house.

However, to embroider a picture, you still need some skills and patience. This method is not suitable for everyone, but if you are engaged in needlework, then hand-embroidered pictures can say a lot about you as a hostess.
Volumetric paintings
Relief images on the wall are also very popular as decorative elements in the interior. Volumetric paintings can be made with plaster on the wall even before it is finished.

But such a decoration can only take place when it is not planned to stick wallpaper on the wall.
Note!


The method of making such paintings requires training and a considerable amount of time. Therefore, it is not suitable for everyone.

paper pictures
There is an easier way to make a 3D image. To do this, you will need colored paper or cardboard. Cut out several figures of the same or different sizes from it. It can be, for example, butterflies.

Using pins or double-sided tape, attach them to the wall in a chaotic manner or forming some kind of pattern. Your paper painting will look more impressive if you choose a color that contrasts with the tone of the wall itself.
Butterflies themselves can also be of different colors. Such a picture will sparkle with new colors when artificial lighting is on, so it will look most advantageous in rooms where the light is switched on most often, for example, in the corridor.

If your house has a staircase to the second floor, then the kittens in different poses, placed on the wall, to which the steps adjoin, will look original.

Paintings from bushings
To make a voluminous decor with the image of flowers and leaves, toilet paper or paper towel sleeves will help. It is enough to flatten the cylinder a little and cut it into equal parts about 2-3 cm wide.
Note!


In order for the flowers to be brighter and the leaves to stand out in color even before work begins, the bushings can be painted in different colors. The individual parts of the sleeve should be placed in such a way that a flower forms, so that you can compose entire compositions.

Paintings made of artificial flowers
The easiest to make are pictures of artificial flowers or other decorative elements. The main thing here is to beautifully glue the finished parts to the base.

For this technique, you will need a frame, solid material and the actual image itself. Wrap a sheet of paper with a cloth, wrapping its edges and gluing it on the back.

Then, after removing the glass from the frame, insert the base of your picture into it and glue artificial flowers or other details (shells, dry twigs, etc.) to it. At the end, you can decorate the frame with beads.

If you already have a finished canvas, then there are many master classes on how to decorate a picture that has already bothered you and thereby update the interior.
Note!


A flat image of nature or still life can look completely different if you attach a few volumetric details to it.

It can be either an image cut out of paper or natural materials in the form of dry leaves or even butterflies.

Photo of paintings with your own hands


Are you looking for fresh and unusual interior decoration ideas? Familiar pictures are good, but the soul is looking for something new. On the Internet, you can find more than one master class on creating volumetric paintings with your own hands from paper, fabric or leather. These are 3d canvases that are striking in their liveliness, which are exciting to create and pleasant to contemplate.
DIY paintings
A three-dimensional picture can be called a 3d sculpture in a frame, made from improvised materials. It can be anything in the full sense of the word: paper, dry flowers, polymer clay, leather, fabrics and other creative materials. From gypsum, for example, magnificent three-dimensional drawings are made right on the kitchen wall. Gypsum modeling is, of course, beautiful, but this article will focus on simpler techniques.
Everyone can make an original masterpiece of art with their own hands. Why don't you try your hand? The master class will help you learn the basic principles to start from the idea and start creating.

Master class "3d paper picture"
For the first pen test, take the simplest version of a three-dimensional picture - paper application.
A set of materials for work:
- frame with deep sides;
- stationery knife;
- pencil;
- colored cardboard with a bright print;
- white watercolor paper or thin cardboard;
- ruler, scissors;
- PVA glue.
Instead of a frame, you can take a candy box.

Step-by-step description of a three-dimensional paper picture:
- cut out a rectangle from a white sheet of paper under the selected frame;
- hand draw or print a heart large enough to fit freely in the frame 9 times in three rows. The approximate size of a heart is 4x5 cm;
- the heart needs to be cut out and circled with a simple pencil, putting it on the white paper prepared earlier. You should get 3 rows of three hearts or more (less) as you wish;
- now the crucial step has come - carefully cut out the "wings" of the hearts with the help of a clerical knife. To do this, you need to make cuts along the contour of the hearts, without touching the lower and upper parts;
- we bend the cut parts of the hearts up and to the center, making them voluminous;
- The blank with hearts must be glued onto colored cardboard. It is desirable that it be a special scrap paper with a small pattern. It will be visible through the bent wings of the hearts;
- the final step is to place the picture in a frame and fix it on the reverse side with a stapler or glue.
The presented master class is simple, but based on it, you can make your own 3d plot - fluttering butterflies, tiles, people and other interesting patterns.

Master class "multilayer 3d paper painting"
It is very easy to make an interesting paper picture using the layered technique - you need to find a drawing and print many copies. The finished product, hung on the wall, looks interesting from different angles - a real 3d picture.
A set of materials for work:
- deep enough frame;
- cardboard;
- laminate substrate;
- thick album sheets and printer;
- glue for needlework;
- acrylic paint;
- acrylic lacquer;
- scissors;

Step-by-step description of a multi-layer paper picture:
- choose a beautiful and bright picture with a distinct image. It is desirable that it has a lot of details that will be convenient to cut. We format or select the image to fit the frame size. We print 10-12 copies on thick paper;
- Depending on what printer you have, we determine the need for pictures to be varnished. So, images printed on an inkjet printer need to be sprinkled and varnished, otherwise the colors will flow. Laser images can be left like this;
- the first image is simply glued onto cardboard cut to the size of the frame plus mounting gaps;
- all other images are cut out, but in a special way. For example, if you are creating a flower, then let several whole flowers with a stem and leaves be cut out, a couple of layers more leaves, and even more inflorescence itself. It sounds complicated, but it will become clear along the way;
- now we are preparing the basis for the parts from a thin substrate for the laminate, which looks like a thin layer of polyethylene foam. The cut out substrate should be slightly smaller than the details so that it is not visible in the finished product on the wall;
- we glue the parts on the substrate, but not all, but selectively - only those layers that should protrude forward. In some small parts, the substrate may not be needed;
- the prepared parts are placed on the base in a frame for glue. First, we place large pictures with many details, and then individual details, which should be more voluminous;
- the side parts should not remain white, otherwise they will give out the presence of a substrate - they need to be painted over to match the image;
- We cover the picture with acrylic varnish in several layers. Each layer is applied after the previous one has dried;
Now you will also have a three-dimensional picture with your own hands - now you can place it on the wall in this form or add glass. Such canvases can be made from fabric, then you will get a picture with a beautiful terry surface. 
Master class "3d leather painting"
A set of materials for work:
- frame;
- the basis of the picture is made of leather, suede or fabric;
- pieces of leather of any color;
- acrylic paints;
- rectangular sheet of chipboard or plywood;
- furniture stapler;
- craft glue or superglue;
- scissors;
- paper (for sketches);
- soap or chalk (for contours on the skin).

The first question that arises about the creation of such a work is where to get the skin? Firstly, it must be natural, and therefore it is not cheap. But you will certainly have a jacket, bag, gloves and other used genuine leather products. Feel free to shred them - you will get a lot of fun and be able to make a gorgeous picture.
Step-by-step description of creating a painting "bouquet of leather":
- on paper, make sketches of leaves and petals and cut them out - these will be templates for work;
- transfer the contours to the skin and cut out how many flowers with petals you want to have in the finished picture;
- if the materials at hand did not contain colored skin of a shade suitable for the colors, then use acrylic paints. Color the petals with burgundy or pink flowers, and the leaves with green. You can choose paints of any colors you like;
- to make the petals rounded and voluminous, you need to hold the skin over the candle flame - it will take on an interesting natural shape;
- we collect buds from the petals, in the center you can place a ball of leather or fabric as the center of the flower;
- we stretch the base of any fabric, suede, leather or other material onto a sheet of plywood and fasten it with staples from the wrong side. The fabric can be pulled tight or draped. The resulting base is inserted into the frame;
- lay out ready-made flowers and leaves on the basis - evaluate their location by stepping aside;
- complement the composition with leather curls, natural materials - shells, dry flowers, etc.;
- now you can glue all the elements to the intended places using a glue gun or a tube of superglue.

We clean the finished picture from traces of needlework and hang it on the wall - that's the whole master class. Similar creations can be made from fabric - decorating the painted silhouettes of girls with dresses made of fabric and lace.
To repeat the master class and create three-dimensional paintings with your own hands, you do not need to have the ability to draw. But what you really need is perseverance and accuracy.

For beginners, you can advise paper techniques, and for more experienced craftsmen - magnificent 3d paintings made of leather, polymer clay or gypsum. Interesting pictures for the kitchen are framed vegetables and fruits made of clay or made of plaster.
Video gallery
Photo gallery


To give a hateful interior design a new character and color, as well as to bring a fresh stream into the design of the kitchen, bedroom, nursery, paintings created by yourself will help. You can make unique paintings with your own hands from any available materials; this absolutely does not require professional art education. Stylish works of art that rightfully occupy a dominant role in the house - this is the bright accent that can enliven the interior, filling it with individual features.
In fact, you can make a picture with your own hands from almost anything. Yes, yes, this is not a joke. Having applied imagination, all creativity and creativity, it is really possible to use any materials at hand: coins, shells, buttons, threads, fabric cuts, leaves, dried berries, small branches, cutlery, sewing accessories, personal photographs and even miniature children's toys .
An excellent solution not only for the kitchen, but also for the bedroom, living room, nursery. Such modular compositions look holistic due to a single trunk and branches extending from it. The background of each individual element corresponds to a certain season (autumn - orange, summer - emerald, spring - light green, winter - blue). The button foliage is also made in a tonality corresponding to the presented seasons.
Button painting

Composition of buttons "Seasons"
A few more buttons
Buttons are an ideal material for creating interior paintings on your own. Using the structure, dimensions, shape and materials wisely, you can create real masterpieces without having an art education.

fluttering butterfly

Cat for cat lovers

Seascape from buttons

Color spectrum-rainbow
Leather goods
Despite the fact that the skin is quite easy to process, the picture is not so easy to handle. Here you need an understanding of working with the material, knowledge of the basic properties of the skin, considerable patience and perseverance. Therefore, it is recommended that you first try to make small trial compositions, and then move on to voluminous, fundamental works.
The most commonly used color palette in genuine leather paintings is brown-beige. But some daredevils are happy to use green, red, orange, yellow patches.
The main advantages of leather images:
- Exclusivity - due to the originality of the material, it is impossible to repeat the picture one to one;
- Relief - depth, elevation, highlights and shadows create an unsurpassed 3D effect, thanks to which the picture "comes to life";
- Availability - small pieces of leather can be found both at home and purchased at the "flea" market or from shoemakers literally for next to nothing.

Still life of multicolored leather

Game of contrasts (applied red, black and white patches)

Convex leather flowers
Video master class: do-it-yourself leather painting
Panel of products
One of the most relevant techniques for creating paintings for the kitchen is subject application. Moreover, in this case, cereals, coffee beans, small dry vegetables and fruits, citrus peels, spices and the like are most in demand.
Food panels look harmoniously in the interior of the kitchen, as they look not only stylish, but also appetizing.


Monochrome composition of black and white beans

Landscape from various cereals and seeds

Round panel of legumes
Framed wallpaper
Paintings from wallpaper are a very budgetary addition to the interior. Moreover, you can create in several techniques at once: appliqué, 3D format, stretching on a wooden base, etc. Wallpaper is good because it fits perfectly into any room in style - after all, the remnants of rolls purchased in excess are used.

Ornament elements

creative collage

Panel from the remnants of wallpaper

Wallpaper frames
Application of dried flowers and leaves
Unusually look on the wall and paintings made from pre-dried vegetation. Buds, flower buds, petals, small twigs, leaves, blades of grass - everything is used. Having drawn a pencil sketch on paper, the necessary elements are simply pasted on top, taking into account the preferred color and shape.

Vase with Flowers

Volumetric picture of dry vegetation

Unusual application of flower petals
Photography in the interior of the kitchen
For those who prefer to follow the path of least resistance, a wonderful way to add color to a room is photographic paintings. In this case, it is enough to pick up a photo on the Internet or from a personal archive, and print it on a large-format color printer.

Do-it-yourself photo-triptych for the kitchen

Thematic composition of several photos

Photo collage on canvas
Fabric drawings
Fabric paintings are also widely applicable in the design of kitchens. They always look original, colorful and stylish. To prevent dust and grease from penetrating inside, upon completion of the creation of a work of art, textiles are usually treated with varnish. For fabric products, synthetic material, burlap and silk are best suited.

Textile application in 3D format

Flat patchwork appliqué

Fabric painting made with a sewing machine
- When creating a picture for the interior with your own hands, it is best not to dazzle with colors, but to use a tone that matches the design of the kitchen. You also always need to adhere to the style of the overall concept of interior design. For example, in a classic room, leather goods and canvases painted in oils are acceptable. The following materials are suitable for high-tech style: glass, metal, mirror. Provence can be filled with floral ornaments and paintings from cereals. Volumetric works harmoniously look in modern kitchens and combined styles.
- The color palette should include three primary colors and several (at the request of the owner) close shades. Cold tonality is allowed to be diluted with warm accents, but you need to take colors from the opposite spectrum.

Color spectrum: the right principles for combining shades
- For convex shapes, you should always use an alternation of light and dark tones. Moreover, oversized dark volumes look best on a light plane. Approximately the same principle of a tandem of glossy with matte materials: matte should protrude above glossy. Thus, a greater depth of paintings and a maximum 3D effect are achieved.
- When making paintings on your own, whether it is an application or a drawing, it is important to observe the basic compositional principles, dynamics and balance.


- An easy way to make a painting original is to move the inner drawing outside of the base outline. For example, to extend the image to the frame or, with relief forms, beyond the border of the frame.
Four simple master classes

Photo of the final result
You will need:
- empty candy box or any deep frame
- double-sided colored paper
- simple pencil, eraser
- cardboard scraps
- sharp scissors
- PVA or transparent stationery glue.
Step-by-step instruction:
- At the bottom of the candy box you need to draw a big heart. It is desirable that the distance to the frame is at least 20 ... 50 mm (depending on the size of the box).
- Make several templates of different sizes from cardboard in the shape of hearts.
- Cut out multi-colored paper hearts according to cardboard templates. Fold each heart in half vertically.
- Glue two hearts of the same color and size. Gluing is done along the edge of the upper figure.
- Lay out a composition of double miniature hearts inside the frame. Important - you can not go beyond the contours of the drawn big heart.
- Glue all the elements according to the laid out scheme. Glue should be applied only to the edges of the hearts.
- Volumetric 3D picture is ready! Then you can decorate it by painting a plain frame or using a hanging decor (candy on ribbons, paper butterflies on a fishing line, and the like).
DIY drawing

Photo of the final result
You will need:
- colored cardboard
- simple pencil, eraser
- ruler
- black marker or marker
- PVA glue
- scissors
Even a child can make such a picture on their own. After all, the exact shapes and proportions are not important here. The main thing is to skillfully wield a ruler and a pencil, as well as to have at least a little creativity.
How to draw a picture yourself: step by step

Tip: The drawing can be left in monochrome or painted with colored pencils, watercolors, wax crayons to match the interior.
How to make modular composition yourself

Photo of the final result
You will need:
- piece of fabric (the size should be with a margin - for each detail you need a margin of at least 10 cm in width and 10 cm in height)
- pieces of plywood and wood slats for the frame
- foam or chipboard for the base
- furniture stapler
- scissors
- tape measure or long ruler
- a simple pencil or chalk (chalk is useful if the fabric is dark in color)
Step by step instructions:
- Two options for creating a base for a do-it-yourself painting:
- Making a stretcher with your own hands. Saw the ends of the rails at 45 degrees and connect them with glue or a stapler. For reliability, it is recommended to fix small isosceles triangles at the corners of the frame. Triangles can be made from plywood or fiberboard. Also, for structural rigidity, you can stretch the fabric around the perimeter by attaching it with a stapler.

Making a stretcher with your own hands
- Cut the finished base strictly in size from chipboard (16 ... 25 mm) or prepared foam.

Chipboard base
- Fixation of textile fabric. Cut the fabric to a size larger than the stretcher, taking into account all the folds. Next, you should slightly moisten the material and only after that proceed to pulling on the base. Corners require special care and attention.
Tip: first you need to stretch the long sides of the future picture, and then the short ones.
Before fixing one of the sides, you need to make sure that the material is not crumpled and not crushed.


- That's all - the modular picture is ready. By the same principle, you can make a photo decoration for the interior.
Decor for the kitchen from threads with your own hands

Photo of the finished work
You will need:
- base - you can use wood, laminated chipboard, corkboard and the like
- miniature carnations with wide caps (so that the thread does not slip off)
- ball of yarn of medium thickness
- scissors
- a hammer
Step by step master class

This technique of self-creation of paintings is only the first step towards the manufacture of masterpiece works of art from threads. Having learned the basics, it will be possible to make pictures of the most complex configurations from multi-colored threads.
Pictures from threads: video master class
Fountain with ideas, create and get up - let the interior paintings made with your own hands please not only you, but also amaze, surprise, delight guests! The stylish interior of the kitchen and the whole house is the merit of enterprising owners who are not afraid to experiment.