
Beautiful wall painting in the interior. Art painting of the walls with your own hands. Kitchen and dining room
There are no barriers to a modern designer in terms of realizing his most daring decisions and fantasies. The experience of generations, combined with progressive technologies, allows us to use skills and techniques to create unique design projects. Wall painting is one of the most original and versatile design techniques for creating a truly unique interior. At the same time, today wall painting means not only the use of classical techniques for creating complex, multi-layered compositions, but also the use of techniques available to most Russians, such as screen printing, drawing with prints and other street art methods. Wall painting can radically change the image of your home without the use of any constructive redevelopment. To create an accent or highlight the most advantageous area, visually change the parameters of the room or mask unsuccessful architectural features or flaws in the finish - wall painting can cope with all these tasks perfectly. We invite you to familiarize yourself with our large selection of design projects for various rooms in which the wall painting technique was used and be inspired for your own achievements.

Design features
First of all, it is necessary to determine what is currently understood by such a design technique as “wall painting”. The ancient art, originating from the Egyptian and Sumerian civilization, has not lost its popularity even today. But, of course, not only the techniques and materials used to create images on the walls have changed with the course of history - the very principle of decorating a home (and public buildings) has changed radically. Nowadays, artists (designers) do not need to leave messages to posterity in the form of wall paintings, this technique is used exclusively for decorative purposes.


Many homeowners who are planning a renovation or a small makeover in their homes believe that it makes no sense to spend time and money on creating a unique mural on the walls, because there are enough incredibly realistic photo wallpapers with high quality printing images on sale. And partly they are right - it will not be difficult to find a suitable plot on photo wallpapers in the store. But the interior created with their help will not be unique, will not carry a piece of the artist's warmth. And if you yourself paint the wall, then your individual view of aesthetics, the way you decorate your own home.


Today, an incredibly wide range of themes and stylistic solutions is available for interior wall painting. With the help of modern materials and the individual eye of the artist (which may be you), you can create unique masterpieces - from traditional murals to graffiti-style inscriptions.


Of course, the following criteria will influence the choice of theme and color palette of the image on the wall:
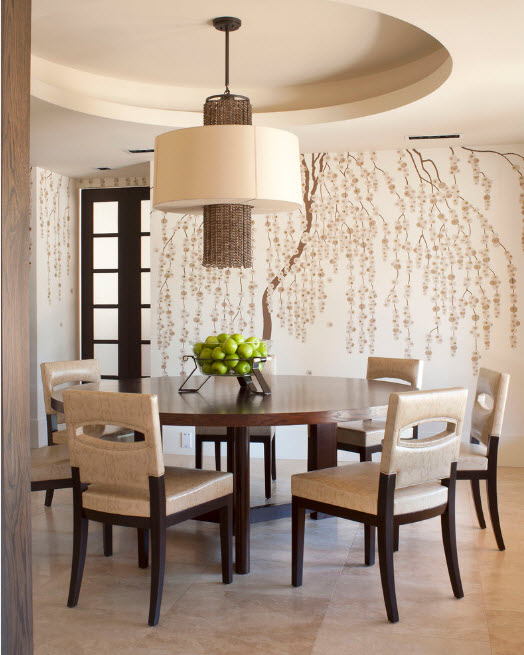
- belonging to the room (if in the children's room it would be logical to depict cartoon and fairytale heroes, a landscape or abstraction will look spectacular in a living room or bedroom, then in the dining room you can depict bright fruits, berries - to increase your appetite);
- the size of the room and its layout (number and location of door and equestrian openings);
- the location of the room relative to the cardinal points and, as a result, the level of natural light;
- interior execution style (it would be strange to depict a classic fresco in a room with modern design and graphic handprints of family members as a composition in a room with a traditional style);
- your personal preferences in the style of image execution and choice color solutions.


Wall painting in the interior: stylistic solutions
In order to navigate in all the variety of topics for painting the walls of a modern home (we omit the options for creating images for public buildings), it is necessary to at least superficially familiarize yourself with stylistic decisions.


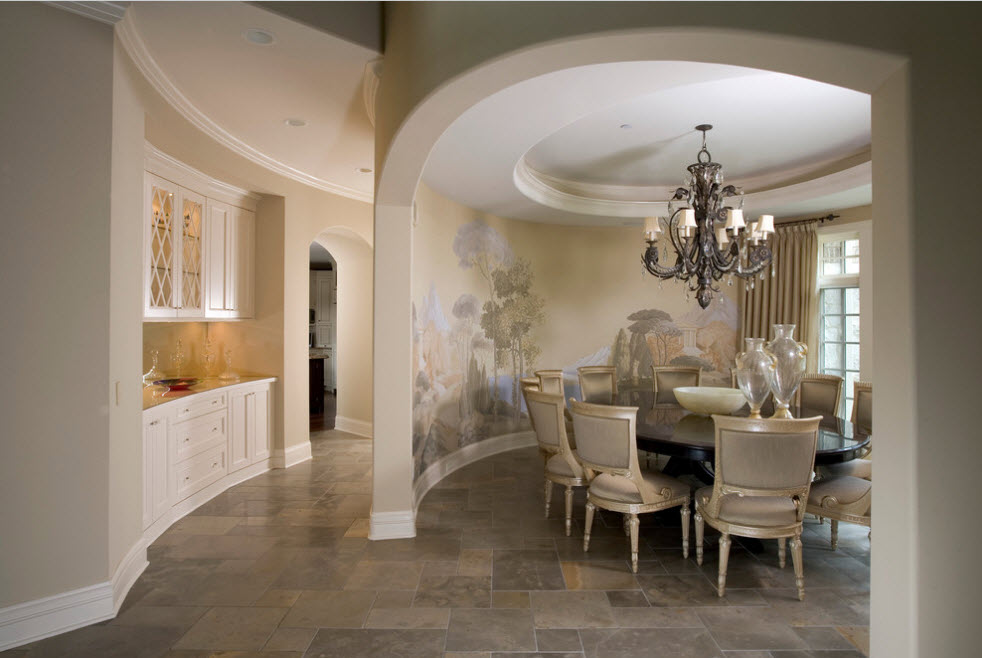
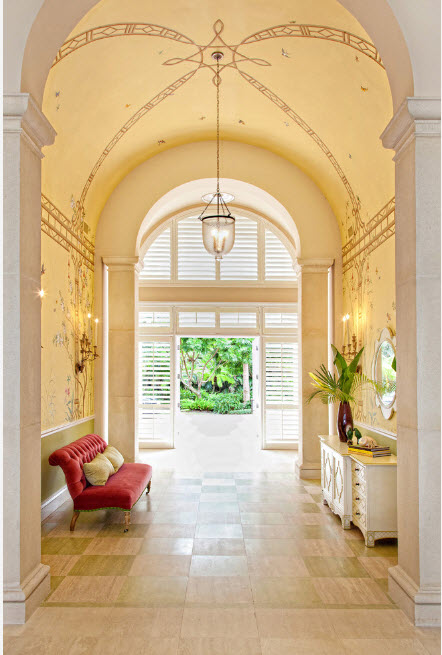
 Classic direction. Classics in the interior will never go out of fashion. It is not for nothing that this direction in the design of spaces is considered traditional - the harmony of shapes and lines, color combinations and materials. In wall painting, this is most often reflected in the image of an ideal landscape - it is as realistic as it is a reflection of the dream of a "golden age". By choosing a classic style for wall decoration, you leave behind the banality and monotony. This is surprising, but these days the classics in wall painting look more relevant than high-tech, minimalism or loft. What is typical for the execution of painting in classical style you can use the most modern materials and tricks.

Baroque and Empire. These are two opposite lines in the development of classicism. If the baroque strives to demonstrate luxury, extensive decoration, then the empire tries to join the conciseness, use simple solutions. Both directions are relevant for use in the painting of residential spaces. But much depends on the general style of interior design, the size of the premises and, so to speak, the general scope.


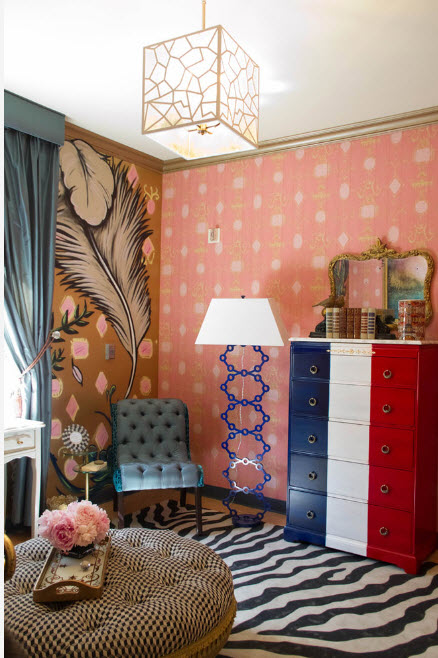
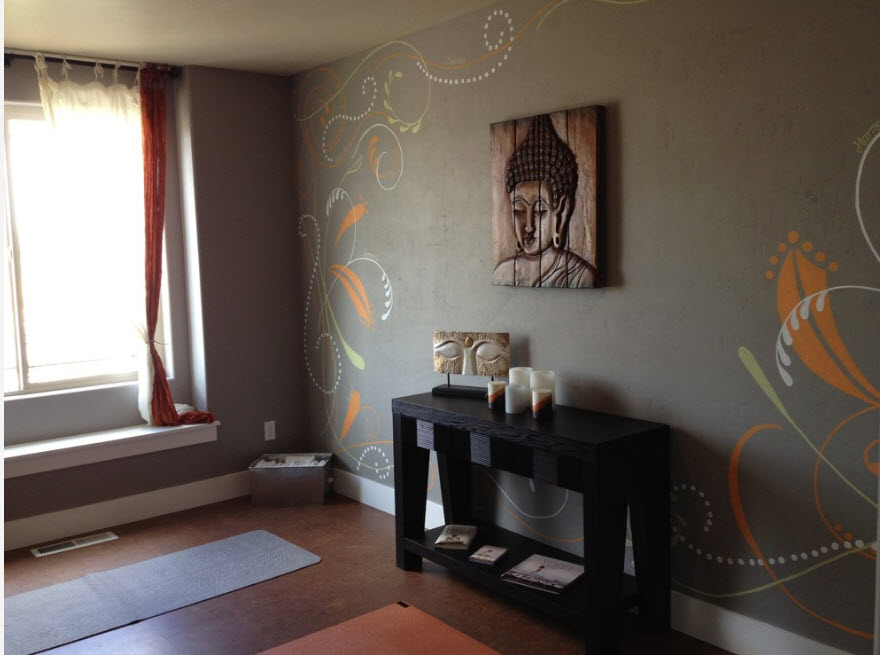
Modern or Art Nouveau. This style of painting is easy to recognize - the predominance of "lush", "live" and literally "breathing" forms. characteristic feature is the use of a complex floral ornament with a predominance of wavy lines. The color palette mainly consists of natural shades, bright, flashy tones are used extremely rarely.


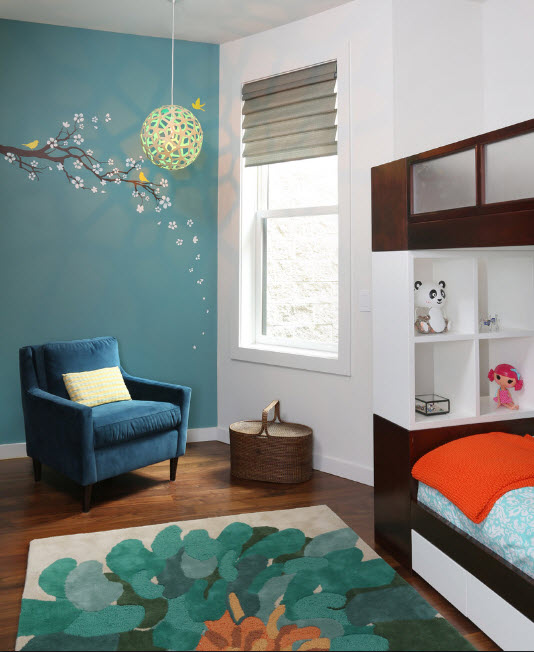
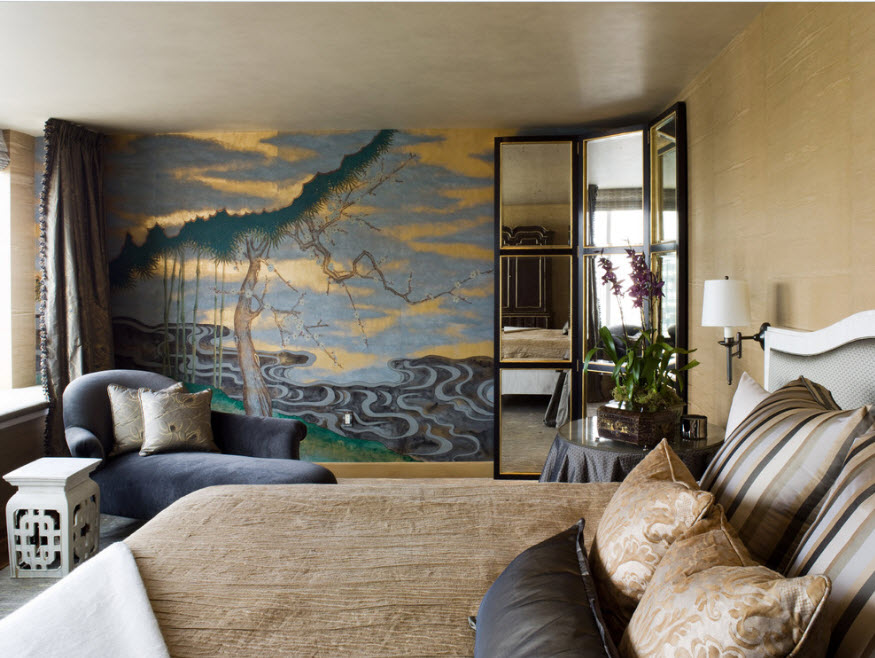
Japanese style. At present, the Japanese style when painting walls is manifested not only in the application of traditional oriental landscapes, images of sakura or small courtyards with a characteristic landscape design. The Japanese style in wall painting is also an anime, replete with details, characteristic paraphernalia, allowing even an ignorant person to unmistakably recognize the handwriting of this hobby that has conquered many people. In our country, plant motifs, the image of landscapes, and sometimes fragments of oriental nature, have become more widespread.


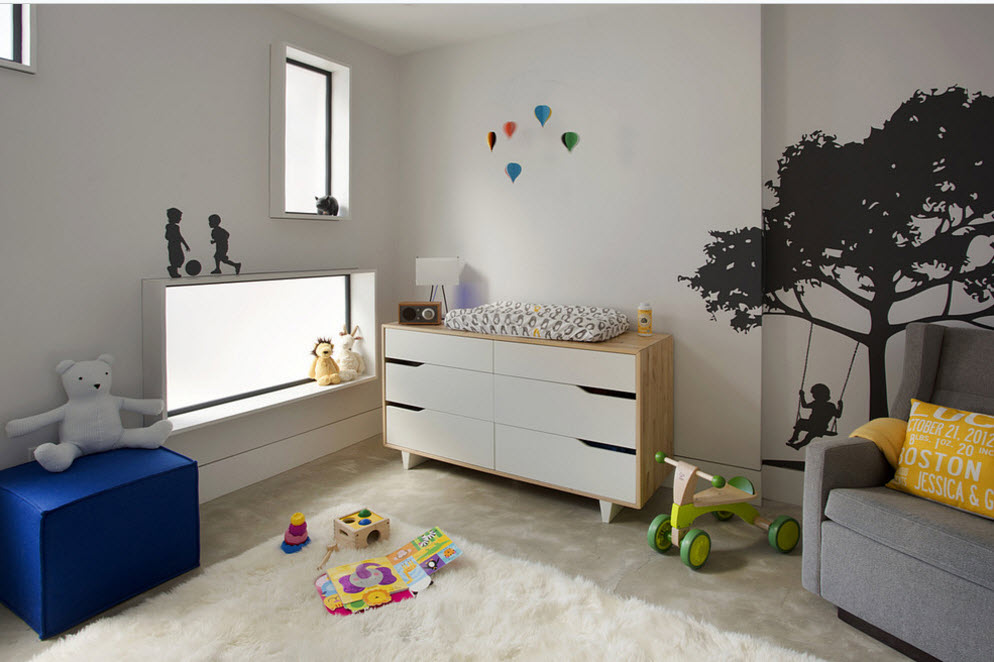
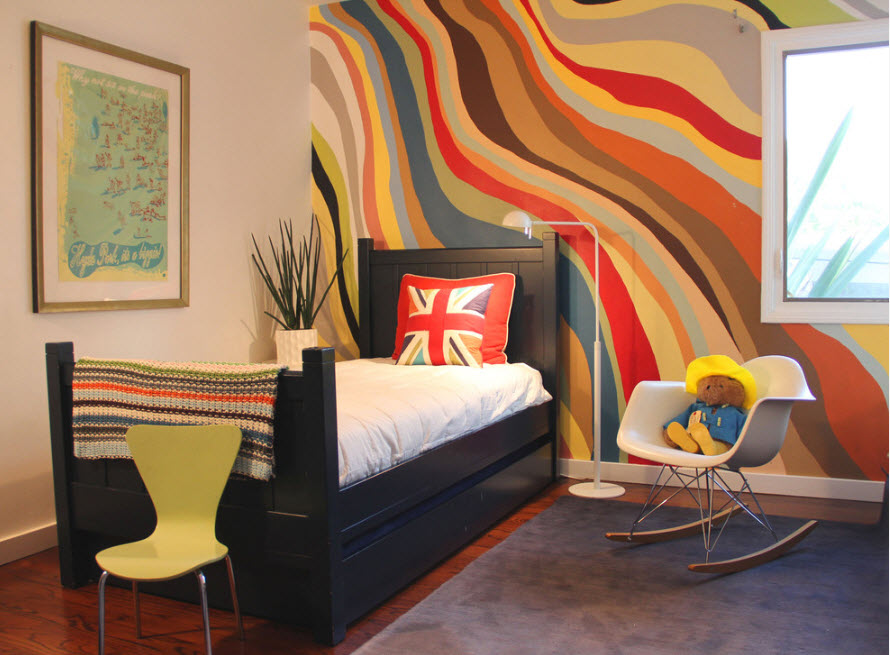
Minimalism and primitivism. The name speaks for itself - it is used to express the artist's thoughts minimum set color combinations, lines and shapes. It may be just a single stripe or a figure executed in a contrasting color, but thanks to its balance, the pattern becomes a symbol of the designer's imagination.


Wall painting: a decorative component in various rooms
In addition to the obvious decorative component, wall painting can also have very specific functional purposes. For example, with the help of wall painting, you can visually change the architecture of the room - make it wider, "deeper", "raise" the ceiling, or completely "erase" the boundaries of space. Wall painting can also act as a zoning element, delimiting the functional segments of the combined room. Wall images are able to focus attention on a particular area of the room, highlighting the most advantageous elements of the interior, "pulling" attention from the unsuccessful ones.


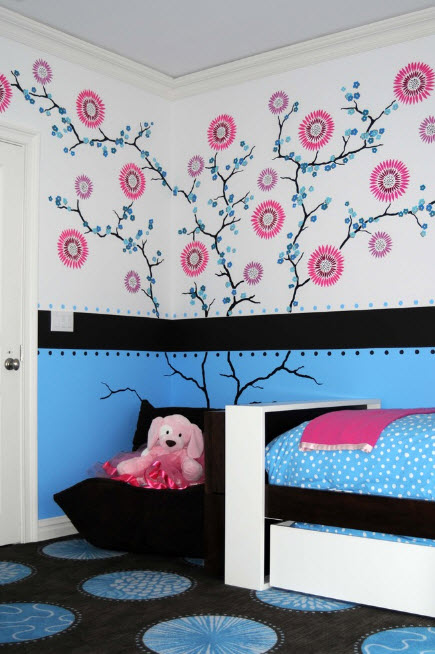
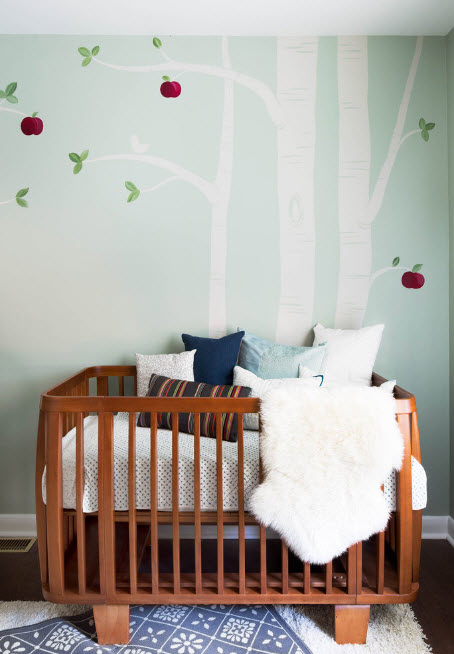
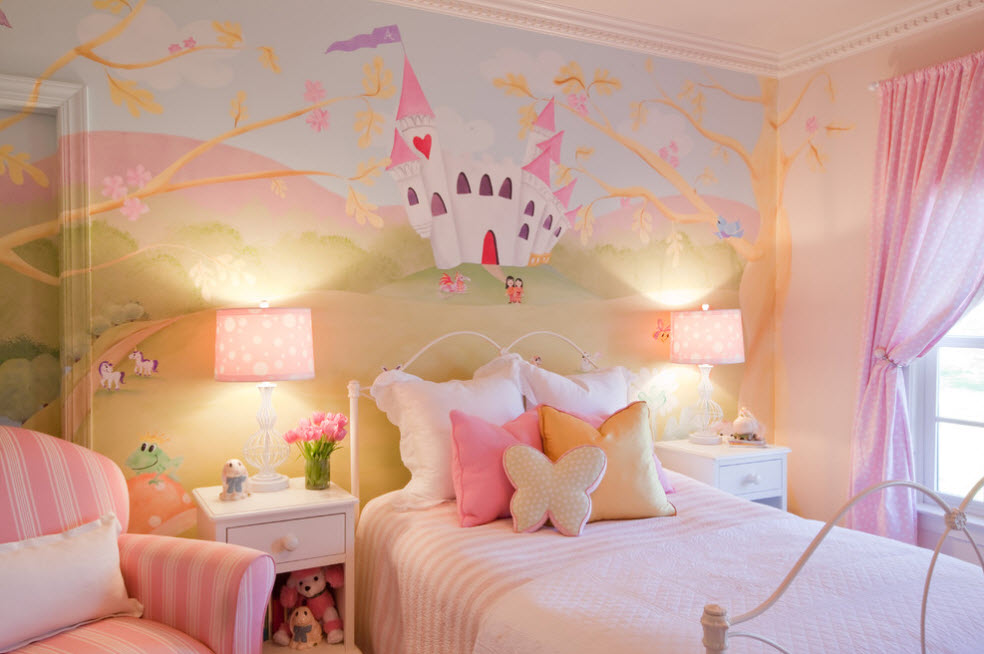
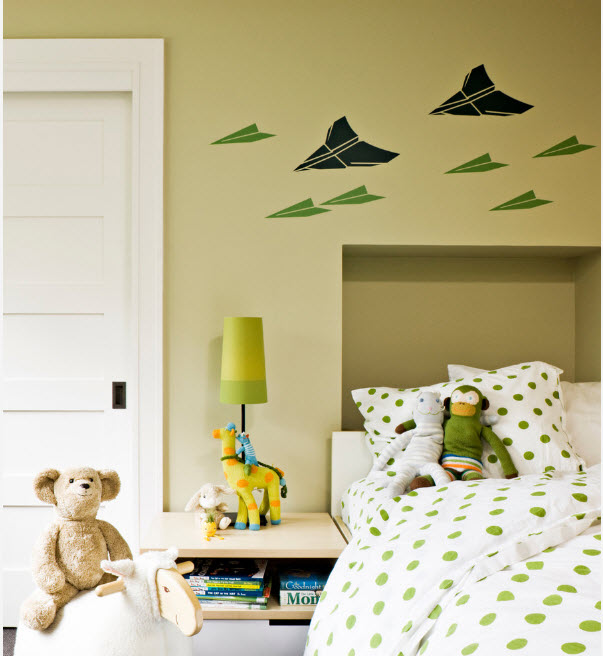
Children's room
Currently, the undisputed leader in the creation of wall paintings is the interior of the children's room. And this is not surprising - it is for the child that we want to create wonderful world in which it will be interesting for him not only to sleep, play and spend time, but also to develop, gain new knowledge and skills. And everyone knows that any knowledge is perceived by children much easier and easier if it is presented in a playful way. With the help of wall painting, you can create any of the options for fairy-tale worlds. Of course, there are photo wallpapers and interior stickers that will cost many times cheaper, but, firstly, it is not always possible to find decorative material that suits the theme, interesting to the child, and secondly, hand-painted walls will always come first in terms of exclusivity and artistry.


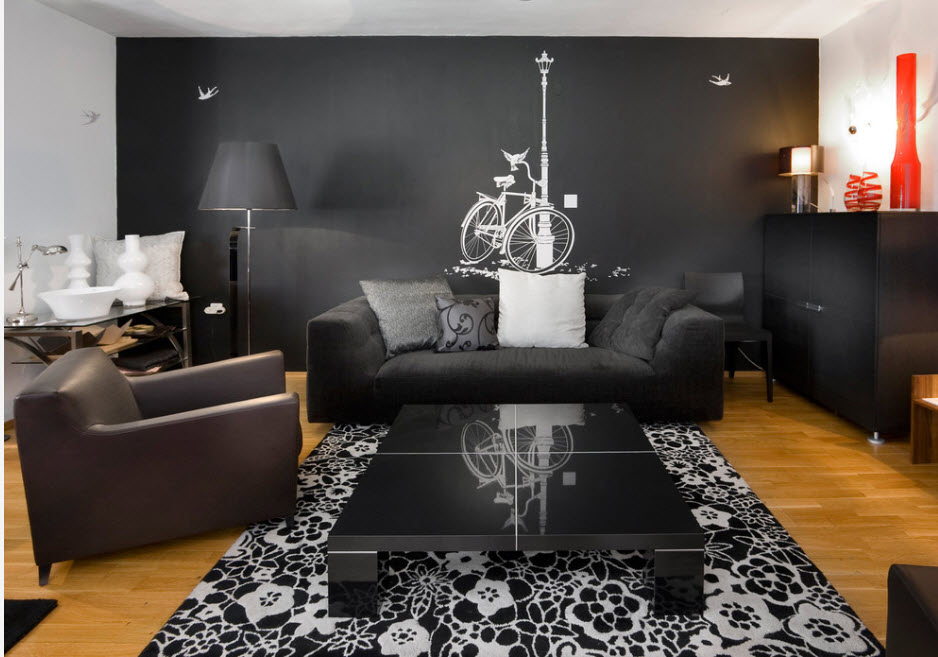
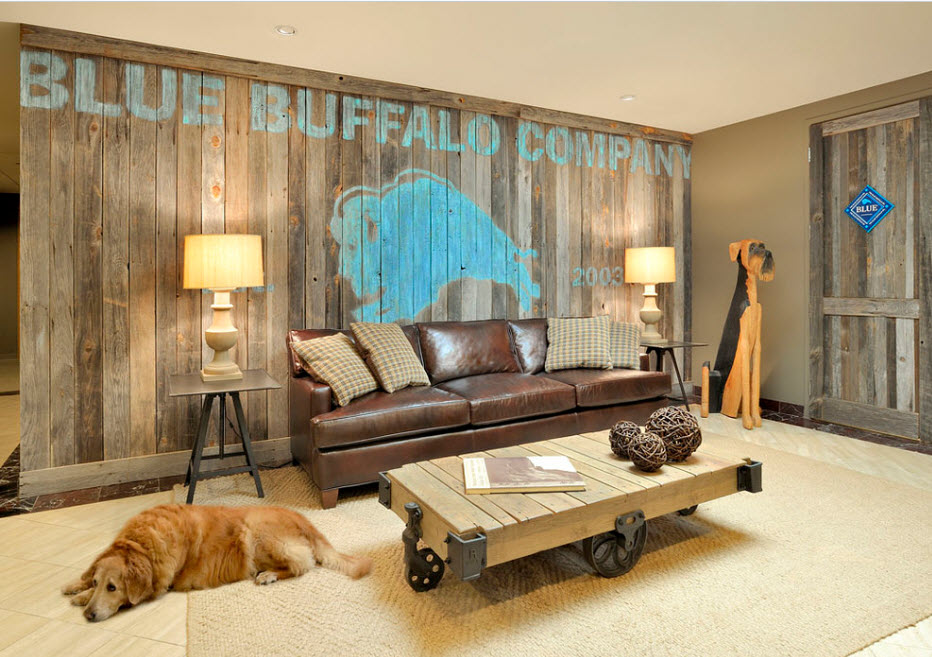
Living room
Wall painting in the living room will not only create a highlight of the interior, increase the status of the exclusivity of the room, but also create a certain accent. At the same time, this design technique is relevant for both small spaces, and spacious living rooms, in which several functional segments are connected. But the dimensions of the space, of course, must be taken into account when choosing an image to create an artistic painting.


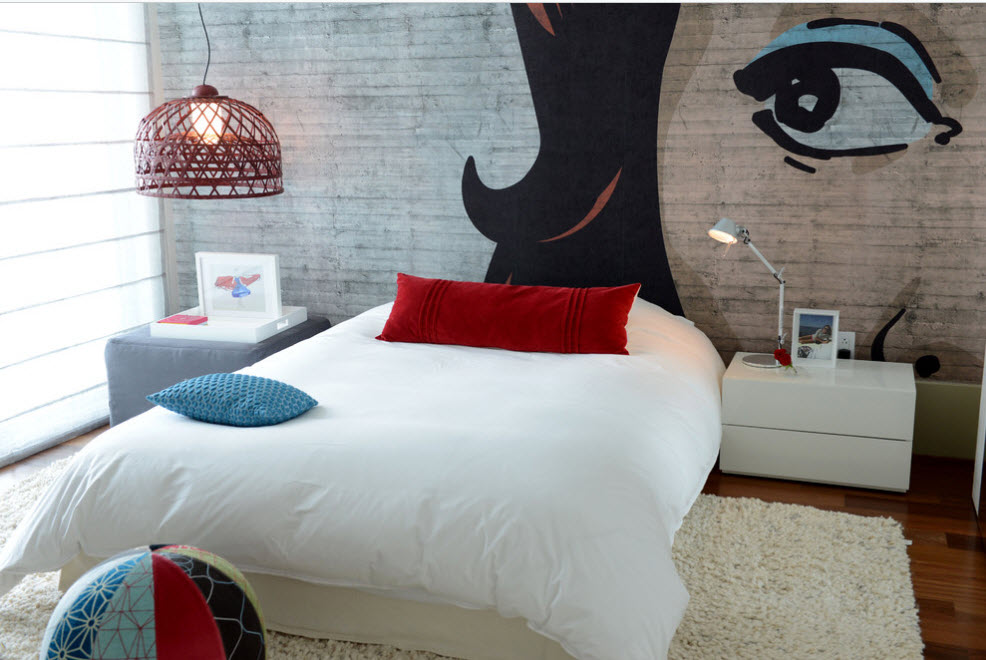
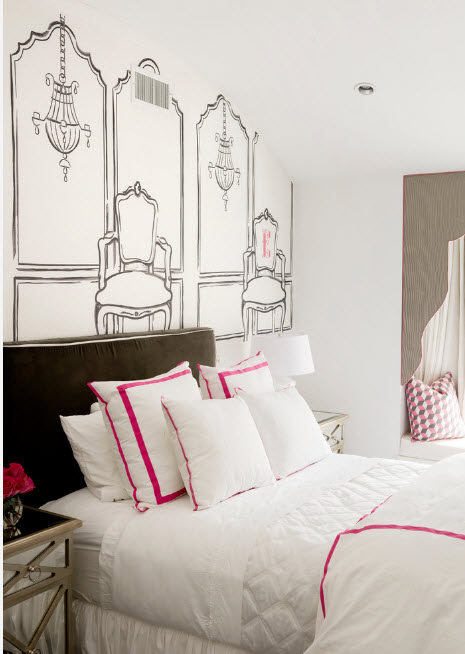
Bedroom
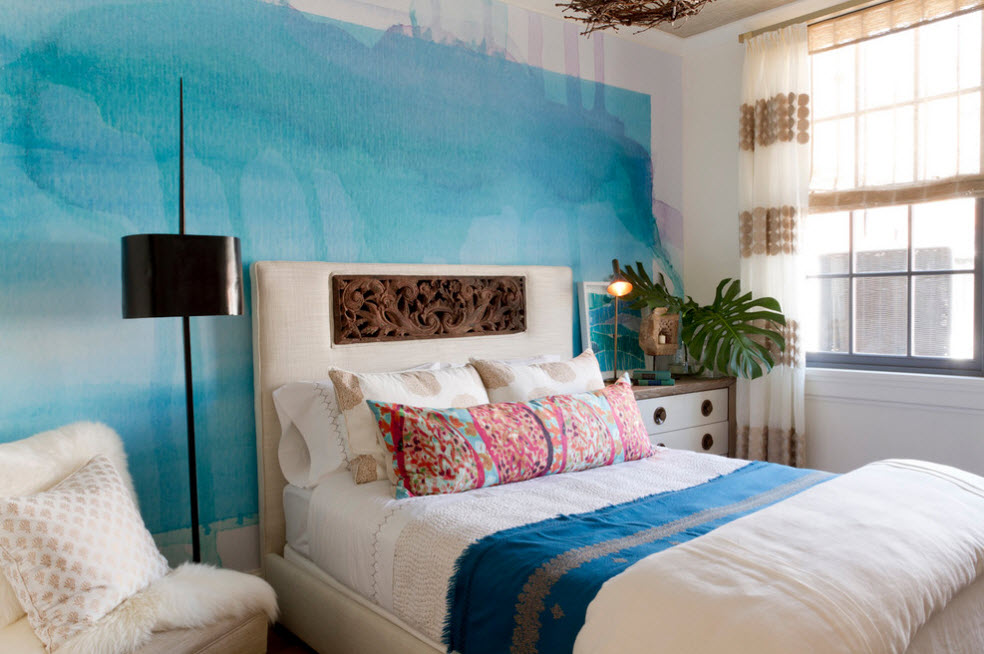
Most often, for bedrooms, a romantic style of drawing on the walls is chosen. Most of us try to create the most relaxing and soothing atmosphere in the room for sleeping and resting. Therefore, delicate shades in the image of floral motifs or light landscapes become central theme in the interior of the bedroom.


Techniques used in creating wall paintings
Modern designers have practically no restrictions in the choice of techniques for creating wall paintings. At their service and the experience of generations, and modern materials and improvised means. The image can be applied both on a perfectly smooth surface and on a textured one - the weight depends on the goal. Most often, when creating images on the walls, modern artists use:
- oil;
- acrylic;
- fluorescent paints.


A very popular tool for creating an original wall painting is an airbrush - on a perfectly flat surface, you can create a drawing without traces of strokes and sharp transitions between colors. Consider the most popular techniques used for wall painting in modern homes.

Aerography
A fairly popular technique these days. If we translate this expression literally, it turns out “I write with air”. Air really plays an important role in the use of an airbrush tool - an airbrush. Using compressed air, the paint is sprayed onto the previously prepared surface. Images are light, literally airy with barely noticeable color transitions.


Fresco
The oldest technique based on painting on wet plaster is relevant at all times. The characteristic texture of this technique is recognizable in any version. The resulting image has a high wear resistance - it is not without reason that many samples of the most ancient frescoes have survived to this day. At present, the fresco technique is used both to create samples of modern painting and to imitate old wall images (for this, they resort to artificial aging of the surface, patting).


Painting with fluorescent paints
It is easy to guess that the technique is based on the use of fluorescent paints that glow in the dark. A unique image can be created using different color solutions of these special paints. But the technique was most widely used for decorating the ceiling in the form of a starry sky. In addition to the fabulous effect, a feeling of dimensionless space is created.

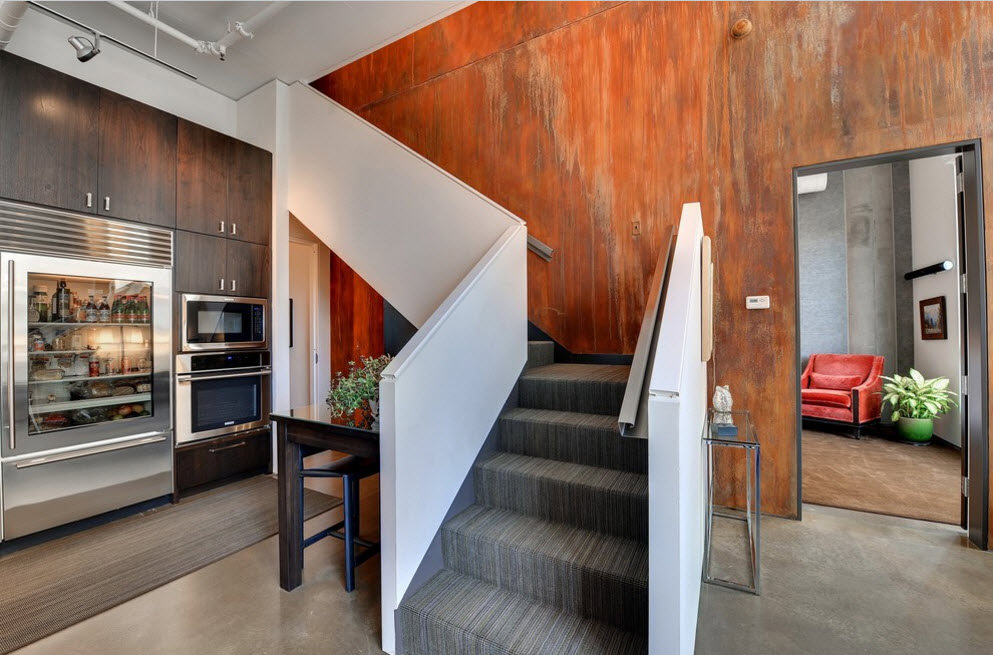
With the help of volumetric painting, you can visually erase the boundaries of the room, make the ceiling "higher" and the room "wider". Certainly on design features painting does not affect the room, but visually creates the effect of some curvature of the volumes of space. Designers like to depict stairs that go into the distance and seem to have no end or open windows, behind which a beautiful landscape opens.


Using stencils
For those who want to express themselves from the artistic side, literally “leave an imprint” on the walls of their own home, stencil technique is an ideal way. It does not require special skills, because it is based on applying images using ready-made stencils that you can create yourself or purchase in a store.


Painting with acrylic paints
The use of acrylic paints is incredibly popular at the present time and is due to a number of advantages of these materials for applying images to a wide variety of surfaces:
- fast drying;
- lack of smell;
- high environmental friendliness;
- ease of application;
- the ability to use on surfaces with different textures and textures;
- resistance to ultraviolet radiation.


Every person wants their home to be light and cozy to make it pleasant to come after a hard day, to relax, relax your body and soul.
Of course, you can equip your home with the right furniture or stylish wallpaper. But perhaps the most original way to create a dream interior is artistic painting of the walls.
This designer technique has been used recently, but already won sympathy apartment dwellers and homeowners.
To bring a little into your home picturesque beauty, it is not necessary to look for professionals. wall painting it is quite possible to do it yourself, which will allow you to create unique impeccable interior tailored to individual preferences.
In contact with
Classmates
Wall painting is not difficult, but exciting!
In this case, it all depends on the ability, creativity and artist's imagination. Yes, yes, this activity will make you feel real artist.
Your canvas - it is a wall like a blank slate, providing freedom for creativity. At your disposal paints all kinds colors, brushes, sponges, spray can and other devices.
Wall painting in interior may vary from regular colors and geometric figures, decorated in the form of an ornament, to whole finished paintings - landscapes, still lifes, illustrations to your favorite books and movies.
It doesn't have to be a professional artist. Even a person without drawing skills can paint a wall using stencils.
video:
Types and techniques of artistic painting

With each century, this technique has been improved all the time. Fresco is painting on fresh plaster. As a rule, water-soluble paints are used.
When painting, it is necessary track, so that the plaster does not dry out. Only then will a true fresco with rich flowers.
If the plaster begins to dry out, then it must be periodically moisturize.
Important: decorative painting walls are made mainly with large artistic brushes. Paint brushes won't fit here!

The undoubted advantage is that you can take your time, and thoroughly draw a drawing.
However ordinary paints do not adhere well to such material. Therefore, they must be prepared: acrylic grind the paints in a mixture of vegetable glue, eggs and notify. It turns out something similar to tempera. You can apply paint in several layers.
The mural needs some framing, to aesthetically arrange its borders at the joints with the ceiling and glued wallpaper walls. How to do this with decorative moldings, you can learn from
Note: In case of some drawing errors, small areas can be slightly corrected by washing clean water. However, this is not recommended, as the pattern will become less durable and may even crumble over time.

Artistic wall painting using this technique is performed colored plaster, and the number of colors will depend on your idea.
Do not perform complex paintings in this technique and try to use no more than 4 colors. Apply them successively on top of each other, allowing each layer to dry slightly.
Most upper layer will be background Pictures. Can be applied over it outline future image.
Then in the right places scratching plaster to the depth of the desired color. Here it is necessary to show utmost care - nothing can be fixed!

Sgraffito technique
Encaustic

Here the paint is melted wax, mixed with color pigments.
Such materials are special naturalness, which means non-toxic, so they can paint walls in children's room.
Apply paint should only be on dry plaster.
In this technique, it is best to use tough non-porous brushes, as the paints are very soft.
To make the drawing look be careful you can draw an image in advance with a pencil with a very soft lead.

Encaustic in the interior

Executed using paint cans for small parts and airbrushes for large images.
To use this technique, it is not necessary to prepare surface walls. The paint is easy to apply over other paint, plaster and even wallpaper.
It opens new Horizons for design ideas. For example, in the background colored wallpaper, you can draw any objects, and the room will turn into a blooming garden or tropical forest.
airbrushing it is possible to carry out artistic painting of both walls and ceilings.

Airbrushing in the interior

Most often, painting is done using aerosol cans. Any surface for painting is suitable - be it plaster, dye or wallpaper. But be sure to remember that spray paint is applied only to well dried surface.

Remember how in such drawings they beat shades gray, gradation is recreated. Images are similar to black and white photographs. Recently, such wall decoration has become more stylish than ever.
realistic, volumetric and elegant image captivates. But to paint the walls with your own hands in this technique is extremely difficult and it is unlikely to succeed for a beginner.
Performed on a wall that has undergone whitewashing. Base paint - tempera, which is recommended to be applied with a thin stiff brush with light strokes, as if you are drawing with a pencil. Most small details can be drawn with ink. Be careful in choosing tones.

Author's technique - painting the walls with strokes using a sponge
interesting technology to help transform interior. It is characterized simplicity performance and the special subtlety and beauty of the resulting images.
You will need:
- several sponges(depending on the amount of paints used);
- paints(preferably water based)
- spray with water;
- soft simple pencil;
- stencils.
The working surface, that is, the wall, must be pasted over white
Note: artistic painting of the walls in the interior creates a certain ease, a slight mess and at the same time airiness.
To begin with, applied to the wallpaper sketch with a pencil.

Would you like to suggest photos for publication on a topic?
Please help us make the site better! Leave a message and your contacts in the comments - we will contact you and together we will make the publication better!
How many times did our eyes stop at the intricate patterns applied to the walls. It is not only beautiful, but also quite affordable. You can, of course, turn to a specialist and bring a new trend to the interior, but it's easier to do it yourself. It is enough to stock up on acrylic paints, buy a stencil or make your own unique template. Even people who are far from art will be able to do such art.
Sometimes the painting brings not only aesthetic pleasure, but also solves additional functions, for example, hides a low ceiling or uneven walls. In small rooms, small patterns of light colors are appropriate.
Often the walls of a children's room are decorated with frames from your favorite cartoons or fairy-tale characters.

The hand-painted ceiling echoes the ornamentation on the wallpaper.

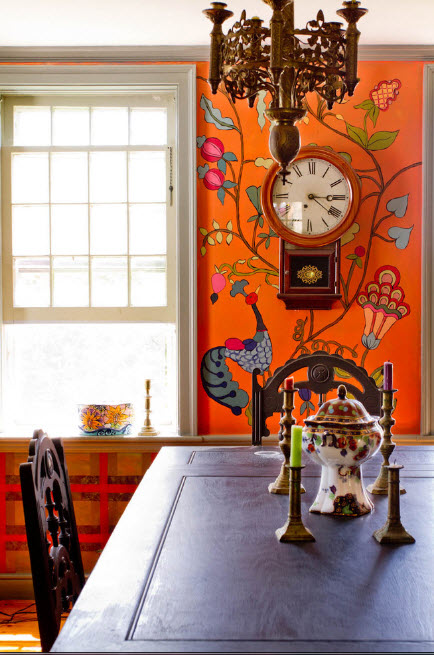
Decor should complement the style and color scheme of the room. On the walls classical cuisine appropriate floral motifs.

Moroccan patterns on the walls of the bedroom, applied using a stencil.

Stencils for wall painting, where to buy
To decide on a stencil for painting, you need to explore the room and choose a place for decor. If there are already existing textures and patterns in the interior, the ornament must be compared with them. If the work will be carried out on a "blank canvas", they try to think ahead and imagine furniture and other future interior accessories. Typically, wall stencils are designed to cover large areas. Although, with small designs, for example, a damask stencil, it is convenient to decorate the walls. After choosing a template, you need to decide on the color of the composition.
Remember, paint is applied over the stencil.
Designers do not recommend using two contrasting colors on their own. It is better to opt for a combination of glossy paints of the same or similar shade.
You can find stencils on the websites of online stores or on the shelves of building hypermarkets. An example is the online decor store Allstick.ru.
 Having opted for a universal roller, you can get a whole set of rubber nozzles for decoration.
 The best choice ready-made templates will be products based on a polymer film that is glued to the wall. These stencils can be easily washed and reused many times. If there is no template you like, you can make it yourself.

Stencils for painting walls with your own hands, step by step with a photo
Homemade stencils for wall painting can be made on a cardboard or lavsan base.
Option number 1 Template on the film
A lavsan film is placed on the glass, and then covered with a printed paper stencil. With the help of a clerical knife, excess details are removed, creating your own unique pattern.
 Option number 2 Stencil from plastic folders
Stationery folders vary in density, color, and smoothness, but any of them will work for stencil cutting. Such templates are durable and water resistant. If you stick the transparent part of four folders together with masking tape, you can make a template for a large pattern.
 The selected ornament is printed out, and then applied to plastic and cut out. It is advisable to fix the edges with tape.
 It turns out a ready-made stencil for painting.
 Option number 3 Cardboard template
For a budget stencil, a cardboard base is suitable. It is made according to the principle of plastic, but scissors are used for cutting. Cardboard templates get wet, so they are more suitable for one-time use. Often the edges of the stencil are reinforced with adhesive tape or varnish.

Option number 4 Drawing using a projector
The drawing template is transferred to the wall through the projector, outlined and painted.

Option number 5 Stencil masking tape
You can create a picture on the wall using masking tape / narrow tape. First, an ornament is formed on the wall, and then paints pass exactly along the edge of the ribbon.

Option number 6 With the use of fruits
Half a lemon dipped in paint may well become an original template for kitchen wall.
 Homemade templates have a number of pros and cons that must be considered when making them.
Advantages:
- variety of options;
- ease of manufacture;
- use on different types surfaces;
- economy.
Flaws:
- problem with fixing on the wall;
- the occurrence of errors when cutting;
- rapid wear;
- small details spoil the drawing itself.

Wall painting styles, photo
There are many types of wall decoration. To decide on the choice of ornament for your interior, you need to navigate the styles of wall decor.
- Classics adheres to harmony and simplicity. It has neutral motifs that fill the room with positive and soothing after a hard day's work.

- Abstraction on the wall is an unusual interweaving of geometric shapes, plant elements and other artistic forms.

- Splendor, grandeur and volume bears the Baroque style. It is distinguished by the brightness of colors and the richness of the play of light and shadows. The style is characterized by large leaves and large flowers.

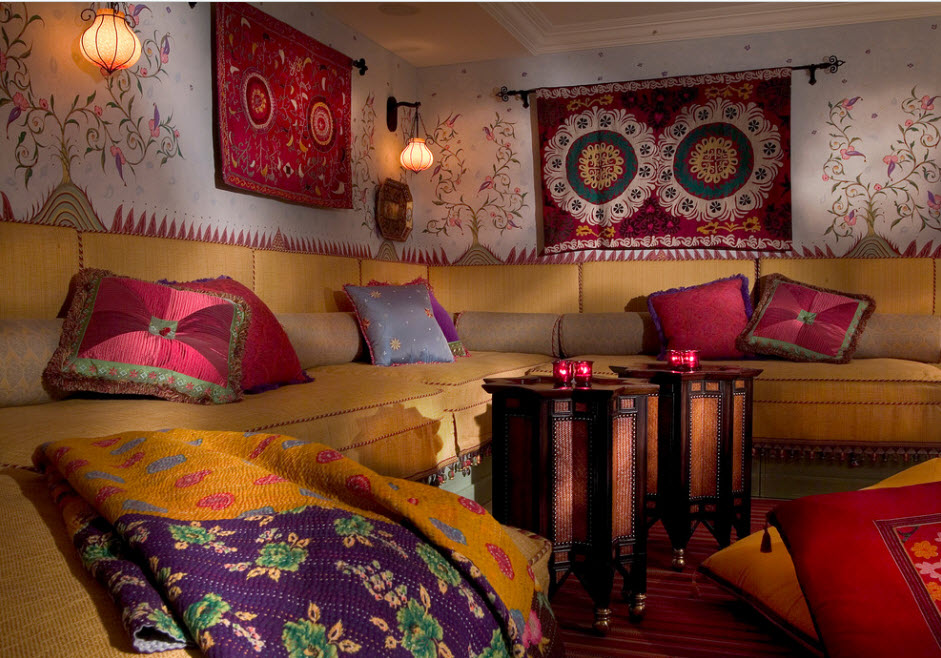
- A special worldview, imposed by the influence of Islam, conveys the Arab direction. The complexity of the ornament is complemented by Arabic script and canvases similar to Arabic carpets.

- Artistic paintings are real canvases or copies of famous masters.

Sometimes styles combine or complement some important element.
Wall painting master class with photo
Required tools:
- plastic sheets;
- marker;
- roulette;
- stationery knife;
- glue spray;
- insulating tape;
- dye;
- brush.
Step 1. Design selection
Having artistic skills, you can create your own unique pattern or go online for a ready-made template. The pattern you like is printed. With a large format, several sheets are printed, and then they are glued together.
With a repeating ornament, it is necessary to achieve a uniform arrangement of the pattern on the wall.

Step 2. Sheet preparation
You can buy blank plastic from an art supply store, but it's easier and cheaper to use plastic folders for this. For the blank, you need a square of 60x60 cm, so the sheets are interconnected with adhesive tape.

Step 3: Transferring the Pattern
The printed image is placed under a translucent stencil, and then transferred to the plastic with a marker.

Step 4: Preparing the Stencil
Cut out the template using a utility knife. This step is the most laborious, because every detail is important here.

Step 5: Placing the Template on the Wall
To attach the stencil to the wall, you will need glue spray or tape. For convenience, they use a ladder, because it is better to start painting from the top corner.

Step 6: Patterning
The paint is applied with a brush to the wall through a stencil. Sometimes a sponge is used for this. The amount of paint depends on the size of the room and the detailing chosen. It usually takes at least 24 hours for the dye to dry completely.
The template is removed with sharp movements, at the end of the decoration.

Step 7: Repeat
The stencil is applied to the wall several times until the selected pattern is completely formed.

View of the interior before painting:

View after completion of work:

Wall painting in the room, photo
It is known that the color of the interior affects the mood. Despite the existing rules for selecting shades for the bedroom, each person has his own preferences and tastes. It can be unexpected colors and abstract patterns. Forget traditional rules when choosing bedroom wall decor.

The Art Nouveau living room features earthy tones and breathable shapes.

Oriental landscapes with cherry blossoms are inherent Japanese style. It is most often used for the bedroom.

An example of painting when the boundary of space is “erased”.

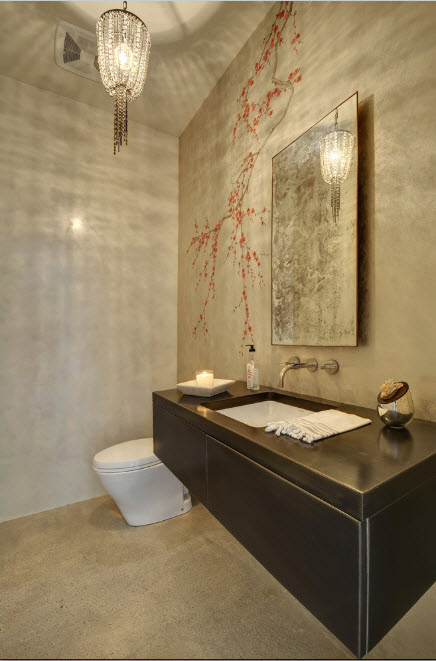
Fresco - painting on damp plaster, appropriate even in the bathroom. It is not subject to fading and cracking. is a particle of the plaster itself.

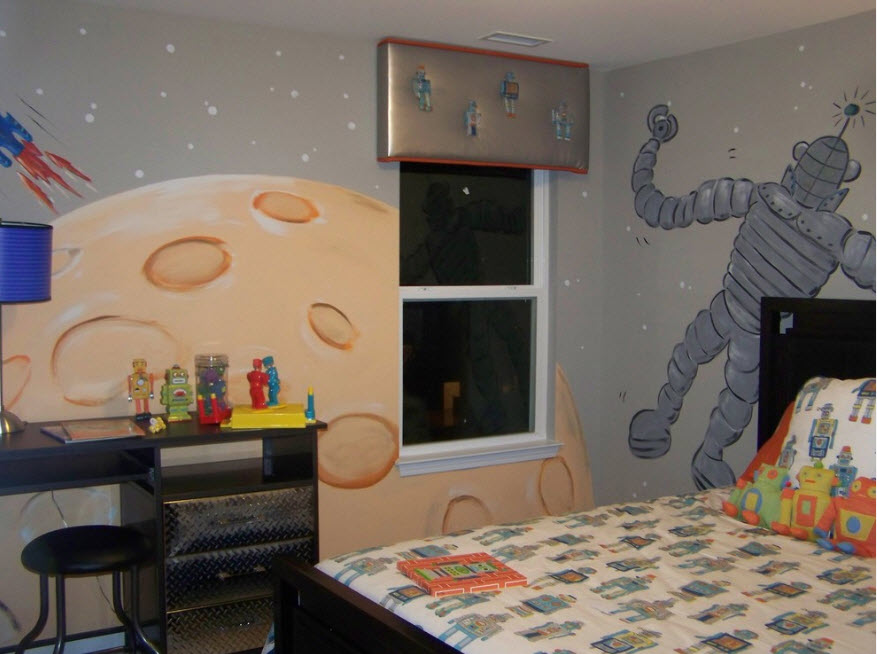
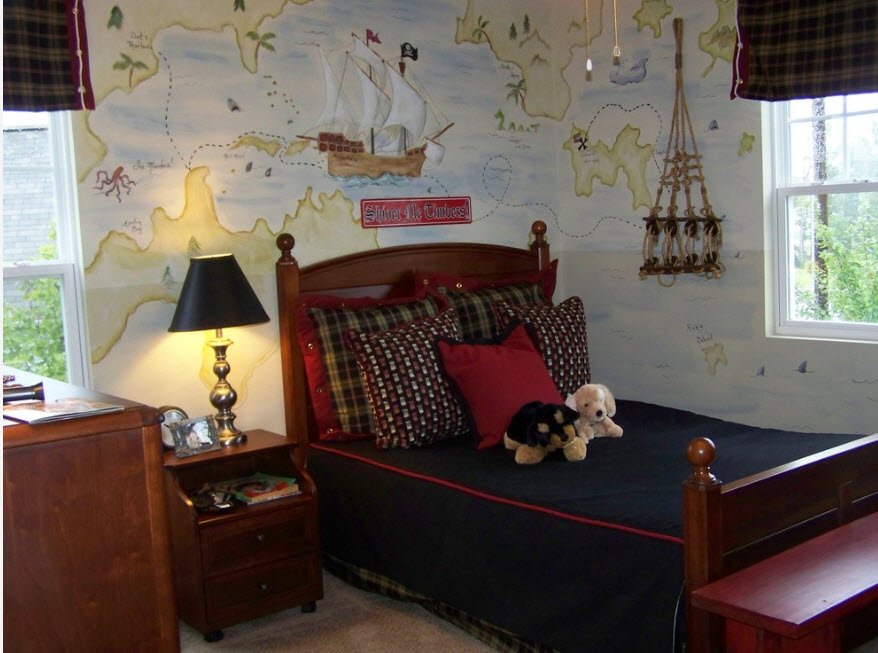
Wall painting in the children's room, photo
Children's wall decor should be bright and understandable for the baby himself. Often in such artistic painting there are:
- scenes of favorite books;
- starry sky;
- nature (animals and plants);

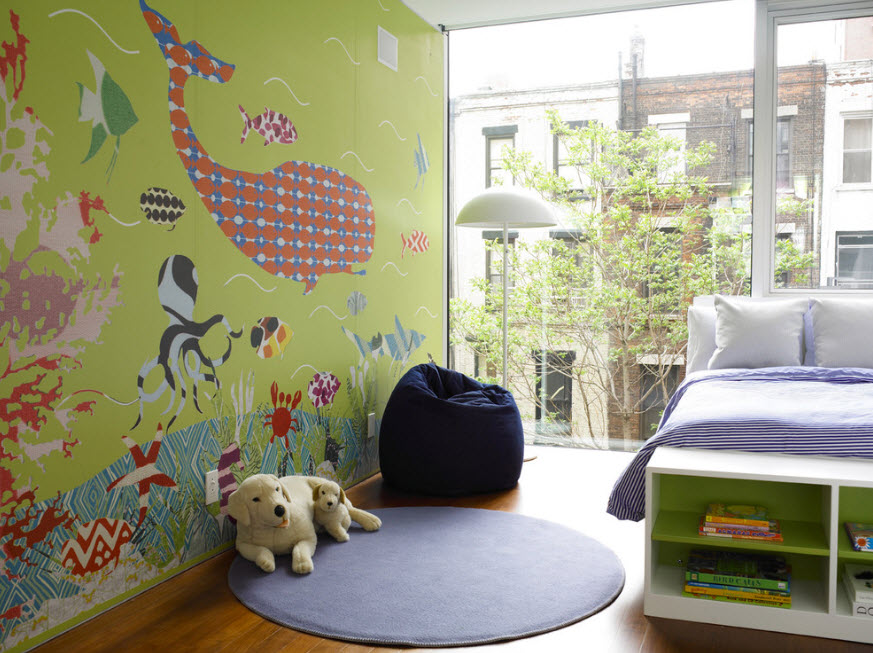
- marine theme (ships, fish, pirates);
- the name of the child is played;
- cartoon fragment;
- it is appropriate to transfer a child's drawing to the wall.

For girls, the wall is decorated in pink, decorating it with princesses and fairies.

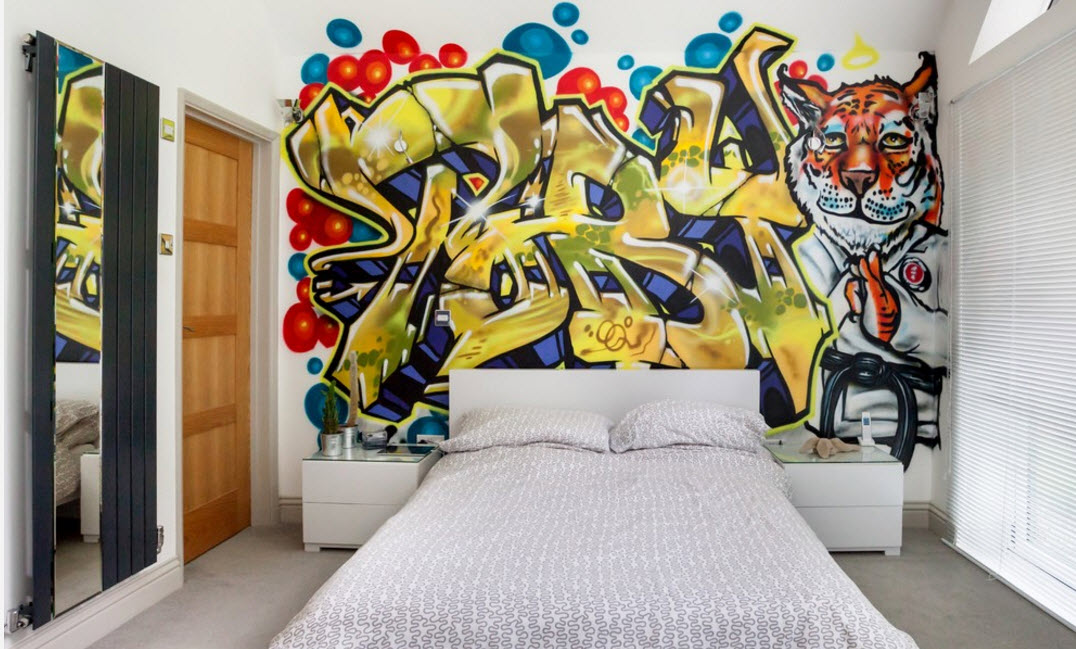
Teenagers will be delighted with graffiti or high-tech stories.

For a non-standard room, a pattern that smoothly passes into the floor is suitable.

Wall painting in the kitchen, photo
Before you start painting kitchen walls, you need to choose the style of decoration and the size of the ornament. All elements must be combined with the features of this space.

An increase in the interior can be achieved with the help of a distant landscape.

Separation of kitchen areas by wall decoration.

Classic kitchen wall painting using a stencil.

Abstraction would be appropriate for a high-tech kitchen.

Ceiling painting, photo
Of course, painting the ceiling is much more difficult than the walls. This is where patience and care come in handy. It is also necessary to think about acquiring special scaffolding for lying down, because the creation of a drawing often takes several weeks. Hands and neck get tired from continuous work.
Artistic painting on the ceiling is mainly framed in an oval or circle, and a light source is located in the center.

Visually raise the ceiling with the image of the sky and stars.

In the dining room, the pattern is placed on the farthest plane, so it looks like a real landscape.

The star theme is applied to the ceiling with fluorescent paint. At night, the decor glows under UV lamps. They are placed around the perimeter of the picture.

In the nursery, not only the walls, but also the ceiling are often decorated. A smoothly transitional landscape from one surface to another creates a whole and will be appropriate for all ages.

The basis for painting is a drawing that is transferred to the surface through a stencil or displayed using a projector. In order for the template to fit snugly against the wall, its surface is treated with screen glue.
Self-painting on the walls provides for the following rules:
- the work surface is cleaned and degreased before painting;
- the borders of the ornament are marked with a level and a pencil;
- for decoration it is better to use a universal roller. It works well in large areas.
- circular movements with a brush during staining will exclude the ingress of villi into the pattern;
- a small amount of paint is taken on the brush, and its excess is removed with a rag;
- reusable stencils must be washed at the end of work;
- to protect the pattern from exposure to the sun and moisture, it is varnished;
- For beginners, it is better to work with acrylic paints. They dry quickly.
By adhering to the above rules, you can avoid many mistakes and not waste time correcting them.
Do-it-yourself painting is best done without intricate patterns and small details.

Wall paints

Suitable for painting different kinds paints: water-based, oil, enamel, tempera, but acrylic is most often used.
- The fresco on the wall is applied with a special powder mixed with water. Such material is most often used for painting the ceiling. The paint is very durable, does not crack or fade.
- To decorate the ceilings of clubs and restaurants, fluorescent paint is used, which glows under the influence of ultraviolet radiation.
- Acrylic is considered the most practical. It is odorless, resistant to moisture and sunlight, which is especially useful for children's rooms and kitchens. Any surface is suitable for its application. The paint dries in about half an hour.
- The depth and originality of color is conveyed by oil paints. They are bright and do not crack, although they dry slowly and smell unpleasant.
- Tempera paints are ground on yolks or a solution of glue. They are durable but prone to cracking.
Tools and materials for work
Starting the decor, you need to stock up on the following materials and tools:
- For the sketch, you will need a variety of paper and tracing paper. For non-standard ornaments take whatman paper.
- Auxiliary tools: two sizes of ruler, triangle, adhesive tape, scissors, etc.
- Charcoal and graphite pencils, markers, eraser.
- A variety of brushes: building, synthetic, bristle, flutes.
- Acrylic paints different colors and shades. They come in glitter, mother-of-pearl and silver. For painting large areas, building acrylic is purchased, which is supplemented with colors. There are facade and interior acrylic.
- To paint and create a three-dimensional panel, you will need spatulas and stacks.
- The work requires baths, rollers, sponges and a telescopic stick.
- Bucket, spray gun for wall irrigation.
- To prepare the wall for work, decorative plaster is required.
- Beads and glass for decoration.
- Fine-grained sandpaper for grouting and varnish for fixing.
Sometimes masters use an airbrush and a spray gun to paint large surfaces.

Wall painting in the interior technique
The painting technique depends on the technology of applying the pattern and is performed both on wet and dried plaster.
- A drawing on dry plaster, called alsecco, will be light and short-lived.
- When frescoing, a layer of water-soluble paint is applied over wet plaster. The paint dries quickly, and the ornament itself is considered one of the most resistant and durable. Work in this technique is within the power of professionals.
- Relief painting is based on plaster and has ledges.
- Airbrushing means "painting with air" when paint is sprayed onto a wall with an airbrush. This decor comes out very gentle, with soft transitions.

- Screen painting is the simplest. It does not require special skills and abilities. The template is bought ready-made or made independently.
- Three-dimensional decor (blende) allows you to expand the interior and correct flaws in the finish. It is applied by the master and such work is expensive.

Do-it-yourself wall painting in the interior, step by step with a photo
On a white or cream background, green tropical foliage will look good. This decor is perfect for a living room or bedroom.
To work, you need two types of palm leaf stencils.
Stencil #1

Stencil #2
The leaves will be in three shades: white, green and pale olive. Distribute three colors oil paint on separate trays, as well as for each shade, they prepare their own rollers and brushes.

Begin the decor with a green leaf. The paint must be distributed over the entire roller, including the edges. Then its excess is left on a paper towel.
You can initially distribute and fix three stencils on the wall surface and paint them in your own shades.

Then stencil No. 2 is taken and a row of colored leaves is covered with new samples. At the same time, they try not to match their colors; they make a green or olive tint on a white background.
Self-decoration of the walls will bring zest to your interior, making it inimitable and unique. The most important thing is to choose the right ornament, because it will be in front of your eyes every day.
The original painting of the walls in the apartment can be easily done with your own hands
Wall painting is a great alternative to wallpaper and other decorative materials used for interior decoration. A hand-made drawing has many advantages: durability, exclusivity, it looks quite expensive and presentable in the interior. But there are also negative factors due to which many owners of apartments and houses prefer alternatives: the high cost of the work of the master and materials. This is the reason to think about painting the walls with your own hands.
Can a layman paint the walls in a room
Even a simple painting often costs customers a round sum, all because a professional artist takes on it, highly appreciating his work. But the artistic painting of the walls in the interior can be quite simple and does not require artistic skills. Many people are afraid to paint the walls in apartments for a simple reason: lack of experience and fear of ruining the repair in the room. But in this case, the main thing is a good choice of image and technique in which the drawing will be performed.
In order for the composition to look as profitable as possible in the room and emphasize its advantages, hiding the flaws, you should familiarize yourself with the simplest and most affordable options for painting walls in the interior.
 One of simple options do-it-yourself wall painting in the apartment
 Pattern selection
Decorative wall painting begins with the choice of a background and an image that will be present on it. It is also important to choose the location of the decorative element on the wall and consider the following factors:
- the size and shape of the room;
- purpose of the premises;
- the location of the source of natural light, how bright the room is;
- general style in the interior.
For example, fairy-tale motifs, simple images of animated characters, flowers, bubble, cute and simple scenery. For the kitchen, motifs with fruits, vegetables and dishes are ideal. Walls in bedrooms and living rooms can be painted with plant compositions.
Wall painting in the apartment - the ability to hide the defects of the room: bumps on the walls, too low or high ceilings, lack of lighting.
Do-it-yourself artistic painting of the walls will be more successful if you first sketch the room on paper and plan the location on it.
Proper preparation of walls for painting
Wall painting in the bedroom or any other room should be carried out only on the correct prepared surface. It is subject to the following processing:
- with traces of old finishing materials they should be removed;
- significant irregularities are leveled with a mortar or adhesive mixture;
- after it dries, the walls are plastered;
- a primer is applied over the plaster for subsequent better adhesion with putty;
- the surface is puttied and sanded with sandpaper, then primed again.
 Scheme of preparing walls for painting
 After all these works, the walls are painted. The material should be applied evenly, preferably in two layers. Only after the paint has completely dried, you can start drawing a picture using one of the available methods.
It is better to use acrylic paints as a background: the layer of material will be distinguished by increased strength and durability, and also have excellent external characteristics.
What colors to paint
- ease of mixing and application: to obtain lighter shades, the color should be diluted with white paint;
- the material adheres well to the surface;
- to obtain the desired consistency, the paint is diluted with water.
You should also acquire materials for drawing drawings:
- soft colored pencil for making contours, if necessary, it can be easily removed with a regular eraser;
- for large strokes, large wide flat brushes;
- for thinner lines, small kolinsky round brushes are suitable;
- if you plan to draw flower petals, you should get a foam rubber round roller, the edge of which will draw the details.
To achieve maximum strength and durability of the finish layer, after applying the pattern and drying the paint, the wall is covered with a special varnish. You should also take care of its acquisition in advance.
Easy ways to paint on the wall
There are two main options for drawing pictures on the wall in the apartment. Even people who do not have experience in wall painting can use them:
- by hand;
- using a stencil.
 Variants of the image of trees on the wall
 If you have at least some skills in drawing, then you can use the first option and draw a simple image with a brush and acrylic paint. But if such a prospect is frightening, and there is no desire to experiment in fine arts, you can buy a stencil at a hardware store and use it to create an interesting and original decor in the room.
Stencil decorative wall painting in the interior is a faster and more practical option. Before you paint the walls in a room, it is important to find harmonious shades of the background and pattern.
How to paint a wall by hand
The first thing you need is a suitable drawing. As a template, you can take the image of a tree. You can draw a dark tree on a light background, or vice versa. White or beige acrylic paint will stand out clearly against a dark wall. Work must be carried out in accordance with the following instructions:
- A contour is applied to the wall with a soft colored pencil. It is not necessary to monitor the evenness of the lines. If they are a little crooked, the quality of the drawing will not suffer from this. The line, if desired, can be erased or corrected with a rubber eraser. It is worth making sure that the pencil does not violate the integrity of the paint layer on the wall. The drawing can be partially transferred to the adjacent wall and ceiling. When drawing a contour, you should constantly step aside to evaluate appearance Images.
- Contours and small branches are drawn with a thin brush, if they are present in the drawing. The paint is applied in several strokes, so the drawing will look more professional even if the artist cannot draw a short, even line.
- The contours are carefully filled with a thicker brush. This should be done carefully, without going beyond the contours. The tree is “painted over” from the bottom up, the paint is applied in a thin, even layer. First, larger elements of the picture are sketched, then transitions are made to smaller details.
- A tree may have leaves, butterflies or birds may fly near it. It is important to choose the colors of these parts. As an option - monophonic elements. It is better not to experiment with bright shades, if additional small elements differ in color from the tree trunk, it is better to take soft pastel colors. The edges can be decorated with thin lines of gold or silver acrylic.
The walls in the apartment with your own hands can be painted with other drawings, but the above technique is the basis for the successful application of any image to the surface.
 Large flowers on the wall with contour drawing over the image
 Large flowers are another popular option for wall painting in living rooms. It can be a living room, a bedroom, a kitchen, a nursery or even a bathroom. Bright elements of juicy shades will look favorably on a light background.
The drawing can be done in warm or cold colors, if desired, they are combined. After filling the main volume with paint, the contours are drawn with a thin brush using black acrylic. This should be done after the color paint is completely dry.
screen painting
Construction stores have big choice stencils to create decor on the walls in the apartment. They are glued to the wall and then easily removed. Such a pattern can be applied both on top of a painted surface and on wallpaper. In the second case, they must be suitable for staining. In addition to acrylic paint and a stencil, you should purchase a narrow roller. Drawing is quite simple:
- The stencil is glued to the wall.
- The roller is dipped in paint, for this purpose it is better to take a special container for paint, so its excess will not remain on the tool.
- Even before the paint dries, the template is carefully removed from the wall and can be reused.
If the wall is opened on top of the picture with a transparent varnish, this should be done only after all layers of paint are completely dry, otherwise the image will be damaged.
More details on the video:
Decorative indoor painting is a way to create an exclusive, fashion design in a residential area. Painting a wall by hand is quite simple, the main thing is to carefully consider the image on the wall and how it will be in harmony with other interior elements.
The other day, I finally did what I had been planning for a long time: I drew a picture with lettering and doodles on the wall of my Moscow apartment, which we were preparing for rent. This was my second experience of drawing on the wall - for the first time I tried to do it in Thailand, and although I was not very pleased with the results, I realized that I like to draw on the walls :) I decided to summarize the information in the post - suddenly you are also going to draw on the walls and Do you have the same questions and concerns as me?
HOW TO PREPARE A WALL
Before you draw something on the wall, you need to make sure that the wall:
a) flat
b) painted
If you have a wall with wallpaper - they need to be torn off, the wall should be leveled, primed and painted with paint. If already painted - you can immediately draw, if point “a” is observed. And yes, speaking of evenness, I mean not so much horizontal and vertical deviations (this is just a drawing that will help to hide it and it is not so critical), but smoothness. If fingers and pantyhose don't cling to the wall - it's already ok :) If the wall is bumpy, then in theory you can still draw, but get ready that it will be difficult, you will spend more ink, and the result will not be as wow as you would like. Well, yes - most likely, you will spend more time on the drawing than if you still did the alignment.
I'm speaking from my own experience: the wall I painted on in Thailand had a texture of “crap with pebbles and sand”. This, you know, can be found in Russian porches, often painted with green paint. I didn’t fix it, because the alteration at that moment scared me more, and I thought that it would do, but then I regretted it very much and for a long time: it was unrealistic to draw a straight line.
The wall in Moscow was handed over by the developer painted in White color, you could take a black marker - and start drawing. But I wanted a black background (because simple paths are not for me), so I painted the wall black before painting. I chose Siberia's slate-effect paint, because at that time I had not yet decided what I would paint on the wall with and was considering ordinary chalk. I applied the paint myself with a roller and a brush at the joints with the walls and ceiling (covering them with masking tape), nothing complicated.
On the advice of representatives of Siberia, the wall was not covered with anything else before application. After the first layer, the wall did not look very good - there were a lot of bald spots, after the second one everything evened out, the wall became pleasantly black, and, which I liked, slightly rough and completely matte. I tried to draw on the wall with chalk - the sensations are a little strange, it seems that the chalk is not perfectly washed off the paint, but, alas, I have nothing to compare with yet, so I can’t formulate a review on how this paint works exactly under the chalk board. For my purposes, the paint suited me 100%.
WHAT TO DRAW: MY CHOICE OF MATERIALS
If nothing comes into contact with the wall, you can paint it with anything: even with a pen, even with CD markers - the main thing is that you feel comfortable working with the tool and the line thickness / color suits you. But if someone or something touches the wall, everything is more difficult, especially if the goal is for the drawing not to be erased (if it was erased, a combination of chalk and slate paint will save you :)).
In my case, the matter was complicated by the fact that I planned to draw a picture on kitchen apron, which is supposed to be washed at least occasionally. I can already see how you grabbed your head and shout: “But how to wipe off the fat ?!” But first things first.
I considered the following options:
- Draw a picture with chalk, cover with glass
- Draw a picture with a brush and some kind of indestructible paint and do not cover it with anything
- Draw with indestructible paint + cover with glass
The glass option didn’t really appeal to me, because it’s an extra expense, and not a small one, and I don’t really like how the glass looks on part of the wall, and doing it on the entire wall is a bit crazy. Therefore, the idea with chalk was quickly crossed out and I went to look for indestructible paint.
Here I was planning to do a big review of a wide variety of markers and materials, but the truth is that when I went looking for something that is easy to draw on and hard to erase, I came across only one brand everywhere: Molotow. They make markers with very powerful inks that you can't wash off easily. And, alas, no one paid me for this publication (comrades from Molotov, I will not refuse free markers, if anything;)).
Molotov has several types of markers, I was interested in acrylic ones - they are erased only until they dry, then they can’t be washed off with ordinary water, only with a solvent (at least I couldn’t wash it off, but I rubbed it notably). Acrylic markers come in different sizes and have different nibs, I'll definitely give a detailed review sometime write on Instagram . I liked the 4mm round tip the best, I would have preferred larger size, but I didn’t find round ones anymore, but I don’t like beveled ones. The markers are refillable, which means that when the ink runs out, you can add more. The tips can also be changed (they are erased), but you need to know which tips are suitable for which marker.
As a slightly cheaper alternative, I considered buying ordinary white acrylic paint and painting with a brush - the effect is almost the same, but it loses a lot in terms of convenience, plus I wanted to get a line of equal thickness.
The result is this: I am very satisfied with the chosen tool - easy to use, economical consumption, the line is dense and bright, and yes, the pattern is not washed off! I furiously rubbed one area for several minutes, the line did not go anywhere. And for those who are worried that there will be greasy drops, I will inform you that there are very cool and penny grates on pans that save you from splashing, plus our working surface turned out to be 10 cm deeper than the standard and, accordingly, the stove does not stand close. Well, if the tenants stain the wall so that it won’t be washed off, I won’t be very upset - I’ll paint over it and apply a new drawing;)
WHAT TO DRAW
For a long time I was tormented by the question of what to draw. On the one hand, I wanted to make a lot of lettering, on the other hand, I wanted to make a lot of different lettering, on the third hand, doodles have firmly entered my life and it's a pity to leave them overboard. And also the apartment was made for rent, and the drawing was in the kitchen, I wanted the final picture to be quite neutral, but at the same time appropriate.
At some point, I decided that I should put my self-expression at the forefront, that is, draw in the style in which I would like to draw to order. So, these are dudliks + lettering. But I added a small challenge to myself: I decided that my objects would not be separate and on their own, as happens almost always in my drawings, but would stick out a little from each other, overlap and flow.
I decided that lettering and doodles will be on an equal footing, that is, I will not highlight lettering with complex decor and fill it with color, I will draw everything in the same thickness, not giving anyone the main role.
And then I thought about the sketch for a couple of weeks and even drew a few rough options.
Follow the evolution ;)
At first I wanted to do lettering in Russian, Cyrillic, to practice, but then I ran into a wall called “I can’t find funny, but short and concise quotes that would look appropriate.” Either I am so picky, or the Cyrillic alphabet is still too obliging and attracts attention. I changed everything to English and felt relieved - after all, it is much more familiar and easier for me to work with the Latin alphabet.
Then I tormented doodles for a long time - in the original version there were a lot of things not about food - clouds, rainbows and all that, but by the final version I decided that the kitchen is not a place for clouds, you need more sweets, vegetables, appliances and everything related to food . Therefore, I took the last sketch as a basis, redid it on the go on the wall.
HOW TO TRANSFER A PICTURE ON THE WALL
If you have a sketch and want to transfer it from your notebook/ipad to the wall, there are three main ways to transfer it.
Method one: by eye
The most banal, obvious and not requiring additional stray. Look at the picture - try to repeat on the wall. This is exactly the method that I used, because there was no time to organize the other two. It will work if it’s not very important for you that the picture repeats exactly the same, if you know how and are ready to improvise, and if it doesn’t annoy you when the picture on the sketch and on the wall no longer converge :) I decided for myself that it’s easier to draw immediately on wall without a sketch than "peek" because it's more annoying than helpful.
Method two: squares
This method allows you to transfer the picture quite accurately, but it takes time. The bottom line is this: draw your sketch into squares, then draw the same squares on the wall and transfer the picture using this grid as a support. That is, the contents of one square were schematically transferred, then the second, the third, and so on. This still does not guarantee perfect accuracy and you will still need to adapt, but in theory it is easier than without squares. I didn't have the patience to draw squares.
Method three: projector
The most convenient, but at the same time the most expensive way, which, alas, I also know about only in theory, because I had to wait three weeks for the selected projector model and I have not bought it yet. There are two types of projectors: directly for artists, for transferring pictures to the wall, and ordinary ones, with which you can also watch movies.
The most famous projectors for artists are produced by the American company Artograph. Most models are arranged as follows: put a sheet with a sketch, put a projector on top and it projects the picture onto the wall. In my opinion, this approach has many disadvantages: the sketch must be clear enough and of a certain size so that, on the one hand, it fits into the space under the projector, and on the other hand, it must show a sufficient amount of detail. Well, it's not very cheap either.
A projector that can also be used as a home theater is, in my opinion, a more reasonable solution. But here you need to understand this: not every projector that can show movies will be good for projecting pictures on the wall. There are a million of all sorts of muddy parameters, which are very well described in this note Here are the main ones to keep an eye on:
- the projector must be short-throw, that is, have a ratio of distance to image size, the smaller the better. Conventionally, 0.4:1 or 0.8:1 (means that to project a meter of the picture, you need to set the projector 40 or 80 cm from the wall, respectively). A lot of projectors fall off here, because if the ratio of 1.55: 1 is completely fine for showing a movie, then when you try to paint a 2x3 wall using this in a small apartment, there will be problems, because the length of the room is not enough :)
- the projector must be high contrast and show well even in bright room(because it is not always possible to curtain all windows, and drawing at night is a dubious pleasure), so you need to monitor the parameters of lamp power (from 200 watts), contrast (from 10,000: 1), and lumens (from 3000).
- it is convenient if you can connect a flash drive
- Well, the most tricky parameter, which is not available anywhere, but is very useful: vertical and horizontal adjustment of the image. The projector with these two parameters can be placed not exactly opposite, but a little to the left-right-higher-lower and twisted so that the image does not mow.
Unfortunately, I cannot recommend you a specific model, because I myself got confused in the choice and have not bought anything yet. If I find time, I will figure it out, buy and test it - I will definitely write additionally. Judging by the Yandex.market of models that combine all of the above qualities, you can’t find cheaper than 50,000, but rather you should count on 80-90, so the pleasure is not cheap. For a one-time painting, I definitely would not take it.