
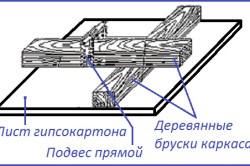
How to make a wooden frame for drywall
Drywall is one of the most popular building materials. It is used for leveling surfaces, building partitions during redevelopment, installation of various structures. It is not difficult to work with the material, even a novice home master can do it. Installation must begin with the construction of a wooden or metal frame. Despite the fact that the metal base is more durable and easier to install, many prefer a wooden frame for drywall.
Frame materials
The use of a frame makes it possible to hide the flaws of any surfaces without compromising the useful area of \u200b\u200bthe room. Its construction must be taken seriously. The success of further work depends on how accurately it will be calculated and designed.
For the construction of the frame, you need to prepare wooden bars. It should be coniferous wood, the best option is pine.
The material must be flawless and well dried so that during operation it does not deform and withstand heavy loads.
Before starting to work with the material, it should be treated with an antiseptic composition. The antiseptic should not be toxic, since the work will be carried out indoors. It should easily penetrate into the wood, not decompose, not wash out and not have a smell. Do not use oily antiseptics. This can adversely affect the health of the residents of the house.
The thickness of the bars must be at least 40 mm. Permissible humidity - no more than 15-18%. However, the thickness directly depends on the dimensions of the future GKL structure. For example, when constructing a partition, attention should be paid to its width and height. The larger these values, the larger the cross section of the bar should be. For wall or ceiling cladding, the width of the material is selected based on how much usable area you would like to save. If the surfaces are very uneven, you should use bars of different sections.
Base for drywall
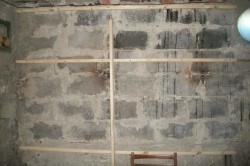
Figure 1. Rigid fastening of a wooden frame to the wall.
To fix a wooden frame to walls or ceilings, there are two ways. One of the most reliable is considered to be a rigid mount directly to the wall (Fig. 1). The binding is done first. If the frame is built on the ceiling, then the bars are attached to the walls. If a wooden frame is made for a wall, then the fastening of the bars is carried out to the ceiling, floor and walls located perpendicularly.
The plasterboard frame can be attached to ceilings or walls in another way: using metal brackets. The advantage of this method will be quick installation, and the disadvantage is the low rigidity of the structure.
Before making a wooden frame, for example, on a wooden ceiling, it is necessary to mark up (Fig. 2). For this, the lowest point of the ceiling is determined. From it you need to retreat 50 mm and draw a horizontal line around the entire perimeter of the room. A strapping rail will be fixed along this contour. To draw an accurate horizontal line at the corners of the room, marks are made at the required level. A cord is pulled between them and a straight line is beaten off. In the rail, you need to drill holes for fasteners with a diameter slightly larger than that of a self-tapping screw or screw.
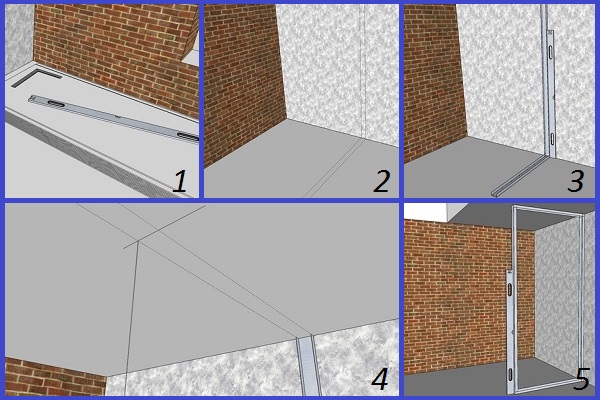
Figure 2. Marking the frame: 1 - prepare a pencil, an angular ruler and a level, 2 - using a level and a pencil, you should make an even marking for fastening the profiles, 3 - the profile is applied to the marking and screwed to the floor and wall, 4 - marking the attachment point with using a plumb line, 5 - assembling the frame and checking the evenness with a level.
The rail is applied to the line on the wall and the marks of future fasteners are transferred to the surface with a pencil. Then holes are drilled into which dowels or wooden plugs for self-tapping screws will be hammered. Reiki are fixed around the perimeter.
The next step is to install the base of the bars on the surface of the ceiling. The fastening step of the parallel bars should not exceed 800 mm. This will ensure the reliability of the future design. Supporting bars are attached perpendicularly, on which drywall will subsequently be mounted.
The frame for the wall can be assembled on the floor and only then fixed to the wall. The size of the wall on which the drywall will be attached is measured. From the result, subtract 5 mm on each side and cut out the bars of the appropriate size. Assemble the frame from 2 horizontal and 2 vertical bars. Additional rails are fastened with a step of 600 mm, crossbars are fixed perpendicular to them. The frame is fixed with dowels, screws or dowel-nails around the entire perimeter of the wall. With this manufacturing method, the heat-insulating layer is attached directly to the wall, and the frame closes it.
In the manufacture of the frame, you can do without transverse bars if its length does not exceed the length of the plasterboard and there are no door or window openings on the wall.
Making a frame for a partition
Before building a frame for drywall, it is necessary to draw up a drawing of the future partition, on which to indicate the location of the doorway. When calculating the rigidity of the structure, the number of horizontal parts should be taken into account.
To complete the work you will need:

- Level.
- Pencil.
- Perforator or drill.
- Saw.
- Screwdriver.
- Self-tapping screws or screws, mounting dowels.
- Metal corners.
- Screwdriver.
- Bars: for vertical racks, the section is at least 40x70 mm, for horizontal - 30x50 mm.
Installation of the frame begins with fixing the strapping bars to the floor, walls and ceiling (Fig. 3). For this, self-tapping screws and dowels are used, if the floors are concrete, and nails, if the floors are wooden. Anchors will be needed for ceiling mounting.
First, the fastening takes place on the ceiling. The boundaries of the future partition are marked, only after that the bars are mounted. With the help of a plumb line, a line is marked on the floor. For more accurate marking on the walls, you need to make several marks. After marking is completed, the beam is fixed on the floor.
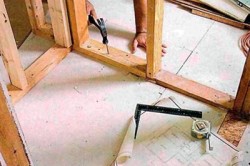
Figure 3. Installation of the frame begins with fixing the strapping bars to the walls, floor and ceiling.
The next step is to attach the vertical strapping that will connect the ceiling and floor bars. Vertical racks will carry the main load in the structure, so the fastening should be as strong as possible with a fastening pitch of no more than 400 mm. If the main walls in the room are not made of durable materials, then dowel-nails are used for fastening. You can drill holes in the wall in which to place plugs from wooden pegs and screw in screws or hammer in nails.
If the main walls are strong and smooth, then the strapping can be fixed on straight hangers, which are used for a metal frame.
When the strapping is ready, racks are installed with a pitch of 600 mm. It is this step that will make it possible to mount each standard sheet of plasterboard on two racks. Racks can be fixed with metal corners.
For horizontal lintels, a beam with the same cross section is used as for the entire structure. They are fastened with screws. For greater reliability, metal corners can be used.
The opening for the door in the new partition needs reinforcement. For this, additional racks and horizontal jumpers are used. The threshold will be the lower part of the frame.
Laying communications in such a partition is not recommended. However, if necessary, holes of the required diameter are drilled in the racks. The electric cable is laid in special protective corrugated pipes or tin boxes.