
Stages of building a house from a bar: step-by-step construction, materials and tools
Everyone dreams of their own home. However, often, when buying a ready-made house, you can purchase several unpleasant “surprises” with it, and it’s already difficult to remake it at your own discretion.
It is a completely different matter when a house is built from the very beginning to the end independently according to a personal project. The construction of a bath from a bar with your own hands is carried out in stages, just like at home, so you can consider it in the general case for these two buildings.
Construction stages
The whole process of building a bathhouse or a house from a bar or log consists of several successive stages:
- project preparation;
- preparation of terrain, materials and tools;
- building a foundation;
- floor erection;
- walling;
- floor and roof installation;
- windows, doors;
- interior and exterior decoration.
Preparation of the project, preparation of the site and materials
We can safely say that the preparation does not obey any standards. In this case, everyone is his own master, so there is no need to talk about some kind of technology or rules.
As for materials and tools, then on the contrary, everything is according to the standard. For each hotel item, the necessary materials will be considered separately. The same applies to tools.
Do-it-yourself timber house is gradually being built on a flat and prepared site. But it is necessary not only to level the site, but also to remove all unnecessary.
In rare cases, the preparation includes a very laborious process - replacing the soil layer. This is only necessary in cases where the soil has a very low coefficient of resistance.
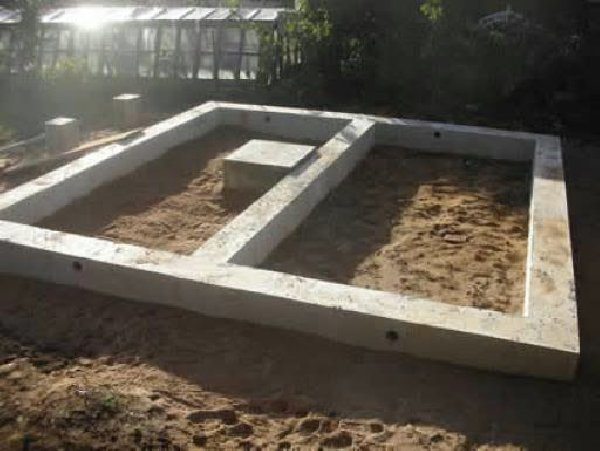
Foundation construction
Three types of foundations are now known:
- columnar;
- tape;
- slab.
For a private house, a strip foundation is best suited.
It is more time consuming and expensive, but it has its advantages:
- has a huge bearing capacity, which allows not to make appropriate calculations;
- quite simple in its execution;
These two advantages allow you to get rid of many of the difficulties that a columnar foundation involves.
We will consider the technology of erecting a strip foundation.
To calculate the materials for the strip foundation, you can use the calculator:
This will require the following tool:
- shovel:
- a hammer;
- wood saw;
- a welding machine or a hook for knitting with steel wire, or a special knitting machine;
- containers for mixing cement mortar, as well as containers for clean water.
- So, it all starts with marking on the ground. You can carry it out with the help of a rope and pegs, or simply by drawing lines on the ground. You can check the correctness of the markup using a tape measure.
- It is only necessary to measure both diagonals in a rectangle - they must be the same. This will mean that the foundation is even.

- Next, you need to dig a pit. He digs to the depth of laying the foundation, plus another 20-30 cm. The width should be 5-7 cm more than necessary.
- I must say that if it is planned not to arrange the formwork for the foundation, then the width of the pit can be as wide as the casting part of the foundation itself should be.
Advice!
If a bathhouse is being built from a bar with your own hands in stages, then you can not do the formwork for the foundation, since it is being erected in order to give the tape an even shape, but in this case this is not required.

- Only in the case when the tape rises above the ground, it is simply impossible to do without formwork.
- So, the casting part of the foundation should have a width that will allow you to easily lay a beam or log on it. Often, only 15 cm is enough for this, but such a foundation can simply crack.
- The minimum width of the casting part should be 25-30 cm.
- After the trench is dug, a layer of crushed stone or gravel is poured on its bottom. The layer thickness is about 10-15 cm. Then the same layer of sand is poured. In this case, this layer is carefully compacted. Sand can be compacted with water.
- Next, you can pour the foundation. For a bath, part of the trench can be filled with construction scrap, that is, pieces of broken slate, broken bricks, glass, and so on. Every 30-40 cm of such a layer is shed with a liquid solution.

- The last approximately 50 cm are poured with clean concrete.
- If the foundation is being built for the house, then it is better not only to make it completely from monolithic concrete, but also to reinforce it. For reinforcement, steel reinforcement with a diameter of 10-12 mm is used. Belts are made of wire, and a frame is made of belts.
Concrete is prepared according to the proportion:
- 1 part cement;
- 3 parts sand;
- 2 parts of crushed stone or gravel;
- water.
This ratio is only suitable for cement grade M500 and above.
If the formwork has not been erected, then after the trench is completely filled, it should be allowed to dry. This may take from a few days to 2-3 weeks.
After that, in any case, it is required to build a base. It can be made from red brick.
Smooth masonry can be easily done with your own hands using a plumb line or water level.
After the foundation has completely dried, a layer of waterproofing is laid on top. It can be represented by a layer of roofing material.
If the formwork was erected, then it is removed only after 3-4 days in normal weather, however, the foundation should not be exposed yet, since it will not have time to gain the required percentage of strength.
Floor erection
For this work, you will need the following materials:
- timber with a section of 100 by 50 mm;
- board with a thickness of about 25 mm;
- wood screws;
- dowels for beams;
- tow or moss.
It all starts with the erection of the first crown.

Advice!
The first crown must be laid as evenly as possible, since it is on it that all subsequent crowns will be laid.
In addition, the first crown must be impregnated with an anseptic, since it is most exposed to moisture from the soil.
Beams for walls should have a section of 150 by 150 mm. For logs and internal walls - 100 by 50 mm.
To make the junction of the beams, that is, the lag, you can use two methods of attaching the logs:
- in half a log;
- "dovetail" or "frying pan".
Fastening in the second way implies hitching in such a way that both beams are in the same horizontal plane.
This type of connection is shown in the following photo.

Connection "frying pan"
This method is the most optimal, although more laborious. To connect two beams together, you can use the "thorn" method. To do this, a spike is cut at the end of one beam, and a groove of the same size is cut at the end of the second beam.
Since sometimes the length of the lag is quite large, it is necessary to erect pillars under it. They can be made from brick and cement mortar.
It is worth saying that it is better to lay the beams for the log on the edge. Logs should be placed in increments of 40 to 100 cm, depending on the expected load.
After laying the logs, subfloor boards are stuffed on them. From below, on the logs, you can make a crate, and lay a heat insulator on it. For the subfloor, boards with a thickness of 25 mm are used.
After that, you can immediately lay a finishing coating on this subfloor, for example, grooved boards 28 by 36 mm.
Walling
The phased construction of a house from a bar with your own hands, the next step involves the construction of walls. This is done by successively erecting crowns of beams.

All beams can be fastened at the corners in the way “in half a log”, or “in a spike”, which were discussed a little higher.
It is worth saying a little about the profiled timber. It differs from the usual one in that it has ready-made grooves. Therefore, the stages of building a house from a profiled beam, and specifically, the process of building walls, are slightly different from the same work from a regular beam.
The difference is that a regular beam needs to be fastened every 2-3 crowns. This is done using . For them, a hole is drilled in the beams, which passes through several beams, for example, through two. A dowel is hammered into this hole, which can be either wooden or metal.
Otherwise, the stages of building a log house from profiled and ordinary timber are no different.
As for the internal walls, they should be erected simultaneously with the construction of the main walls.
Each subsequent crown should be laid on a layer of moss or tow.
Cover and roof
The ceiling is made of the same materials as the floor, that is, beams 100 by 50 mm are used as beams. The beams are laid in the same way as the logs.
They are sewn on top and bottom. A vapor barrier film is placed on the boards of the lower skin, and a heat insulator is laid on top. From above, the beams can also be sheathed with boards.

The rafter system is also made of 100 by 50 mm beams. Rafters are installed with the same frequency as the beams. The rafters must be attached to the beams.
From above, the truss system is sheathed with boards, which will act as a crate. Next, a layer of waterproofing is laid, and roofing material is upstairs.
Brief conclusion

So, as you can see, the phased construction of a do-it-yourself log bath, like building a house, is not a difficult and insurmountable task. In addition, it must be said that the price of such construction is also relatively low, but with proper insulation and decoration, the owner receives a unique, comfortable and durable housing.
The video in this article is ready to present my vision of this process.