
DIY garden house
Where does the landscaping of a suburban area begin? We propose to consider the option of building a small house with amenities and a terrace, which, after the construction of a full-fledged housing, will become an excellent place to relax, store household equipment, or even a cozy guest house.
Inside the house there is a separate bathroom (4), a rest room with good natural light (3) and a small change house with an outside entrance (1) for storing small things or a mini-workshop. For a pleasant pastime in the fresh air, we will allocate a place in the plan for an attic (2), approximately 180x260 cm. The total dimensions of the house are 6x6 meters, just under the standard length of the scaffolding.


Foundation tricks
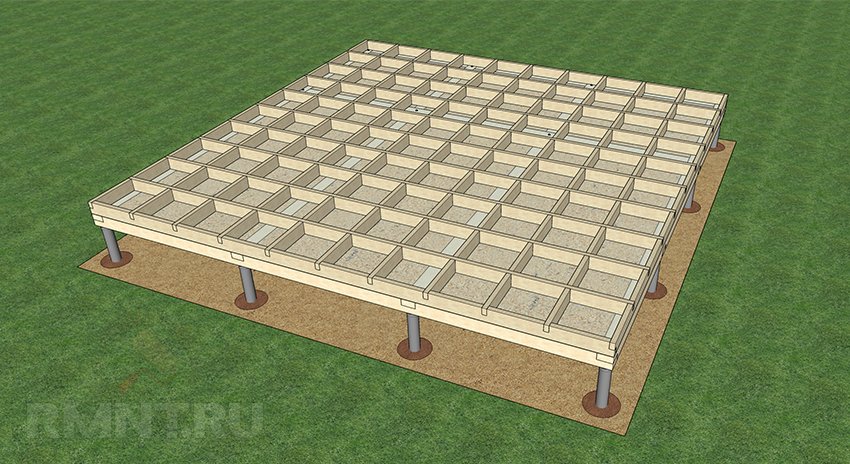
Our building is based on 16 concrete pillars, arranged in a 4x4 square with a gap of 2 meters. The marking of the site is carried out with a grid stretched on stakes, from each of the 16 intersections a mark is transferred to the ground by a plumb line. Four internal wells are dug strictly at intersections, twelve external wells are dug with an inward displacement of 7 cm.

You can dig manually, drill with a power drill or use a crane drilling machine. We drill wells with a diameter of 350-400 mm to the depth of soil freezing plus an additional 50 cm. Pour a bucket of crushed stone or river pebbles onto the bottom of each well, then add two buckets (25 liters) of concrete grade 300 with filler fraction 5-8. We stick plastic 110 mm sewer pipes (gray PVC) into the solution that has not yet set. We orient them with sockets up; for long pillars, pipes can be made prefabricated. We align the pipes vertically, as well as at the intersections and the general level of lacing, pour 1-1.5 buckets of sand into the pits, and fill the rest with earth.

After the bases have set, we pour the same concrete into the pipes, it can be seated by vibration or pinning. The column is reinforced with a profile 14 mm rod in the full length of the pipe, an M12 stud 200 mm long is welded to the upper edge. Such a foundation does not react in any way to winter heaving of the soil: a smooth sleeve around the post does not allow the soil to freeze to concrete.
Grill and frame floor
A week is given for the drying of the pillars. On top you need to stretch a small (15 mm) chain-link mesh, painted or galvanized, two meters wide. We stretch it on the studs of the pillars, we sew the edges with wire.

Then, on the foundation, a grillage is assembled from a bar 150x150 mm:
- at the intersections we make a half-tree hem;
- we make holes for the studs with a brace of 20 mm;
- fold the inner grillage of the grillage;
- we horizontally start the outer bars, observing the dressing scheme;
- tighten the nuts over wide washers until the beam crushes the mesh;
- we finally derive the common horizontal plane with linings from roofing material;
- cut off excess studs.

We draw the mesh to the grillage either with wire, or we knock it out from below with galvanized nails. We put a windproof membrane into the cells, tuck it high at the edges. After the space between the bars is filled with a mixture of wood chips and slaked lime 5: 1 and covered with plastic wrap, the edges are shot with staples.

A crate is mounted on top of the film: a 50x150 mm board is placed on an edge in both directions to form cells of approximately 580x580 mm. Eleven boards go to each side, twenty-two in total. At the edges and at the intersections with grillages, the boards are drilled 70 mm with a 10 mm drill, then they are attracted to the base with self-tapping screws. The intersections of the lathing must be carried out as on the grillage - with pruning half a tree, we wet all the cracks and junctions and seal them with summer foam.
The floor frame, with the exception of cells completely located under the terrace, is filled with mineral wool and covered with a semi-permeable (150 g/m) diffusion membrane. The floor is laid with an edged tongue-and-groove board over the entire plane. We make ventilation holes in the cells under the terrace in the frame boards.

Walls, corners, openings and junctions
Further work begins with two walls opposite the corner attic. First, on a flat base of the house, we lay out and assemble on self-tapping screws a frame of boards on an edge with external dimensions of 570x240 cm. We add 2.4 m of racks of 24x150 mm boards with an interaxal pitch of 60 cm to the assembled frame. 60 cm. We will use these short boards as horizontal beams in the frame for joining the skin.
We raise the wall vertically, temporarily fasten it to the base with cuttings from the boards. The bottom board of the wall frame is fastened with 120 mm pins to the ribs of the floor system every 40 cm. The second wall is assembled in the same way and set perpendicular to the first, temporarily tightened with scarves.

Please note that the outer corner is thus "empty". We cover it with foam, put a beam of 60x60 mm, and fasten the extreme boards of two walls to it, having previously made holes for 100 mm self-tapping screws.

We assemble the rest of the walls in the same way, the inner corner is processed in the same way as the outer one. From the outside, we sheathe the house with 12 mm OSB sheets 2400 long, so the vertical seams fall exactly on the centers of the racks. Release the sheets 200 mm above the wall frame, below the sheathing falls at least to the middle of the grillage. At the corners, the edges are displayed along the frame of the adjacent wall.
When one side is sewn up, we scroll a 40x40 mm bar along the vertical edge from the inside and fill the remaining space with foam. From the same angle, we begin the sheathing of the next wall, fasten the edges of the sheets to the connecting bar.
To form doorways, choose a board 50x150 mm and knock down an installation box from it with internal dimensions of 100x210 cm for the front door and 80x210 for internal ones (with a canvas width of 70 cm). Before installation, the vertical rack of the wall is completely cut out (it can be divided into 4 crossbars), after installing the box, 35 cm of liners from the boards are added on top of its vertical racks.

Window blocks with an opening width of less than 60 cm are formed by adding horizontal bars. A block for a wide window is assembled from a 150x50 mm board and inserted into the frame in the same way as a door block, but in this case, fragments from at least two racks must be cut out under it, and T-shaped junctions should be strengthened with scarves.

Everything you need to know about roofing and attics
To save from cold and heat, the ceiling must have a layer of mineral wool insulation with a thickness of at least 200 mm. In this case, it is better to make the roof single-pitched ventilated. There may be an attic, but only as a room for storing materials with a useful height of 40-60 cm.
From a board of 150x50 mm we knock down trapezoidal single-pitched rafters with a height of 60 cm in the back and 110 cm in the front. Two six-meter trusses are being installed above the "full" part of the house and five more will be installed with a removal above the attic.
To obtain a sufficient width of the rib, a counter-lattice from a beam of 50x50 mm is screwed onto the lower boards of the rafters with self-tapping screws. The top board of the truss is longer than six meters due to overhangs of 40 cm at the front and back of the house. Therefore, you will either have to splice the existing forest with overlays, or import a longer one. One and a half meters from the low edge of the trusses, vertical jumpers are installed. The rafters are also strengthened in the front part with similar racks, but they are placed exactly above the walls under the direct lining of the terrace from the floor to the roof. The entrance to the attic is located in its widest part - in the inner corner of the terrace.
Fasten the rafters to the wall frame, adjusting the solution of the latter at the top. Then add intermediate floor beams between the rafters from a 150x50 mm board with a 50 mm counter-lattice. Hem the OSB ceiling with a thickness of 9 mm and screw the outer skin of the house to the ends of the ceiling. Fill all the gaps at the junctions with summer foam, then lay a vapor barrier and mineral wool in the ceiling, nail a windproof vapor-permeable membrane on top. Cover the attic floor with 12 mm OSB sheets with cutting grooves for the rafters. On the vertical beams in the rafters, sew up the vertical walls of the attic with OSB boards, insulate them as desired. Cover the rafters with plastic wrap and lay a cold roof made of metal tiles or corrugated board.
Interior and exterior decoration
In conclusion, we will give recommendations for finishing work. Outside, you have a flat plane with hidden racks every 60 cm. Therefore, both plastic siding and the block house will fit perfectly.
For interior decoration, drywall suggests itself, but fastening directly to the racks will be a mistake: the wooden frame walks a lot, cracks will appear. The walls can be sheathed with OSB, followed by ennobling MDF panels or clapboard. If you still intend to use drywall - prepare the profile frame in accordance with all the rules.