
How to make a slab foundation with your own hands
A monolithic slab or slab foundation is a fundamental foundation, which, unlike a strip foundation, has a simplified installation technology and is used for “complex” soil. Such a support is much more reliable, lasts longer and is suitable for any type of buildings (block, wooden, brick houses, one-story and multi-story buildings, baths, sheds and much more).
The main advantage of the slab foundation is that it can be easily erected by a person who does not have much experience in construction work. In addition, buildings of this type have other advantages.
Pros and cons of slab foundation
By and large, such a foundation is an improved version of the strip foundation, which has an increased bearing capacity. The slab shallow-depth monolith compares favorably with the following advantages:
- Suitable for areas where the soil is characterized by increased heaving. If the soil is mobile, then laying the strip foundation is impossible. In turn, the slab foundation on heaving soils, at the moments of freezing and freezing of the soil, will rise and fall evenly, without collapsing.
- Provides reduced ground pressure.
- Not subject to deformation and shrinkage.
- Requires minimal effort and earthworks in preparing the foundation (to prepare the pit, you will need to remove a very thin layer of soil).
In addition, a monolithic slab foundation can be used as a finished floor, and a heating system can be immediately integrated into the foundation.
However, there are both pros and cons to the slab foundation. The latter include the high cost of building materials that will be required for such a structure. However, given that when laying a monolithic foundation, you get two in one (foundation and floor), the amounts will not differ so much.
With the correct calculation of the slab base and the correct laying of the layers of the “pie”, you will build a house on any soil.
Monolithic slab device
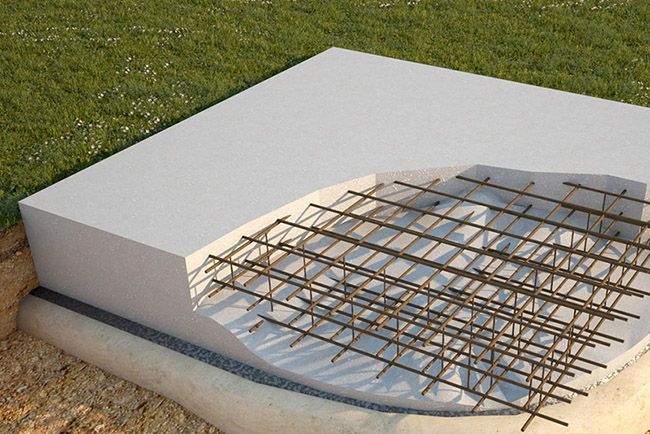
As with the laying of any monolithic structures, the device of a slab foundation implies a certain sequence of layers of concrete "pie":
- Sand and gravel substrate - 15-20 cm of sand allows you to level the "naughty" soil, and 15-20 cm of gravel will become a good drainage system.
- Geotextile (some lay it in front of a sandy base).
- Concrete "preparation" with a thickness of about 5-10 cm. This layer is a rigid base that will be required for waterproofing.
- Rolled waterproofing material (it is better to give preference to materials based on fiberglass).
- Thermal insulation about 15-30 cm thick. Insulation (polystyrene foam is best) will reduce the heaving force and make the foundation not so cold.
- An armored belt consisting of two reinforcing meshes with cells measuring 20 x 20 (rod diameter 12-16 mm).
- Concrete screed 20-50 cm thick and underfloor heating system (if applicable).

To fill the slab foundation with your own hands, you need to make the right calculations.
Calculation of the slab foundation
Unlike a strip foundation, much fewer parameters will need to be clarified to calculate a slab foundation. We will need to know the bearing capacity of the soil and the concrete itself. It is also worth making sure that the tiled foundation will be able to withstand the weight of the future building. To do this, we divide the total weight of structures (concrete base and buildings) by the total area of \u200b\u200bthe foundation.
Consider an example. Dry soil has a bearing capacity of 2 kg / cm 2, we use concrete grade M 150 with a bearing capacity of 163 kg / cm 2. Based on these data, it turns out that the foundation and the building should not exert more than 2 kg / cm 2 pressure on the ground.
The calculation of the thickness of the slab foundation will also depend on these indicators. Let's say you plan to build a bath on 2 floors 10 x 10 m, respectively, the base area will be 100 m 2. If the thickness of the foundation is 20 cm, then its approximate weight (including the armored belt) will be about 100 tons. With a building wall thickness of 25 cm, the total weight of the entire structure will increase by another 30 tons. But, after all, the house will still have furniture, equipment and people. We add another 70 tons and get 300 tons. If we divide this value by 100 m 2, then we get approximately 0.1 kg / cm 2 - this will be the pressure exerted by the building on the ground.

Healthy! If you plan to build a small building, for example, a slab monolithic foundation for a garage, then the minimum base height can be 10 cm. If we are talking about residential buildings, then the minimum allowable thickness is 20 cm.
However, keep in mind that this is only an approximate calculation. Regardless of whether you plan to build a slab monolith or a strip foundation yourself, it is better to carefully study:
- GOST 25100 - to deal with the classification of soils;
- SP 70.13330 - which refers to enclosing and load-bearing structures;
- SP 28.13330 - anti-corrosion coatings for the load-bearing frames of buildings;
- VSN 29-85 and 37-96 - manufacture and design of the MZF.
It should be borne in mind that the slab foundation is very different from the "tape", so the area of \u200b\u200bsupport and other parameters will vary.
After drawing up the project, we begin to prepare the markup for the slab foundation with our own hands.
Marking features for a monolithic slab
The markup for such a base has several features:
- For a monolithic slab, it is enough to mark only the future building itself. Where the walls and partitions will be located can be decided later, when the base is ready.
- On each side, the markings must be made 1 meter larger than the perimeter of the future home. Such manipulation is necessary for arranging the drainage system and the blind area.
- If, according to your project, the building will be equipped with terraces, balconies, a porch and other extensions, then these elements must be poured along with the foundation. Accordingly, the markup needs to be thought out for them.

To carry out the construction of a slab foundation, we suggest that you familiarize yourself with the standard technology for laying such a foundation.
Do-it-yourself foundation building technology
Consider a step-by-step instruction that will help you lay the foundation.
Pit preparation
The depth of the pit depends on the density of the soil:
- If the earth is very dense, then a depth of 50 cm will be optimal.
- If peat prevails on the site, then it is better to deepen the base by 1 m.
The bottom of the pit is leveled on the horizon. If in the process of its preparation pits were formed in some places, then it is impossible to fill them with earth, only with sand. Otherwise, the slab foundation for the house may shrink.
Substrate
At this stage, it is necessary to prepare a pillow for a slab foundation. For this:
- At the bottom of the pit, pour washed sand without impurities.
- Compact the sand layer. If the pit is very deep, then ramming must be done in layers.

- If you plan to conduct communications, then you need to lay the sewerage and plumbing already at this stage (gas and electricity can be installed later).
- Lay the gravel pad and tamp it down. Make sure that the crushed stone is distributed evenly and strictly horizontally, it is better to use a hydraulic level for this.
- Spread geotextile over the pillow.
Formwork and insulation
To prepare the formwork for the slab foundation, consider the following nuances:
- The formwork is set along the perimeter of the house, and not according to the marking "with a margin" of 1 m.
- For construction, use 50 mm boards.
- The formwork is set in height, which will be equal to the thickness of the monolithic slab. To align it horizontally, use cords and a level. If you do not do this, then before you make a screed, you will have to set marks on the formwork itself (with such marking, you can easily make a mistake).
- After that, waterproof the slab foundation. To do this, lay the overlapping material on the formwork boards.
- Also at this stage, an additional layer of insulation can be laid under the waterproofing. For this, it is best to use high-strength EPS.

The next stage - the insulation of the slab foundation is carried out using sheet material (for example, XPS expanded polystyrene), which must be laid in two layers. The height of both layers of insulation should be about 20 cm. The material should be laid closely.
Reinforcement and pouring
To perform, the following step-by-step instructions will help you:
- It is necessary to knit the armoframe in two rows with a step of 20-25 cm. Lay the lower lattice on special clamps, so that there is a distance of 5-7 cm between the waterproofing layer and the metal rods.
- The second row of reinforcement (top) is laid in such a way that after you pour the concrete, the grate “hides” in the cement by 5 cm, but no less.
- Connect both layers of reinforcement with vertical drains, which must be made from the same bars.

After that, the concrete solution is poured. It is best to use the composition grade M 300 for this.
You need to pour the solution in one day - the shorter the intervals between portions of concrete, the stronger and more reliable the foundation will be.
The poured foundation can only be leveled with the rule and wait until the base dries (28 days for complete solidification). It is best if the weather is warm outside, and the humidity is about 80%. It is also recommended to cover the base with polyethylene and moisten the concrete mass daily with water from a spray bottle.
In custody
Thanks to these recommendations, you will be able to independently lay a slab foundation on a slope or on "difficult" ground. However, it should be borne in mind that there are many options for laying such foundations. For example, some prefer pile-slab foundations.