
Type of foundation for the extension of the veranda
Own home is the most cherished dream for most urban residents. It can be issued not only inside (as in an apartment), but also outside. This makes you not only worry about the safety of the structure, but also mobilize all your creative abilities in order to create a real masterpiece on the adjacent plot. To do this, you can use elements of wildlife (flower beds, hedges, rock gardens), artificial reservoirs (pools, ponds) and all kinds of buildings (arbors, pagodas, verandas, and so on).
The foundations of the house and the verandas are arranged separately from each other.
Verandas are built more often than other structures in most of the territory of our country. The veranda allows you to expand the living space of the house, equip it for one or another room. But it very rarely happens that the construction of the veranda is started immediately with the construction of the whole house. More often, the owners intend to do this much later - when the house has long been built, and there is not enough space in the house.
You will not be able to quickly build a correct, solid veranda. After all, here you need to pay special attention to such a moment as to the house. How long it will be erected will depend on how long your own structure can serve you. After all, the connection of the foundations of now two structures is actually a very complex process. And this is despite the fact that a fairly light one is needed under the veranda.
The main types of foundation for the veranda to the house
This event is more than justified, because, no matter what goals you are pursuing during the construction of the foundation, you probably do not want to see cracks on the walls of the veranda after a while, and turn the gaps in the floor into thresholds. Namely, this becomes a consequence of the fact that under the veranda and the house there are 2 separate bases.
As already mentioned, each structure is almost entirely dependent on how strong the foundation turned out to be.
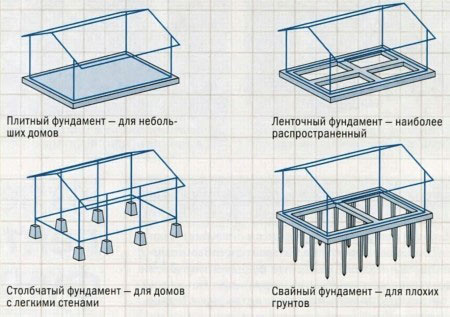
Most often, a columnar or pile foundation is used for the veranda.
The same can be said about the base under the veranda. If you build a veranda immediately with the house, it will be built-in, while the foundation will be common. This process allows you to build not a simple, lightweight veranda, but make it a full-fledged room in the house. It will be possible to conduct heating and many other communications here. An attached veranda is built after the house has been erected. Here you will need fewer materials, but the work will be much more difficult.
This option has some features. So, for example, if the veranda should be attached to the house, it should not be placed close to one of the walls. This must be done, leaving a small gap between the future small structure and the main building. The distance between them should not exceed 4 cm. This is what will avoid distortions due to the fact that one of the structures will be lower or higher. This advice applies to those whose houses are located on heaving or loose soils. Despite the fact that the foundation for the veranda may be light, it should be equal to the foundation for the main building.
There are several most suitable options, according to which the foundation is poured under the veranda. These include:
- block foundation;
- tape;
- concrete;
- stone;
- column foundation.
Back to index
Features of the construction of a strip foundation under the veranda

If you feel the strength to cope with such a process as, then you can build both a light veranda and a very impressive extension to the house, which will be used as a full-fledged room. This option allows you to maximize the insulation of not only the walls, but also the floor. In order to build such a foundation, you will first need to dig a trench around the entire perimeter of the veranda. The depth depends on the depth of the foundation under the house. If you do not know this indicator (for example, when you bought a ready-made house or built it a very long time ago), the depth will depend on the quality of the soil. So, when the soil is sandy, it will be enough to dig up only to the first layer of sand. If the soil is clayey, you will not find any sand in it. In this case, you will have to dig a trench with a depth of 100 to 200 cm. This indicator already depends on the depth of soil freezing. In the central part of Russia, a foundation 1 m deep will suffice.
After the trench is dug, it is necessary to build the formwork. For this, wide boards are quite suitable, which should be installed slightly above the ground. You can strengthen the boards with pegs, bricks or other materials at hand. The next stage is connected with strengthening the platform for the foundation. This is necessary for soils of loose and heaving type. If there is enough sand in the soil, you skip this step. For the first option, you will need river sand, which is poured onto the bottom throughout the trench. After that, it must be tamped either manually or with water. To do this, it will be enough to shed a little sand, and it will settle well at the bottom of this mini-pit.
Back to index
What materials to choose for the construction of the foundation?

After all the preparatory work is completed, it remains to fill the entire trench with concrete mortar. For these purposes, you can use ready-made concrete, which will be brought to you by order, or you can start making your own mortar. In the second case, you will need the following tools and materials:
- shovel;
- concrete mixer;
- drill with mixer nozzle;
- sand;
- cement;
- plasticizer;
- rubble or gravel.
First you need to decide on what volumes you will fill in at one time. Here you should not be afraid that the concrete will lie poorly in several layers. If you start pouring on one day, and continue and finish a little later, the result will be no different from what you get with a one-time pour. In many ways, this will be facilitated by the addition of a plasticizer to the concrete mass. This material provides the strongest adhesion to the surface to which the concrete is attached. In addition, it removes excess moisture from the solution, which has a beneficial effect on the state of the finished foundation in severe frosts.

So, when you intend to do all the work at once, you will most likely need a concrete mixer or, in a pinch, an electric drill with a special nozzle. In order to prepare the mortar by hand, you only need a shovel and a large vat, in which the concrete will be prepared. You need to mix 1 bucket of water with the same amount of cement. After that, 50-70 grams of plasticizer is added. Next, 3 buckets of sand and gravel are added. Everything is mixed and you can proceed to the filling.
If the batch is carried out using a concrete mixer, the order of mixing the ingredients will be slightly different. So, you will first need to immediately run all the dry ingredients (sand, cement, plasticizer and crushed stone) into it, after which the motor starts and as soon as everything mixes a little, you can gradually add water. In this case, the solution mixes much better and you may need a little less liquid. Therefore, when adding water, remember its amount. Next time you will already know exactly how much you need and will be able to run everything at once.
There are other options for building this type of foundation. One of them is that the trench is not filled with concrete, but brickwork is built inside it. In this case, it will not be necessary to erect formwork. As for strengthening the soil, it is necessary in any case. For masonry, the same mortar is suitable as for pouring, but without crushed stone. Brick is best to use red. At the very bottom after the sand, first 1 row of bricks without mortar is laid, after which all other rows are laid with mortar. Another method provides that large stones are first laid in the trench, which are spilled with a more liquid solution consisting of 1.5 parts of water, 1 part of cement, 3 parts of sand.