
Laying a brick base on the foundation
A brick base on a strip foundation is the lower part of the wall to increase the stability of the structure, the laying of which is carried out on the surface of the base of the house. From the first days of its existence, brick has gained immense popularity in the construction industry, especially low-rise buildings and country houses. In our article we will talk about the features of the characteristics and performance of laying a brick basement.
Main characteristics
The type of material and shape of the base directly depends on the foundation. The strip base is characterized by the location of a flat coating above the ground. The masonry of the brick base plays a very important role for the stability of the structure.
If you choose the wrong brick or perform construction in violation of technology, then the box may become deformed. This part of the building is located - between the blind area and the walls. Building codes must be complied with, as the basement is constantly exposed to precipitation and mechanical damage.
Material selection is also a very important part of the process. The best option is red burnt brick, which has a uniform structure and a smooth surface. It is worth noting that silicate stone can also be suitable for these works, but only in the area above the waterproofing.
Important! If silicate brick is used, it is necessary to protect it from atmospheric precipitation.
Tools and materials for work
For these works, a material of high strength and undeniable quality is required. Therefore, it is important to familiarize yourself with the best bricks for masonry.
When masonry is being done, we may need materials such as:
- bricks;
- A solution of cement, sand, water and plasticizer;
- Mesh for masonry.
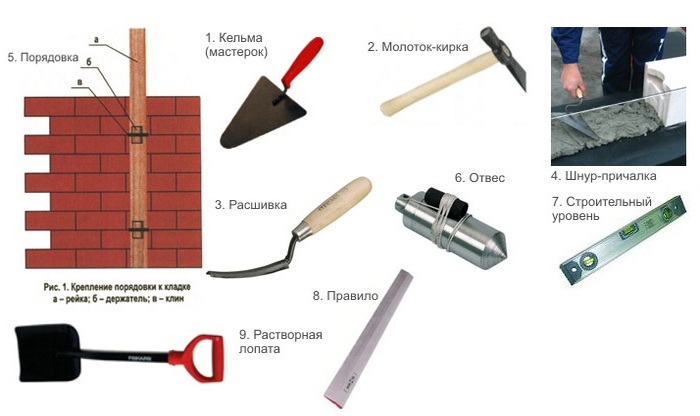
In addition, we need tools to do the job:
- Master OK;
- Pickaxe - hammer;
- Shovel shovel type;
- ordering;
- Cord;
- Level for construction tasks;
- Level for water;
- Stitching;
- Metal rod;
- Trough;
- Plumb.
When building a base, in addition to bricks, you need to purchase the optimal amount of cement and sand - the main ingredients of the solution.
Attention! When leaving for a purchase, remember that it is better to let the materials be more than the norm than they are not enough.
Preparing the foundation for laying

The preparatory stage of work consists of two such actions:
- Checking the horizontalness of the foundation and its diagonals;
- Surface leveling.
The first point can be diagnosed with the help of a hydraulic level, with which we first check the corners, and then the entire area.
Attention! In order to make the foundation at zero, it is necessary to think over this even when it is poured. If it is already ready and has some deformations, then it is imperative to correct the flaws. After analyzing a large number of videos and photo instructions, we have compiled the main ways to fix it.
When creating a foundation at zero, you must perform certain actions:
- We check the position of all corners with a special device with a hydraulic level. We write down all deviations in this way: if the angle is 20 mm higher, then we write +40.
- We mount the formwork on the base of the house;
- In all corners of the formwork, we mark the zero points, which will be the level when the mortar is poured. Each such layer must be higher than 30 mm, otherwise the concrete will not be strong enough.
- We create cuts, which should be identical with the zero points at the bottom;
- We carry out the installation of fittings;
- We mix the ingredients for the solution: 1 part sand to 4 parts cement;
- We moisten the base of the house with water and fill the formwork with a solution;
- Through the cuts with a rope, we check the zero value.
In addition to this work, there is a need to analyze the state of the diagonals. If this base is rectangular, then there should be them and the parallel sides should match in length. All this in total will create evenness of the walls of the house.
Attention! The divergence of the diagonals can be corrected at the time when the laying is performed. Namely, the length of the walls decreases and the short structure increases.
Fundamentals of the waterproofing process

Waterproofing is carried out to protect the basement from various kinds of precipitation. For our case, when the material is a brick, this process is performed twice, namely:
- Under the plinth on the base;
- Under the wall on the plinth.
The waterproofing layer may contain a solution of cement or a special roofing material on the mastic. A protective crane can be mounted along the perimeter, which is made of asbestos-cement or reinforced concrete slabs.
The principle of leveling the foundation with brickwork

It is worth considering that the walls of the house exert constant pressure on the foundation. The stability mechanism of the building box depends on the proportionality and evenness of each of its components.
To make an even foundation during the laying, you need to find the following tools:
- shovel;
- Plumb for construction purposes;
- Roulette;
- A hammer;
- Cement tank;
- Master OK.
To create the perfect bottom, you need to start laying out a layer of sand. The lower part is not visible, but all the irregularities affect the further work.
Attention! The lower compartment, then it will not be possible to align, so this must be taken care of immediately.
High quality formwork will allow you to create a smooth interior and exterior. However, in isolated cases, the bosom does not help.
Foundation leveling methods

There are several ways to align:
- Use of formwork and pouring concrete;
- Brick lining method;
- Covering with a mesh, which is trimmed with plaster;
- Creation of an additional layer of thermal insulation.
Important! There is a certain standard for the thickness of the horizontal seam: for example, the largest value should not exceed 1.2 cm; the deviation should be no more than 1.5 cm from the horizontal for every 10 m. These standards are fixed by SNIP.
Step-by-step instructions for laying the basement
Initially, the laying process begins with the first dry layer of bricks. This process is necessary in order to perfectly plan the subtleties of the series. Next, we mark the foundation for future vertical seams.
Cooking brick

For this project, we are best suited for a red solid brick, which must be treated with water. So that the material is always at hand, you need to spread it around the base area in small groups.
Making a solution

One serving of the solution contains the following ingredients:
- Cement - 1 part;
- Sand - 4 parts;
- Water;
- plasticizer.
Attention! Proportions may vary depending on the desired result. Basically, 3-6 portions of sand can fall on 1 part of cement.
The process of laying the plinth

Here are the main tips taken from monitoring video recommendations:
- Masonry should start from the corners of the structure. This action will guide you through the rest of the process;
- The thickness of the horizontal seam according to building codes should be 1.2 cm, with reinforcement - 1.6 cm;
- To obtain such a seam, we recommend using a 12x12 metal rod, which must be placed along the edges of the future base.
A number of steps in this process:
- The solution is laid out using the trowel method;
- The brick is placed on the cement and pressed a little;
- Level check the vertical and horizontal of the building;
Advice! If there are discrepancies or inconsistencies, the materials must be knocked out with a hand trowel.
We carry out wall laying

Wall laying is carried out in the following sequential steps:
- We stretch the mooring cord, which will help create an even row between opposite rows of the same horizontal line;
- Along the line of the cord we make the first row of bricks.
Attention! The thickness of the joints and the location of the first row are based on the marks on the foundation, which are made when laying out without mortar. That is dry.