
Amazing DIY hanging chairs. Hanging chair DIY hanging chair step by step instructions
It is hardly possible to meet a person who would not feel the desire to settle down in a comfortable chair and feel the smooth swaying movements of the suspended structure. Comfortable swings have always been very popular. Today, the range of hanging seats has been significantly expanded: hanging sofas and armchairs adorn many suburban areas, easily blending into landscape design.
The basis for the manufacture of suspended seats were ordinary rocking chairs. Wicker structures made of rattan or wicker have become the most promising for furniture experiments, because they weigh quite a bit, but at the same time they have excellent strength.
As a result of such furniture experiments, designers created hanging chairs that resemble half a ball in shape.
Semicircular structures are attractive in that they allow you to evenly distribute the entire load. In addition, it is convenient to hang them by installing the device at the highest point.
The frame of hanging chairs can have several options.
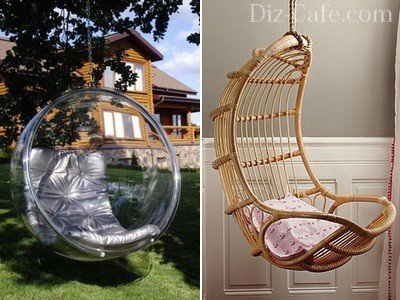
Wicker chairs made of wicker, rattan, transparent acrylic or plastic have a rigid body. For comfort, they are complemented by decorative pillows and soft mattresses.

The hammock chair is a softer version of the suspended structure. On swaying soft pillows, you can always pamper yourself in moments of relaxed rest.

Closed on three sides with wicker walls, the cocoon chair is ideal for seclusion and abstraction from external fuss
Instead of traditional rattan or vines, hanging chairs are increasingly being used synthetic materials, thanks to which structures become lighter, more flexible and quieter.
As you can see, there are many options. We will specifically analyze 2 examples.
It is not difficult to build such a chair. It is only necessary to master the basic technique of weaving macrame.

Such a hanging chair will allow you to create a special atmosphere on the site, conducive to peace and tranquility.
To make a chair, we need:
- Two metal hoops of different diameters (for seat D=70 cm, for backrest D=110 cm);
- 900 meters of cord for weaving;
- 12 meters of lines;
- 2 thick cords for connecting rings;
- 2 wooden bars;
- Scissors, tape measure;
- Work gloves.
To equip the chair, it is better to use hoops made of metal-plastic pipes with a cross section of 35 mm. Metal-plastic pipes of this thickness have a metal braid inside and are able to provide sufficient strength to the suspended structure.
To make a hoop from a pipe, we first determine the length of the segment using the formula S = 3.14xD, where S is the length of the pipe, D is the required diameter of the hoop. For example: to make a hoop D = 110 cm, you need to measure 110x3.14 = 345 cm of the pipe.

To connect the ends of the pipes, wooden or plastic inner inserts of the appropriate diameter are perfect, which can be fixed with ordinary screws
For weaving, a polyamide cord with a 4 mm thick polypropylene core is ideal, which can be purchased at a hardware store. It is good because it has a soft surface, but unlike cotton fibers, when knitting, it is able to create denser knots that will not “spread” during operation. To avoid discrepancies in the color and texture of the material, it is advisable to purchase the entire volume of the cord at once.
Stage # 1 - creating a winding for hoops
Our mission is to cover metal surface hoops. It takes about 40 meters of cord to decorate 1 meter of the hoop in dense coils. We make the turns slowly with good tension, applying the cord evenly and neatly.
To make the winding tighter, tighten every 20 turns, twisting them with force in the direction of the winding until it stops. As a result, we should get a smooth and dense braid surface. And yes, to protect your hands from calluses, this work is best done with gloves.
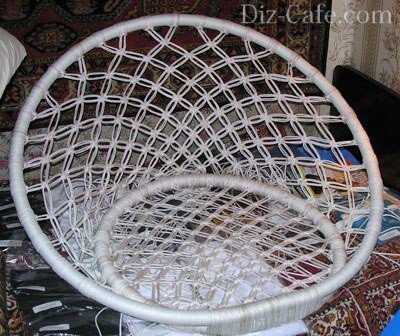
Stage # 2 - mesh weaving
When creating a grid, you can use any macrame pattern you like. The easiest way is to take the "chess" as a basis with flat knots.

Weave the mesh with a double polyamide cord, attaching it to the braided hoop with double knots
During weaving, watch the tension of the cord. The elasticity of the finished mesh will depend on this. The free ends of the knots should not be cut yet. From them you can form a fringe.
Stage # 3 - assembly of the structure
Braided hoops are assembled into a single structure. To do this, we fasten them from one edge, wrapping them together with one cord.
From the opposite edge of the rewind, we vertically place two wooden rods that will serve as a support for the back of the structure.
The length of the support rods can be any and is determined only by the selected backrest height. To prevent the hoops from slipping, we make shallow cuts at the four ends of the wooden rods.
Stage # 4 - decorating the back of the chair
The pattern of weaving the back can also be any. Weaving starts from the top of the back. Gradually lowering to the seat.
We tighten the free ends of the cords on the lower ring, collecting their hanging edges into loose brushes
When the pattern is braided, we fix the ends of the threads in the lower part of the back and decorate them with a fringe. Strengthen the design will allow two thick cords that connect the back to the seat. An elegant hanging chair is ready. It remains only to attach the slings and hang the chair in the chosen place.
Hanging chair with cover
If you don’t feel like weaving, or for some other reason, the first option didn’t suit you, then this one may be suitable.

A cozy, gently swaying nest is an ideal place where you can relax, forgetting about your problems, or just take a nap
To make such a hanging chair, we need:
- Hoop D=90 cm;
- A piece of durable fabric 3-1.5 m;
- Interlining, dublerin or trouser tape;
- Metal buckles - 4 pcs.;
- Sling - 8 m;
- Metal ring (for hanging the chair);
- Sewing machine and the most necessary tailor's accessories.
You can make a hoop from a metal-plastic pipe, which is sold in the form of a folded bay, or from bent wood. But when using a tree, you should be prepared for the fact that under the influence of a temperature difference, the hoop can quickly dry out and deform.
Stage # 1 - cutting the cover
From a three-meter cut, we cut two equal squares, each measuring 1.5x1.5 meters. Each of the squares is separately folded four times. To make a circle out of it, draw a circle from the central corner with a radius of 65 cm and cut it out. By the same principle, we make and cut a circle from another square. On each of the resulting circles, stepping back from the edges by 4 cm, we outline the inner contour with a dashed line.
We outline the holes for the lines: fold the circle in four and iron it so that the folds are guidelines. The first pair of lines will be located relative to the bend at an angle of 45 0, the second - 30 0. Having marked the corners for the slots for the slings, lay out both circles again and iron them.

We make rectangular cuts 15x10 cm in size along the four axes. We make cuts along the contour of the Y-shaped markings made inside the rectangles
To make the same cuts on both circles, we connect the fabric cuts and cut them off with pins. Along the contour of the finished cuts of the first circle, we make cuts on the second piece of fabric.

We bend the petals of the slots inside out, gluing the edges with interlining. Only after that we make a full cut, stitching it along the edge, stepping back 3 cm
Stage # 2 - connecting elements
We grind both circles together along the previously marked dashed line, leaving a hole for inserting the hoop. Cut out the free allowance with cloves. We turn the finished cover inside out and iron it.

From the filling material we cut out strips 6-8 cm wide, with which we sheathe the hoop. Sheathed frame is inserted into the case
Stepping back 5-7 cm from the edge, we sweep both sides together. Turn the edges of the hole left under the insert of the hoop inside out.
We cut off the unsewn allowances from the front side with pins, and sew the edges, departing from the edge by 2-3 cm. Using the same technology, we process the entire edge of the cover
We fill the cover with padding polyester, stretching the filler strips and fixing their edges with a hidden seam. To strengthen the cover on the hoop, we quilt the fabric in several places.
Sling mode for four cuts 2 meters long. To prevent the threads from unraveling, we melt the edges of the slings.

We stretch the melted ends of the lines through the slots, form loops from them and sew 2-3 times
To be able to adjust the height and angle of the hanging chair, we put buckles on the free ends of the slings. We collect all the slings into one suspension, fixing it on a metal ring.
Methods for arranging a suspension system
Such a chair can be placed in the garden, hanging from a thick branch of a sprawling tree. If you are planning to make a hanging chair a functional decoration of a veranda or gazebo, you will need to build suspended structure.
The suspension system must support not only the weight of the chair itself, but also the weight of the person who sits on it.

To fix a simple hanging chair, the weight of which, together with the person sitting in it, is no more than 100 kilograms, it is enough to install a simple anchor bolt
With this method of fastening, one should take into account the maximum load on the ceiling ceiling, which is measured in kg / m 2, because the entire suspension system will act on this area. If the allowable load is less than the weight obtained in the calculation, it is necessary to distribute the load across the ceiling by constructing a power frame that combines several anchor bolts.
Make such a chair, and you will get a great opportunity to relax at any time, enjoying pleasant swaying movements, while gaining peace and a philosophical attitude to all troubles.
Anyone can make a hanging chair with their own hands, it is not always difficult. Moreover, there are several types of such products. After watching the master class, having familiarized yourself with the drawings, patterns, description, you will understand which one you can do.
Before you learn how to make a hanging chair, decide who it is intended for. The material from which the frame will be made and the choice of fasteners depend on the magnitude of the load. It matters where the product will be installed. When creating an outdoor chair, choose stronger materials, fabrics that are resistant to fading and rain. And of course, consider your capabilities, for example, working with metal requires certain skills, abilities, and the use of special devices. But anyone who wishes can master the basics of weaving macrame by carefully viewing the training master class on the Internet.
Romantic hanging chair
Such an openwork swing will decorate a bedroom, a loggia, provide a comfortable place for relaxation in nature. Using the macrame technique, you can weave an original comfortable and attractive hanging chair at home.
The originality of this product lies in the fact that its frame consists of two fastened hoops of different diameters. The choice of these structural details is of particular importance, since they are the rigid base of the product and must withstand a significant load. After all, it is so difficult for children to resist using a hanging wicker chair as a swing.
What do you need to work?
To start a master class on creating a macrame chair, you need to prepare:
- 2 metal hoops: with a diameter of 700 mm - for the seat, with a diameter of 1100 mm - for the base of the back. Gymnastic hoops are not strong enough. Under significant loads, they will deform. Therefore, it is better to use hoops made of metal-plastic pipes with a cross section of 35 mm. They demonstrate high strength due to the braiding inside the rings.
- Inserts and screws for fixing metal-plastic pipes.
- 12 m sling.
- 2 cords that we will use to connect the rings.
- 2 wooden bars.
- 900 m of macrame weaving cord. The cord is best purchased at a retail outlet that specializes in a building assortment. We recommend a polyamide cord (4 mm in diameter) with a polypropylene core.
- Gloves for work.
- Roulette.
- Scissors.
Step-by-step instruction
- First you need to determine what the frame of the wicker chair will be. To form each hoop, you need to fix the ends of the metal-plastic pipe. To do this, we use wooden or plastic inserts, which we fasten with screws.
- Next, we calculate the length of the cord segment that will braid the frame (larger and small base circles) according to the formula S = 3.14 * D (moreover, S is the length of the metal-plastic pipe, D is the diameter of the hoop).
- First, using the prepared cord, we make the winding of the hoops. At the end of the process, the frame should be completely covered with cord. To wrap a meter of hoop, about 40 m of material is consumed. To increase the density, after every 15-20 turns, the cord should be additionally pulled with force.
- You can weave the mesh itself using any of the macrame techniques that you own. For example, the most in a simple way- "chess".

When weaving we use a double cord. We attach the canvas to the hoop also with the help of double knots.
- During operation, control the uniform tension of the bundle, so you will be able to weave a neat and elastic product.
- We assemble the finished mesh and braided hoops into a single structure. We connect the hoops together from one edge, wrapping them with one cord (this is the end of the future seat).

- On the opposite side, we install two identical vertical wooden rods on the parts of the hoops that form the frame. Cuts should be made at the joints for better fixation. The height of the backrest of the future hanging chair depends on the size of the rod.
- Let's start building the back. Use any kind of weaving technique, starting with the top piece, moving towards the seat.
- Fasten the ends of the cords that remain on the lower hoop, arranging them in the same brushes.
- Reinforce the design of the connection between the seat and the back with two large-diameter strands.
- The wicker chair is ready. It remains to attach slings to it and hang it in the planned place.
Retreat: hammock chair
The hammock chair does not have a rigid frame, so it stands out among other similar products due to its compactness and mobility. Such a seat can be taken with you on a picnic to be mounted on a tree, attached to the ceiling in the house or hung on a special holder. Sitting in a hammock, you can only sway a little, but you should not use it as a swing. Otherwise, the mount will loosen over time, become unreliable. Making a hammock chair with your own hands is easy, it has quite simple design. This master class will help you create a product designed for weight up to 90 kg.

Necessary materials and tools
- Oak spike or handle for a shovel.
- Thick rope.
- 2 m of strong fabric (similar to canvas).
- 2 steel carabiners.
- A can of black paint (or another color of your choice).
- Scissors.
- Electric drill with a drill.
- Sewing machine.
Work description
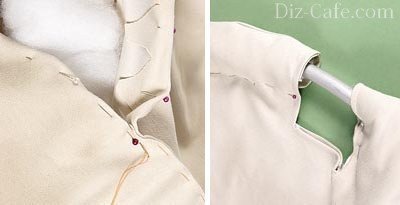
- Fold the piece of fabric into two layers. Using a marker and a ruler, mark the corner, cut it off (as shown in photo 1).
- Unfold the fabric, sew the bottom and top edges.

- Unroll the fabric so that the longer side is on the right hand. Fold over the edge to make pockets where we will tighten the cord. Pre-tuck or overlock the cut, this will allow the fabric to retain its structure longer.
- Repeat the same steps on the other side of the matter.
- Stitch the edges neatly, pin the seam.
- In an oak stick (or handle), drill two holes on each side for the fastening device.
- Using a can of paint, make a design on the fabric. For this you can use various ways and stencils. The paint should dry within an hour. After complete drying, if you want, apply the pattern on the other side.
- Pass the cord through the hole in the side spike (which is closer to the edge). Tie a knot, then pull it through the prepared (sewn) narrow cavity in the fabric. Before passing through the second hole of the spike, also tie a knot. Repeat the operation with the other side of the hammock, but tie the knots on the cord in reverse order.

- Make a knot for a carabiner (as in photo 9) in the middle of the cord. Attach the carabiner. Using a drill, drill a hole in the ceiling for the hook. Install the hook.
To make sitting in a new hammock chair more comfortable, sew or use a ready-made round pillow by placing it in a pillowcase, in harmony with the textiles of the chair in color. As you can see, building a hammock chair with your own hands is not very long and inexpensive. They will be enjoyed by adults and, of course, children.
How to hide in a cocoon
The cocoon chair is a strong metal carcass braided (with greater or lesser density) most often with artificial rattan. Being in such a structure, a person feels a special feeling. The hard shell-cocoon, swaying easily, creates an atmosphere of security inside, fenced off from the problems of the outside world.

Of course, not everyone can make a similar hanging chair with their own hands, because you can’t do without a welding machine in your work. But if you know a person or workshop who can help you, feel free to plan a cocoon wicker chair that will provide you with many pleasant hours of relaxation.
Tools and materials
- 2000 mm of wire or reinforcement with a diameter of 8 mm for the base of the ellipse.
- 1 spoke with a diameter of 8 mm for the seat.
- 7 spokes with a diameter of 8 mm for the back wall.
- Vice for giving the desired shape to the fittings.
- Welding machine.
- Metal grinding machine.
- Bar, nail.
- Roulette, square.
- 120 m of 16 mm rope (cut into 10 m pieces).
- Paper, pencil.

Operating procedure
- Take a large sheet of paper, draw two perpendicular lines 1000x900 mm so that their intersection is shifted down. Draw an ellipse.
- Measure according to the plan, then cut 2 pieces from a metal rod. Bend them according to the drawn pattern and connect them by welding at the top and bottom.
- Match the resulting shape with the diagram.
- Weld the lower arch, which will be in place of the seat, to the metal ellipse, slightly tilting it back.
- In pre-prepared wooden beam ok, you need to hammer in a nail, while leaving part of it in order to form a bracket. Insert the bent needle into the bracket and weld this point to the arch.
- Weld other knitting needles evenly on top and bottom to form the back wall of the cocoon.
- To make the structure strong, weld a pre-bent horizontal rod.
- With even rods, retreating the same distance, we sew up the arched seat.
- Finish all welds with a corner grinder.
- Degrease the metal frame special composition, paint it with the paint of your choice in 2 layers.
- Starting from the bottom of the frame, braid the knitting needles one by one (as wattle is constructed) until you cover the entire frame. Do not forget to fix the ends of the ropes on the back.
You just have to choose the mounting method and install a comfortable seat. Such a cocoon chair can become a place to relax both indoors, attached to the ceiling, and outdoors, suspended from a separate support or a strong tree branch. It can support a person's weight of about 80 kg.
If you know how to sew on a typewriter, you can weave something using the macrame method, or you know the art of metal welding, be sure to use one of the workshops suggested above. Give joy and pleasure to yourself and your loved ones.
Easier than a regular landline. Of course, it will not be possible to make an acrylic bubble chair at home, but the rest of the product options - a basket, a hammock, a wicker cocoon chair, are quite feasible.
The model is chosen based on the skills that the home master possesses.
This is the easiest option, available even with minimal experience with a sewing machine. For its manufacture you will need:
- a piece of fabric with a width of 1.2–1 and a length of 2 m. The denser the matter, the greater the load it will withstand, moreover, dense fabrics are more resistant to wear;
- scissors, centimeter;
- sewing machine and iron;
- nylon rope;
- wooden plank or bar;
- steel carabiner.
The color of the fabric is chosen depending on the style of the room. The color of the ropes is usually white, as brightly colored ropes are hard to find.
Manufacturing technology is uncomplicated.
- The fabric is folded in half in length, measured from the upper right corner of the edge (not along the fold line) 40 cm and a cut is made from the mark to the lower right corner. A fragment is cut off and unfolded: the pattern should have the shape of a trapezoid. In this simple way, a corner is formed so that the result is a hammock chair, and not just a hammock.
- The upper and lower edges of the "trapezoid" are tucked, ironed, tucked again and stitched on a sewing machine.
- The sides are tucked exactly at an angle of 90 degrees, twice, so that a cavity is obtained for pulling the rope. Sew the seam on the machine.
- AT wooden bar of the desired size, drill 2 holes on each side at a distance of 2 cm from the edge and from each other. The bar can be painted or simply varnished.
- The ends of the rope are burned to prevent unraveling, a knot is tied on one side, then the rope is passed through the hole in the bar to the knot. The cord is pulled through the side edge of the hammock from the side of its wide part, and then passed through the second hole on the same side of the beam. The size of the resulting rope loop determines the height of the hammock and the size of the chair, so before fixing the knot next to the beam, you need to make sure that its parameters are satisfactory.
- The rope is passed through the second hole on the other side of the bar. This loop is hung from a carabiner to ceiling hook, so its length should be sufficient for the normal location of the hammock in the air.
- Then the cord is passed through the second edge of the product from the narrow upper side, and pulled through the first hole on the other side of the beam.
- The position of the rope is adjusted until the shape and height of the product suit the future user. Then the rope is tied in a knot, and the excess is cut off.
- to the ceiling or ceiling beam fix the hook, the finished hammock is hung on it.
The following video contains a master class that will tell you how to make a hanging hammock chair with your own hands:
wickerwork
Any of the materials with sufficient flexibility is suitable for making with your own hands - willow vine, grape, willow, bird cherry, rattan, bast. But, since in the middle latitudes it is easiest to find thickets of willow or broom, willow twigs are the most popular raw material.
For a hanging chair you will need:
- about 400 pcs. young willow twigs with a diameter of 10–20 mm;
- as a frame, it is easiest to use a finished metal or metal-plastic hoop. If necessary, you can make it yourself from a hollow tube of the desired diameter;
- a knife, ruler, awl and round-nose pliers will be needed when weaving;
- twine and glue are required for tying the frame;
- synthetic cord with a diameter of 4 mm, similar in color to the vine - for the back of the product. With sufficient skill, it can also be woven from a vine;
- slings (ropes) for hanging - the length depends on the height of the ceiling.
The appearance of the product is determined by the technique of weaving. With a minimum skill, it is recommended to work with a simple single weave. If you have experience, you can weave a more complex pattern.
In the very simple version the manufacture of a hanging chair is done in this way.
- A cross is made - 3-4 thick rods are tied in a cross with a twine smeared with glue. The length of the rods is equal to the diameter of the future seat.
- They wrap the cross with a thin rod so that it alternately turns out to be below and above the rods of the cross. In difficult cases, round-nose pliers are used.
- The next rod is tied in the same way with a circle larger diameter. The operation is repeated until the seat of the desired size is obtained - usually it is 70–80 cm.
- The last circle of weaving is tied with twine smeared with glue. For this, an awl is used.
- The back of the chair is woven with a macrame checkerboard pattern. To do this, a synthetic cord is tied to the hoop that makes up the frame of the product so that one end of the rope remains short, and the second, the working one, has a maximum length. The cord is tied with a flat corner and tightened.
- The same is done with 5 more cords. In total, at the beginning of weaving there should be 12 ends: 6 short and 6 long. The ropes are divided into 3 groups of 4 cords each. 3 square knots are sequentially knitted in the first row, and in the second row the first and last 2 cords are left untied. The operation is repeated until the back and sidewall of the required height are woven out.
- The woven seat and the hoop with the back are fastened with twine smeared with glue. The back can be strengthened with two thick rods.
- Slings are tied to the hoop in 4 places. The latter are connected with a carabiner and fixed on a hook, rod or chain.
Photo of a DIY wicker hanging chair
Cocoon and ball
A cocoon differs from a basket or hammock type structure in its closeness. Such models have very high sidewalls, closing with the back, and enclosing the seated person from three sides. The shape of the product is an egg or a ball. There are also drop-shaped, completely closed models. But at home, the manufacture of the latter is very difficult: such a chair has big sizes, requires a reinforced frame and a very durable material for weaving.
With their own hands, they often construct a structure from hoops, and therefore a self-made hanging cocoon chair almost always has the shape of a ball.
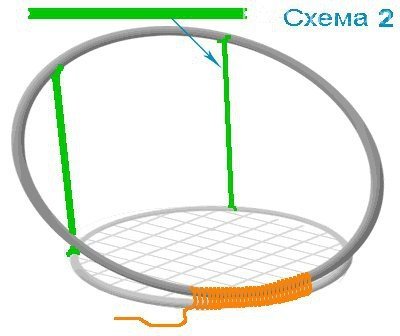
- The frame is the main one. It is assembled from at least three steel hoops, fastened together with screws. It is recommended to reinforce such a design with fragments of hoops - arcs installed perpendicularly and dividing the conditional "ball" into segments.
- The hoops are sequentially wrapped with a synthetic rope - turn by turn. Every 5-10 turns, it is advisable to coat the area with glue.
- The space between the segments is braided with the same rope. You can use a thinner decorative cord and weave the mesh if the skill allows you to create a more openwork design using colored polyamide threads.
- For a seat in such an armchair, it is desirable to install a wooden plank, since the bend of the ball does not create a convenient support. The same role is played by a fairly rigid elastic pillow. For the back, you can use a softer pillow - from sintepuh, for example.
- Hang the product on a chain attached to the outer hoop.
The following video contains a lot interesting solutions for self-manufacturing hanging chair:
Swing chair
A do-it-yourself swing (or rocking chair) differs from an ordinary hanging chair in that it swings only in one plane and practically does not rotate. This is achieved in a simple way: they fix the rafters or holding rope loops not to one point, but to two.
- The basis of this do-it-yourself manufacturing option is most often a hanging hammock chair, since its default design provides for fastening to a wooden beam, and only then to a hook on the ceiling. To enhance the swing effect, the hammock is hung not on two ropes, but on 10-12 on each side.
- A more suitable modification for a swing is a hammock sewn in the manner described above, but with elastic and hard cushions fixed directly to the canvas - a seat and a back. In this case, the fastening is done a little differently: in the side parts, the rope is used to reinforce the edge. Then the edge is divided into equal segments, and the cord is fixed at each point, grabbing the rope hidden under the fabric. All 10-12 ends on one side and the other are adjusted in length and tied together.
- The design looks more beautiful, where the cords are tied around a fastening ring, which, in turn, is fixed on a bar or even simply hung on two ceiling hooks.
- Street version, involves the arrangement of a typical swing structure: two support posts in the shape of the letter "L" and a crossbar.
DIY swing chair (drawings)
 Egg
Egg  Hammock
  Cocoon
From the hoop
Metal and less often metal-plastic hoops often become the basis for a hanging chair. They come in a variety of diameters, are durable and quite affordable. Build from them and.
All these types of hanging chairs, as well as hammocks, are made by hand using the macrame technique, and read on how to weave such a product correctly. So, we need:
- two hoops with a section of 35 mm of different diameters - 70 cm for the seat and 110 cm for the back;
- about 900 m of polyamide or nylon cord for weaving with a section of 4 mm and 2 thick cords for the bundle;
- 12 m slings and 2 wooden blocks.
Manufacturing technology includes the following steps.
- Both hoops are wrapped with a cord, tightening every 20 turns. The cord must be very tight.
- The seat hoop is braided according to any of the macrame techniques. The simplest and most popular is the “chess” with flat knots. When weaving, the cord must be well stretched, the elasticity and strength of the future product depends on it.
- The second hoop is tied to the seat with twine. Spacers are placed on the opposite edge between the hoops - they provide rigidity to the back. Cuts are made in the bars before installation in order to securely fasten them to the hoops.
- The back is braided with a cord using the same or some other macrame technique. The braid starts from the upper, wider part, gradually descending to the seat.
- The slings are tied in four metas, achieving the correct position of the chair, and hung on a hook or rod.
- You can decorate the product with decorative braid, tassels and so on.
The following video will help you make your own hanging chair from an ordinary hoop:
The design of the hanging chair is quite simple, and the materials of manufacture are quite affordable. Having shown a bit of patience and perseverance, you can get a completely worthy original product from the most ordinary items.
Peace and tranquility - one can say that one of the most important criteria when arranging the interior of a room in a house (apartment) or when ennobling with landscape design country yard. A do-it-yourself hanging chair will bring to this picture not only visual calm, but also physical relaxation, serene relaxation during its operation. A hanging chair is designed to lull a person and lead to a philosophical thoughtful conclusion, with its direct use - dimensional rocking.
Varieties of hanging chairs
There are at least 6 versions of hanging chairs that can be installed both indoors and in the patio, under the canopy of trees.
So this is:
- Wicker hanging chair. It is a frame of two hoops, one of which is, as it were, the entrance to the chair, and the second is the seat itself. This design is braided with ropes. To strengthen the skeleton of the composition, supports can be additionally installed between the hoops in the form of segments corresponding in length from other hoops;
- Hanging chair hammock. This form of hanging chair is also comparable to a hanging chair made of a soft frame wrapped in fabric. It is convenient because it has comfortable adjustable dimensions and ease of installation;
- Hanging chair to the ceiling or vice versa, its prototype is a hanging chair, which is mounted on a rack. advantage hanging structure on the stand is convenient because it is portable. However, a chair suspended from the ceiling also has its own zest - the design will take up less space in the room and withstand more weight of the person resting in it;
- Hanging rattan chair with rigid frame. It is made from wicker, acrylic or durable plastic. At the same time, it is very difficult to perform this type of hanging chair on your own. For a comfortable pastime on such an armchair, its seat is decorated with soft pillows or miniature mattresses;
- Hanging chair cocoon. It is notable for the fact that three-quarters is hidden by rope wicker walls, made using the macrame technique. An ideal modification of a hanging chair for those who dream of privacy;
- in the form of a drop. Such a chair is more suitable for children, as it has an association with a small cozy house in which the child can feel like in a shelter and forget about the world around him for a while.
All these models can be found in many IKEA stores, while the hanging chair itself, as well as its accessories, are relatively inexpensive, and it will only be a matter of time and desire to purchase it.

However, for those who intend to make a hanging chair with their own hands, do not despair either. You can make your own - an individual and ordinary hanging chair, according to the elementary scheme presented below.
Suspension Chair Standard Design Scheme
In order to make an elementary and simple hanging chair, you will need to purchase the following list of materials and tools:
- Two hoops, different in diameter, made of metal-plastic, or PVC pipes, which then will need to be rounded and give them the desired rounded shape in terms of dimensions.
- Strong cords and polyamide threads for fastening hoops.
- Slings, wooden rods and foam tapes (either tape or glue can be used instead of tapes).
- Construction tape measure (or centimeter tape), scissors, needles, cotton threads and a knife.
In the event that the chair is supposed to be subsequently sheathed with fabric, then in addition you will need to purchase a little padding polyester to stuff the seat and back.
So, the scheme for designing a hanging chair with your own hands is as follows:
- A hoop with a smaller diameter is braided with macrame knitting technique, in the form of a checkerboard grid with flat knots, or any other pattern that has a strong fastening of transverse threads.
- Then two hoops, a braided small and a large one, are fastened together with foam rubber bands in such a way that it looks like a standard hanging chair.
- Further, the resulting design of two hoops is woven along the part of the back with a similar pattern, as on a small hoop, and at the end, if desired, it is decorated with a fringe at the bottom.
- For structural strength, in its wide part - on the back, spacers are installed, in the form of wooden rods, which are cut at the ends for fixation, and thus additional strength is created for the hanging chair;
- Also, at your discretion, to your taste, you can beautifully and accurately sheathe the resulting shape of the chair - with a cloth.
- In conclusion, the finished model, with the help of slings, is hung in the desired place, securely fixing it to the ceiling.

For a chair with a soft frame, that is, an ordinary hammock, you only need one hoop and a very dense fabric. The hoop will need to be sheathed with fabric, and the resulting seat will need to be filled with padding polyester. Then, in the provided areas on the seat under the slings, fix the structure by the loops to the ceiling. The space between the feet can be further processed with a fabric like a comfortable and cozy soft back.
A dacha is a place not only for intensive work, but also for a good rest, so it is difficult to imagine a home garden without a hammock or a swing. In gardening stores today you can find designs for children and adults. different shapes and dimensions. If you don't want to spend money, try making your own garden furniture. In this article we will tell you how to make a comfortable DIY hanging chair and decorate household plot country house or .

Materials:
- metal hoops;
- slings;
- cord;
- centimeter;
- wooden bars.

Master class for making a hanging chair for a summer residence
If you have not found hoops of different sizes, you can make them yourself from PVC pipes with a cross section of 3.5 cm. Decide on the size of the chair and calculate the length of the pipe using the formula:
L=3.14*d, where L is the length of the PVC pipe and d is the diameter of the ring.

For example, if you need to make a hoop with a diameter of 100 cm, you need to measure 100 * 3.14 = 314 cm of the pipe. To connect the ends of the pipe, inserts made of wood or plastic can be used.
It is better to braid the hoops with a polyamide rope 0.4 cm thick, as it is more durable and at the same time soft to the touch. It is better to buy a lot of cord in advance so that it is enough for the whole product, at the rate of 400 cm of cord per 100 cm of the hoop. The winding should be uniform, and to increase its strength, tighten every 10-20 twists.

Now you can start weaving the net using the macrame technique. You can choose any pattern, for example, chess with flat knots or any other. Watch the tension of the rope during weaving, as the beauty of the product depends on it, as well as the strength of the finished cross. The remaining ends can be turned into a fringe that will hang down beautifully.

After the hoops are braided, they can be assembled into a finished structure. Start by braiding them together from one end. To make the back, wooden rods are inserted. It is best to make cuts on the ends of the rods so that they do not slip off.

You can also braid the back with any pattern, while it is better to start from the top and go down. When the chair is ready, you need to attach the slings and hang the product in a convenient place.
Watch a useful video: Weaving ropes for a chair
Master class chair for giving with a fabric cover
If you are not familiar with the technique of macrame and do not want to do weaving, you can make a chair with a fabric cover. To make it, you will need a hoop with a diameter of 0.9 m, 3.0 meters of durable fabric, metal rings and buckles, braid and slings.

From a piece of fabric, it is necessary to cut out two squares measuring 150 * 150 cm. In order to make a circle, the squares must be folded four times, measured 0.65 m and cut off. At a distance of 40 mm, measure the contour with strokes.

Now you need to outline the cutouts for the lines, so the circle is folded four times and marks are made relative to the bend lines. The first two slings will be located at an angle of 45 degrees, and the second - 30. The slots should be 10 * 15 in size.

To make them on the second circle, connect the parts and make a mark. Two circles need to be sewn on a typewriter along the marked line so that there is a hole for the hoop. From the synthetic winterizer, cut strips 6-8 cm wide and sheathe the hoop.

The cover must be filled with padding polyester and fastened to the hoop. It remains to attach the slings and fix them in one suspension on a metal ring.

Hanging seats have been popular for a long time. Most often they are made of rattan, as they are highly durable and lightweight.

Semicircular structures are very comfortable for relaxing, while they can be hung on a tree or other support. The form of hanging furniture can be completely different, so each owner of a country house chooses the most suitable options for himself.

On the market garden furniture you can find hanging furniture made of plastic, wicker, acrylic or rattan, and each has its own advantages and disadvantages.

To make the seat soft, the kit includes decorative pillows or mattresses. There are many options for decorating a corner for relaxation, so you can either make garden furniture yourself or buy ready-made products.

A hanging chair can be hung not only on a tree branch, but also in a gazebo. To do this, you will have to build a suspended structure that will withstand not only the furniture itself, but also the weight of a person.
Watch the video: Hanging chairs - romance in the house
The advantage of the chair is that it will fully meet your needs and be in harmony with the overall landscape design.
