
Aged doors: the fastest way to get the effect of antiquity. Artificial aging of objects. Techniques and methods Processing the board with an iron brush
- This is a long and painstaking process, consisting of mechanical processing of wood and work with paints and varnishes. This finishing method is associated with Leon42, a participant in the forum "House and Dacha", with naturalness, antiquity, folk culture.
According to Leon42, buy furniture and brush it with a metal brush - this is not yet aging it, but simply scratching or, at best, making a textured surface. Furniture bought in a store - made of lamellas and "skinny" - is not suitable for texturing, it looks rather sad and flawed.
leon42 believes brushed furniture should be rough and solid, able to capture the natural beauty of wood.
It is the superficial approach to the aging of wood, according to the forum member, that forms the opinion of many people about products processed using this technology as “furniture of fire victims”. Meanwhile, the combination of aged wood with metal, stone or ceramics in the interior is always a fashionable and stylish technique that allows all the inhabitants of the house to touch eternity and feel like in the Middle Ages.
Under natural conditions, wind and moisture, sun and temperature changes "work" on the aging of a tree. How to do what has been happening for many decades, in a few days?
Material preparation
For brushing, it is better to use soft and medium hard wood with a pronounced texture, such as spruce, pine or larch. In these wood species, soft fibers are formed, as a rule, in the spring-summer period, when there is an intensive growth of annual rings, and they are more “loose”.
Wood with a uniform and unexpressed texture like beech and maple is not suitable for aging.
Before working with wood, prepare its surface. Eliminate all defects and dirt, whether traces of sweat, grease or other stains that may appear during the application of the tinting composition. Process any products (small architectural forms, furniture, etc.) after disassembling: you will spend less time and can get it everywhere with a brush.
brushing
Brushing (English brush - “brush”), or texturing a tree is giving it a relief characteristic of old wood. On the initial stage soft fibers are removed from solid wood. There are several processing options: light aging - a barely noticeable roughness is created on the surface, or deep and rough, when the depth of the roughness reaches 2-3 mm (for decorative elements, sometimes for rough furniture).
Can any detail, say, ceiling beam, pre-process with an ax: make notches, trim the edges without fear of spoiling - no one but you knows what the result should be. In this case, you will receive a product with a deep microrelief of the surface and irregularities on it up to 20 mm deep.
Do not forget about the "traces" of the vital activity of bugs and worms. Simulate them before finishing with a drill or drill. You can also apply simple carving elements: pigtails, dragons, etc. - you will get "Scandinavian style".
Sanding: tools and brushes
At large enterprises, machines and automatic lines are used, where everything is provided - from the feed rate of the workpiece to a powerful dust removal system. For an ordinary summer resident, such equipment is expensive and, in general, an unnecessary pleasure. If you will do this type of work often, it is better to purchase a brushing machine. The most common and publicly available is Makita. The most economical and simple option is a “grinder” or a drill, preferably with the ability to adjust the speed.
The whole brushing process can be divided into three stages:
- Rough selection of soft fibers
- Grinding
- Polishing
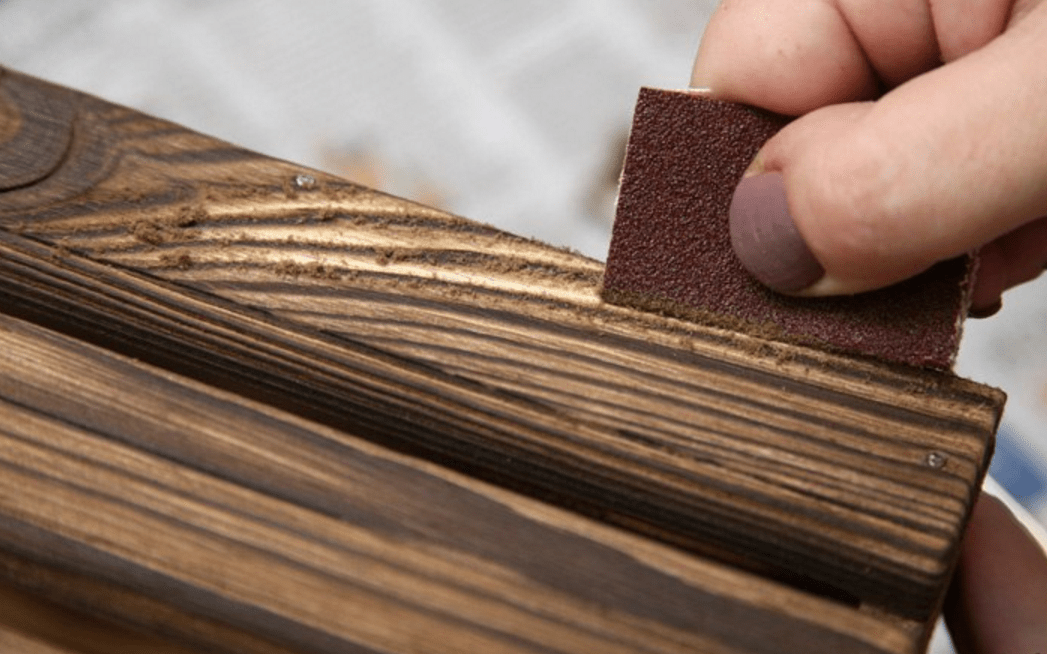
Accordingly, each of them needs its own brush. At the first stage ( brushing) use metal (brushing). If you are making structures for the outdoors - a gazebo, a canopy, a fence, etc., then most likely this will be your only brush.

When processing with a metal brush, scratches can remain on the annual rings themselves, which are difficult to get rid of during further processing.
When working with kratsovka, you must adhere to the following rules:
- brush along the fibers, otherwise damage the annual rings and ruin the woody pattern;
- the speed of movement of the brush and the pressure should be approximately the same, otherwise pits will result;
- the light source should be placed on the side at an acute angle, directing the beam of light across the fibers - this way you can better see the surface to be treated;
- do not press hard on the surface, do not overload the engine, otherwise it may cause premature equipment failure;
- the speed of revolutions should not be higher than 3000, better - 2000-2500: the brush can quickly scatter;
- be sure to work with glasses, do not neglect protective gloves: pieces of wire from the brush can fly off several meters, injuring others;
- take care of respiratory protection and dust removal: during this work, even eyelashes are covered with “powdery mascara”, let alone the lungs;
- a new brush needs to be “run in”, otherwise it will strongly “wave” the workpiece, after a while it will begin to process the surface cleaner;
- work only in one direction (rotation), the reverse should not be turned on - this will “kill” the metal brush;
- the humidity of the processed wood should not exceed 15%, otherwise, instead of a textured surface, you will get a shaggy-hairy one.
When processing sustainable and hard wood (larch, oak), be sure to use dust extraction systems: the dust of these wood species is considered carcinogenic and can cause lung cancer.
If you want to get rid of lint and get a better finish, you will need another brush - plastic (nylon), or rather, a grinding disc made of polymer-abrasive material. The most common grain size is 120.

Abrasive brush - universal, characterized by a more delicate surface treatment. If you use this brush, you can do without a metal brush, especially if the workpiece needs to be treated delicately or if you want to avoid the specific scratches left by brushes.
The principle of working with an abrasive brush is the same as with a metal one. It is better to reduce the speed to 1500 in order to extend the life of the brush. Dust when working with a plastic brush is finer and stickier, so do not forget about a respirator.
Surface treatment specifics:
- do not grind the edges-edges and corners of the workpieces, especially if you do not plan to varnish them later: they will cling and chip off;
- do not make a deep relief on the seats, table tops and other horizontal surfaces - they will make it difficult to clean the surface: spilled drinks, crumbs, etc. will clog between the fibers;
- in order to prevent clogging of dust and snags of a rag during cleaning, such surfaces must be sanded with an abrasive brush and fine-grained sandpaper.
The final stage of brushing - polishing or fine grinding: performed with sesal or other synthetic brushes. You can use fine-grained sandpaper, abrasive sponges, metal wool, removing dust from the finished surface with a wide brush and vacuum cleaner.
Finishing operations
At the final stage, tinting is done (changing the color of wood by several tones), patination (underlining the texture of wood with special compounds that penetrate into the pores open during brushing), craquelure (the effect of cracking and drying out), and varnishing.
After brushing, the board will look like new, but with a textured surface. To give it an old look, it is covered with various compositions, dark colors look more natural.
Exactly right game with the color of brushed wood gives it an aged look. Areas with soft wood (pores or depressions) are stained unevenly with more dark color, from solid (combs) - to lighter. Recently, options with light troughs and darker ridges have been popular.

The easiest way is to apply a generous amount of dark stain and immediately wipe the area with a rag or a wide rubber spatula. In theory, stain should soak quickly into soft surfaces, but slower on ridges. However, this is often not the case in practice, so Leon42 I settled on a more complex method: after complete drying, the ridges are polished with fine-grained sandpaper. This method requires further processing with varnish or colorless impregnations, so the top layer that is opened remains without a protective coating.
Another option is to use paint in two contrasting colors: the surface is completely painted over with the first color, then the second is applied. While the last coat dries, run with a wide rubber trowel, removing excess paint and exposing the ridges of the first coat.
Proper texturing is a simple but messy, time consuming and unhealthy process.
As a result of difficult and hard work, you will get decorative elements that carry the beauty of antiquity and at the same time have high strength. Every detail made with love with my own hands, will be unique.
According to the materials of the participant of the forum "House and Dacha"
Editor: Olga Travina
Despite the variety of glossy facades, antique wood interior elements remain in demand. The purchase of such furniture will cost a pretty penny. In the case when you don’t really want to spend money, you should not refuse the idea of \u200b\u200bhaving an aged chest of drawers or a table. You can try to age the furniture yourself. Let's try to figure out what technology is used to process semi-antique wood with our own hands. After all natural conditions age the tree for many years. And to get the result quickly, you have to age the tree artificial way.
You will not find semi-antique furniture in every home. It should be used where appropriate. The design of the room should be thought out in the appropriate style so that antique products look decent.
Usually, the tree aging procedure is performed for a specific purpose, namely:
- Satisfy the taste of the dwellers.
- Save money on antiques. It is much cheaper to buy inexpensive furniture and age artificially.
Using certain methods of aging wood, you can get exclusive things. Both the entire product and its individual parts are processed. Particular attention should be paid to items such as chests of drawers, sideboards, book shelves, mirror frames. They are most often aged, since it is difficult to imagine a vintage-style interior without these items.
Aging methods
The process of processing semi-antique wood with your own hands is carried out in several ways. The main ones are:
- Chemical processing- used for hardwoods.
- Roasting or heat treatment- universal option.
- Machining or brushing- this way you can process products made of oak or needles.
Furniture for aging is selected massive, with a rough texture, so that outwardly it resembles hand-made objects of past centuries. Before processing, it is better to disassemble the furniture into individual parts. This will make it possible to process even hard-to-reach places.
To facilitate the achievement of the effect of aging wood, it is better to purchase material that is already damaged by a bug, with minor chips, cracks and knots.

If the process of aging a tree with your own hands is performed for the first time, then it is better to practice a little on separate unnecessary bars. The quality of the result depends on how well the solution, stain or varnish is applied. It is recommended to work on outdoors so as not to harm your own health.
How to make new boards or furniture look like old products? Now you know that several techniques are used for these purposes. Let's consider each of them in more detail.
Related article: Features of performing work on grinding a wooden house
Mechanical restoration
It is possible to age a tree mechanically in products from such species as pine, spruce, larch. It is these types of wood that have a pronounced texture, the presence of layers of fibers with varying degrees of hardness.
The main task during machining is the formation of various kinds of chips, potholes, cracks in an artificial way. You can achieve this by doing the following:
1. Wooden surfaces are processed with an ax or a special grinder. Potholes are randomly applied to them different depth and width. The bar is hewn, while you should not achieve special accuracy and symmetry.

2. After that, we proceed to grinding the surface with a brush with metal bristles. It will be easier to do this with a grinder and an appropriate nozzle. During processing, sanding is carried out along the grain until the inflicted potholes and chips take the form of naturally formed defects on the wood.

3. Then we move on to the second degree of grinding. At this stage, we work with a brush with soft bristles and sandpaper. During this treatment, soft fibers are removed, and coarser ones remain. Thus, we get an uneven tree structure. In the same way, you can additionally highlight knots and cracks.

4. On next step We are working on the color of the wood. It is necessary to bring the light new wood as close as possible to the shade of the board darkened from old age. Here you can apply a stain or a dark shade of acrylic-based paint.

5. When the applied agent is completely dry, we process the surface with fine-grained sandpaper. At the same time, we try to perform all actions carefully. The paint must be removed from the hills and ridges, and it remains in the potholes.
6. At the final stage, we open the treated surface with a colorless or light yellow varnish and dry it completely.
Related article: Features of the selection and use of tung oil
On the video: a method of mechanical aging of a wooden board.
As for the question of how to age wood on small items, such as small pieces of furniture or wooden utensils, here the process is slightly simplified. The surface to be treated is thoroughly cleaned with a brush from wood dust until the desired effect is achieved. The subsequent staining and opening with varnish is identical to the process described earlier.
Brushing should only be done by hand using a metal bristle brush until small dents and ridges are achieved.

Heat treatment
Wood can be aged by heat treatment. A feature of this method of aging is the complete absence of mechanical processes. The disadvantage is a certain danger to human health during the work. Therefore, they should be performed outdoors, while protecting the skin, eyes and respiratory organs.
Heat treatment or firing is done by exposing the wood to direct fire. Either a torch or a blowtorch should be used. It is necessary to burn to a depth of about 3 mm.
If heat treatment is carried out superficially, then the effect of aging will not be as pronounced as with stronger firing.
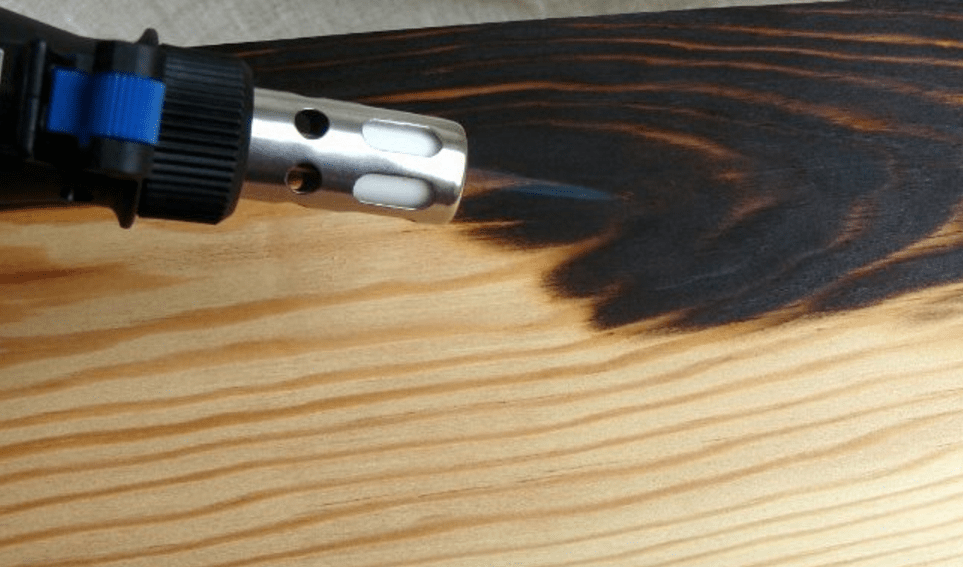
After finishing the heat treatment, perform the following steps:
- With the help of a metal brush or a grinder with a bristle nozzle, they begin to scrape off the carbon layer to the desired degree of antiquity. It is not necessary to paint the surface. Soot will highlight the entire structure.
- Sanding is done with sandpaper.
- A top coat of clear lacquer is applied to the aged wood.

chemical method
A tree can be aged during chemical treatment by means such as alkaline compounds or ammonia. You can use funds household chemicals which contain alkaline constituents.
The essence of the process lies in the fact that when the product gets on the wood, it burns out its soft tissues. The structure of a tree is distinguished by the presence of hard and soft tissues. When processing antique wood, soft tissues are removed in various ways.
If you want to achieve attractiveness and nobility from the wooden elements of your interior, you just need to age them. Moreover, it is easy to do this at home, choosing a good way. In this article we will talk about popular ways of artificial aging of things and their techniques. Strange as it may sound, but in the interior the tree looks much more beautiful, from which it breathes antiquity. From this material you can make an original lamp, stand, chest of drawers, table, wardrobe, window sill, doors, floors or a garden bench. Any item will radiate comfort and warmth. In addition, today everything old is in fashion. Did you know? There are more than a dozen tree species on the globe that are equal in hardness to iron. They are almost impossible to process and sink in water. They are even used in mechanical engineering for the manufacture structural elements and nails. These are temir-agach, parrotia, yew, azobe, Schmidt birch, ulin, jatoba, sucupira. If you wait until the natural wear process of wood occurs, it will take a lot of time. Dozens of years are needed for the natural pattern on the material to acquire a specific interweaving of dark and light tones under the influence of the sun and wind. This effect is successfully used by today's designers, thus turning even the cheapest wooden items into attributes of luxury and style. Without it, you cannot create country styles, Provence, retro, shabby chic, vintage. In addition, the acquired antique furniture will last much less than new, but artificially dilapidated. Many popular styles of modern design are characterized by the use of worn and worn objects and details in the interior, pastel colors and romantic decor elements. Did you know? Every year, for their needs, people cut down about 15 billion trees of the entire green fund of the planet, while replenishing it with only 5 billion new seedlings. This style was first spoken about in the 19th century by the French living in the province of the same name. Their traditions, intertwined with everyday peasant chores and southern nature, became the basis for the development of a new direction in design. Provencal houses were distinguished by elegance and simplicity at the same time, a reverent attitude to the things of their ancestors. It was these family heirlooms that became the personification of the spirit of southern France. Did you know? by the most tall tree in the world is considered a sequoia from the State of California. Its trunk has grown to a height of 115 meters, and in diameter it reaches 8 meters. It represents a completely new direction in interior design. It originated in the UK about 30 years ago. Its basis is the restraint, conservatism, frugality and passion for everything old, but good quality, characteristic of the British. Did you know? In the United States of America, all crafts made before 1830 are classified as antiques; in Canada, before 1847; and in Great Britain, before 1917. It was invented by the French, laying the fundamental foundations of the uniqueness and emphasized originality of old worn-out interior items. Initially, this was the name of wine with many years of aging, but over time, a whole design style was formed. Its main feature is the use of antique items, which must accurately correspond to the fashion trends of their era. Modern craftsmen have long mastered many methods of artificial dilapidation of wood. Each of them has its own advantages and differences. Let's find out which ones. The technique of mechanical stylization of antiquity is carried out in several ways by treating wood with a stiff brush or by applying two-layer paint. The first option is called brushing, and the second - patination. The essence of the method is to extract soft wood fibers, as a result of which a clearly defined relief is obtained on the surface of the board. The same thing happens in nature after decades. Video: how to age a tree - brushing
Experts consider brushing to be the easiest method, but they call for a responsible approach to the choice of wood. To do this, it is better to use conifers with a clear pattern. Important! When working with lumber, do not forget to use a mask or goggles to protect your face and eyes from splinters and dust. A respirator won't hurt either.. When the choice of material is made, you can get to work. Experienced craftsmen advise to initially practice on some unnecessary pruning in order to “fill” your hand: Important! When purchasing lumber, consider their classification. To create a worn effect, class C is more suitable, which is characterized by an unlimited number of knots (including fallen ones), cracks and depressions. If the spirit of excessive antiquity is not to your liking, you can give preference to class AB boards. They have a lot less defects. Patina was once called a thin oxide coating on copper products. Today it is a popular technique in the processing of both metal and wood products. The method is laborious, although it is carried out using the application of special reagents. Its implementation requires extreme accuracy, perseverance and attentiveness. If you are not experienced with these techniques, it is advisable to practice on scrap wood. Designers love to use patination when decorating a home in country and classic styles. So let's get to work: Video: furniture patching
Important! Patination is not used on parts with which a person often comes into contact. The paint wears off very quickly, which gives the effect of untidyness instead of the spirit of antiques.. The effect of aging is achieved by complex processing of lumber. This technique is carried out in several stages: This method looks original only on hardwoods, since their wood contains tannins. When in contact with chemical reagents, they darken, due to which the effect of wear occurs. Important! If there are signs of fungus on the wood, a special chlorine-based bleach will help get rid of the problem. Please note that it penetrates 3 cm deep into the material. The technology is characterized by simplicity and the presence of different variations, with which you can achieve a greater or lesser degree of aging. Be sure to sand the surface with a piece of sandpaper with a large fraction before work. And then choose the method of your choice: Even at home, you can make fragments of semi-antique finishes and decor, although in fact they will be completely new. In this process, it is important to show maximum imagination and diligence, and then your wooden items will look no worse than those offered for sale in antique shops. The use of natural wood in the design home interior gives the premises a more solid look. Antique imitation is also popular in the manufacture of furniture, but the cost of such work when contacting cabinetmakers is high. You can complete the entire cycle of work yourself, since aging a tree with your own hands is not too difficult. It only takes time minimum set tools and desire. Any processing of wood in order to improve the decorative properties also has a positive effect on its safety, since it is associated with the application of several layers of coloring compositions and varnishes on the surface. The service life of properly aged products is much longer than those that have been subjected to minimal impact. Such furniture is less susceptible to decay, mold, damage by insects and other pests. But the main goal artificial aging- giving wooden elements special external properties that will allow them to look more solid. But it is important to understand that the entire interior of the room must comply with a single style. Different types of wood can be aged in different ways. A number of methods are not suitable for working with certain varieties. Table 1. Methods of aging and types of rocks that can be subjected to techniques. Impacts on the surface with the help of special compositions can be divided into techniques: Processing with physical impact on wooden planes is also possible: Other methods are also possible - for example, imitation of natural damage, which is achieved with an awl, sandpaper and other tools. Advice! All of the above methods can be combined to achieve greater reliability. Most methods of self-aging wood do not require specialized tools and expensive materials. It is important to work carefully and slowly. What will be required: Sequencing. This method will help to imitate scuffs and emphasize the relief. Lacquered or painted objects partially darken over time - this is due to constant contact with hands and for other reasons. Most often, such a change concerns the corners and relief parts of the product. To simulate the master use: The application of bituminous varnishes is accompanied by their immediate removal from most of the surface. The irregularities of the wooden object will still remain dark. After drying, cover the product with a layer of shellac. When using wax polishes, they are rubbed on the wood, and after drying (which will take a long time) they will manifest themselves in the form of reflections. We present to you step by step instructions on patination of wood to create the effect of scuffs on it. Step one. To begin with, the box is carefully polished, for which sandpaper is used. Thanks to this, you will eliminate all the roughness and irregularities. Then, when the processing is completed, you need to remove the dust with a rag. Step two. All places where scuffs will be in the future are treated with simple wax from a candle. For example, these may be some sections of the flat surface of the box, its side parts. Still, all these areas can be pre-treated with a primer on wood, but - and this is important - an exceptionally thin layer. Step three. The main color paint is applied to the box (in our example it is white acrylic paint). Apply gently with a brush to all surfaces. Acrylic paint dries quickly. All subsequent work should be carried out only after it has dried. Step four. The box is re-processed with sandpaper. Due to this, parts of the paint will be removed, and therefore grinding should be carried out only in the right places. With those areas that have been waxed, there will be no difficulty in removing the paint. It is also important to move along the fibers of the wood. Note! Do not use very coarse sandpaper. Otherwise, you may damage the surface of the wood. Step five. Now we want the wood to look stained at the corners of the box. This can be done using special composition, called patina (give preference to the one that is water-based). A small amount of paint is applied to the palette (or any other suitable surface). Step six. For applying patina, it is better to use a piece of sponge. The latter is pre-wetted in a patinating composition, after which the paint is applied to the surface with soft, gentle movements. Step seven. When all the compositions are dry, the box should be varnished (preferably matte, not glossy). Everything, the work can be considered completed. Now it remains to wait for the box to dry, screw the fittings. You can use the furniture drawer! On a note! If desired, the patina can be applied in two layers - this allows you to get a more saturated color. But in this case, you don’t need to overdo it, otherwise the furniture will not look natural.
The essence of the method is to apply several layers of paint, and the lower (darker) ones should shine through the translucent upper ones. What coloring compositions can be used: Reference! Many also use strong tea leaves. The result should be a surface painted in different shades that shine through each other. The technique consists in covering surfaces with droplets of paint, which will give it an original look. Most often used in conjunction with other aging techniques. You will need: It also makes sense to prepare some object (for example, a sheet of paper) on which you can practice spraying. Advice! It is recommended to cover the table and nearby objects with newspapers so as not to stain them during work. Process description. Advice! To get large splashes, you need to capture more paint with a brush, and to apply small point drops, on the contrary, as little as possible. This method is often used by artists to create craquelure - imitation of aging, looks like a paint layer cracked from time to time - in the form of a web. It can also be used for aging wooden painted or varnished products. One of the most effective methods There are two ways to get a craquelure surface. Important! Only one pass should be made in one place. Otherwise, the composition will begin to roll off the plane. After 24 hours after drying, a finishing coat must be applied. It is better to use shellac or acrylic varnishes. The result should be a surface with a cracked top layer of paint, and the first layer is visible in the cracks. The method is more time consuming compared to the one-step method, but it looks much more impressive. The resulting surface will look and feel old - with peeling paint. Other ways to create artificial craquelure: All patination methods have been repeatedly tested by design and decor experts. Not very difficult but effective method aging. For work you will need: Advice! For rubbing, you can use a regular candle. The method of chemical action on wood. Most often, craftsmen prefer to age products made from hardwood. Special formulations can be used as chemicals: Or what is in every house: Small products can be immersed in the solution as a whole, and large products can be treated with a brush or swab. It is important to take a fabric that will not leave particles on the treated surface. Different chemicals interact with wood fibers in different ways. For example, Epsom salt leaves purple spots on a birch, and iron sulfate leaves olive ones. The process consists in the primary machining of the part with sandpaper and the application of a chemical solution. After the reaction and drying, the product will receive the appropriate form, after which it will be possible to continue working with it. A kind of mechanical action on the structure of wood. Use metal brushes or special nozzles for drill. The method is based on the removal of softer upper layers, while remaining solid. After such processing, paints and varnishes can be applied or other methods of artificial aging can be applied. The following breeds are practically not amenable to this technique: Surface treatment is carried out along the grain of the wood. One of the types of thermal aging of the product. It is best to use a miniature gas burner - it is more convenient for working with both large and small parts. By acting on the planes with open fire for different times, you can achieve the appropriate shades - from light brown to radical black. Often after this, processing with a metal brush (brushing) is performed. Advice! Such manipulations should be carried out outdoors, in a garage or a special workshop, observing fire safety measures. The process looks like this. The technique will require some experience to get the best result. It is important to consider that the lower layers of sand are hotter than the upper ones, so the bottom of the workpiece will darken somewhat faster than its top. By placing and changing the arrangement of details in the sand in different ways, you can achieve different effects and smooth transitions from light to dark tones. Sand firing is also combined with other methods of wood aging. Masters use other methods for aging wood. Examples: Combinations of different techniques are carried out depending on the initial state of the planes of the tree and on what effect you want to achieve. Working with wooden blanks requires accuracy and care. Sometimes the defects obtained during the work are very difficult to correct. This type of varnish is considered professional and expensive, it is used to protect many products: furniture, decorative ornaments, musical instruments. It is sold both in finished form (you can immediately use it) and in dry form - you will need to dilute the resin yourself. For beginners the first is better time to buy alcohol varnishes that are already suitable for work, this will allow you to learn how to work with them correctly, without being distracted by cooking methods, although the cost of such mixtures is high. After a while, you can try to make shellac yourself. Proportion of breeding: 900 g of shellac will require 240 ml of denatured alcohol. Application methods: swab or brush. There are several methods, but the main sequence is as follows. In addition to longitudinal movements, shellac can be rubbed in circles or "eights" - this way you can better achieve continuity. This job requires experience. To give wooden product a special kind, as if he was already many years old, designers use artificial aging techniques. Some of them can be easily done on your own, and some will require special attention and accuracy. In most cases, expensive materials will not be needed.
03.09.2016
71960
Sometimes emphasizing old age - original solution unsightly sash problems. So, beautiful without additional expenses. Of course, the effect should be deliberate - slovenliness is out of place in any interior. do-it-yourself wood aging - methods, tools and materials are described below. The vintage original look of the doors is obtained in several ways. Below, they are listed in order of increasing effort and cost. The operation algorithm is also described. So: How to do it right: Cleared from. Use a hair dryer or solvent. The canvas is carefully sanded, the boards are knocked down so that there are no gaps. Not bad before aging with all sorts of protections - flame retardant, moisture-retaining composition. The existing cracks are left - they will give even more flavor. Hinges and handles are removed. The method takes a little time, it is safe with the skills of working with the tool. How to do it right: Everything ingenious is simple! To get antique doors, the previously cleaned surface with a solvent and a spatula is covered with black ink, and then the shoe polish melted to a liquid state is rubbed with a brush. You need to rub hard. The method has a drawback - removed door leaf it is important to ventilate during the week - the smell is unpleasant. These antique effects are very easy and fast to get. The style of an apartment or house must be consistent, otherwise the effect is inappropriate. You can get aged doors in other ways. They will require more time and labor. In addition, costs will increase due to the purchase of several shades of paint. So: It is important not to overdo it - the doors should be aged, and not put into disrepair. The door laid on a horizontal surface is cleaned by a chemical or hot method, then the machine is used. You can achieve the effect manually, but it will take more time. First they work with a rough nozzle, then they clean the chips and, finally, they polish. During each stage, the canvas is applied various formulations- stain, ink, shoe polish, so that the further transformation of the old wood goes on continuously. The final step will be varnishing. Using the above methods, it is not difficult to artificially age a tree. In addition to the interior, wooden fragments of furniture - legs, armrests - are decorated in the same way. Various methods of aging the door surface at home require compliance with the steps and nuances. For example:
By itself natural wood beautiful and new canvases are unlikely to need decoration by the methods described. Work should only be carried out on used interior doors to give them a second life and save on buying a new set. Indeed, in the cold season, dense fibers grow, which are the frame. And in the summer a loose and light tissue is formed. It is she who is erased over time, which provides antiquity to the boards.
Provence, shabby chic and vintage in design
 This style is characterized by:
 The shabby chic style is manifested in the following features:
 Vintage interiors are characterized by:
Step-by-step instructions for aging wood
 Hard brushing wood
 Burner-aged wood
 by the most simple option experts consider rubbing wax into the relief bulges of the surface, which creates a worn effect. We will go by applying patina.

What is it for?


Preparation for work


How to grow old with your own hands
Dry brush method


Creating a patina


Master Class. Do-it-yourself patination on the example of a furniture box


Video - How to patinate furniture facades
Glaze

 Glazing is the result of work


Crackle

one step


two step


Creation of scuffs


Etching


brushing


Burning


Sand firing

other methods

Features of working with shellac


Results
Video - How to age wood
Types of artificial aging of wood
Work with paint and varnish
Features of the wood aging process