
Tips for creating glass tables with your own hands. We make a glass table with our own hands How to make a table with a glass top
- Advantages and disadvantages of glass tables in the interior
- DIY high-tech glass table
- Glass table with wrought iron legs
Glass tables complemented, for example, with wrought iron legs, are very elegant and refined interior elements. However, how to make such a table with your own hands and in general, is it possible to make it yourself? Answer: yes, it is possible. The following tips will help you make this piece of furniture with your own hands. However, before you get down to work, remember that glass is a rather complex material. It must be handled with extreme care. The option “and so it will do” in the case of a glass table will not work. You will have to throw all your strength to do it for real worthwhile thing for your interior design.
Advantages and disadvantages of glass tables in the interior
In addition to the fact that glass is a “delicate material”, you need to know about its other advantages and disadvantages before you take on the job yourself. So, let's start with the benefits, because they are really tangible.
- This is very stylish element interior. It will look good in almost any interior style, especially if you combine glass and wrought iron legs.
- Practicality. Modern glass tables are designed to be truly functional pieces of furniture, not just serving as decorations.
- Finally, these tables have high level durability. They are not afraid of high temperatures or humidity. So, unlike wooden table, a glass table with wrought iron legs can perfectly get along in the kitchen. In addition, it can be washed with any household detergents which makes the table easy to maintain.

The main disadvantage of a do-it-yourself glass table is that it is very easily soiled. It will permanently leave fingerprints and other traces. That is why it will have to be washed very often. However, this drawback is solved by replacing the traditional glass with a matte glass of the desired tinting.

In addition, if you decide to make a table with your own hands, do not forget about the high cost of materials. This is especially true if you want to combine glass with wrought iron elements.
DIY high-tech glass table
The easiest way to make a glass table with your own hands is to use simple metal tubes and glass. The simplicity of this method is that all you need to do is glue all the elements together. You can buy a ready-made sheet of glass or cut the table top into any shape you want. Metal pipes can be bought at a hardware store.

To make this piece of furniture in the now fashionable high-tech style, you first need to choose the right glue. If you will use standard version with mirror glue, it will be visible through the glass surface when it dries. Accordingly, this option does not suit us. Yes, and this type of glue dries for a very long time, which is unacceptable in our case, when there are no other types of fasteners.
That's why you should go looking for special glue. It is of two types: "glass-metal" and "glass-glass". Both domestic and foreign manufacturers produce such glue, Polish and German glass glue is especially appreciated. Please note that glass glue dries only under the influence of a special building UV lamp (a regular medical UV lamp will not work). Such a lamp can be rented at a hardware store. Working with her is extremely easy. The glue completely polymerizes under the action of rays in 30 seconds.

Glass table with wrought iron legs
The combination of glass and exquisite forged metal can give any interior a touch of elegant home comfort. The fact is that openwork weaving powerful metal is perfectly combined with the subtle elegance of glass. In this case, it is better to abandon matte countertops and choose the option with transparent glass, because the beautiful forged legs should remain in sight. In addition, so that a table with wrought iron legs does not get lost in the design, it must be supplemented with chairs in the same style. Of course, the chairs do not have to be completely made of forging. It is enough to have a couple of forged parts.
In addition to beauty, such a table also has practical advantages. It is very stable, and due to its rather large weight, no one will be able to accidentally budge it. And besides, forging opens up the widest scope for imagination. Find a good master blacksmith and he will recreate any intricate ideas from your sketches.

Glass is one of the few materials that are equally suitable for any interior. Glass gives a certain freedom to space, weightlessness of the structure. With its apparent fragility, modern views glass can reach the strength of metal. If until recently the presence of glass products in the interior meant glass vases, dishes or figurines, now times have changed: shelves, cabinets, coffee table tops and even dining tables made of glass successfully compete with wood and metal.
What you need to know to make a glass top table
Despite the strength of modern glass, working with it remains one of the most difficult: glass fragments and cuttings of any thickness pose a rather great danger to others, and insufficiently processed sections of the finished product can become a source of very serious injuries and even mutilations. If you decide to make a table with a glass top yourself, you must first take care of the safety of those who will use it.
The most suitable glass for a dining table top is triplex 10mm thick or tempered 6-12mm: a tabletop made of this material has all the necessary characteristics - it is durable, withstands shock, resistance and other mechanical damage.
The greatest difficulty is the process in the manufacture of countertops - cutting glass to the desired size and processing slices. As a rule, when buying in specialized stores, the service of cutting glass to the desired size is provided - in this case, processing the edges of the tabletop will also not be a problem.
Glass is best combined with wood and metal (unless, of course, it is intended to manufacture a purely glass table). The combination of metal and glass is more suitable for high-tech style, and wood with glass looks organic in interiors of any style.
How to make a glass table durable and reliable
In order to calmly sit at a table with a glass top made with your own hands, without fear for your household and for the safety of serving, you need to achieve its stability, firmly connect the parts together, and securely attach the table top to the base and carefully process its edges, rounding all sharp corners.
Methods for joining glass with various materials can be different - each of them has its own advantages and disadvantages:

The design of the table can directly depend on the choice of the method of fastening parts: there are many variations on how to make a glass table yourself, and how it should look exactly in your kitchen. We offer several options that you can easily use in order to make a table with a glass top. However, first we will dwell in more detail on the general technological features of the manufacture of such tables, which, in the absence of the necessary skills, can cause some difficulties.
Before you start making your own glass table…
Challenge 1. Glass selection
In the presence of many various kinds glass, different in color, appearance, technical specifications and price, you can be a little confused when choosing the right one.
To find the optimal combination of price and quality of the material chosen, a preliminary drawing of the future table and safety considerations for its further operation will help: the more glass in the structure and the greater the load this part of the table will experience, the stronger and thicker the glass should be.
The color and decor of the glass are selected based on the general style of the room where the table will stand.

In addition, it is necessary to take into account the ratio of the cost of glass, the complexity of the shape of the glass part, as well as your skills in working with glass: if you cut the details of the structure yourself, there is a chance of spoiling the canvas if you have no experience in cutting glass.
Challenge 2: Cutting Glass
Work order:
- The finished drawing, indicating the dimensions and configuration of the glass part of the table being made, is an indispensable condition for starting work on glass cutting.
- The second condition is the presence necessary tool and auxiliary materials for cutting, as well as the implementation of the patterns according to which it will be performed.
We will definitely need:

You may also need:
- A hammer with a rubber knob and pliers with rubber overlays - the cut line is tapped with a hammer for even separation, and pieces of glass along the line that are still there after cutting are carefully broken off with pliers;
- A thin rod with a diameter of about 3 mm, which is placed under the cut line.
If you have never held a glass cutter in your hands, it’s a good idea to first get used to an unusual tool by practicing on unnecessary scraps: learning to control the pressing force (about 2 kg, can be measured on ordinary scales), developing hand hardness and learning how to draw a continuous line without redrawing is the main conditions for the glass to be cut correctly and efficiently.
The order of work on glass cutting:
- A rag soaked in a solution baking soda, carefully clean the glass from dust and dirt and dry it - the surface intended for cutting must be room temperature, clean and dry.
- We lay the glass on a flat, clean surface - it is important that the planes touch as tightly as possible, and the near edge of the glass coincides with the edge of the substrate;
- We outline the cut line - we impose a ruler or a stencil made in advance; If a glass cutter is used without oil supply, it is necessary to dip the glass cutter roller in oil;
- The cut line starts from the far end of the sheet, is carried out in one continuous movement.
Important: the glass cutter’s starting point lies 2-3 mm from the opposite edge - you can’t start from a sharp edge. The line ends on the contrary - when the glass cutter jumps off the cut surface!
- At the end of the line just drawn (exactly at its end point!), we put any thin round object between the glass and the substrate - you can use a thin flat screwdriver. By sharply pressing on both sides of the line, we break the just cut piece of glass - if all the steps were performed correctly, the glass will break exactly along the drawn line, regardless of the complexity of its contour (Fig. 4). If this does not happen, it is necessary to break off the small pieces remaining on the cut line by lightly tapping on them from the back with a hammer and using pliers or a special slot on the glass cutter body.
Slicing is done very slowly and carefully, the movements of the tool must be directed along the plane being processed. The tool must be moistened with water or turpentine to prevent overheating of the glass edge:
After making the tabletop, you can start making the underframe for our table.
Option 1. Immortal classic - a universal style for any interior.
The peculiarity of such a table is the tabletop, as if hovering above the base.
The dimensions of the table top are 1350x800 mm, the height of the legs is 750 mm, the height of the table top holders is 30 mm.
Accordingly, we need the following materials:
- Glass top 1350x800mm;
- Bars for table legs 50x50x75 mm - 4 pcs;
- Planks made of laminated chipboard (thickness 25mm): 120x600 mm - for the end parts of the underframe, 2 pcs. and 120x1150 mm - for the side parts of the base, also 2 pcs.;
- Chipboard sheet 1150x600 mm - for a false tabletop (if you don’t want to see the knees and shoes of people sitting at the table through the tabletop);
- Furniture corners - about 10 pieces, self-tapping screws for their fastening;
- Elongated confirmations - 8 pcs;
- Fasteners for the tabletop (Fig. 6) - 4 pcs.
The underframe is assembled in accordance with the diagram (Fig. 7).
Moreover, if you still decide to make a false tabletop, you will not lose: its surface can be decorated by changing color scheme table and even style (for example, by laying a mat with hieroglyphs, or pieces of coral and sea pebbles, or even simply by putting burlap under glass).
Holders for the tabletop are fixed on the upper ends of the legs, places for mounting the holders are carefully measured on the glass of the tabletop, holes are drilled and the tabletop takes its place.
The fastening of the tabletop can be arranged in another way, without drilling holes - it is shown in the diagram in Fig. 8, and is also used in the next version of the round table.


Glass table will be a great addition to any interior. However, its cost is quite high, especially for designer models. Therefore, it is much cheaper to make a glass table yourself. How to do this, we will consider further.
Glass table in the interior of an apartment or a private house
Glass is an environmentally friendly material that harmonizes with almost all objects and adds chic to any room. Among the advantages of glass, we note:
- combination with any materials such as wood, glass, metal, leather, plastic;
- stylish appearance;
- Fire safety;
- variety of shapes and colors;
- duration of operation;
- ability to transmit light;
- high level of strength, when using special glass.

A glass table fits quite well both in the living room or kitchen, and in the bedroom or nursery. This table makes the room more refined, original and aesthetically attractive.
In a small room, a glass table will help increase and expand the space. In addition, glass makes the atmosphere lighter and more relaxed.
For the manufacture of glass tables, for safety reasons, it is recommended to use durable tempered glass, which is resistant to mechanical damage and scratches.
In addition, there is an option for the manufacture of glass tables using unusual glass that has a tinted, matte or glossy sheen. In relation to the shape, the fantasy is also limitless, the tables are of the usual square, round and oval shapes or asymmetric - wavy. Thus, it is possible to install a table in a room with any style of interior.

In order to make table legs, metal, wood, stone or beautiful forging are used. We offer you to get acquainted with the features of the combination of a glass table in the interior:
- an excellent solution would be to use a glass table in a room that combines a dining room with a kitchen and a place for receiving guests;
- glass tables or small tables are most appropriate for a modern interior style - modern or high-tech;
- in order to focus on the glass table in the room, it is enough to use glass of bright saturated shades or a colored mosaic;
- high cost and special luxury is distinguished by a table with a dark glass top;
- glass coating special formulations will prevent the formation of spots on its surface.

DIY glass table: a variety of shapes and configurations
Making a glass transformer table will be an excellent option for a small room. Sliding or folding models are quite popular. Also, it is possible to build a table, in which the legs change in height. If you install a table on small legs, then it will function as coffee table, otherwise, it turns out a table for eating.
Coffee tables are quite popular and easy to manufacture, which include a glass top and legs made of wood and steel. Such models have simple form, therefore, in order to build them, special glass cutting skills are not required.
An excellent addition to the dining table will be chairs with bright upholstery. It is possible to purchase chairs based on thermoplastic. In addition, the use of wicker chairs will also be quite relevant.

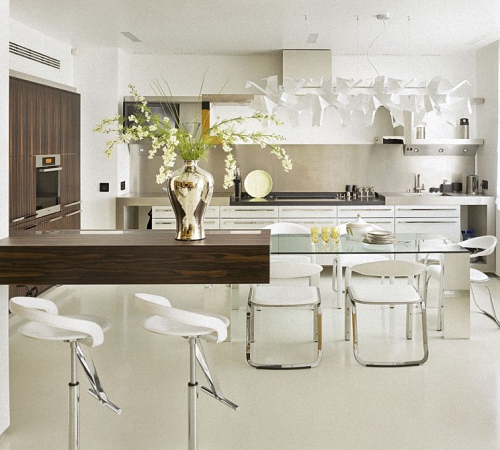
If you plan to install a table in the kitchen, we recommend choosing tiles, a refrigerator hood and other chrome-plated household appliances for this room. A basket can be placed on the table, in which fruits or a vase of flowers are located.
A do-it-yourself kitchen table with glass can be a great decoration for any kitchen or dining room. Especially relevant is its installation in a small room. Transparent glass is able to expand and enlarge the space. In order to avoid stains on the glass after its manufacture, it is recommended to apply a special solution to the surface of the countertop, which is sold in a hardware or furniture store.

Glass furniture made by frame method
In the self-production of a glass table and other furniture based on glass, this way is the most successful. For this, you need to have furniture board, in which a hole of any configuration is cut.
Next, the previously cut glass is fixed in it with the help of a glazing bead. Among the disadvantages of this method, they note a not very attractive appearance, the inability to install sufficiently dense glass.
With the help of mechanical fasteners, after a certain time it is possible to change the furniture and install another glass. The presence of a facet is mandatory.
Doors, windows, some models are made in the same way. desks made of glass. Fixing the glass in the frame does not require additional processing, so the whole process is based only on the installation of a glass sheet.

Glass table photo and glass cutting features
Before the beginning this process you should decide on the thickness of the glass and the size of the glass cutter. There are glass cutters:
- roller type;
- diamond type.
The first option is designed for thinner glass, up to four centimeters thick. Such tools have from one to six rollers. Each glass cutter has a cutting line. There are models that have an oil tank, for beginners, we recommend using them.
The cost of a diamond glass cutter is higher than that of a roller glass cutter. These glass cutters are able to cut glass with a thickness of more than one centimeter. In order to cut glass, you will need a flat, hard surface on which a thick film or cloth is laid. To ensure evenness of cutting, it is necessary to have a wooden ruler, in the event that it is necessary to cut glass of a certain shape, a pattern should be made in advance. For these purposes, we recommend using plywood.
The next step is to prepare the glass for cutting. To do this, the glass is washed and degreased. If the glass has a corrugated surface, then a diamond glass cutter is not suitable for cutting it. In addition, such glass is cut exclusively from the smooth side. Before starting work, we recommend taking a small glass and trying to cut it in the right direction to get used to the tool and practice a little. When cutting glass with a roller glass cutter, the cutting line is covered with a turpentine solution.
The entire sheet of glass must fit on the surface without protruding beyond it. A thick ruler or pattern is placed directly on the cut line. The glass cutter is taken in hand like a pencil, mounted on a ruler. To prevent it from slipping on the surface, we recommend gluing it with fabric-based adhesive tape. The diamond glass cutter practically does not press on the surface, while in the process of its conduct a strip is formed along it. If the pressure was too weak and the glass does not separate, then re-cutting is not carried out in the same place. This rule relevant for both diamond and roller-type glass cutters.
The roller glass cutter is placed in the hand so that the ring and middle fingers press on it. After cutting, a white stripe is obtained. Next, the glass is moved to the edge of the table and tapped from below with a glass cutter. While holding the main part of the glass, gradually break off the areas that are not on the table. For these purposes, you can use pliers or do it manually.
If it is planned to perform curly cutting of glass, then for this, a pattern is applied to the glass, according to which cutting will be performed. Further, this fragment is outlined by a rectangle, which is cut out with a glass cutter. Gradually, unnecessary details are cut out with a glass cutter.
To ensure that the end sections of the glass are not sharp and uneven, sandpaper is used, with which they are polished.
DIY glass coffee table
We offer the option of self-manufacturing a coffee table with chrome legs. The fixation of the legs in this case is carried out with special glue, without the use of clamping mechanisms.
To purchase additional fittings, contact a hardware or furniture store. In order to build such a table, you will need chrome legs, the length of which depends on your personal preferences.
You will also need to purchase a special glue, after applying which there are no traces left, and the glass is held on the surface very firmly. This composition is able to polymerize only in the presence of ultraviolet radiation, which is produced by a special lamp. In the presence of this appliance, the whole process of making a glass coffee table takes no more than two hours.
Please note that using regular superglue or silicone sealant- unacceptable. Firstly, after their application, turbidity and stains are visible on the surface of the table. Secondly, during the operation of such a table, after a maximum of a month, the legs will begin to move away from the surface.
Therefore, having decided to make such a table, it is necessary to invest in special glue with a lamp necessary for its solidification. At the same time, this glue, after hardening, will not allow you to detach the table leg from the glass roof, if you try to do this, the glass will simply break.

When constructing a glass coffee table, use glass that is at least 1 cm thick. To cut it, you will need only a diamond glass cutter.
To build a glass coffee table you will need:
- glass;
- glass cutter;
- rulers;
- pencil
- mittens;
- glue for glass;
- ultraviolet lamp;
- drills;
- file;
- sandpaper.
To begin, define optimal dimensions and the shape of a coffee table. Depending on this, it is recommended to make markings directly on the glass. The shape of the table can be either strict oval or rectangular, or arbitrary. For the manufacture of the second option, experience with a glass cutter is required.
After marking the surface of the cover, start the cutting process. We recommend checking the markup several times so as not to make a mistake when cutting.

Before cutting, the glass cutter is dipped in vegetable oil, if necessary. The cutting process is described in detail above, we will not dwell on it.
After that, the process of grinding the ends of the glass surface follows, if this is not done, then there is a risk of injury during the operation of the coffee table. First, put on gloves made of thick fabric, take a file and polish the surface. This is followed by the process of using a diamond-coated grinder, if available. The work is carried out at low speeds, as a result, a slightly rounded, not sharp edge is obtained. Next is the process of sanding the cover for the coffee table with sandpaper. Finishes the processing of the ends of the felt, which is sold in roll form. It wraps around the surface, providing reliable protection glass. In its absence, special paste-like compositions are used, which are applied to a pre-defatted coating. Their cost is much higher than that of felt.
The main step in the construction of a coffee table is to fix the legs on the lid. To do this, the tabletop must be turned over and laid on a flat surface. First, markings are made, according to which the legs will be fixed on the table. Next, glue is applied to the glass and a leg is attached to it. Work should be done by at least two people. To polymerize the adhesive, use a special lamp with ultraviolet radiation.
In the absence of the possibility of buying glue, we recommend using special suction cups. They are attached to the leg, and then to the glass. For additional fixation of the legs on the suction cups, a small drop of wood glue is applied to the glass surface before installing the legs, it will ensure a secure fastening.

Set the table, and place books on the places where the legs are fixed, which will improve the adhesion of the glass and the legs. After 48 hours, remove the books, wash the glass with special solutions and place it in the living room. It is possible to paste glass with a special decorative film with different patterns imitating a matte surface, ornaments, flowers or mosaics.
Do you want to diversify the interior without extra costs? A DIY glass table is a great idea. A unique product will update the interior of the room. Of course, independent production furniture can not be called a simple matter, but the result is worth it. Yes, and such a product will cost much cheaper than purchased. Today's article - detailed description the process of making a table with a glass top.
Design features
The most popular are products with a monolithic countertop. But there are also transforming tables, with the possibility of extending the table top. The form may be different:
- Round.
- Oval.
- Rectangular.
- Square.
Glass can be ordinary, transparent, as well as frosted or tinted:
- The transparent design is the perfect solution for small spaces. It creates the impression of soaring, grace and lightness.
- The matte countertop often has a greenish tint. This is the natural color of the glass.
Important! Colored material attracts attention, first of all, with its unusualness and originality. For example, black glass is a great addition to a gothic or modern style. It will look great with chairs made of white metal or plastic.
For the manufacture of the underframe, most often, chrome-plated metal or wood is used. The wicker underframe looks good, forged metal or durable high quality plastic. If the tabletop is made with a frame, then the frame must be made of the same material as the underframe.
DIY glass table - advantages and disadvantages
The advantages of glass tables include:
- Beautiful appearance. Such a product looks stylish and favorably transforms the interior.
Important! Particularly organic glass fits into the concept modern styles— Hi-tech and Minimalism.
- Practicality. Thanks to modern technologies, there are high-strength grades of glass. Furniture is also safe, where the glass is covered with a special film. Even if broken, the countertop does not crumble to smithereens. The fragments are firmly glued to the film.
- Persistence. The material is resistant to high humidity and significant temperature fluctuations. It is chemically neutral with respect to aggressive substances. Glass does not absorb grease and dyes. This compares favorably with the usual countertops made of wood, MDF and chipboard.

However, there are also disadvantages:
- Fingerprints and traces of dirt are clearly visible on the surface.
- If you put dishes on it, then there is a rather loud noise.
Important! Compared to the advantages, these disadvantages are not critical at all:
- Fingerprints are invisible on the matte surface.
- The use of special caring compositions allows you to maintain products in perfect condition.
- The problem of noise is also quite solvable. It is enough to purchase special coasters for dishes.
DIY manufacturing technology
Consider how you can make a beautiful glass table yourself.
Training
First, decide where the new piece of furniture will stand, how you are going to use it. For example, as a coffee table or for eating. Take all the necessary measurements, draw the product to scale, indicating the location of the legs and the size of the tabletop.
To make a glass table with your own hands, you will need:
- Glass cutter - roller or diamond.
- Long metal ruler.
- Hammer with a rubber striker.
- Pliers equipped with rubber pads (for breaking glass).
- Bulgarian.
- File or emery bar.
- Turpentine or kerosene.
- Just glass. Which option to choose - transparent, textured, tinted or mirror, you decide.
Important! It is advisable to use high-strength hardened material for the manufacture of countertops, with a thickness of 0.6 to 1.2 cm.
The main thing is that the glass is dry and clean. It is best to dedust it with soft textiles and a soda solution. Such preparation will not be superfluous, because dirty glass can break away from the cut, and the tool quickly fails.

Cutting glass:
- Lay the prepared glass on a table or plywood sheet.
Important! Make sure that the material is adjacent to the surface with its entire plane.
- Place a thin rod (about 3 mm in diameter) under the cut line.
- Place a ruler on the glass so that it is 2-3 mm from the cut line.
- The optimal pressure force on the glass is 2 kg - this can be easily checked with conventional scales.
Cutting Features
It is best to cut glass using a thin metal ruler. Highly qualified craftsmen cut the material by eye, according to the markings previously made with a marker or along the edge of the table.
Important! If you do not have much experience in cutting glass, then it is better to practice on scraps beforehand. This is not so difficult and will take a little time, but the chance of cutting the material perfectly will increase significantly. Try to draw only one cutting line.
Glass is broken off by hands in protective gloves. At the same time, position the glass so that the cutting line and the edge of the cutting table coincide. Press on the glass with a sharp movement, and it will break off along the cut line.
Important! If sharp edges or glass residue remain, remove them with rubber-backed pliers. For greater efficiency, place paper folded in several layers under the jaws of the pliers.
If the glass is curved, mark the stencil and pass the glass cutter along the line. Do the same for the round cut. To make unnecessary glass easier to break off, make special “rays” and break off in parts.
Edge processing
Even if you worked with the utmost care, sharp “teeth” and protrusions remain along the edge of the edge, which must be removed. Of course, best option for processing the glass edge is a special machine. But manual processing is also quite effective:
- Work at the same time only in cotton mittens.
- Use a file or abrasive block to file the edges.
- Be sure to moisten the file with turpentine or kerosene.
- To make the edges even, evenly move the file or block along the edge.
- For grinding and polishing the edge, use a drill with nozzles or a grinder.
- Grinding speed should be low (1200-1700) rpm.
- Sandpaper grit varies from coarse to fine.
- Polishing is the final step. Perform it with a felt circle, using a grinder or drill.

Glass tables are always distinguished by their attractiveness and sophistication. They are able to give any interior, regardless of the style in which it was decorated, freshness and presentability. If in the near future your plans do not include the purchase of additional furniture, do not be upset. It is not too difficult to make a glass table with your own hands, and therefore even a novice master will be able to cope with the task. If you follow the instructions below, you can create your own table by providing it with a neat glass plate top.
The variety of models is quite large, and therefore, even before starting work, you need to decide which option you need. If we consider the functional purpose, then we can distinguish the following types of tables:
- magazine;
- writing;
- kitchen;
- computer.
Desk Dinner table
Computer desk Coffee table
Determine not only the purpose, but also other furniture parameters before assembling a glass table. Products differ in form. The model can have a round, square, rectangular or non-standard shape.
Of course, if you are considered a novice craftsman, then it would be better to choose an easier option so that the glass table is successfully made. Use finished drawing to simplify the task and not make a mistake.
1
2
3
What will be needed for work?
In order for the creation of a glass table with your own hands to be successful, you need to purchase or prepare the following materials:
- sheet of glass. Both ordinary and special glass are suitable, the main thing is that the thickness of the plate is at least 6 mm;
- legs. Masters believe that in this situation the best way chrome-plated metal blanks are suitable;
- devices for fixing the legs;
- glue for special jobs. Such a substance is suitable for connecting a glass surface and a metal element. It is important that after complete solidification it remains transparent;
- sandpaper, instead of which it is allowed to use special agent for polishing glass surfaces;
- gasoline (as an option - acetone);
- chipboard or plywood sheet, which will be needed later to ensure that the glass plate is evenly positioned.
It is impossible to get the job done without the following tools at hand:
- ruler for taking measurements;
- marker (or a simple pencil);
- glass cutting device;
- goggles and gloves that can provide protection when doing work;
- hammer with a rubber nozzle;
- drill;
- grinding machine;
- file;
- felt wheel for polishing.
How to make a glass table with your own hands?
1
2
3
4
5
If you are interested in how to make a table, follow the instructions provided:
- Cut out the tabletop and finish its edges. In order to please you with the result, make sure that the glass is located on a flat surface, you can use a table for cutting glass, if possible. Before working on glass, wash it to remove foreign particles and polish it. The fact is that even the smallest pieces of dirt can make it difficult to cut. If you don't prepare the surface properly, you risk making an uneven cut. Use a pencil or marker to mark the bottom. Place a ruler over the line. Use the glass cutter to cut the material according to the marks you have made. Please note that glass cutting equipment is not very easy to manage, and therefore it is better to practice a little on unnecessary glass elements. Gently tap the cut line, separate the cut section. Wear gloves when doing this work to avoid injury.
- Carefully process the extreme parts of the glass blank, using special tools for this purpose. First, remove the largest uneven areas using a file, and then take grinder and sandpaper to get the job done. Do not neglect safety precautions and wear glasses that can protect your eyes from foreign particles. Remove sharp edges, starting with the largest bumps and ending with the smallest flaws. Give the desired shape to the glass plate. Polish the edges of the workpiece using a special paste and a felt wheel. So the countertop will look more aesthetically pleasing.
- The assembly process requires heightened attention. First, turn the product over, and then mark up, determining the places where the legs will be. Drill holes in the upper part of the product to fix the suction cups, apply a little adhesive and assemble the individual structural elements. Repeat the procedure, taking the next 3 legs. As a rule, this is enough to firmly attach one part to another. However, in order to give the connection reliability, experts use a special adhesive composition. In order for the finished product to look presentable and neat, you need to choose the right thing to stick with. It is important that after hardening it remains completely transparent and does not spoil the appearance of the leg. Fully assembled tables should look neat even when scrutinized.
- If you wish, you can make the furniture more mobile. A table on wheels is always distinguished by its ease of use and its practicality. When carrying out cleaning, you will easily move it from place to place. To make a table on rollers with your own hands, follow the instructions above. Having made the product according to this scheme, work on its legs. Choose the right accessories (if you want, you can take rollers from an old skateboard that is no longer in use). Make sure that they are located at a distance of 100 mm from the edge and are fixed strictly parallel to the planks.