
Book walls do-it-yourself drawings. A repository of knowledge is a do-it-yourself bookcase with drawings, diagrams and a detailed description of how to make it yourself. bookcase design
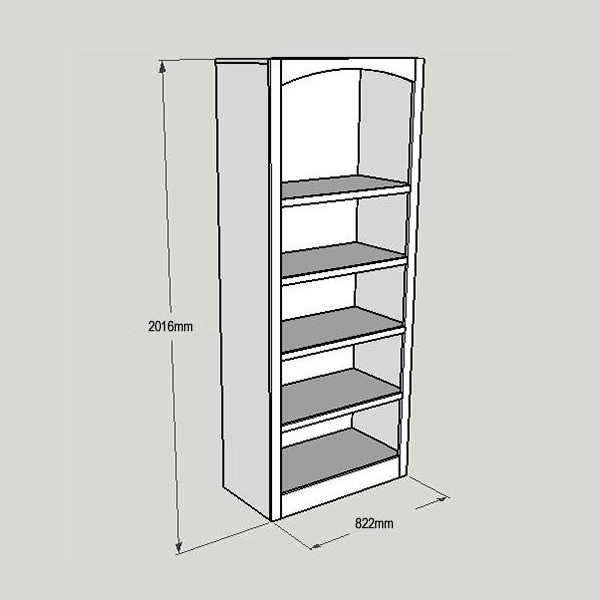
Do-it-yourself bookcase, drawings, diagrams, description and assembly procedure of an indispensable home library storage. The details of the cabinet body are connected using euro screws (confirmations) and wood screws, which gives the structure strength and assembly speed. The cabinet is divided into two compartments, one of which is closed with glass doors, the other with doors made of solid glued wood, which is clearly shown in the figure.
The cabinet body consists of:

1.
Side wall left.
2.
Side wall right.
3.
Upper horizon.
4.
central horizon.
5.
Table top horizon.
6.
lower horizon.
7.
Back wall.
8.
Decorative bar.
A drawing of a bookcase is shown in the figure.

Material size specification:
Side wall - 16 x 400 x 2099 (mm)
upper horizon - 16 x 250 x 800 (mm)
central horizon - 16 x 246.8 x 768 (mm)
tabletop horizon - 16 x 396.8 x 800 (mm)

Lower horizon - 16 x 396.8 x 768 (mm)
rear wall - 3.2 x 790 x 2061 (mm)
decorative strip - 16 x 50 x 800 (mm)
glass door facade - 8 ... 10 x 399 x 784 (mm)
facade of a wooden door - 16 x 399 x 450 (mm)
Top Compartment Insert Shelf - 16 x 246.8 x 768 (mm)
lower compartment slide-in shelf - 16 x 396.8 x 768 (mm)
Accessories:
Door handles with fasteners - 6 (pcs.)
furniture hinges for glass doors - 8 (pcs.)
furniture hinges for wooden doors - 8 (pcs.)
shelf holders - 20 (pcs.)
screws confirmat 7 x 50 - 16 (pcs.)
decorative caps for Euroscrew - 16 (pcs.)
wood screws 3 x 16 - 40 (pcs.)
plastic thrust bearing - 4 (pcs.)
DIY bookcase, drawings and assembly order:
1.
Prepare all parts and accessories.
2.
Mark the center of the holes for the confirmations and drill them:
- at the ends of the parts, with a diameter of 4.8 ... 5.0 (mm), a depth of 35 (mm)
- on the plane of parts, with a diameter of 7.0 (mm), through
3. Mark the centers of the holes for the wood screws, in increments of 250 (mm), and drill them:
- at the ends of the parts, with a diameter of 2.0 (mm), a depth of 12 (mm)
- on the plane of parts, with a diameter of 3.0 (mm), through
4.
Mark holes for furniture hinges in the center details, drill holes of the required diameter to the estimated depth and install furniture hinges.
5.
From the end of the side walls and the upper horizon, we mill folds with a depth of 3.2 (mm) and a width of 11 (mm). The rear wall (laminated fiberboard ST-S, superhard, with a front decorative layer) will lie flush in the folds.
6.
We connect the side walls with the upper horizon with confirmations.

7. We connect the side walls with the central horizon with confirmations.

8. We connect the side walls with the horizon of the tabletop with confirmations.

9. We connect the side walls with the lower horizon with confirmations.

10.
Fasten the plastic gliders to the lower ends of the side walls.
11.
Mark the centers of the holes for the shelf holders and drill them to the desired depth.
12.
Attach the shelf holders and place the shelves on them.

13.
Hang glass door fronts.
14.
Hang the facades of wooden doors.
15.
From below we fix a decorative bar.

Here is such a bookcase, we should succeed.
Sliding wardrobe drawings with dimensions
A wardrobe is an essential piece of furniture in a home. But what if the family budget cannot bear its acquisition? The idea of \u200b\u200bcreating a wardrobe with your own hands has its own positive sides: you can design the product in accordance with the wishes of family members, adapt its dimensions to the dimensions of your apartment and acquire skills in the process of working on the object that will be useful in the future.
Also on assembly, you can save about 2/3 of the cost of a similar product bought in a store.
- Create a project
- Preparing cut parts for assembly
- Mounting process
Create a project
You should start with a project that will help you imagine what the final look of the cabinet will be and will become the basis of all subsequent work on sawing parts and their further assembly.

Having at your disposal drawings of the wardrobe with dimensions, you can make a material calculation for all parts.
The body and outer shelves are best made from laminated chipboard. For internal filling, ordinary chipboard is used, and plywood for the back wall.
Please note that in the model diagram, the outer hull walls have a depth of 10-15 cm greater than the internal filling (shelves and walls of partitions).
This is necessary so that later there are no difficulties with the installation of mechanisms for installing sliding doors. It is not necessary to build a cabinet of exactly this width. If the area of the apartment does not allow, or if you need smaller furniture for your needs, one of the sections can be removed.
Another important point.
In order to freely lift the finished product, the length of the diagonal of the side wall should be a few centimeters less than the height of the walls of the room. Otherwise, it will be impossible to install the cabinet in place, since its top will rest against the ceiling.
Having checked the dimensions again, and having made the detailing (the quantity of each part with its exact dimensions) of all elements, we order their sawing in the furniture workshop.
It should be noted that chipboard has a certain structure, and errors in the description of dimensions will affect the correct cutting of parts. For example, a part marked as 800×600 differs from a part marked as 600×800 - this can be seen in the photo.

All dimensions are indicated only in millimeters, so that there is no confusion when cutting cabinet parts. In the same workshop you can order sliding doors, rollers and guides for them.
Preparing cut parts for assembly
Having brought home the cut parts, it takes some time to figure out what will be attached to what and how to make a cabinet from a set similar to the "constructor for adults".
Projects - archives of 3D models PRO100
Each item will be tagged with the data shown on the detail sheet.
Having dealt with the details, on all future walls the places for fastening the shelves, bottom and top are marked, and holes are drilled for their installation. This must be done on initial stage, since then, when assembled, it will be inconvenient to work with a drill and you can make a mistake, or make a defective hole.
All ends that will be on the front side should be ennobled by gluing them with edge tape in the color of chipboard.
Having cut off a piece of tape of the desired length, it is applied to the end and ironed with a hot iron (an old one that is not a pity).
The glued strip is pressed tightly to the surface by hand, and after the glue has cooled, the edge of the edge is cut off with a sharp knife. Trimming one side must be done in one step, without stopping the knife blade, otherwise the burrs will remain on the decorative tape.
After that, the cut corners of the edges are polished with fine sandpaper.
Mounting process
It is important to consider that it is easier to assemble cabinet parts on the floor by laying them out on a flat plane. You can do the work yourself, but it is more convenient if there is an assistant who can support the part to be mounted in time or give the tool. If legs are provided in the design, they are screwed to the bottom in the first place.
Since the box is quite large, the legs are arranged four pieces in a row every 75 cm. In order not to scratch the floor during the installation of the finished product, felt pads are glued to them.

After that, the side walls are attached to the bottom of the cabinet.
At this stage, you need to make sure that the frame parts are at an angle of 900 to each other. To do this, you can use a template made from two perpendicularly connected planks.

Now we are docking the side walls with the upper plane.
Their ends are located in relation to each other so that the top overlaps the end part of the walls. From the very beginning of the assembly of parts, it should be ensured that it is laid face down.

If it turns out the other way around, then you will have to turn the frame over to attach the back wall, and this, firstly, is extra work, and secondly, the frame does not yet have sufficient rigidity and may warp.
After that, in accordance with the drawing, mounted internal partitions and shelves.

The main body of the cabinet is assembled, and it's time to nail the back wall. It may consist of one single piece of plywood or be joined from several parts. The wall should be nailed with small carnations 3 cm.

Carnations must be hammered in carefully, placing them vertically with respect to the butt, otherwise you can chip on the chipboard.
On the upper and lower edges, the nails are punched with a distance of 15 cm, and on the sides, gaps can be left larger: 20-25 cm.
The finished cabinet frame is installed in place, and the rail mechanism is mounted.
First, the upper guide is screwed, and then the lower one. Such an order is established so that during the fastening of the upper strip, you do not accidentally damage the already installed lower guide.

If it turned out that the guide is slightly longer than the desired size, the excess is cut off with a hacksaw.

Sliding doors are installed last.
It will be very difficult to put them in place yourself, especially if they are made of glass or have a mirror surface, so the help of a second person will be required.

It may take longer to assemble than you planned, but your home will be decorated with this modern wardrobe made by hand.
The home library is a cause for pride. A DIY home library deserves all possible praise. For beginners, the creation process may seem complicated, but in reality everything will turn out to be simple, interesting and exciting.
First of all, you need to decide on the materials and find them or buy them at a hardware store. For the most ordinary bookcase may be useful:
- Wooden boards - oak, alder, cherry, beech, birch, maple, etc.;
- Wooden boards - fiberboard, chipboard, MDF;
- Finishing materials - slats, borders, glass panels, metal inserts.
If you are assembling a cabinet at home for the first time, it is best to start with fiberboard and other similar materials. In this case, you will have the right to make a mistake and not even one - fiberboard is much cheaper than solid wood and easier to work with.
After you choose the right material, you need to decide on the model. The base of any cabinet is:
- Side panels;
- Shelves;
- Top panel;
- The bottom panel;
- face pads;
- Back wall.
Depending on the type of cabinet, this set will change, decorative elements, doors will be added, and something will be missing on the contrary. And you can't do without tools. To build a closet at home, you may need:
- The material itself;
- Plywood sheet;
- Hacksaw;
- Drill;
- Jigsaw;
- Meter (roulette);
- A hammer;
- Screwdriver;
- Glue (carpentry);
- Lacquer, paint, etc.;
- Glass (optional)
- Accessories for furniture.
We have also prepared drawings and diagrams so that you can make a classic or other type of corner, as well as a straight bookcase with your own hands.
DIY photo of bookcases \
Corner Posts 3-Wall Classic Wave Of Ladder Shelves Rack
How to make a bookcase with your own hands?
If you prefer to do the work completely from start to finish on your own, then before working from solid material, you will need to cut out parts to assemble the cabinet that matches your measurements for a particular model. next step there will be preparation of the workplace and assembly of the frame. We will consider the complete algorithm for assembling a cabinet at home in the following subsections.
Dreaming of a bookcase? Then rather watch the following video and pick up a hammer:
Angular
Perhaps one of the most difficult to manufacture, but useful in everyday life, bookcase designs. There are four main types:
- Triangular;
- Trapeze;
- Five-walled.
Another feature of corner cabinets is the width of the doors.
- For wardrobes, it must be large enough - at least 450 mm.
- For ordinary bookcases with doors, any size will do.
Observe proportions - the ratio of height to width of the base of the cabinet should be strictly 5 to 1. Corner cabinets are very capricious, it is better to assemble them from ready-made parts, the slightest inaccuracy in a millimeter can turn into damaged furniture.
The most rational in terms of space use is the L-shaped cabinet. Using his example, consider the manufacture of a corner bookcase. Dimensions:
- Height - 2450 mm;
- Width at the wall (left section) - 1225 mm;
- Width at the wall (right section) - 1240 mm;
- Side plate width (shelf depth) – 605 mm.
To put it simply, these are two ordinary cabinets brought together into one design by corners. You can choose the internal configuration of the cabinet yourself, provide it with doors. It is important to think carefully about the process of opening the doors, in corner cabinets they can interfere with each other.
And now let's talk about how to make a wood-based bookcase with your own hands.
L-shaped bookcase DIY bookcase

Classical
Having dealt with the nuances, we proceed directly to the assembly of the simplest cabinet.
- First of all, we create the frame of the future bookcase. We arm ourselves with a screwdriver and connect the side walls to the top panel, helping ourselves with corners and a level.
- We do not remove the level far and begin the installation of shelves. Perpendicular to the walls, we insert them into the cabinet and fasten them to nails, screws and corners. It will be more convenient if you mark the attachment points with a pencil or chalk in advance; ideally, there are already recesses for the shelves in the sidewalls. We tighten the fasteners and fix the work.
- We nail plywood to the back wall. Pay attention to this stage, it is the back panel that holds the entire cabinet and gives it stability. For large do-it-yourself bookcases, it is better to replace plywood with chipboard (nails for self-tapping screws).
- We decorate the front part, varnish the product.
It's time to find out if you can make a built-in bookcase with your own hands.
The following video will teach you how to make such a bookcase in just 15 minutes:
Built-in and with glass
As an addition to existing furniture or an element of a complete composition, a classic corner five-wall cabinet can act. It is characterized by a special depth of the shelves, blank side walls and large sizes. It is not recommended to install it separately - it will take a lot of space, it will bring little benefit.
The assembly and installation of a built-in wardrobe does not ideologically differ from the assembly of a classic wardrobe. Difficulties can arise when attaching the top part - it is important to maintain a 90 degree angle between the parts.
Doing it yourself is also not difficult if you use our tips. If you like products with glass doors, you can easily order them in furniture stores and factories. Under standard sizes cabinets there is always a ready-made door, for unusual models a special one will be made. It remains only to attach it to the assembled cabinet.
DIY bookcase with glass doors

Drawings, diagrams and videos
Below you will find a selection of drawings of the bookcases described earlier, as well as some others.
DIY bookcase drawings
 Rack
Rack 
 Simple
  built-in
  Classical
You can make a bookcase with your own hands. How do you like this approach?
The idea is good from all sides: many people make furniture to order, especially if needed. custom size, shape or material.
To you, a novice furniture master, such luxury will cost much less. You will only have to pay for building materials.
In contact with
Classmates
Types of cabinets

- Angular.
If only you have, albeit the smallest, free corner, a bookcase will surely fit there.
This version of the cabinet is very practical, but perhaps the most difficult to manufacture. Try to sensibly calculate your strength before proceeding with its assembly.
- Classic rectangular.
Such a bookcase also does not take up much space. It is quite easy to make, which is great for beginners.
- built-in.
Depending on the form, the manufacture of such a cabinet may have a different level of complexity.
All cabinet walls are attached to the ceiling, floor and walls of the room. It takes up a lot of space that can be used more functionally, but in large rooms such a cabinet looks very representative.
- Rack.
This is the easiest option for the most beginners. In addition, the rack is great not only for storing books, but also clothes, tools and conservation. It is very multifunctional.
Step-by-step instruction

Step 1. Think of a place for your future closet.
Step 2 Decide on the type of bookcase. Only based on this choice will you be able to proceed to the next step.
Step 3 Take measurements. If you have already figured out the area where the cabinet should be in the future, it is very important to measure this place in order to understand what size cabinet you need.
In this case, you need to be very careful and precise. As the saying goes: "Measure seven times, cut once." But it’s better to measure ten times, especially if at school you didn’t have much success either in geometry or in labor.
Step 4 Make drawings. This is perhaps the most difficult and responsible point. A competent drawing - already consider an almost finished wonderful bookcase.
Can be found various options drawings on the Internet and adjust them to your size. If the idea of a unique author's closet is firmly entrenched in your head, draw its diagram yourself.
Take note: There are many specially designed blackening software programs that will make your job much easier. Examples of the best of them: LibreCAD, freeSOFT, AutoCad.
Step 5 Buy building materials. The most common and cheap option for the manufacture of furniture - chipboard.
Cutting chipboard requires a special expensive tool, so show your drawings to a specialist working in the place where you buy the material, and he will easily solve your problem at a reasonable price.
That's just shelves made of chipboard are short-lived, they soon bend and break under the weight of books. It will be more practical to use MDF - a denser material made from tightly compacted sawdust, or various varieties natural wood.
So, you will need:
- MDF, chipboard or wood, cut according to your drawings;
- plywood, for the back wall of the cabinet;
- drills, nails, nuts, etc.
You can make both an open type cabinet, without doors, and a closed one. But it would be more rational to opt for a closed type of bookcase, because in this case the dust will settle much less on books, which will save time when cleaning.
In addition, constant exposure to direct sunlight leads to damage to books: they quickly turn yellow and become dilapidated. True, there are also people who like to inhale the dust and enjoy the sight of books stylized as antiques. If you are one of them, feel free to choose a bookcase without doors.
Assembly
Be sure to find a completely flat surface for this step. Consider self-assembly bookcase on a specific example of a classic bookcase.
- Marking under the base.
Take a ruler and a simple pencil. With the help of these simple devices, you can easily cope with the first stage of cabinet assembly.
Make a notch, about 5 cm from the bottom of the boards that will become the side walls of the bookcase, on both sides.
- Working with a drill.
Now you need to drill the workpiece.
To do this, place the side wall so that it has a right angle (90 °) with the future cabinet shelf and at the same time is in a stable position, according to the line you marked.
On the sides and in the middle, drill a suitable hole to screw in the screws you have available. Repeat the same operation for the top wall of the cabinet and all its shelves.
Please help us make the site better! Leave a message and your contacts in the comments - we will contact you and together we will make the publication better!Books are not only a source of knowledge that teaches life, relationships and communication culture. For people who are passionate about literature, a book is an object of reverent worship, a friend and comrade.
And despite the fact that modern world offers a lot of opportunities to have a lot of books in electronic form, which is much more convenient and affordable than the paper version, anyway, every home should have a library. Let it be small, but filled with classical and modern literature in a traditional, familiar form.
Of course, we know that it is best to store books in bookcases specially designed for this purpose. But if you are a young family, have recently bought a home and have not yet acquired the necessary furniture, then a bookcase will probably be at the bottom of the shopping list. However, there is a great way out - to make a wardrobe with your own hands.
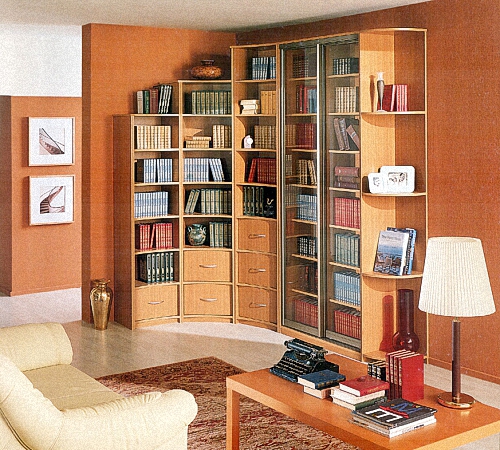
Types of bookcases in the interior, their advantages
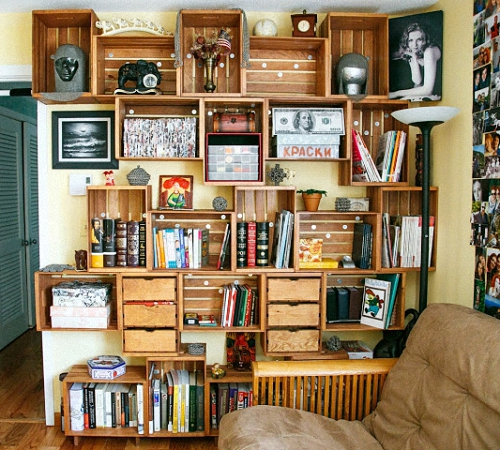
Now designers offer many interior solutions: unusual bookshelves. There are many options, and often among them there are simply unimaginable, but surprisingly simple in execution. Let's look at the simplest, but at the same time beautiful and interesting option a bookcase that is easy to make yourself.
Traditionally, bookcases come in two varieties: open and closed.
- Closed cabinet more convenient for storing paper books, as it does not allow sunlight, moisture and dust to penetrate inside. The disadvantage of books is that they absorb dust and moisture very strongly, and this deteriorates, which subsequently negatively affects human health. On the other hand, a bookcase closed with solid doors has a rather bulky appearance and does not look very nice in a small room . This can be avoided if the doors are made of glass. Shaded glass will protect books from the harmful effects of sunlight.
- open bookcases they look light and airy, they fit well into a room with a small footage. Usually they are narrower than closed cabinets, and are intended, in addition to storing books, for things and objects that play a role in interior design. If you opt for an open bookcase, then you will need to constantly maintain a certain climate in the apartment: humidity , temperature, purity level. But on the other hand, such a cabinet gives easy access to books, which is very important if you like to read. In addition, open cabinets are very easy to assemble, and it is easy to model them as fantasy tells.
Bookcases are also made in horizontal and vertical versions, and in shape - rectangular, corner or shelving. Before choosing a wardrobe that suits you, take into account factors such as free space in the room, its size and interior style.
The most popular and common cabinets designed for storing books and other things are cabinets. Such cabinets are available in a wide range of models, and you can easily choose how it will look according to your preferences: without doors or with doors of any kind - hinged, sliding, accordion, glass or deaf.
The modular design of the bookcase allows various combinations of elements. Thus, you can get a cabinet of any configuration, width and height. This type of bookcase is versatile, because different variations are easy to adjust to any room - both large and small.
The built-in bookcase is a kind of sliding door system. All parts of such a cabinet are attached to the walls, ceiling and floor. There are a lot of design options, but the most common are side partitions without a cover and a bottom and walls of the room as boundaries.
If you have a small apartment, and there are a lot of books, then the corner cabinet will become optimal solution. This design is very roomy, compact and fits well into any type of interior.
We make the cabinet ourselves: the necessary materials and tools
There are a lot of materials used for the manufacture of furniture now, and they will form the cost of your cabinet. Models of an exclusive nature are made from expensive materials, such as natural wood, solid wood or veneer. But for more affordable cabinets, materials such as chipboard or MDF are used, with a laminate, polymer or melamine coating. MDF - more modern material, it differs in the increased durability and environmental friendliness. It is produced in the form of plates by dry pressing of small chips when exposed to high pressure and temperature.
So, to make a cabinet with your own hands, you will need:
- Milling machine;
- Sander;
- Sandpaper;
- Hacksaw, drill and screwdriver;
- A hammer;
- Nails and screws with washers;
- Roulette and pencil;
- Joiner's glue;
- Lacquer and stain;
- Shelf blanks made of furniture board;
- Sheets of plywood for racks, support covers and back wall;
- Beams from a natural tree for legs.
What to consider when drawing up a cabinet drawing
- First of all, decide on the model of the cabinet and the place in which it will stand. Divide the cabinet drawing into several constituent parts carefully drawing every detail. Good assistants in this matter for you will be such specialized computer programs, like "Basis furniture maker" or "AutoCad". When creating drawings, take into account any little things, even the plinth on the floor of the room, which will easily eat five centimeters from the closet, and besides, it will not allow you to move it to the wall. In this case, the bevel of the vertical edges from the side of the plinth will help. Also, the skirting board can be completely removed.
- Now determine the exact dimensions of the cabinet. This means not only the width and height, but also the number of shelves, as well as the distance between them. The smallest depth of a shelf for books is 20 cm, for deeper shelves - 30 cm. The thickness of the shelf should be at least 2.5 cm with a length of 1 m, this will help to avoid sagging.
- Be sure to decide on the color of the furniture in advance. There will be no problems with this, since modern industry offers big choice colors and shades.
Preparing cabinet details
After all the drawings are prepared, start preparing the cabinet parts. Sawing parts - quite hard work Therefore, it is better to entrust it to specialists. A chipboard sawing machine is quite expensive, and it does not make sense to buy it for the sake of making one piece of furniture. You can use a jigsaw, but the work will be, firstly, very long, and, secondly, not of sufficient quality. Best to order cutting chipboard at the place of purchase.
We take as a basis for the production of a standard rectangular open-type cabinet. For it we will use chipboard veneered with oak and oak itself. You can paste over the rectangular ends of the panels with veneer, or prepare oak slats in advance, which will be glued to the ends, and rounded off towards the end of the work.
- Take a width of 30 cm and a length of 3 m, and cut them into blanks 1.6 m long. After that, you need to fit the size of the rail. Here you will need a template for leveling the board, a sawing machine and a guide. The dimensions of the template are as follows: length 1500 mm, thickness - 20 mm, width - 250 mm. When sawing, place the template under the board.
- Prepare the required number of rails. They need to be passed through planer, while being careful: both sides should be parallel to each other and absolutely even. Also, the rails should be sanded so that the surface is perfectly smooth.
- The slats are completely ready, and now they need to be attached to the chipboard with glue. At this point, you will need a clamp. To prevent the workpiece from being squeezed when clamping the clamp, place a piece of plywood of a suitable thickness under it. When glue comes out of the seams of the parts when clamped, carefully wipe it with a rag, or remove it with a chisel after drying. The slats should be joined at an angle of 45 degrees.
Edge milling and cabinet back
End milling is not a difficult and lengthy job, but it still requires accuracy and thoroughness. It is necessary to choose the right cutters for the relief and clearly set the desired overhang; when feeding the workpiece into the milling cutter, it is necessary to observe smooth movements and avoid deviations to the sides.
Before starting work, check the performance of the cutter on excess trim. After the desired size is set, start processing the rails.
When the milling is completed, check the contact of the workpiece with the working part. If there are gaps and crotches between them, remove them with sandpaper with a grit of 150. Such differences will be noticeable after you open the finished cabinet with varnish, so you need to eliminate them immediately.
The back wall of the cabinet is an inconspicuous side, so it does not require special processing and finishing. But exactly how well you install it depends on the overall reliability of the entire structure. The back wall is the connector of the entire cabinet, on which all other parts are attached.
Most often, sheets or pieces of plywood are used for the back wall of furniture. Such material is very easy to process, and its installation will not take much time. Using a sawing machine or electric jigsaw, cut off the pieces of the desired size, and remove the chamfer from the saw cuts with sandpaper.
If you need a more durable, strong back wall with high wear resistance, make it from chipboard, which is much heavier in weight. But remember that such material is much harder to process, and requires both special fasteners and certain fastening methods.
Getting Started with Cabinet Assembly
Now you are all set necessary details, and you can directly assemble your bookstore. It must be done on the most even surface in order to prevent distortions.
Attach the side walls to the top, for this, use the corner to prevent uneven corners at the joints. Drill holes for fasteners; use a drill with a diameter smaller than the diameter of the connecting element. Now pull the parts together with fasteners. Highly a good option- confirmation, it is convenient to use and practical. Buying it, you also get a hex key, which will facilitate the clamping moment.
Once you've secured the top of the cabinet, move on to the bottom, remembering to use the corner to adjust the joints. Having connected all these parts, begin to mount the shelves. Do not rush to fix the back wall, without it, the installation of shelves will be much easier and more convenient. Since bookcase shelves are constantly subjected to loads, it is not worth making them removable. It is easier to fix them with the same confirmation, and it is best to make 3-4 fasteners for each of the side walls. Thus, not only the shelves, but the whole will receive additional stability and reliability.
So, we have come to the final stage - the installation of the back wall. In the event that you opted for chipboard, a construction stapler, self-tapping screws or nails will serve as fasteners.
Video about assembling a bookcase with your own hands
Well, now you have an original bookcase in your apartment that you assembled yourself. As you can see, this work is not only simple, but also does not require large financial costs. Now in your interior there is an exclusive piece of furniture that cost you much cheaper than store analogues. And if you have any questions, you can ask them in the comments, we will be happy to answer them.
Buying a bookcase is a rather expensive process, and besides, it is not always possible to find the model in the store that will fully satisfy all the needs of a book lover. Self-manufacturing bookcase helps not only to save money, but also opens up new possibilities for designing an individual model of the right size. Learn about the features and methods of making a bookcase with your own hands.
DIY bookcase: features and varieties
Before starting the manufacture of a bookcase, we suggest that you familiarize yourself with its varieties. In relation to the design features, open and closed models are distinguished:
- open bookcase - provides an opportunity to select a book without opening the cabinet door, however, in this case, the products absorb dust and moisture from the room, eventually losing their presentation;
- closed bookcases - more bulky and less aesthetically pleasing, such designs perfectly protect books from external irritants.

In addition, there are:
- vertical;
- horizontal bookcases.
This embodiment is determined by the availability of free space in the room, its dimensions, and the style of interior design.
Case-type bookcases are quite popular both in apartments and in private houses. They differ in a variety of shapes and configurations, in relation to the design, the number of shelves, the presence or absence of doors, the material for their execution are individually selected.
Modular designs are a combination of individual elements from which it is possible to obtain a cabinet various shapes, height and width. This cabinet is versatile and perfectly adapts to the various parameters of the rooms in which it is installed.
Built-in type bookcase is a sliding door system, the main structural parts are fixed on the ceiling or on the walls.
Corner bookcase is a great solution for small spaces. The design fits well into any interior, is characterized by large capacity, compact size, optimal use of corner space, easy accessibility of books.
Do-it-yourself drywall bookcase
Drywall is an excellent material for making various furniture at home. To work, you need a minimum of skills and tools. A drywall bookshelf or bookcase must have a certain strength, so it is recommended to build a high-strength frame and use several layers of drywall.
To obtain perfectly even internal and outside corners, use a special steel profile for additional reinforcement. If the bookcase will be located next to the kitchen or bathroom, use a moisture-resistant drywall option. In order to fill the internal space of the shelves and avoid dull sounds when hitting the structure, install a heater inside, for example, mineral wool.
It is possible to manufacture a combined bookcase, the walls of which are made of plasterboard, and the shelves are made of glass or wood.
Before starting work, make drawings for the bookcase with your own hands. The scheme of the bookcase is determined by the place of its installation and the dimensions of the structure. Determine the thickness of the shelves, their number.
- level;
- plumb;
- paint cord;
- pencil
- square.

It is possible to supplement the design with a built-in lamp. Wiring is done before installing drywall. In relation to the marked lines, install the guides using dowel nails. After the construction of the frame part, the profiles are fixed using a suspension or special self-tapping screws. The transverse bar gives additional rigidity to the structure. The strength of the structure determines the installation step of the profiles.
There are two options for the frame for drywall:
- metal;
- wood.
The first option is used more often, as it has maximum strength and good operational characteristics. wooden frame prone to shrinkage, collapses under the influence of a humid environment. In any case, after installing the frame structure, the process of plasterboard sheathing follows.
In relation to the load, sheathing is carried out in one or two layers. All sheets are fixed in a checkerboard pattern. The following is the process of finishing the previously designed cabinet:
- separating tape is glued to the joints between the planes;
- seams are puttied with reinforcing mesh or tape;
- perforated corner joints are installed on the corner sections;
- the entire surface is puttied and painted.
If there is lighting in the cabinet, pre-build holes for the lamps. Their installation is carried out at the final stage.
DIY bookcase made of wood
Solid wood bookcases are expensive and belong to the elite class. Such furniture needs enhanced care in order to avoid loss of presentability. Wood is a living material that is prone to absorb moisture and odors. It is forbidden to place mugs with hot water, or sharp objects.
Among the advantages of bookcases made of natural wood, we note:
- environmental safety - the material "breathes", the furniture is characterized by zero toxicity, with high humidity in the air, it absorbs it, and when it is low, it gives it back, thus regulating a healthy atmosphere;
- long service life - correct handling wood ensures its long-term use in everyday life;
- natural and aesthetically attractive appearance is another indisputable advantage wooden furniture, the room, with the help of such a cabinet becomes more comfortable.
DIY bookcase photo:

Different types of wood are distinguished for the manufacture of bookcases, linden with alder, cedar, linden are softer and more pliable. Materials with medium hardness include birch, oak, mountain ash woods. Birch, acacia and pistachio are considered the most durable and hard.
Before you start working on a bookcase, decide on its dimensions. This is followed by the process of calculating the amount of wood, fittings and fasteners. As additional materials for finishing use slats, curb elements, metal or glass connections.
If you have no experience in making bookcases, we recommend using cheaper types of wood. After selection suitable material decide on the model. The basic elements of bookcases are:
- side panels;
- shelves;
- upper and lower sides;
- facial patches;
- additional shelves.
These components vary according to the cabinet type. After defining the model, the process of acquiring materials and preparing the tool for work follows.

Among the standard tools for working on a wooden bookcase, we highlight:
- electric drill;
- jigsaw;
- roulette;
- screwdriver;
- furnishing components.
At the initial stage of work, prepare the parts and process them on special equipment. The following is the process of assembling the frame part. The most difficult option is a corner-type bookcase. There are several options for such structures:
- triangular;
- trapezoidal;
- g-shaped;
- five-walled.
In order to avoid distortion or deformation of the structure during operation, it is not recommended to build too complex models. The ratio between the height and width of the cabinet is five to one.
Initially, the frame part of the cabinet is assembled; for these purposes, you will need a screwdriver, previously prepared parts and fasteners. Using a level, check all connections for evenness. After building the frame, install the shelves. The back wall is recommended to be made of plywood in order to save material.
The finished structure is covered with a primer, moisture-proof material and paint or varnish. Additionally, front doors made of glass and fittings are installed to decorate the finished structure.

Do-it-yourself bookcase from chipboard
The optimal depth for a home wardrobe is 40 cm. The dimensions of a home wardrobe are 20x80x40 cm. Such dimensions are optimal for storing books and magazines. Optimum - inexpensive and easy to process material for the construction of a bookcase - chipboard.
In the process of work, you will need a tool in the form of:
- shooter;
- confirmation drill;
- tape measure and pencils;
- self-tapping screws.
In addition, prepare fasteners in the form of confirmations, furniture corners, thrust bearings. Before starting work, make drawings or use ready-made options. For sawing and veneering parts, use highly professional equipment or contact specialists.
When using a jigsaw to cut parts, be careful as there is a risk of damage appearance Chipboard. For the manufacture of the back wall of the cabinet, use plywood or fiberboard white color, at least 3 mm thick.

After preparing the parts for work, the assembly process follows, which is consistent with the drawings. Initially, the frame part is assembled in the form of a rectangle. For these purposes confirmations are required. Install the confirmation and fix it with a screwdriver. All ends must be connected flush, check the evenness of the connections with a level. Check the diagonals of the structure.
This is followed by the process of fixing the back wall of the cabinet, for this, use self-tapping screws or nails, in relation to the material of the part. The minimum mounting step for self-tapping screws is 10 cm. Additional rigidity of the structure is provided by confirmations installed in the places where the shelves are fixed. To close the hats, use special caps, matched in color to the cabinet. Set the shelves in relation to the bookcase project. Install decorative overlays on the front of the product. Install overlays, fittings, if necessary, make a door to the bookcase.
Making a bookcase with your own hands
We offer the option of making a bookcase with your own hands with glass. Among the advantages of such a design, we note:
- attractive appearance;
- ease of manufacture;
- protection of books from high humidity and dust;
- availability of materials for manufacturing.

It is more difficult to build such a bookcase than a regular shelf, however, this design has protective properties that protect books from the damaging effects of external factors.
In standard bookcases, the interval between the shelves is about 22 cm, and the depth of the shelves is 35 cm. Bookcases of standard variations consist of two compartments - upper and lower. The upper part is designed to store large books, and the lower part is a blank facade.
The main elements of the bookcase are:
- upper, side and lower sidewalls, from which the frame of the structure is constructed;
- face pads of vertical and horizontal type;
- shelves;
- doors with glass inserts;
- the back wall, most often made of plywood or fiberboard.
To fix the shelves, brackets with corners are used, thus improving the aesthetic appeal of the structure. For slotting, use special nozzle on the drill.
Assemble the frame part of the cabinet in relation to the drawings, and then install the shelves on the sides. Additionally fix the shelves with glue to work with wooden surfaces. Drying time of the structure is at least one hour. Use self-tapping screws to secure the top of the cabinet. This is followed by the process of processing the bookcase with paints and varnishes. Additionally, we recommend using impregnation with moisture resistant characteristics. Previously, all the details of the cabinet are subjected to grinding.
To keep books on the shelves, install face plates on them, which perform not only a practical, but also an aesthetic function. Glass, for a bookcase, choose tempered. We recommend cutting it in advance, using the services of specialists. It is possible to decorate the cabinet with multi-colored glass or mosaics.
It is more difficult to build a corner bookcase with your own hands, such designs are distinguished by good capacity and save usable space in room. The success of obtaining a quality product is correctly constructed drawings that determine the nature of further work.