
How to make a stool at home. Homemade stool: manufacturing features, design choice. Making a stool with your own hands. Video
"Can you make a box? Yes? Okay, you'll make stools for now." This is from a conversation with a brand new job seeker in a small furniture company. Indeed, making a simple stool with your own hands is no more difficult than a box. That one can be more difficult if it is retractable in the nightstand. Therefore, it is better for those who are interested in carpentry to master it, starting with a stool. You won’t save much money on this, stools are inexpensive. But the acquired skills will allow you to take on large cabinet furniture, which will save you many times over, plus unique items in the interior.
A stool as a starting object in the furniture business has another advantage: it requires little planing and sawing work with the inevitable garbage, you can test your carpentry skills on the balcony or even in the kitchen. After making sure that the matter is going well, we will think about a carpentry workshop with a workbench and other things; Without it, you can no longer make furniture more impressive.
Device and something about terms

The classic wooden kitchen stool is arranged as shown in fig. It can also be seen that its construction is rather complicated for a beginner, but we will come to it through simpler samples, but no worse. In this case, the picture is needed for another.
The reader may think that to call the support beam a tsarga, and screeds / struts with prolegs are already purely furniture specifics, sort of like a bench for sailors - a bank. As for the king, this is not so. Drawers can also be found in other branches of technology, and there they are by no means beams either in appearance or in the nature of the load.
In fact, the drawer is a structural element that distributes multidirectional loads among the components of the power circuit. When distributing the load, it is impossible not to experience it; make them work.
In the manufacture of furniture, the drawer is most often combined with a support beam in the form of a board or beam placed on the edge. This idea is so ingrained that some experienced carpenters consider any such board to be a tsarga. However, the kings and furniture are very diverse.

For example, at pos. 1 fig. (underside of a stool with legs in nests) tsargs are still quite tsargi-bearing beams, only from a bar. But already at pos. 2 tsargi - kerchiefs, and their frame does not hold anything and is only decorative; on pos. 3 kerchiefs can do without it. And on pos. 4 (dressing table) tsarga - jib, which is a beam no more than a scarf.
Table with removable legs, pos. 4, the case is generally interesting. When it is disassembled, the side will be a shaped steel brace, because. only in this case does it keep the underframe boards from breaking out of the tabletop when pushed, or simply from falling apart if the tabletop is also removed. But when the legs are in place, their heads are pressed into the corners and the table is standing, the underframe boards will become both beams and drawers, because. support both vertical and lateral loads. In this case, it is even legitimate to talk about attaching the legs to the sides (!), because. the product acquires proper strength and rigidity only when the mounting nodes of the legs are assembled and loaded.
Tsars from the board can also be vertical posts, and not beams. In this case, they are called combatant tsars, pos. 6. In general, you need to deal with drawers as with beams: first of all, look at how they work in the structure, and how they look is the second or fifth question. It was necessary to be distracted immediately by the kings, because. in furniture they are found all the time.
What do we do?
To make a stool, let's see what we can do. Not all, there is an endless variety of stools, but for starters, typical examples. Our task is to choose what is simpler and better for a specific purpose.
A classic kitchen stool can be both utilitarian and very artistic, pos. 1 and 2 in fig. Its design has developed over the centuries and such stools serve for many decades. The strength of the design allows you to use the stool as a work table, everyone knows this. You can take on a classic stool from the very beginning, having mastered several woodworking techniques, see below.

In lightweight stools, pos. 3-8, the legs are attached either without drawstrings at all, into sockets in a thick, durable seat, or into sockets in scarf drawstrings. In the first case, both the seat and the legs have to be thickened, so such stools are inferior to others in strength, often in appearance, pos. 3.
In order for the lightweight stool to be durable, its legs are tied with screeds: the lower, the stronger and the thinner the screeds can be, pos. 4 and 5. But the low frame of the couplers interferes with the legs of the seated person, and the cut into the thin legs of the stool weakens them. Therefore, instead of a simple frame, they often make an H-shaped one, pos. 6, or put couplers at different levels, pos. 7.
The greatest strength and convenience is provided by the X-shaped system of ties (tie cross), pos. 8. With a certain configuration of the legs, it is possible to do without the lower cross; one such example will be discussed below.
Important subtleties
If you ever undertake to make a lightweight stool, please note, firstly, that its legs should be slightly apart, i.e. the axes passing through the centers of the heads and heels of the legs should deviate from the vertical by 7-12 degrees outward relative to the axis of symmetry of the stool. The second option - the legs should be arched and expand upwards, see below. Without one or the other, the legs can break even with a slight swaying on a stool. Moreover, both solutions are valid if the stool is symmetrical about the vertical axis, i.e. not extended in plan. An exception, up to proportions of 1:1.5, is a stool with screeds at different levels, it can be pulled out in the direction of the lower screeds.
Second, in order to cut the heels and the heads of the legs to the required angle, their blanks must be assembled into a tightly tightened bag and cut in 1 pass. Otherwise, the stool will remain an oblique splay: it is still possible to adjust the vertical legs to the size along the length, but it is simply impossible to achieve the accuracy of the angles necessary for processing the legs one by one on a tree. The corners will already go half a degree-degree against the drawing, but this is not so important, as long as all the legs are the same.

Stools-pedestals, pos. 9 and 10 are heavy and material-intensive, but very durable, because consist, from the point of view of mechanics, of 3 tsargs located in mutually perpendicular planes. The same stools are easy to manufacture, and it is better to start mastering the furniture business from them. In such a case, in Fig. drawings of 2 types. At pos. on the right, the details of the pedestal also cut into half a tree, see below; the mortise slot is not conventionally shown. The seat in both cases can be of any centrally symmetrical shape; put it on dowels, see below. Covers on round pedestal stools make them visually indistinguishable from more labor-intensive poufs when padded as described below.
Note: in the inset at the bottom left of Fig. variant of a stool-cabinet for a summer residence. It needs 4 parts, but it does not get stuck in loose earth either.
Box-shaped, or shield, stools (pos. 11 and 12) require 4 parts, but are lighter and interfere with the legs less. Making them is no more difficult than the previous ones, and all the connections are doweled, which makes the job somewhat easier. Box-shaped stools can be stretched in length up to turning into benches, and their strength and stability depend very little on height. The well-known household stool (pos. 12) is from this breed. In general, shield stools are also a grateful object for a novice carpenter, so we also give drawings of several types for them: normal room height, on the right in the figure, household lower, on the left in the same place, and below - the device is a very small children's stool.

Note: in fig. on the right is a diagram of a reinforced box stool. Pos. c) there is a way to make it look more attractive by veneer sidewalls. This stool is well suited to the country: simple, light, inexpensive, looks good, and in terms of strength and convenience it is not inferior to the classic one.

Stools on pos. 13 and 14 only look like box-shaped ones, but in fact they have 4 wide and flat legs. Therefore, such stools must be made with drawers made of boards or beams, and the legs should be fastened with a proleg. True, in this case it is only one and can be located so that it does not interfere with the legs at all.
The next variety available for self-production by beginners is stools with X-shaped legs. To give them the necessary strength, either 2 drawers and 2 prongs are required, located mutually perpendicular, pos. 15, or 4 tsargi-beams forming the upper frame, and 1 coupler between the crosshairs of the legs. The latter option can be inscribed in the interior of the living room or bedroom, but most of all, the racks are made folding. Suddenly become interested - in fig. folding country stool, drawings and folding method. It is possible to assemble a country set from such a garden folding table. In fact, there are many designs of folding stools for different purposes, from a fishing rack to picnic furniture, and some of them are easy to make with your own hands.

Note: all described stools are quite plastic and tolerant of the configuration of details, therefore their creative executions are possible. different styles, pos. 17-20.
Materials, tools, technology
What to do?
Wood is suitable for the manufacture of any stool. In terms of strength and durability, a wooden stool is second only to a forged metal one, and in terms of convenience and functionality it has no equal among its counterparts. Any quality wood will go on a stool, except for very soft and easily decaying species: poplar, willow, aspen, alder.
The quality of wood for any furniture is determined, firstly, by the absence of visible defects: cracks, falling knots, chips, wormholes, traces of rot and mold in the form of spots of a color unusual for this breed, see fig. Secondly, wood for furniture should be room-dry, with a moisture content of 8-12%. in the process of drying, a violation of its structure is possible and in the room furniture made of it may eventually crack or crack.

Note: The slanting and graininess of wood on furniture in piece handicraft production is in many cases acceptable, and sometimes desirable, because. allow you to get a beautiful texture. The famous Karelian birch is nothing more than an ordinary warty birch, completely curvy due to unfavorable growing conditions.
The tree is air-dry, with 12-20% humidity (this is an ordinary timber) must be kept in a dry room at a temperature of 15-30 degrees for 1-6 weeks, stacked on non-damp stands. The initial plots (boards, beams) are placed on stands at intervals, and the next belt (layer) of the pile is also placed on stands; now you can use the same plots as them, laying a couple across.
Note: it is impossible to dry the wood under the influence of heating devices or the light of incandescent lamps - we will get very poor chamber wood.
On the seat of the stool they usually take pine or spruce, and on the legs a harder tree: birch, oak, maple, beech. Of course, the entire stool can be made from hardwood. Of the fairly affordable imported breeds, wenge, hemlock, mahogany are suitable.
A full replacement for wild wood will be modified wood - MDF of medium and high density. MDF is not impregnated with anything, it is made from sawing waste of commercial wood pressed at an elevated temperature, i.e. The material is quite environmentally friendly. MDF is inferior to wild wood in terms of abrasion resistance, so it is advisable to stuff hardwood soles on the heels of MDF legs.
From plywood, you can make pedestal and box-shaped stools, as well as clothed stools with an X-shaped coupler of legs (pos. 8 in the figure at the beginning) and similar to them in terms of power circuit. Also, plywood will go on the seat of any stool. From chipboard, as a rule, only box-shaped stools are made entirely. in the designs of all the rest there are points of concentration of loads, which the chipboard does not hold. But chipboard will also go well on the seat.
Note: it is highly desirable to impregnate plywood for furniture with a water-polymer emulsion from both faces and from the end.
About glue

Most furniture joints are glued. Traditionally, bone carpentry glue is used for this. It is inexpensive, does not require drying to a tack before joining parts, and gains strength as soon as it hardens. But for its preparation, you need a glue maker, which, however, you can make yourself.
Very strong glue for wood "liquid nails". It also makes it possible to hide the adhesive seams, because. tinted under a tree with sawdust, or you can buy ready-made tinted. Water-based acrylic wood glue is even better.
Liquid nails and acrylic are quite expensive, so in many cases they are replaced with almost the same durable PVA, but not the usual office paper, but wood. The corresponding marking must be looked at on the label, and wood PVA is sold not in stationery, but in construction and hardware stores. It is necessary to glue parts on PVA only after exposure to tack; glue is applied to both connected parts. Exposure for strength gain - at least a day, only then you can continue to work or load the connection.
Note: all adhesive joints do not hold shear along the seam; they need to be reinforced in this direction in various ways; for some, see below.
What to do?
We will assume that since you are a workman, you have a simple measuring and marking and working tool, including chisels and chisels. It is also desirable to have a caliper with a depth gauge. But, in order to start making stools and furniture in general, you need to stock up on a couple more devices first.

Firstly, a thickness gauge (height gauge) for marking, see fig. It can be done with your own hands, using a pair of screws instead of a lever lock. If you wish, you can also swing at a home-made thicknessing machine, amateurs do.
Secondly, wooden panels for furniture are not assembled just like that, they will come out humpbacked and slitted. Shields need to be rallied, i.e. when assembling do not glue the boards, press the edges tightly against each other until the glue is completely dry and gains strength. See below for how shields rally, but for now you need to make adaptations for this: plaz or wyms. The basis in both cases is strong, even and seasoned boards of at least 150x50 for the plaza and 120x50 for the vime.
A very convenient plaz from a screw clamp and an emphasis with a dead point, pos. 1 in fig. If there are no components for it, then the simplest plaz, pos. 2. The boards in it are compressed with wedges, pos. 2a, alternately knocking out with a mallet, and roughly under the size of the shield they put a spacer from the same board as the base of the plaza.

Large shields, approximately longer than 50 cm, cannot be rallied on the plaza, because at the same time, its base bends itself. In addition, the removal of the edges of the boards beyond the plaza should not exceed 150 mm, i.e. on a plaza of 250 mm boards, you can rally a shield up to the same 50 cm wide. This is enough for a stool, but for the future it is better to get 3-4 wyms, pos. 3. The fastening of the end bosses-stops in all cases must be very strong, on M8-M12 through bolts with nuts, because very large forces act on the stops in work.
How to do?
To make a stool, you first need to master several types of connections. wooden parts:
- Half-tree tie-in (half-tree).
- Tongue-and-groove connection.
- Spike-groove connection.
half a tree
Half-tree connection, shown in fig. Technologically, it is the simplest and quite reliable, if it is additionally fastened, 2-3 points per connection, with dowels, self-tapping screws, bolts, nails and, optionally, glued. At work hand tool the notches are first filed along the edges, not reaching 0.5-1 mm to the desired depth, and an excess array of material is selected with a chisel. To make cuts deeper, so that later with one blow to knock down the excess - a manufacturing defect!

Half-tree connections are closed, pos. 1, so the crosses are assembled, open, pos. 2, for assembling corners, and deaf (closed) half, pos. 3, for tapping on the run. In addition, half a tree can be connected both by layer, pos. 1-3, and along the edge, pos. 4. In the latter case, if the parts are high enough, the connection holds well and only on glue without additional reinforcements; this is how the supports of pedestal stools are assembled.
Tongue and groove
For tongue-and-groove joints, pos. 1-3 in the figure, the 1st point of additional fastening or just gluing is enough. The tongue-and-groove connection can be open single, pos. 1, open double, pos. 2, triple, etc., or closed, pos. 3. The latter can be separated only by pulling the part with the comb, and the open tongue-and-groove joints can also be turned by turning the parts relative to each other, i.e. a closed tongue-and-groove comb is technologically more complicated (a hole must be drilled along the edges with a drilling depth limiter and then carefully gouged), but stronger and more reliable.

The tongue-and-groove and tongue-and-groove connections are mechanically similar, so they are often confused. For example, connections on pos. 1 and 2 in the old Soviet textbooks for vocational schools are called tenon-groove. But in fact, the shoulder of the spike, unlike the shoulder of the crest, bypasses the spike from all sides, pos. 4. This makes it possible to hide the semicircular edges of the hole selected by the end mill, and makes the connection resistant to breaking out in 2 planes, along and across.
The spike, as well as the closed tongue-and-groove comb, can be wedged when assembled with a hardwood wedge, also pos. 4. The connection becomes one-piece, but very strong and no visible additional fasteners are required, glue will last forever. The connection on a wedged spike is generally “dead”, it is easier to smash the entire product to smithereens than to separate it.
Note: joints on spikes in furniture, many types are used; For example, a small part of them is shown in Fig. on right. We will get acquainted with the necessary ones along the way when describing the corresponding types of furniture.

Dowels
Dowel connection is the main thing in carpentry, because. it is strong enough and invisible; completely closed. Actually, a dowel is a round or octagonal spike made of hard wood, made separately from the parts to be joined. How the connection is made with dowels is shown in Fig., here you can’t do without a thickness gauge for marking.

Dowels can be wedged during assembly, see fig. on the right, then they are called pins; wedges must be placed across the wood fibers of the parts to be joined. The dowel connection is one-piece, but very strong and reliable. The joints on the dowels are usually glued.

The attentive reader probably already had a question: where to get them, these dowels? Random twigs-slivers will not be reliable. True, dowel sticks are commercially available, but you can also make them yourself. In general, the main dowel connection in furniture has a lot of other subtleties, so we give a selection of videos:
Video: connection on dowels
Video: making round sticks for dowels and arrows
Video: do-it-yourself dowel making tool
Video: homemade jig for drilling holes for dowels
Rallying

Boards in furniture panels are rallied in different ways. On a tongue (a type of tongue-and-groove connection), pos. 1 in the figure, it is easiest to rally if you use tongue-and-groove boards. Due to the large contact area of the surfaces to be joined, adhesive tongues are very reliable and often used. However, only boards of sufficient thickness can be rallied to the sheet pile, because. the crest of the tongue should, on the one hand, be no wider than 1/4-1/3 of the thickness of the board, and on the other hand, it should not be narrower than 10-12 mm. It is believed that the minimum thickness of boards from a wild array for rallying on a tongue is 30 mm, but it is not recommended to rally boards less than 40 mm on a tongue; the dimensions of the tongue for the magpie board are shown in fig. above. Boards made of MDF and laminate can be stacked on a tongue with a board thickness of 16 mm or more.
Rallying in the rebate, pos. 2, it is safe only if the fold is with a lock. A lockless fold is just a quarter, and a shield made of quarter boards will not be reliable, just like a shield rallied into a rail, i.e. just ends edged boards. It is difficult to make a lock seam at home, therefore, like a lock tongue-and-groove, they are rallying shields made of MDF or laminate, see fig. on right. In this case, the thickness of the boards can be from 12 mm.

Rallying on dowels, pos. 3, possibly solid boards from 20 mm and MDF / laminate from 12 mm, but laborious and difficult. It is best to rally thin boards into a smooth fugue, pos. 4. Grooves for the fugue will have to be chosen manual router on wood with a disk cutter, but the fugue itself can be made from plywood from 3 mm, which makes it possible to rally "wild" boards from 12 mm.
About the seat
Sitting on a hard stool for a long time is uncomfortable, so something softer will fit here. How the soft seat of the stool is arranged is shown in pos. 1 fig. It should be noted right away that it is better to make the outer upholstery from burlap, and sew capes for stools from decorative furniture fabric. The stool is used intensively, often casually, and expensive jacquard, etc. it will soon get oily. And the cape can be washed, and sewing it is much easier than a cover for a chair or armchair.
The inner skin is put on glue with a wing inversion from 60 mm, pos. 2. Glue is applied only to the base and the wings are applied, drying it to a tack. Foam rubber is chosen “on a snap”: compressed to the limit with fingers and suddenly released, it should straighten up sharply, and not pull up smoothly.
The outer skin is also placed on glue, with an overlap of the inner wings by at least 30-40 mm. Its edges, so as not to creep, are pulled together with harsh threads up and down, and the threads, so as not to be accidentally torn, are sealed with thick paper, thin cardboard or just tape. Upholstery nails, if necessary, imitate pushpins, pos. 3. The seat is attached to the base when it is completely ready.
The wicker seat pos. 4, but it requires a reliable frame, like a classic stool. Lightweight stools and stools without a tightly attached seat are not strong enough. Modifying cabinets and box stools by replacing the top board with a frame is not worth it for the same reason.
Note: dimensions of ordinary, not for a bar, stools 420-450 mm in height; the seat is from 350x350 to 400x400 mm square and 300-450 mm in diameter is round.
Examples and Samples
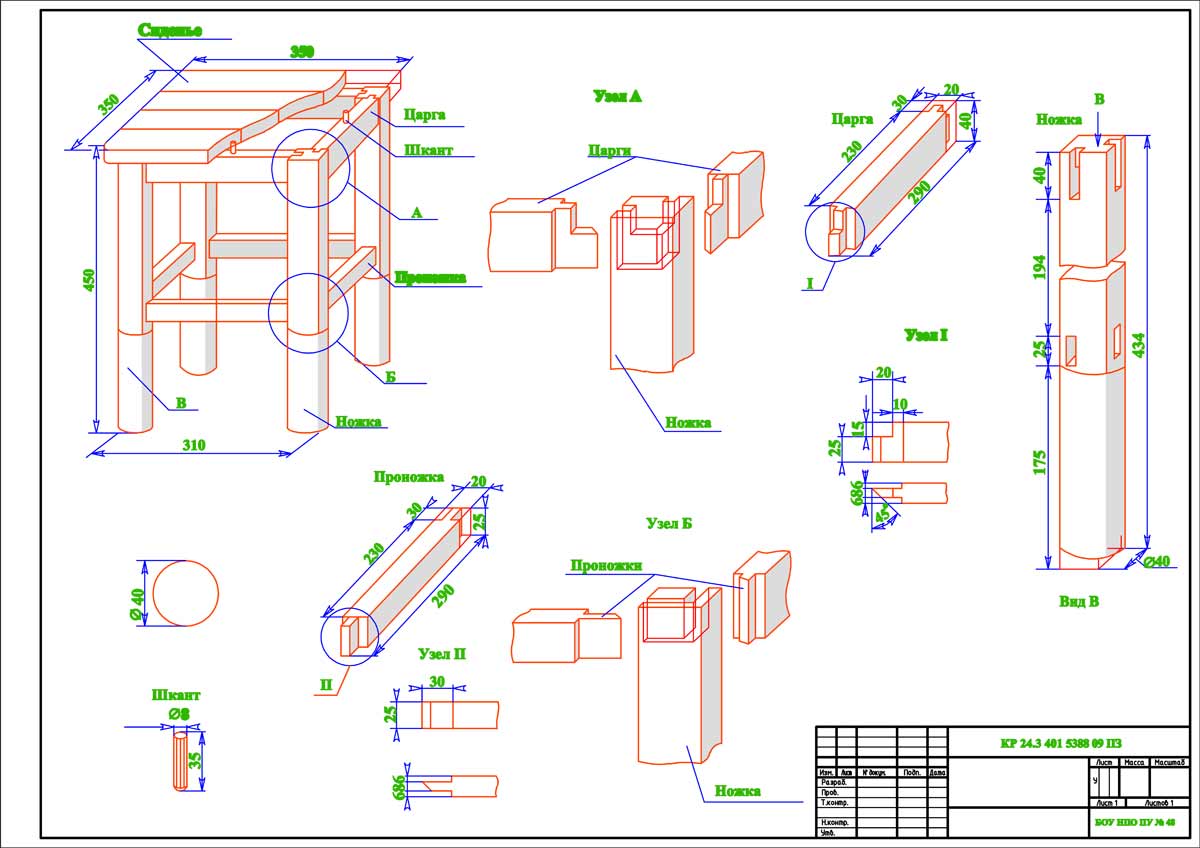
The most reliable and functional is, as we see, still a classic stool; no wonder she got into the classics. Therefore, we give her drawings, see fig. Pos. BUT - general form and device; B - seat mounting method; B - detailing; G - scheme for rallying the seat on the dowels; D - base assembly; E - checking for evenness by measuring pairs.

However, the established canons do not exclude evolution up to revolutionary changes. Revolutions are generally not needed for society because they are ruinous, but in technology they are almost always fruitful. An example is a lightweight kitchen stool based on a classic one, see next. rice. The use of plywood (top trim), laminate for the seat and, most importantly, the removal of the drawer side outside the load-bearing belt, gave rise to a very simple, light, cheap and comfortable design - there are no prolegs. And in terms of strength, it will not yield to the classics, only a wicker seat cannot be made.

And, finally, a variant of the base of a lightweight stool without prolegs. Assembly method see fig. Material - wood or plywood. The seat can be anything. Thanks to the correctly chosen configuration of the legs, the stool is quite reliable, and in appearance, especially with soft seat will go into any living room.

Finally
Making furniture with your own hands is not only economical, but also exciting. And therefore - in a good hour! From a simple stool to such a closet or bed that the grated designer will gasp in admiration.
A stool is an integral element, a must-have fixture in any home. You can't call it too expensive or rare to be taken for hand-made, but a hand-made stool is sure to be more durable and elegant than a standard item from any store. This is what we will talk about today.
As with any more or less serious work, you need to be well prepared to create a stool. List of required toolsThe first step is to prepare all the tools that you might need. You need to prepare different tools, as we will look at various photos of stools, from which you can do the work yourself. The list looks something like this:
Materials for making a stoolIn addition to tools, of course, you will also need materials for making a stool. Their list can be limited to the following items:
Possible stool optionsSince stools are considered a fairly common option for seating devices, there are many varieties of them. We believe that it is necessary to consider the most convenient and popular ones in order to know for sure what you can do with your own hands. The most popular options are below:
To dot the "i", we suggest you look at the photos of the stools that we have given in the classification.
The stool we want to review first is perfect for both the kitchen and glazed loggia where you can sit down to relax and drink tea. It will have crossed legs, fastened with timber for greater structural stability. The seat of the stool will be covered with fabric, under which foam rubber will be located. This upholstered stool is the perfect seat for any kitchen. Naturally, in order to do everything right, it’s not enough just to follow the instructions, you need to carefully study the drawing, which we recommend that you do.
Characteristics of the barsTo make a stool, we need to prepare the bars. Their characteristics will be as follows:
Making a wooden stoolWe make legs and base
The first thing you need to take on is the legs of your future stool. Let's get down to business:
The legs are ready and it remains for you to paint their base in the color that you like best. We perform sittingWhen making a stool for the kitchen, a soft seat is something that must be present in its design. Luckily, it's not that hard to make. In order to make a durable seat, you need plywood. Its thickness is not too important, but a thickness of less than 12 millimeters is not recommended, since such a seat will be too flimsy.
Let's get down to business:
Congratulations, the part you will sit on in the future can also be considered finished. We collect a wooden stool with our own handsFinally, a few details of the future stool, your own production, are assembled. But by "assembled", we mean that they are made. And now they have to really be assembled so that the stool can begin to be used. Let's just say - the work is very simple. You just need to attach the finished base to the seat.
Your kitchen stool is made and ready for a long and reliable service.
DIY folding stoolEveryone knows what a folding stool is, and this, by the way, has been known for a very long time. it indispensable assistant fishing, outdoors, this is something that you can’t do without in the country. And instead of going to the market and spending money on a stool of suspicious quality, you can also make it yourself. Stool: dimensions and drawingThe design of such a folding chair is painfully simple, but still, it is necessary to use the drawings so that everything comes out clearly and without unnecessary snags. Therefore, we offer you the ideal drawing for consideration.
Necessary materialsTo create all the necessary elements separately and assemble them into a single whole in the end, you will need the following devices:
How to make a stool from prepared materialsWhen all the materials and tools are collected, you need to start making a chair.
Suitable materials and a small nuanceIn the process of making a folding stool, in general, you can use almost any type of wood. But mainly pines or birches are recommended. By the way, a pine stool will have a very small weight, which is convenient for carrying it often, for use on fishing trips and to the country. True, such a pine stool tends to loosen quickly, and requires periodic tightening of the bolts that hold the structure together. There is another interesting design refinement that will allow you to do without convenient fixture even more convenient. You can attach a portable handle to the structure of a folding stool. Such a handle is fixed between the inner legs. If you initially take bolts not 4 centimeters each, but 6-7 each, a very convenient handle for carrying the product can be fixed between the inner legs.
Making a stool with your own hands. VideoAt the end of our conversation, so to speak, in order to reinforce the work done, we offer you an entertaining video that tells you how to make a stool with your own hands. The video describes in detail all the nuances and subtleties of making a high-quality, durable and reliable chair at home. After spending half an hour of your personal time, you will finally figure out all the necessary operations and will be able to get to work with confidence. After all, it is not for nothing that they say that you can read it 10 times, but having seen it once, you will surely know how everything is done.
|


A stool is one of the most popular and comfortable pieces of furniture. Unlike a classic chair, it is smaller and can be easily moved. But the main advantage that a wooden stool has is the possibility of self-production and the choice of design.
The latter affects the performance and labor intensity of production at home.
Recently, a children's stool made of wood has become very popular. It has a simple design, ideal for a child. But besides him, such furniture can be used by adults - additional accommodation for guests, mobile wooden stools are often taken for fishing, picnics.

To analyze the qualities, you need to familiarize yourself with the popular types of this type of furniture. Most often, do-it-yourself stools are made in the following forms:
- Children's option. Characterized by small size, light weight. A prerequisite is the absence of sharp corners. The recommended manufacturing material is solid board. Stool legs should have maximum contact with the floor for better stability.
- Foldable design. It is useful for hiking, fishing, in the country. Making a folding stool is more difficult, but the result is maximum comfort and mobility.
- For giving. It is made from a single bar, then treated with protective compounds. These measures are necessary to reduce the effect of moisture and sunlight on the material, as it will most often be outdoors.
- Combined designs. You can make a step-stool with your own hands or make a box instead of a traditional seat. The choice depends on the required functionality.
A homemade round stool has the best performance, it is well suited as a nursery. But it is not suitable for permanent sitting. Therefore, most often they opt for the classic rectangular or square shape of the seat.
The video shows how to make a classic stool:
Drawing overview
The first step is to decide on the size. Seat dimensions vary from 300*300 to 450*450 mm. If this is a children's option - 250 * 250 mm. The height directly depends on the height of a person and can range from 260 to 480 mm. In exceptional situations, a children's chair may be 200 mm high. But this is rarely done. In some cases, high stools will fit the bar counter.

There are many drawings of a stool - for beginners and professionals. In the first case, it is recommended to choose simple designs. People with carpentry skills stop at folding or combined (ladder, box) assembly schemes.

All drawings are conditionally divided by complexity:
- The number of parts varies from three to five. The more constituent parts, the more stable the structure will be. But this affects the complexity of production.
- Manufacturing material. The easiest way is to make a stool, but in the future there may be difficulties with its operation - the influence of moisture and temperature differences will affect appearance and reliability. It is recommended to choose chipboard or timber, a wooden board.
- Available tools. To produce a wooden stool, you will need a minimum of tools: a tape measure, a ruler, a hacksaw, sandpaper, a drill or a screwdriver.
Choice of tools and materials
Before you make stools out of wood, you need to consider in detail the list of materials and tools. For a solid wood product, you will need minimum set. It is important to consider the initial state of the material. The easiest way is to make plywood with your own hands, since it is easy to process, there will be no difficulties with painting, you do not need to sand the entire surface.

The optimal list of tools: a carpenter's square, tape measure, electric drill (screwdriver), pencil, grinder, confirmations with plugs, metal furniture corners, self-tapping screws. To process chipboard sheets, you will need an electric jigsaw.
In addition, you need to study the properties of materials. You can make a stool from such blanks:
- Solid wood and beams. The best option for home production. Recommended thickness - up to 5 cm. Advantages - reliability, good aesthetic properties, durability. The disadvantage is the complexity of processing, the product must be varnished or painted.
- Chipboard. Sheet thickness - 10 mm. For manufacturing, you will need three blanks with a size of 400 * 300 mm (legs), 300 * 300 mm (seat) and 200 * 120 (jumper). It is better to use moisture resistant chipboard. It is from it that a children's stool is most often made.
- Plywood. In this case, you need to carefully approach the choice of model. It is recommended to use sheets of brands FSF, FSF-TV and FK. Thickness from 10 to 18 mm. The grade of plywood must be at least the second. For the manufacture of a sheet with dimensions of 1250 * 1250 mm is sufficient. It is advisable to make a children's chair from moisture-resistant plywood.
It is not necessary to use only wood, constructions consisting of several materials will be convenient - timber, plywood, chipboard. It is important to have drawing skills in order to compose correct scheme assemblies.

Manufacturing procedure
Is it difficult and how to make a stool with your own hands? First you need to decide on the drawing, choose the optimal design. Next stage- preparation of material for production. Wood, chipboard or plywood must be dried and checked for defects. Then settles down workplace, Special attention given to lighting.

As an example, consider how to make a stool from chipboard.
Production stages:
- Sheet layout. This is necessary for the formation of blanks. Beginners are advised to make patterns out of paper or thick cardboard. This way you can avoid sizing errors. It is important to consider kerf tolerances.
- Formation of blanks. The best tool is . Edges should be smoothed with sandpaper or grinder.
- Fastening components. Depending on the design, you can use the slotted technique, the connection with furniture corners or wooden spikes. If the structure is made of wood with your own hands, you can use confirmations. This screw tie fixes various components well, improves stability.
- Painting and varnishing. The finish surface can be matte or glossy. If it is important to preserve the original texture, use translucent or transparent varnishes. Most often, acrylic compositions are used.
- Additions. Often install special shock absorbers on the legs. They minimize the appearance of scratches on the floor, reduce noise when moving furniture.
The world of stools is vast and varied; photo in fig. give only a general idea of its range. It is from a stool that many amateur carpenters begin their creative journey: you can make the simplest, but practical and pleasant-looking stool with your own hands in half an evening, and in the future, stools of other types will allow you to master the essential subtleties of furniture craftsmanship, and not one of the products will be superfluous in the house.

Other pieces of furniture do not possess such amazing properties; This is explained, on the one hand, by the fact that the stool is essentially extremely simple, purely practical and comes from the deepest antiquity: wooden decks on which cavemen sat around the fire, these are already stools. For the same reason, a stool must endure everything, be strong, reliable, durable.
On the other hand, the simplicity of form and design allows the stool to fit into any interior and generally be at home in any environment. Over the centuries and millennia, this must certainly have been appreciated, and was evaluated as a suitable basis for embodying certain aesthetic concepts in the material. Such an exquisite piece of furniture as a banquette is also nothing more than a stool. Fanciful design and decor require the use of complex technological techniques, therefore, to make a luxurious stool, you will need a fair amount of skill and experience. It is much easier to buy both, working with the usual basis, and here the stool provides a complete range of products from completely primitive to technologically the thinnest.
Stools are made from the most various materials, from ropes to stone. A plastic stool has long been commonplace, and forged or welded metal is also not unique, but in this post we will figure out how to make a stool out of wood. The reason, in addition to the "primordiality" of the material, is that it a wooden stool can be extremely simple, durable, reliable, and at the same time have high aesthetic merits. How so? Well, let's go!
Tool
The manufacture of a stool begins with the preparation of a tool and a workplace. Do not worry, we will not immediately advise you to spend some decent salaries on a wood milling machine, a drilling machine, a planer-sawing machine and a lathe. Let's try to do without even a carpentry workbench. Maybe it will come to all this when there is a taste for work and income from it. In the meantime, we will limit ourselves to the minimum that will allow us to work from a table on the balcony or in the garage, laying a film on the floor so as not to spread sawdust. And this minimum of a tool should be useful on the farm in general, suddenly (everyone has his own inclinations) the first stool will turn out to be the last.

So, for starters, in addition to an electric drill, you will need a pair of C-shaped carpentry clamps for 180-220 mm (top left in the figure), one (preferably 2) F-shaped for 400-500 mm, at the top center, and, preferably, clip-on clamp, top right. They will cost inexpensively, and the range of their application, in addition to carpentry, is very wide.
Buying a jigsaw, of course, would be nice; it is not so expensive and suitable for a wide variety of jobs. But at first, instead of it, you can use ... a frame hacksaw for metal; they go on sale as mini hacksaws. Just do not take entirely plastic ones (lower left in the figure, pos. a). This is a tool for rare occasional use. Such a miracle on the Internet can be found for as much as 18 rubles, but plastic sponges are quickly eaten up by the steel of the canvas, and a “super-cheap” hacksaw is not enough for a good stool. You need to take a mini-hacksaw with a steel frame, pos. b. It will cost about 50 rubles, but you can work with it for a long time and regularly.
For woodworking, the canvas is tucked into the frame hacksaw “incorrectly”, with the cutting edges of the teeth facing you (upper inset in pos. b). Then a section of the canvas in the frame can be sawn across the fibers, along and obliquely. In any case, the cut comes out even and smooth, literally mirror-like; when sawing in a layer, only under-dried or newly damp coniferous wood is slightly shaggy. Thus, for example, spikes are sawn under the groove, see below. Again, it is “wrong” to cut wood with a frame hacksaw, you can start from the corner, because. wood is softer than any structural metal.
The protruding section (console) of the canvas to conduct a curved cut is slower than a jigsaw, but, with some attention and accuracy, just as accurately. When working at home, it is advisable to fill the blade, as it should be in a locksmith's way, with the ridges of the teeth away from you so that the sawdust falls down, clogging the markings. In this case, you also need to cut in a locksmith's way: keep the tool even, without tilting along the cut, do not lean too much and give a swing (working stroke) no more than 1.5-2 widths of the blade. Also, the protruding ends of the dowels and through spikes are sawn off with a “wing” of the canvas no worse than with a special flexible saw, which is several times more expensive.
Next, wood files - rasps. You will need 2 of them: straight semicircular 200x20 mm, pos. c, etc. cabinet, also semicircular (250-300) x30 mm, pos. d. A cabinet rasp differs from a straight rasp not only in its narrowed end, but also in the way it is cut. Both of them have a notch, of course, not at all the same as that of metal files; those on the tree are instantly clogged with sawdust. Depending on the properties of the tree and the area to be treated (end, edge, face), it is more convenient to work with one or another rasp.
Then, chisels. We will need simple straight chisels to a tree with a width of 6-8 and 20 mm. It would also be nice to purchase a set of 6-40 mm chisels, from 3-5 samples. Often a set of chisels is attached wooden hammer- a mallet, which otherwise needs to be bought separately. However, a mallet, like a clamp-clothes peg, can be made with your own hands from hard, small-layer wood.
About stool sizes
The dimensions of the stool seat, as a rule, are taken in the range from 300x300 to 450x450 mm or, if the stool is round, of the same diameter. Minimum - 250x250 mm; sitting on a plank of 200 mm is already uncomfortable, after 5-15 minutes the edges of even a soft, but too narrow seat also crash into an extensive elastic “fifth point”.
The total height of the stool is taken, according to height, in the range of 420-480 mm. The height of a children's or household stool can be reduced to 260-280 mm; in this case, the seat is also made approximately 260x260 mm or 270-280 mm in diameter.
Note: when designing a stool on your own, it should be remembered that the contour of its supporting surface must be at least 280x280 mm or a diameter of 320 mm for a stool of normal height and at least 250x250 mm or a diameter of 290 mm for a stool of reduced height, otherwise both will turn out to be unstable. For decorative and folding stools, these values can be reduced by 1.25 times.
Of three parts
Yes, a good stool, incl. decorative in the living room, can be assembled from just 3 parts. Drawings of a product of this kind (pedestal stools) are given on the left in fig. The 4-piece option is unsightly, but very durable, therefore it is more suitable as a working stool: you can attach a removable vise to it, drill, saw, chop, etc. In this case, it is better to take the overall dimensions of the 4-piece stool as minimal as possible, see above.

The sample on the left in Fig. - one of the very few types of stools that can be made entirely from chipboard with a thickness of 20 mm or more; the width of the connecting grooves in the details corresponds to the thickness of the material. The base is assembled on glue (carpentry, nitro-glue for wood, PVA or polymer for tiles like bustilat). Seat fasteners - wood screws or confirmatory screws (60-90) x6 mm. Screw connections also with gluing.
The fact is that chipboard really “does not like” loads on the layer and fastening to the end. In this design, the loads concentrated at the attachment points spread well and, with proper assembly, delamination of the material is unlikely. But on the heels of the legs, it is still highly desirable to stick overlays made of solid dense wood (oak, beech, hornbeam) with a thickness of 10 mm or more. Rubber - no need, it will stain and spoil the floor.
3 to 5
Option load-bearing structure stool, shown on the right in the figure, allows, on the one hand, to get rid of the rather laborious and responsible cutting of long even grooves, which is especially important when working with a hand saw. On the other hand, it allows you to get legs of a rather bizarre shape without a significant increase in material waste, because. blanks are marked with minimal technological gaps on a board 200-250 mm wide.
The "highlight" here is that 2 of the 3 parts of the previous design (namely, the legs) are "halved" along. The base is assembled in a cross (diagram at the top right) similarly to the previous one. option, i.e. with gluing of all joints:
- Drill holes for self-tapping screws; holes for fastener heads can be omitted.
- Dry assembly is carried out and, if necessary, fitting of parts.
- 3-4 drops of glue are introduced into the holes for fasteners and smeared inside with a thin splinter.
- Apply adhesive to mating surfaces.
- Withstand parts until the glue sticks on visible surfaces.
- Quickly and tightly collect the entire assembly on the hardware.
Also pay attention to the side surface, marked with the letter A. Before installing the seat, you can put on a round shell rolled from thin fiberboard on it. They put the shell on glue and small hardware (self-tapping screws, nails). After assembling and finishing the entire product, the shell can be decorated, incl. very spectacular stucco polymer clay and get a truly luxurious stool.
4 details
Box-shaped stools-benches made of 4 boards (seat, 2 sidewalls-legs and a vertical longitudinal insert-support beam, on the left in the figure) are widely known and described many times. However, such a stool is simple and cheap only in appearance: for proper strength and reliability, its parts must be cut out of a block of durable wood or chipboard with a thickness of 40 mm and a width of 250 mm. Both materials are not cheap, their trimmings suitable for a stool most often do not go to waste and it is not easy to find them for sale or in your own pantry.

Meanwhile, an economic-working stool-bench can be made literally from improvised materials, scraps of timber from 30x30 and plywood from 2.5 mm as follows, on the right in the figure:
- Segments of the beam are rallied into shields (leg blanks) end-to-end on glue, as described below;
- One side of each shield is glued under pressure (compression with clamps) with plywood;
- Angular grooves are cut out in the blanks of the legs for the same beam and holes are selected with a chisel for the screed from it;
- Paste over with plywood the front sides of the legs in the same way as according to clause 2;
- Assemble the supporting box of the stool on glue and self-tapping screws;
- They fix the seat, which in this case can be made of plywood from 6 mm or boards from 12 mm. You can simply put the seat on the glue, all operational loads and so the box takes over.
simple kitchen
A simple full-size household stool can also be made from scraps of timber, plywood or chipboard, see fig. It is more suitable for seasonal dachas. When used in the kitchen of a residential building, the design turns out to be rather weak, there this stool lasts for 3-5 years. The second option for using the same design is a smaller children's stool, see above; the dimensions of the parts are then proportionally reduced, except for the width of the connecting grooves.

footing
The footstool, on 2 pairs of X-shaped legs, is also quite popular due to its low material consumption and good decorative qualities. However, in reality, it turns out to be not so simple.
Take a look at the sub-assembly marked in red in the fragment at the top left of fig. To perform a strong and reliable tie-in of 3 bars in 2 mutually perpendicular planes is not an easy task for an experienced carpenter; putting a dowel there will be unreliable, and the self-tapping screw in this case is outright hack: the double crosshair is heavily loaded and the steel hardware will go to tear the tree.

These problems can be circumvented by combining the beam and box-shaped power schemes of the supporting structure. We will leave the openwork of the beam frame in the most noticeable place - below - and we will achieve overall strength with an “oak” box-shaped top. Technically, this is obtained by reducing the angle between the legs to 60 degrees. Then, in order to maintain the total height of the stool and the width of the contour of the supporting surface within acceptable limits, the crosshairs of the legs are shifted upwards. The V-shape of the now asymmetrical X is tall and wide enough that a sturdy box can be made of 20mm or thicker pine board, chipboard, or plywood, see left in fig.
Note: the missing overall dimensions can be taken from the figure, it is drawn to scale.
The longitudinal walls of the box need not be sloped; this is done to reduce the visibility of the box while maintaining its maximum volume. If the longitudinal walls of the box are straight, it can be made narrower, so long as the V-shaped part of the legs fits inside. It also does not hurt to deepen the box by sliding its bottom down, the whole stool will only be stronger. In this case, 1-2 attachment points are added on the Λ-shaped parts of the legs, similar to the V-shaped part, marked in green in fig. The box is assembled on dowels (see below) and glue or on steel corners applied from the inside. In this case, the box is first glued, and after 1/4-1/3 of the time of complete curing of the glue, it is finally fastened with steel.
The bottom of the box is sewn up with fiberboard; under the seat, a capacious drawer for useful trash is formed: the supporting structure gives the stool full strength and its seat can be removed or folded down. The last option is better, because the stool, rearranging, is taken by the seat. The folding seat is fastened with a piano loop or a pair of small card loops. The lock in the lowered position is any suitable one: a tight ball latch, a hook and bracket on the underside of the seat, up to a secret lock, if you so desire.
When making this stool, you will have to master at least one joinery and carpentry connection - a half-wood tie-in, this is how the parts of the legs are connected. To embed 2 pieces of wood into each other, using a milling cutter, as they would say in America, can, and the youngest daughter of President Obama (grandmother Jane Psaki is a lady, they say, sensible and skillful). With a simple hand tool, a half-tree tie-in is performed by making cuts according to the markup and choosing a surplus between them. Working “only with hands”, it is necessary to take a closer look at how the layers of wood go on both sides and put a chisel to knock out the excess, so that the chip does not go deep into the mass of material, see above in fig. The rest is obtained with the same chisel, acting like a chisel, without hitting with a mallet, and, if necessary, smoothing the bottom of the groove with a rasp. It is not necessary to smooth it clean with sandpaper, rough surfaces on the glue will hold on tighter.
Note: Please note that the details of the legs of the foot stool are a mirror image of each other both horizontally and vertically, at the bottom right in Fig. If you do not have experience in design work or a naturally developed (convex, as they say) spatial imagination, it will be useful to first model the legs to scale or in life size, collecting their models from 2 layers of cardboard.
More connections
So we have already stumbled upon a dowel connection, one of the most common in carpentry. In the future, we will need an equally common thorn-groove connection. How they are performed is shown in Fig. There is little left to add to it.

First, when choosing a surplus from the groove (pos. 1d), it is not necessary to bring it to full squareness. It is better to leave the edges (short sides) of the groove rounded, and round the edges of the tenon accordingly, so the whole connection will be stronger.
Secondly, the spike does not have to be done on a router at all, it will not take much longer to cut it out manually with the same frame hacksaw. First, at the level of the base of the spike, the workpiece is sawn across along the contour by 0.5-1 mm less than the required depth, stepping back from the marking to the end of the workpiece by 0.5-1 mm. It’s also not a big sin to drive to the full depth, but then a small narrow groove will remain along the contour of the base of the spike. If you don’t finish it a little, then the base of the spike will be slightly broadened due to the elasticity of the tree, and the whole connection will again be stronger.
The spike is finally sawn from the end along the fibers, retreating 0.5-1 mm outward from the markup. Here, for the same reason, the gash is also not brought to the end by 1-1.5 mm, and the excess is simply broken off. If the wood is straight-grained coniferous, the excess at a certain moment will crunch itself and hang on the fibers or fall off. Bring the spike to size and round off its edges with a rasp.
Note: in self-development wooden structures do not forget - all the spikes should be directed only and only along the layer! The tenon thickness for ordinary commercial wood, unless otherwise indicated on the drawings, is taken by default at 1/3 of the thickness of the thinnest of the mating parts.
As for the dowels (round connecting bosses), it is better to buy ready-made wooden ones. The cost of finished dowels is cheap, they are already chamfered and corrugated, which makes the glued connection stronger. Plastic dowels do not dry out with wood and therefore the connection weakens over time.
The main rule when choosing dowels is that their wood should dry out a little slower than the structural one or at the same speed; this condition is almost always satisfied if the dowel wood is harder. Drying out of the dowel is difficult, because. its contact with air is limited. The part, drying out, will compress the dowel; her and dowel lignin are gradually "soldered" and the connection becomes stronger over time.
The diameter of the dowels is taken 2.5-3 times less than the thickness of the narrowest of the parts to be joined; its length is 1.75 times the thickness of the thinnest part. The last dowel (if it is not through) should enter 2/3-3/4 of its thickness, and its remainder should sit thicker in the part.
Note: holes for blind dowels in thin boards are selected so-called. Forstner drill, see below, leaving behind an almost flat bottom.
Also a useful stool
Well, how do you undertake to make a spike-groove with your hands? Then it's time to take on a simple folding wooden stool, see fig., for a summer residence, garden, picnic. 2-3 of these stools will not take up much space in the closet and fit in the trunk of a car. Material - board or plywood. It is highly desirable to impregnate all parts from the latter before assembling the product with a water-polymer emulsion, it will not only protect against moisture and rot, but also strengthen the structure.

How to make a capture
Taking a folding stool with a round seat just by the seat is not very convenient, so the grip for the hand on the sample above is not a whim. In a solid board, the grip is cut out as usual: holes are drilled along its edges with a pen or core drill (diameter - 24-36 mm; distance between centers 95-115 mm, looking at the hand), and the excess between them is cut out. In this case, it is also convenient to use a frame hacksaw.

Another thing is if the capture falls on the junction of the boards; most often this happens in classic kitchen stools, see below. At this point, the beak of the pen or the pioneer drill / guide pin of the crown, when working with a hand drill, will definitely go along the groove and the drill will lead to the right. A jig made of thick plywood or trimming the board does not help, the thin sidewall of the feather or the teeth of the crown tear it, but about steel jig cling to themselves.
It is for such cases, as well as for drilling holes with a flat bottom, that the Forstner drill is intended, see Fig., Its lateral surface is smooth. When making a manual grip in the stool seat, they first drill holes in the conductor according to the above dimensions; left over! Then the conductor is applied in place, securely fastened with a pair of C-clamps, and edge holes are drilled. The surpluses in the details are chosen as always, the gap between the boards is not an obstacle for this.
real kitchen
Now we have classic kitchen stools in line. They get more than others during use, therefore their design is carried out according to all the rules of strength: a rigid beam frame that can alone withstand all operational loads, and a seat that must hold firmly in its place, but in such a way that, if necessary, it can be easily repaired or replace. Therefore, the seat of the kitchen stool is made of shield boards from cohesive planks (see below) and is attached to the breadcrumbs or directly to the frame on the dowels.

The variant with breadcrumbs is shown in fig; pos. And his general scheme and names of components. The advantage of this design is the low quality requirements for the seat shield. By installing a pair of crackers on each drawer (this will not reduce the overall strength of the product), you can make the seat generally from separate boards, and on the original 4 crackers - plywood or chipboard.

Pay attention to the drawers, these are not just boards, they are all the time in furniture, and not only in furniture. The drawer in general is a part that properly distributes the load in the assembly and is itself capable of carrying the load. Tsars can be found in alembic, pipelines, etc., which have nothing to do with furniture.
Also pay attention to pos. E, it shows a way to check the evenness of pairs of legs with diagonals; it is basically the same as checking the squareness of the foundation. The evenness of the pairs during the assembly of the classic stool is checked three times, see fig. right: in pairs assembled individually (left pos. and red lines), between pairs (orange lines in the central pos.) and the overall squareness of the frame (brown lines in the center). The seat is installed only after a complete check of evenness; sawing the legs of a finished stool is utter unprofessionalism.
Below in fig. - drawings of a stool for the kitchen with a seat mounted on dowels. Such a design is less laborious and material-intensive, because there are no operations for the manufacture and installation of crackers, but the seat shield must be firmly cohesive, see below. If fittings are installed on the legs, they should not reach the floor by 20-40 mm so as not to scratch it.

Note: spike cuts at 45 degrees in both cases are made with the same frame hacksaw. A fixed miter box (device for sawing at an angle) at fixed angles of 90, 45 and 60 degrees costs no more than 50 rubles.
How to rally the boards into a shield
The boards, which will now be the plots of the set (package), are usually rallied into shields on glue using special clips - wym, at the top left in fig. In wimms, small additionally fixed shields, as for a stool seat, can be rallied just end-to-end. Large shields, say, for a tabletop or sidewall of a cabinet, are rallied (middle row from left to right) with a tongue, in a fold, on dowels, dowels (lamellas), and in other ways.

Clamps in piece handicraft work are sometimes replaced with various home-made devices on the same principle (compressing a set with pairs of wedges), at the top right, and now more and more often with large F-shaped clamps. In this case, a rather laborious preparation of plots for rallying according to methods a, c, or d is necessary. it is impossible to achieve an absolutely accurate pairing of wooden parts under load due to the low local strength of the wood.
However, there is a way to rally the shield on the stool seat end-to-end completely smooth and without complicated fixtures, this is the so-called. twisted wyma with cheek pads; its diagram is shown below in Fig. Step-by-step rallying of the shield in a twisted clamp is carried out as follows:
- The lower (according to the scheme) plywood cheek is placed on the table;
- The table with a cheek is covered with plastic wrap;
- Glue is applied to the edges of the plots and kept until tack-free or according to the instructions of the glue;
- The plots are laid on the lower cheek over the film and, if possible, tightly squeezed by hand;
- Wrap the set with foil;
- Impose the upper cheek;
- The whole package is carefully, without lifting or turning over, shifted to the edge of the table so that some part of the set hangs over the floor;
- They start winding with a cord, applying turns as tightly as possible, but not quite too tight;
- When the package is wrapped about 1/3 or more, it can be removed from the table and winded on weight;
- The ends of the cord are tied;
- Wedges are inserted under the winding, tapping with a mallet. 4 wedges are needed, they are injected evenly from 4 sides (2 from above and 2 from below), tapping alternately;
- When the wedges stretch all the turns of the winding tightly evenly, the package is left until the glue dries completely;
- After the glue dries, the winding, cheeks and film are removed, the set is cut to size.
The cross section of the wedges need not be rectangular; it is possible to use obliquely cut round sticks; there is only one condition - the wedges are needed smooth. It is desirable to use a slippery propylene cord, packing twine is suitable. The thickness of the wedges is determined based on experience. If there is none, then the package is first assembled dry, without glue, and the thickness of the wedges is selected so that they completely fit under the winding, tightly pulling its turns.
How about softer? DIY stool covers
Long sit on the hard, of course, unpleasant. A comfortable stool on the frame of a classic kitchen can be made with a wicker seat, without fooling around with breadcrumbs, dowels and a shield, see fig. The seat material is colored polypropylene twine and a smooth linen cord.

It is highly desirable to have decorative stools in the living room with beautiful soft ones, and it will not hurt to give a kitchen stool a gloss. But there is not and cannot be a stool on which no one would ever set foot. Or, at least, did not feel an acute desire to do this for quite objective reasons caused by the circumstances. Hence the conclusion: a stool needs a soft, elegant pad on the seat - a seat - which, if necessary, could be removed without fiddling for a long time, and just as quickly placed back.
The first thing that comes to mind in this case is decorative pillow, see e.g. video below. But the pillow can be accidentally dumped on the floor, and she herself will slowly slide there. Another option is a soft case. A cover for a chair or armchair is a rather complicated garment, but with a stool the situation is simpler.
Video: decorative pillow on a stool / chair
Covers for stools are made mainly of the following types, see fig. Pos. 1 - cape with ties. Sewing this one is the easiest, but the ties stick out in plain sight, and there is a lot of fuss with them, especially if the stool is for children and the kid has something to think with knots.

The next option is a cape with an elastic band. She can look great, pos. 2, and you can remove it by simply pulling it off. The structure of the cape on the stool is generally the same as the permanent upholstery: foam rubber, padding polyester and upholstery fabric from the bottom up, but there are a couple of tricks.
Firstly, it is better to take foam rubber from PVC, yellowish soft, pos. 3. It is not suitable for permanent furniture upholstery, because relatively short lived. But in the case of a stool, its other feature comes to the fore: it adheres well to wood, incl. lacquered, so that the cape will not slip to the side and under the angry rider.
Secondly, it is better to cut the cover for a square stool diagonally, i.e. The warp and weft of the fabric should go from corner to corner. In this case, cutting as such is not needed: the cut is thrown onto the seat (folds are obtained at the same time beautiful and smoothly fitting corners), where they mark where to cut, cut and sew.
Note: Case for round stool it is necessary to cut already; an example of its manufacture - see the video below:
Video: do-it-yourself simple cover for a round stool
An option that is also quite soft, original, beautiful and tenacious to wood is a rug for a stool using the patchwork technique, i.e. patchwork, pos. four; see e.g. plot:
Video: seat mat on a stool using the patchwork technique
Finally, a knitted cape, pos. 5. This option is labor intensive and almost exclusively decorative. It allows you to achieve a magnificent visual effect, but, alas, a knitted cape will retain its appearance for a long time only on a stool that is not being sat on.
In conclusion: immediately aerobatics
Very elegant stools with divergent legs. It is generally accepted that they are not amateur products. The reason is drilling holes at exactly the right angle; see for an example in fig. drawings of details of a stool on turned legs. Here, firstly, one cannot do without drilling machine. A relatively inexpensive table-top frame for a drill does not help out: the shaft holder in it is too short, which is why, in combination with a plastic case, the drill leads by half a degree, or even more. Such an error is enough for the stool to come out crooked and wobbly.

Secondly, fitting the details of a stool of this design during the assembly process is excluded, everything must be done immediately exactly in size from solid high-quality wood. See the steel plate at the bottom right in the pic? This is a gauge for checking the diameter of the spikes. In this case, they, regardless of the design and overall design, are required to be round, i.e. needed and lathe on wood.
Now let's go back to the 3 to 5 stool. Let's reduce the size r to 100 mm, this is acceptable. Is it possible now to make this stool with divergent legs? Quite. Of course, they will not be chiseled and not quite round, but the grace and lightness of the stool will be preserved. This is what the aesthetic potential of a stool means in practice.
What piece of furniture is most likely to be found in the kitchen or dining room? Of course it's a stool! This element of furniture, so simple and familiar to all, has been popular with all mankind for many centuries. Its history began in ancient times, when cavemen, sitting by the fire, used wooden decks. Modern world stools are quite extensive and varied, and their models meet all the requirements not only in terms of practicality, but also in terms of aesthetics. Do-it-yourself stool made of wood, drawings and photos of which can be found on the worldwide web at in large numbers, due to the simplicity of its design is the beginning creative way for many amateur carpenters. And today we will look at the most popular and easy-to-make examples.
The simplicity of the forms and design of this piece of furniture allows it to fit into absolutely any kitchen interior. This is what has attracted the attention of connoisseurs of minimalism for many years, allowing them to take as a basis in the embodiment of other aesthetic concepts.
Stool scheme Stool scheme (option 2)
Scheme of a stool-bedside table Assembly of legs with kargs
Depending on the style of the interior of the room, you can make a stool of absolutely any shape and materials. So, for example, lovers of exclusivity may like stools made of stone, metal or glass. However, the most popular and most affordable material is still wood. The reason for this is the simplicity of manufacturing a stool, strength and reliability, and most importantly, high aesthetic merits. The most simple design wooden stools consists of four legs, a seat and connecting plates. However, there are many other options that have a specific purpose.
Stool with storage box
Stool with storage box Stool with storage box (option 2)
It is not sad, but most apartments cannot boast of having free space, and, accordingly, additional lockers for storing various little things. It is for such cases that you can make a wooden stool with a drawer. This model will be an excellent solution for freeing the table and other furniture elements from infrequently used items.
For example, housewives will be able to place such needlework items as balls of yarn, knitting needles and other accessories for sewing or embroidery in a box built into the stool. A strong half of humanity will be able to hide small tools in this roomy chair, such as a hammer, pliers, pliers, nails, etc.
By placing all these items in a wooden stool, on the one hand, the problem of free space on the table or window sill will be solved, and on the other hand, due to their easy accessibility, they will always be at hand.
To make a chair with a drawer, you will need a processed timber 5x5 cm, a board 2x2.5 cm thick and 20x25 cm in size, plywood, which will be used to make the bottom of the box, and fixing materials.
Foldable stool
Folding wooden stool Folding wooden stool (option 2)
It's another one good example chairs for small spaces. The design of the product allows you to have several of these stools in your arsenal - keep some of them in the unfolded state, and store some in a closet or niche, because the dimensions of the folded chair are about 6-8 centimeters thick. If necessary, you can always get it and comfortably seat the whole family or guests at the table.
For this model of wooden stools, you can choose round or square seats, but the design of the fastening of the legs is special. For their manufacture, you can use a board or high-quality plywood with a thickness of at least 2 - 2.5 cm. The base of the chair is made up of two frames that are freely interconnected. As fastening of the frames, special screws with bushings are used, which allow the structure to be unfolded.
Children's stool
Children's wooden stool Children's wooden stool (option 2)
Due to its small size, this chair will always find its place in any home, not only in the children's room. Such homemade stools are very often used as a comfortable footrest for summer people. Therefore, their production will please not only the kids, but will also allow you to take care of the older residents of the house.
For the manufacture of baby chair you need to use a processed, pre-sanded board, in order to eliminate the risk of injury or plant a splinter. The ideal option would be dry linden, which has a light weight, due to the low density, and beautiful texture.
Stools for a country house
Stools for country house Stools for a country house (option 2)
Products to be used outdoors are recommended to be made from wooden beam. Best Option oak or larch will become - these materials are best able to withstand moisture. If wooden stools are assembled from other types of wood, then the bars should be pre-treated with a moisture-repellent agent.
Making a stool - stages of work
So, you have decided to make a wooden stool with your own hands, but do not know where to start? Manufacturing technology is as follows:
Design
First of all, we draw up a drawing of a stool - according to it, in the future we will manufacture all the components of the structure.
When drawing up a diagram, you should immediately calculate and, in the course of work, note all the necessary dimensions of the structural elements and how they are connected. Also, when designing a drawing, it is important to take into account the dimensions of the internal fasteners - the spikes of the crossbars, as well as the grooves cut in the legs of the stool.
If you are not sure that you can cope with the development of a sketch on your own, make this task easier for yourself and find ready-made drawings with photos, and possibly videos, on the net. The main thing is that at the time of the start of work you have a drawing by which you will be guided.
Purchase of materials
After you have developed or found a finished sketch of a stool, you need to sketch out a list of all the necessary materials that you will need in the course of the work. Your list must include:
- bars of the selected type of wood for the legs of the chair with a board for the crossbars;
- board or plywood for the seat;
- self-tapping screws;
- wood glue;
- varnish for woodworking.
If you plan to make a do-it-yourself stool with a soft seat, then you will additionally need high-density foam rubber and upholstery.
Preparing the necessary tools for work
Any production wooden furniture impossible without the use of carpentry tools. All furniture workshops in Moscow and other cities of our country use professional machines and special equipment. But for the production of a stool made of wood or chipboard with your own hands, you will need a minimum list of tools, among which the most popular are:
- Sander;
- electric jigsaw;
- screwdriver;
- chisel;
- plane;
- a hammer;
- roulette;
- pencil;
- building level.
Manufacturing of the constituent elements of the stool
The course of the process begins with the markup, which must be transferred from the drawing for the stool, which we make with our own hands from wood, to the surface of the materials. From a bar according to a given marking, we cut out legs 45 centimeters high. In the upper part of each of them, we make two holes on two adjoining faces, retreating from the top by 2 cm. The width of the groove should be 1.3 cm, and its height should be 5 cm.
1. Marking the board 2. Marking the jumper 3. The board is marked
4. Using a jigsaw, cut out the details 5. The details are ready 6. Smooth out sharp corners with a large sandpaper
7. We grind the parts with fine sandpaper 8. The parts are ready for assembly
From the boards we make crossbars 44 cm long, on which we cut out spikes 1 mm smaller than the grooves. If you decide to make carved legs for a chair, then the method of their fastening will be slightly different from the option we offer. The seat of the stool, as a rule, is made from a sheet of thick plywood or board and cut out according to pre-calculated dimensions.
Before you make a stool out of wood yourself, you should prepare all the structural elements. For this wooden surfaces are first processed with a grinder, and then with fine-grained sandpaper. Do not forget about safety when working with a grinder - it is advisable to wear a protective mask and goggles, and do the work yourself on the street or in a well-ventilated area. Finished components of the structure are varnished. If you plan to change the color of wood, you can pre-coat it with wood stain.
Construction assembly
When making stools with your own hands from the selected type of wood, you should grease with glue and connect all the attachment areas of the chair legs and crossbars to each other and wait until completely dry, then fix the connections with self-tapping screws.
9. Assembly of the stool - we connect the sides with a jumper (1 screw on each side) 10. We fix the seat and the stool is ready
Quite often, in order for the stool to be more durable, the so-called “crackers” are additionally prepared - planks with beveled corners are cut out of a bar with a section of 3x2 cm. These elements are screwed to the crossbars (tsargs) and legs.
After the frame of the product is ready, it remains to attach to it the blank of the seat, made according to the sketch. Cover the finished chair with several layers of varnish and leave to dry for about a day.
11. We cover the product with a colorless varnish Ready stool
For the manufacture of a stool with a soft seat, during the work you will not need any special drawings and sketches. Works are carried out according to the same scheme, only varnishing is carried out only on the legs and crossbars. Foam rubber is glued to the seat of the stool and covered with the selected upholstery material.