
Wooden frame wall structures. The main nodes and connections of the frame house. Bevels or braces
The construction of frame structures has long been unusually popular. There is nothing surprising in this. This construction method is very attractive. simple technology, which allows you to carry out all the work on your own, without resorting to the help of hired workers. And the materials for construction are required not too expensive and quite affordable.
However, when determining the type, one should not proceed from the mass of the building alone.
It must also be taken into account on which it is planned to erect a building. If it is clayey, heavy enough, then it is unlikely that it will be possible to do without a solid, monolithic foundation. If the soil has a normal sand content, then it is enough or.
If the homeowner doubts the quality of the soil for construction on his site, then he can clarify its type and composition with the local architectural bureau. Do not neglect without first making sure that you can actually do without it. The proposed construction will use natural material woody origin. Even fully processed quality material, it is best to avoid prolonged contact with water.
There are two schemes for building a frame house:
- All activities are completely self-managed. Ready-made blocks are not used: only original building materials;
- erection of a structure from fully finished, completed blocks, which are manufactured industrially.
Consider the first, more democratic option
Scheme of nodes of a frame house: laying the foundation
The material for the roof is selected according to the preferences and capabilities of the owner of the construction site. It can be roofing material, and much more. Like others installation work, frame installation also starts from the corners.
The ends of the roof frame are securely attached to the floor joists. The roof is usually in the shape of an isosceles triangle. The distance between the rafters corresponds to the width of the material that is supposed to be used as insulation or coating.
It is convenient to assemble the roof frame on the surface of the earth, and then lift it up and install it on the house.
Sheathing a frame house with your own hands
 Pie scheme frame wall
Cover options may vary. This and more. A durable, waterproof material is laid under the sheathing with a margin of 20-30 cm.
The walls are upholstered with the selected material, then the roof, windows and doors are inserted. The floors are laid last. The boards are hemmed under the laid logs, all the gaps formed between the boards and the logs are filled with insulation.
If there is such an opportunity, then it is better to make the floor insulation two-layer.
First, a layer of foam, followed by mineral wool. When all the insulation is laid out, the floorboards are laid. They are placed perpendicular to the lags. For greater evenness and smoothness of the floor, it can be finished on top with OSB boards or sheets. When the floor is laid, you can proceed to the interior decoration of the walls. All existing gaps between horizontal and vertical lags should be filled with insulation. Special film for superimposed on top. Then sheathing is carried out or.
To make the walls more stable, you will have to install internal braces for both intermediate walls and external ones.
Attachment points for the construction of a frame house
 To
To
Frame houses - buildings are quite comfortable and durable, of course, if their construction was carried out in accordance with existing rules. The design of the frame structure consists of numerous nodes, fundamental - basic, and auxiliary. Absolutely any of the available frame nodes wooden house during construction, it will certainly require especially close attention: there simply cannot be trifles here. After all, if you fix and dock all the elements of such a structure incorrectly, living in a building will not only be uncomfortable, but very dangerous for you and your loved ones. One day, from an improperly distributed load, such a house runs the risk of simply “falling apart” into pieces.
Frame house nodes: features
In order for the frame structure to turn out to be strong and reliable, all nodes must be carried out in absolute accordance with the design documents and drawings. The frame structure includes three key components of the building - these are, of course, walls (more precisely, the wall system), ceilings (floor, ceilings), and also the roofing system. This is the basis of the foundations, and without the correct construction of these elements long stay in the house will be simply impossible. In addition to the main ones, it is also impossible not to note the additional structural components of the structure. They are places of docking, connection different parts, elements of the future house - a frame.
Support for nodal wall system frame houses – foundation. He can be various types most commonly used:
- slab foundation;
- tape;
- column-strip base.
 Anchor bolts act as fasteners for wall units. Ordinary racks are fixed to each of the strapping beams. Auxiliary nodes in this case are the lower, as well as the upper strapping. In order to mount the strapping, you should use special bolts. The most reliable option with maximum strength is the “framework” assembly, when the mounting bolts are located in the harness, and racks are put on them. The process of installing rack beams should be given special attention, because it is on these elements that the load-bearing function is assigned.
Walls: features of corner nodes
When designing the corners, or rather, the corner nodes of the walls of the future structure, it is also important to avoid mistakes. If there is no competent scheme for connecting such nodes, you will have to spend much more time installing the side and front walls of the building.
 To create the frame of the side walls, it is imperative to provide an additional stand, which will be rotated exactly ninety degrees to the corner stand. Thus, it will turn out to qualitatively bandage the frames of the front and side walls. So, the corner connection will become reliable and durable. A definite plus is that such a connection makes it possible to form a good inner corner: respectively, and sheathing of the building from the inside with plywood, drywall or other finishing materials in sheets will be simple and convenient.
Pay attention to the most important detail: the design of the wall (bearing) of your future building must certainly be of the frame type. The dimensions of the vertical racks must certainly be observed in accordance with the existing project, the same requirement would be fair to apply to the gaps between the racks. If we are talking about strengthening the load-bearing racks, then it is usually made with plywood, chipboard.
Docking of the foundation and walls
What is the best way to make a joint between the walls and the base of your frame? Beams can be placed on the support beam either perpendicular or parallel to the walls. Beams can be located at the level of the beam on anchors or on a suspension, perpendicular to the wall. The roof, as well as the walls of the skeletons, have a node represented by racks. These racks should be placed at right angles to the wall surface. You can also place them parallel to the wall, on the gable of the roof, as well as in partitions (internal).
As for the beams supporting the attic, they are made of several elements. If the coating on them is reinforced, installation can be carried out parallel to the walls.
 The outer corners of the walls of the frame include at least a couple of racks. The corner elements of the walls, as well as the points of their intersection, will thus become a support for the outer and inner edges of the ceilings. The framing of the walls will be carried out with the help of boards, the thickness of which exceeds 4 centimeters. The width of these boards is similar to the width of the bearing racks in the main frame of the building. Bottom strapping boards are available in any structural part of the building, and in outer wall they will protrude above the support by a maximum of a third of the total width of the strapping.
Top framing of frame-type buildings
In the event that the lintels and walls are fastened using special wooden linings or high-strength steel plates, it is quite possible to assume that there is no upper trim above the opening with lintels. The harness itself is formed from a pair of boards. If there are openings on the wall for future window or door structures, a jumper is already provided, which will form one knot with the strapping.

The design of the frame means that in the upper harness the joints of the boards are located above central part uprights (installation - in a checkerboard pattern). To fix the elements, nails at least 6 cm long are used. Each end of the top trim boards is fixed with two nails. A rack is nailed to the harness, marking is made indicating the location of the first rack. It is desirable to put a label on two boards at once.
For standard sheet material the optimal distance between the racks is 380 mm. Where there will be window openings and door structures, mark the places of the main pillars, as well as the elements that will support the jumpers. Be sure to include the resulting distances in the design of the frame building: it is important that the distances between the foundation posts are equal.
Proper installation of openings with jumpers is a guarantee that all loads will be correctly distributed and the building will last a long time.
The bottom tie knot is where the tie bars will be attached to the base of the house. Docking of elements is carried out using clamps or special foundation fasteners (bolts). Before laying the beams, they provide high-quality waterproofing of the joints. There is another knot in the design of the lower trim - these are the corners in which the bars will dock with each other. Docking is performed by one of two traditional ways: “in half a tree” or “in a paw”. In order for the connection to be strong, you should take special metal corners or use bolts.
Ceiling and floor beams: what to consider during installation?
The floor beams must be supported in the strapping beam and their installation is carried out with a pre-calculated step. Also installed are ceiling beams. As for the racks, in frame buildings, first of all, vertical corner posts are placed, and after them - intermediate ones. There are several nodes here:
- corners, in places where vertical racks join the upper trim and the lower trim;
- connection of strapping beams and racks.

 In order for the vertical posts to be securely fixed in the corners, grooves are made and additionally fixed with metal corners. By analogy, intermediate racks are fastened. The bars of the upper and lower trim will be equally fixed (the docking points are the racks of the frame structure and corners).
Additional "connections" are important for those who seek to make the house as reliable as possible. Vertical and diagonal supports are the connecting elements with the help of which the entire frame structure receives additional strength. But this method is not always used. More often design frame buildings suggests that for reinforcement it is enough to sheathe the frame with OSB-plates.
truss system
The system of rafters of frame buildings will also consist of a significant number of nodes. These are, in particular:
- places where the rafters rest on the ridge run;
- places where the rafters rest on the beam of the upper trim;
- the place of joining the crossbar and rafters;
- the junction of the counter-lattice of the frame and rafter legs;
- the junction of the counter-lattice of the building and its crate.

 Briefly about each node, we can say the following:
At the skate rafter legs connected in two ways - overlap or butt. In order to fix the rafters to the bars of the upper strapping, it is necessary to make cuttings of the appropriate sizes on them. As for crossbars and other types of supports, their role, as a rule, can be played by bars or boards. The bars of the counter-lattice should be installed with a step similar to that with which the rafter legs will be mounted. The crate of a frame building can be both solid and sparse, it depends on what the roof structure is and, of course, on the type of future roofing material.
The issues of fastening elements of the house are discussed in detail in this video:
With knowledge of what the design of the nodes of the frame building should be, such housing can be built with your own hands. The use of high-quality wood and other necessary materials, compliance with all norms and technologies is a guarantee that your residential building will be functional, reliable and of high quality!
Building a frame house is a popular technology for winter or summer country houses. This technology is distinguished by simplicity, budgetary cost, efficiency, comparative ease of assembly, and the ability to quickly complete all work. It is important to design and calculate the labor intensity of work, the amount of materials, taking into account the climate and individual budget.
At the heart of a frame house are walls, their proper construction is one of the factors for successful construction. Frame houses can be built with your own hands.
Whether you will be doing the work yourself or prefer to turn to contractors - knowledge about correct device the walls of a frame house will be useful, they will allow you to calculate the cost of work, determine the amount of materials needed and choose the best option.
Do-it-yourself construction requires a lot of free time: people with full employment will not be able to quickly cope with the volume of work.
The frame house is based on a rigid structure in which vertical posts are connected by horizontal lintels.

 Frame house wall device (pie)
 Insulation is placed in free cells, then the surface of the walls is finished inside and out. The frame is installed directly on the foundation, but during construction, you must first assemble each wall as a separate frame on a flat area next to the foundation. The walls of the frame house form a kind of “pie”, assembled according to strict rules.
- The calculation of the thickness of the walls is carried out taking into account the peculiarities of the climate and the purpose of the building;
- When choosing a heater, it is important to achieve good sound insulation, as well as thermal insulation, while calculating its quantity and optimal cost;
- It is important to protect the insulation from moisture and other adverse effects with the help of special films;
- Proper insulation laying technology will prevent heat loss, and energy savings also require calculation and planning.
Builders seek to reduce the cost of heating through better insulation building. The calculation of the dimensions of the walls and the selection of insulation is the key to success.
 Calculation of wall dimensions and selection of insulation
 For this, the frame racks must be made of timber with a thickness of 200 mm or more. A cross frame is also allowed, knocked down from bars measuring 50x50 mm.
The wall thickness calculation depends on the climate: in warm areas, with hot summers and mild winters, the wall thickness can be reduced.
Calculation of indicators for a country house, which is visited only in summer time, will be simple: a wall thickness of 40 mm is enough, and suitable for a frame edged board about 15 cm wide, called the "magpie".
Foam plastic, mineral wool, as well as ecowool and polyurethane are used as heaters. Styrofoam is one of the cheapest materials, but it is fragile, insufficient in terms of sound insulation, combustible, and can be damaged by rodents. Mineral wool is popular in modern practice.
 Insulation of a frame house with ecowool
 Ecowool and polyurethane foam are quite expensive, but they have the best protective properties, their use will allow you not to worry about vapor barrier, but during the construction process it will require special equipment for their application.
Since the surface of a frame house, as a rule, for rigidity and strength, is sheathed with sheets of plywood or chipboard during construction, insulation can be attached directly to these sheets. Great importance has a calculation of the amount of materials: it is recommended to use a double layer of insulation. Mineral wool sheets and sheathing material are separated by a windproof film. The insulation is attached with special glue, a stronger fixation can be achieved with the help of dish-shaped dowels.
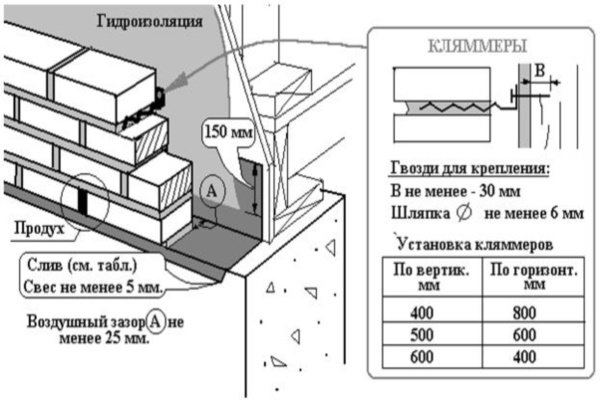
For the external protection of the wall “pie”, a vapor barrier is needed inside the building and its waterproofing from the outside.
 Vapor barrier inside the building and its waterproofing from the outside
 Vapor barrier is necessary to avoid the condensation of wet vapors inside the walls and their entry into the insulation. When moisture penetrates, mineral wool will significantly lose its thermal insulation qualities, and will require large energy costs for additional heating of the building. The waterproofing film is laid outside, from the side of the facade, this allows you to protect the wall structure from wind and precipitation. For vapor barrier, foil materials are used, for example, penofol, for waterproofing, glassine is required, membrane boards can be used. During construction, such boards are fastened with an overlap construction stapler, and the nodes must be carefully glued at the joints with a special tape.
Vinyl siding
Vinyl siding is used in country houses.
 Vinyl siding
 Its cost is inexpensive, it is not subject to rotting, rodents, it is characterized by ease of work and convenience in subsequent operation (easy to clean, looks neat), long service life. Often used for upholstery country houses or, if the developer wishes, to reduce the cost of finishing.
metal siding
Used for facade cladding metal siding, it is distinguished by durability, resistance to impacts and attractive design - the image of a fabulous hut is created.
 metal siding
 Galvanized steel with polymer coated does not rust, tolerates temperature extremes well.
Clapboard sheathing is distinguished by a number of disadvantages inherent in wooden materials - a tendency to dry out (swell), the effects of bark beetles. Modern impregnations are used that reduce the effects of harmful effects and the fire hazard of the structure, making possible fires self-extinguishing.

To the number wooden materials for facade cladding, there is a blockhouse that imitates timber, which is also used for interior decoration, and for the outer skin. This material is stronger than round logs, it is attractive in design, but over time it still changes its shape, since it is a modified lining.
Sheathing should not be attached directly to the frame during construction.
 Block house installation diagram
 For summer houses such a solution is possible, but if you need to spend even a few days in such a house in the winter, steam condensates will begin to destroy the wood and moisten the insulation. For the construction of a winter house, pay attention to the good ventilation of the facade: for this, bars are nailed over the entire surface, 30-40 mm thick, then they are engaged in wall cladding. It is important to calculate the load on the foundation and accurately fill it, then the air circulation in the ventilation gaps will allow the condensate to erode naturally.
Brick
Facade cladding possible facing brick, but a careful calculation of the load on the foundation and walls, which is significant in this case, is necessary so that the structures can withstand its weight.
 Scheme of facade cladding with facing bricks
 This material protects well from harmful effects, but the cost of such a cladding is among the most expensive.
Tile
The tiled cladding of the facade is distinguished by its reliability and long service life, but it is impossible to attach tiles to wooden elements with glue.
 Tiled facade cladding
 The technology of attaching tiles using self-tapping screws is expensive and time-consuming, if you choose this material, an accurate calculation will be required: it is necessary to determine both the amount of materials and the cost of work.
Plaster
Wall plaster is also not very popular in Russia due to its fragility.
 Wall plaster
 It is recommended to use plaster technology in three layers. For plastering in one layer, it is best to use a composition of Portland cement, white cement (lime) and sand. To avoid cracks, it is better to add fiberglass.
Fake diamond
facade cladding artificial stone has an attractive design, such material is quite light in weight and convenient in the process of laying, does not create a significant load on the foundation.
 Facade cladding with artificial stone
 The house, lined with artificial stone, looks very attractive.
Thermal panels
facade cladding wooden houses thermal panels are recommended in regions where the temperature in winter drops below -25 degrees.
 Sheathing the facade of wooden houses with thermal panels
For interior decoration, lining, wood-fiber boards are used, drywall is possible, but it does not tolerate temperatures below zero.

 Finishing wagon
 It is impossible to use it for finishing work on summer houses, which are not planned to be heated in winter.
As seen, frame technology construction optimally combines quality and cost. The device of the walls of a frame house is excellent for high-quality insulation of a living space.
Must be carefully designed frame house, execute exact calculation works for the durability and reliability of the house.
This technology is characterized by simplicity of work and will ensure their low cost.
Video
In this video, you can learn a lot of interesting and new things about how to avoid mistakes and build the right frame walls.
In our country, until recently, houses were built mainly from log cabins, bricks or concrete, but now the time has come for new technologies, and frame houses have appeared in this segment. They are very popular due to the unique combination of high quality and low financial costs. But the main thing is the ability to make a durable frame house with your own hands without the use of special equipment. Therefore, we have made detailed step-by-step instructions for you.
The guide itself consists of 7 steps:
- choice of place for the house;
- design;
- foundation installation;
- frame assembly;
- walling;
- thermal insulation;
- roofing.
The construction of a frame house has the main advantage over other technologies - the rapid pace of construction without the involvement of special lifting mechanisms. Inexpensive frame buildings are put into operation in one season, but such a speed in no way worsens the comfort and quality of living - these parameters are no worse than those of wooden and stone houses.
Site selection
In accordance with the urban planning regulations of the Russian Federation, your residential building must be located at least 3 m from the official boundary of the site. Also, in most cases, local regulations regulate a 5-meter indent from the red line of the street to the house.
It should be noted that all skeletons belong to the IV and V degrees of fire resistance, therefore, in accordance with fire safety standards, the distance from your building to the house on the neighboring site should be at least 10 meters.
The remaining requirements for the placement of the house are presented in this image:
We draw up a project
According to the Federal Law, the developer is obliged to be guided by the project created by professional design organizations. The documentation drawn up must also be agreed upon by authorized officials of various services, where changes and / or additions may be made.
In fact, local authorities require only a preliminary design, including a master plan scheme, plans, section, facades and main technical and economic indicators. Such a project costs no more than 10,000 rubles, and you can order it after the fact after construction before commissioning.
However, for your convenience and savings on alterations, we recommend that you choose a suitable standard project or draw up an individual one, taking into account personal preferences and wishes. In both cases, it is necessary to mark up all communications and add to the plan engineering systems.
 An example of a typical draft design
 We draw your attention to the fact that standard projects traditionally cost less, and individual ones allow you to realize your own ideas. Individual drawings from the project documentation are drawn up taking into account the binding to the relief and other features of the site - only such scrupulousness can guarantee the long-term operation of the dwelling without problems and major repairs.
Engineering systems
To build a frame house, it is necessary to provide for the inclusion in the project of all engineering networks. They are laid in strict sequence, and you need to start from the foundation. In the case of using a concrete base, all technological openings under communication systems must be done at the time of pouring, so that after hardening, do not engage in complex drilling of holes.
The electrical system consists of a switchboard, electrical wiring, sockets and grounding. The distance between points for sockets should be no more than 4 m. Sockets with covers are installed near water sources. Ventilation system includes air ducts with holes. Is it worth mentioning that the ease of access and use of taps, switches, as well as the functioning of drains and sewerage depends on the correct layout of pipes and wires?
Foundation installation
Construction technology provides for the use, or. The strength of the base is increased with the help of reinforcement and monolithic strapping. It is possible to make a high-quality foundation only after conducting a geological analysis of the soil.
In most cases, a simpler base is sufficient for a frame house, which can easily withstand light loads. The most appropriate -. Such a foundation does not require a large number materials, which reduces the cost construction estimate by an average of 15-20%.

In the case of a monolithic foundation, it is necessary to dig a trench, compact the soil and pour a sand cushion. Before you start pouring concrete, you need to make formwork and install reinforcement bars. The solution during the pouring process is necessarily rammed. Vertical studs half a meter long are placed in the liquid concrete of the base every 2 m - the lower trim of the frame will be attached to them. The surface of the resulting grillage must be leveled with cement mortar.
Bottom trim
Seven days after the work on pouring concrete, a lower trim of wooden beams with a section of 15x15 cm is laid over the entire surface of the foundation. The wood is pre-treated with antiseptic agents, and two layers of roofing material are laid along the bottom, which plays the role.
The beam can be fixed with anchor bolts or foundation studs. If bolts are used, then technological holes up to 10 cm deep must be drilled under them.

floors
When all the wooden beams are laid and connected to each other and to the foundation, grooves are formed in them and floor logs are placed (board 50x150 mm). The upper part of the log is aligned horizontally, and boards are nailed along the bottom - they will serve as the basis for the subfloor device. Membrane insulation is laid on the resulting plank base (it does not allow weathering and wetting of the insulation, while not preventing water vapor from escaping). In the intervals between the lags, you need to press in the insulation (mineral wool or polystyrene) and cover it with a vapor barrier. A cut board (40x15 mm) is laid on top.

Create a frame
From the very name of the technology, it is clear that the main element of such a structure is the frame, and it is on it that the entire structure is held. The skeleton consists of vertical posts fixed with crossbars and horizontal strapping. As before, here the entire construction process is carried out in stages.

Wood is used as the material. It is recommended to choose coniferous timber with a low degree of moisture, ideally chamber drying. The height of the racks must correspond to the same parameter of the room. The racks are connected with nails 10 cm long. After fitting the elements, there should be no gaps.

Depending on what load will affect the bearing supports, and also based on the size of the insulation and sheathing material, they plan the distance between the uprights. The universal section of the racks is 150x50 mm, a double beam of 150x50 mm is placed in the openings. The most popular step is 600 mm (allows you to install the insulation “in tightness” to tightly fill the wall). Temporary braces are used to connect the racks with the lower trim, which makes the structure acquire the necessary rigidity.
 Scheme of the device of the corners of the walls
 The installation of the upper trim is carried out after the installation of all racks. Fixation occurs with the help of the same grooves that fastened the lower beam. The upper fastening to the uprights is carried out with two nails, which must enter the material by at least 10 cm. The final fixing of the frame is carried out by permanent cuttings installed instead of the dismantled temporary ones. Read more about this in the article "". We also recommend that you familiarize yourself with the most important device.
We insulate the walls
The outer walls of the house are sheathed with imitation timber, wooden clapboard, plastic, as desired by the owner of the house. Warming is best done with mineral wool. It is environmentally friendly, durable and does not burn, which makes skeletons even more profitable and in demand.
 Scheme proper insulation frame walls
 The material is pressed into all the gaps between the beams to remove voids. A hydro- and windproof membrane will help protect the tree from moisture, which is mounted on top of the insulation on the racks, and only then the lath crate for the ventilation facade is stuffed, which will be hidden under the outer cladding. From the inside for sheathing walls fit OSB or gypsum fiber boards mounted on top of a vapor barrier.
Building a ceiling
The ceiling is attached to the floor beams, which, in turn, are fixed with nails or steel brackets on the top trim beam. Where interior partitions are installed, support bars must be installed, in place of which a wooden ceiling shield is nailed.

Roof
Before starting work, determine the degree of slope, the number of slopes, the type of roofing, the design truss system.

A roof with a complex shape looks attractive, but it is difficult to implement, therefore not cheap. Most often found, allowing or attic space. Here it is necessary to install only one skate, there are no valleys at all, which eliminates the accumulation of precipitation and leakage. To prevent snow from lingering on the roof, plan a slope of more than 28º, but not more than 50º, otherwise the wind load will increase.
The cross section of the rafters is determined according to the thickness of the insulation material placed between them. It is best to take a board with a caliber of 150x50mm and a length of 6 m. Two boards need to be knocked down in the shape of the letter L, and then they are lifted up and the angle is determined, making sure that the overhangs go beyond the level of the wall by 30-50 cm. Now the boards can be assembled with the help of a crossbar, and we will get a semblance of rafters.


The upper trim acts as a Mauerlat here. According to the made sample, rafters are created for the entire roof, not forgetting a step of 600 mm. The rafters on the ridge are installed on the pediment and the installation of the remaining elements is continued along them. The type of roofing material depends on what the crate will be.
roofing material
The step-by-step instruction ends at the stage of installing the roof cladding. You can choose , or . All of these materials are easy to work with, affordable, and look decent. After facing works, it remains only to install downpipes and drainage system, which will be responsible for the removal of precipitation outside the site.
Now you imagine the whole process of building a frame house with your own hands , so that the structure is strong and warm. If you do not ignore the rules of construction and assembly technology, you will become the proud owner of your own home, which you can only dream of.
Building a frame house is like assembling a constructor. The wooden frame house is assembled in accordance with the scheme. At the same time, the strength and reliability of the future structure depends on the quality of the assembly units. What are the features of the implementation of the main components and connections of the frame house? And how to properly fix the lower and upper harnesses, racks, jibs, crossbars?
Knots for connecting the lower trim
The lower one is a frame made of a wooden beam or several boards knocked together, which is laid on top. On the concrete foundation under the lower strapping, the so-called beds - boards are placed. They perform the main function - they level the foundation and hide those flaws that could be made during its pouring.
The beds are attached to the concrete foundation with anchors. Mounting points are located at a distance of no more than 0.5 mm. At the same time, at least the ends of the beams are fixed with anchors.
Connecting the bed to the concrete foundation.
To install anchors, holes of a certain depth are drilled. They pass through the board and go deep into the thickness concrete foundation. The depth of drilling and driving in the anchor is determined by the height of the wall of the house and the design of the foundation. For traditional 2.5-3m stud wall on concrete base the depth of the anchor in the concrete is 15-20 cm.
The second option for mounting anchors is to concrete the anchor studs in the process of pouring the foundation. When casting a concrete slab or tape, hollow cones with internal thread. After the concrete has hardened, the anchors are screwed into these elongated cone-shaped studs.
Features of the anchor connection
- Holes in the beam are drilled 2-3 mm more than the diameter of the anchor stud.
- Wide washers can be placed under the anchor bolt heads to increase their contact area with wooden surface, and increase the strength of the fastening connection.
 Anchoring bottom harness.
 Before fixing, mandatory waterproofing is carried out - a roofing material is placed on the concrete or its surface is covered with a special waterproof composition, mastic. After installation, check the horizon. Deviations from the horizontal level are allowed in sizes not exceeding 0.5 ° per 3 m.
Lower strapping knot on a columnar foundation
Mounting described above structural units frame house is used on strip and slab foundations. For columnar bases, a different scheme is used:
- For ease of fastening, the upper part of the column supports should have a flat horizontal head with holes.
- Put on top of the headband wooden beams, which perform the function of grillage.
- In the beams, recesses of the required depth are drilled. They are drilled under the holes in the headband.
- Fix the beam with bolts or screws.
 Strapping from a built-in board on a pile foundation.
 On a note
It is necessary to fasten the beam to the foundation. Shallow belts and slabs are subject to significant movement during freezing. Reliable connection of the beds and the lower harness ensures the reliability and durability of the entire structure.
The design of the nodes of the frame house
Vertical frame racks are installed on top of the bottom trim and fastened with nails. Fastening with metal corners is used for T-shaped connection of beams without cutting. It's easier to do it. Fixation of beams with metal nails is used at the junction with partial cutting of the lower beam. This is a more difficult do-it-yourself connection.
A joint without cutting is used for corner frame supports. Butt joint with fixation with plates or corners is used in the main nodes of a frame house, if the construction is done by hand, without the involvement of professionals. If experienced builders work, then they use a connection with a partial tie-in. It prevents strong movements of the timber and frame boards during drying.
On a note
Vertical notch size frame rack is 30-50% of the thickness of the lower trim beam.
The corner joint without cutting is fixed with metal plates using wood screws. In this case, reinforced steel corners with several perforations are used. As well as durable self-tapping screws in light golden and silver colors.
Strengthening the corners for fixing the corners of the house is carried out due to technological processing - metal plates are hardened during the manufacturing process. Or due to the use of metal with a large section thickness, up to 2-3 mm.
 Ways of fastening racks.
 A punched connection is often used to attach posts in the middle of a wall. The supports are inserted into the prepared recesses and additionally fixed with nails. After that, their fixation in a vertical position is supplemented with jibs - diagonally inclined strips that rest on one side against a vertical rack, on the other - against a horizontal harness. For the convenience of the stop, the ends of the jibs are beveled - they cut off part of the end.
Temporary jibs
In the process of assembling the frame, temporary braces are also installed, which fix several vertical posts. Temporary jibs are placed between the upper and lower trim at an angle. They connect several vertical racks and are fixed with nails.
Temporary jibs are located on the outside of the frame. For their fastening, it is not necessary to cut down, but they need to be fixed in such a way that, upon completion of construction, temporary auxiliary beams can be easily dismantled. Therefore, nails are used to fix them.
 Temporary jibs for racks.
 Temporary braces hold the posts upright until permanent braces are installed at the bottom and top of each stanchion. Once the permanent braces are in place, the temporary fixing beams can be removed.
On a note
The construction project contains a description of the nodes of a frame wooden house in the drawings. He often does not describe in detail the method of fastening temporary jibs, since they do not carry the main load and support the frame temporarily.
Upper binding knots
The upper trim of the frame house is laid on the vertical frame supports after the installation of the corner posts. If the perimeter of the house is large enough (more than 6 m), then in addition to the corner posts, intermediate ones are also placed - in the middle of the wall. And only after - put the top harness.
After laying the top row, temporary braces are attached - through the entire wall. Next - attach the remaining vertical racks and struts to them. After that, the temporary braces between the upper and lower trim are removed.
It is most convenient to assemble the walls of a frame house in a prone position, knocking together the lower trim, vertical posts, crossbar, jibs and upper trim. And only after that raise the walls to a vertical position, where it remains only to fasten all the walls of the house together. For a strong connection of the walls of the frame house, a second upper trim is used, which overlaps the first upper trim.
 Double top knots.
 When using a double top trim, you can do without the use of steel corners. In this case, there is no need to partially cut off the ends of the boards, performing the connection "in the paw". Because such connections with cutting out part of the butt end violate the integrity of the board and, accordingly, weaken it.
On top of the second upper strapping, floor beams are laid. The beams are laid on the end, the distance between the beams is set depending on the size of the spans and fastened with nails.
wall corner
The corner of the frame house is the place of maximum heat loss. As a rule, it is in the corners that condensation accumulates and it is they that need to be insulated in the first place. Therefore, even at the frame assembly stage, care must be taken to ensure that the corners of the future frame house are warm. How to do it?
Smooth fixing plates are placed on the outside of the vertical beam. They connect adjacent single-level surfaces of a vertical post and horizontal beams. Fixing corners are located on the side. They connect mutually perpendicular surfaces. What else is important to know about angles?
During construction in regions with a cold climate, non-solid wood is used as vertical racks. wooden beam, but assemble the corner post from separate boards. The resulting design resembles a well. A heater is installed in this internal space, which retains heat and limits possible heat loss.
 Installation of corners in the frame of the house.
 It should also be warm, for this, single racks are used, but the load from window and doorways removed with a bolt. The crossbar is fixed along the entire length of the frame wall with the help of a gash into all vertical posts. At the same time, it is important to take into account that under each window opening there should be at least 1-2 vertical support boards.
Rafter system nodes
The nodes of the truss system include all connections between its elements, namely:
- Fastening the floor beams to the top trim.
- Fastening the rafter to the upper harness.
- Fastening racks on the gables to the upper trim and to the extreme rafters.
- Fastening of internal racks to the rafter bed and to the ridge.
- Fastening struts - inclined beams that support the rafters and rest on the bed.
- Fastening the crossbar to inclined rafters.
- Lathing fastening.
 The nodes of the truss system.
 The fastenings listed above can be done using corners or using nails if the elements of the truss system are connected with overlapping each other.
Fasteners
The following elements are used as fasteners for the nodes of a frame wooden house:
- Mounting plates (corners or even plates with or without holes). Plates and corners are attached to beams or supports using wood screws.
- Staples (straight and angled) - wire fasteners of a certain diameter. Their edges are bent and inserted into the ends or side surfaces of the beams.
- Bolts - used to tighten adjacent beams and rafters, inserted into through holes and fixed in them with nuts.
- Nails.
All connecting fixing and fastening elements for frame structures are made of metal. For fastening the load-bearing elements, reinforced corners made of hardened steel or increased thickness, 3-4 mm, are used. For fastening the supporting elements, corners made of ordinary steel with a thickness of 2-3 mm are used.
 Variety of fasteners.
 In order to protect against corrosion for the manufacture of corners, plates, galvanized steel is used. Rust protection is especially important in outdoor construction, when metal fasteners in the walls can become the center of moisture condensation, wetting a section of the wall. Therefore, galvanized fasteners are in high demand in various nodes of the frame house.
Node connection errors
The drawing of knots assumes the presence of sketches and descriptions. However, despite this, novice builders often make offensive mistakes. Let's list the main and most frequently repeated erroneous actions that beginner individual builders make when assembling a frame:
Not all jibs are installed. This is not true. The braces ensure the stability of the wall against wind loads. In addition to the jibs, to withstand the wind, it is necessary to use rigid plates in the outer skin.
- Use a solid beam or boards tightly placed next to each other as corner posts. Such a corner will be cold. Moisture will condense in it and mold will grow.
- Use "black" self-tapping screws for fasteners. They are not strong enough, especially if insufficiently dry wood is purchased for construction. When drying and warping, “black” self-tapping screws can be corny “torn off”. A more durable option is golden and silver-colored self-tapping screws, coated with galvanization or a layer of chromating, phosphating.
- An insufficiently dry tree is used, which shrinks heavily and “tears” the existing knots and connections.
- And another mistake is not to use nails. These proven fasteners are often stronger than any self-tapping screws.
Frame construction is a new technology in which, despite its apparent simplicity, there are many nuances and features.