
How to make a table with a drawer from a stool. Bedside table with your own hands. An example of how you can make a bedside table with your own hands, drawings and diagrams
Bedside table in the bedroom or bedside table next to the armchair in the living room - essential attribute the interior of many apartments. Of course, now you can buy any cabinet in stores, but will it be unique? We bring to your attention 10 unusual ideas how to make an original bedside table with your own hands from different objects and materials.
1. Bedside table with your own hands from the drawers
Place a wooden box from vegetables, fruits or a postal parcel on legs or wheels. Attach a shelf inside the box. The drawer can be placed both horizontally and vertically, as well as making a high cabinet of two or more drawers.

The box can be decorated, for example, with cut branches. How to make such a nightstand with your own hands, read.

2. DIY nightstand with rope shelves
From an ordinary wooden box or box, as well as ropes, you can make a nightstand with a flexible design. You can customize the shelves and different rope holders yourself, depending on the items and things that will be stored in the cabinet. To do this, you need to drill rows of holes in the side walls of the cabinet and even on top. Pull a strong natural or synthetic rope through the holes and make different shelves and compartments for things.


3. Bedside table with your own hands from books
Unusual and original project bedside tables in the bedroom or living room. Pull stacks of books with belts, ties or tie with thick ribbons. At the same time, place wooden modules, square or rectangular boxes between the stacks. It may even be dense carton boxes from shoes or small household appliances. Old books, vintage leather belts and wooden elements will give the nightstand a unique charm and style.

4. Nightstand from the chest
The chest has long been the main piece of furniture in huts and huts. Now ancient or modern chests are a rare phenomenon in the interior. However, if you are the owner of an old grandmother's chest, then you can make a vintage nightstand out of it with your own hands. Capacious space under the lid of the chest will allow you to store many things, including bed sheets or toys in the children's room. In addition, designers offer exclusive options for cabinets in the form of expensive leather chests. These ideas can be taken as a basis and inspiration. The transformation of a chest into a bedside table consists only in the decor of the chest itself. It can be both updated and aged, left in its natural form or painted.


5. Bedside tables from suitcases
Unlike antique chests, finding old suitcases is much easier. A do-it-yourself bedside table from a vintage suitcase will decorate the interior of the room, and also provide an additional closed storage space. You can even hang a small combination lock on the bedside table from a suitcase and store intimate things there. To make a cabinet, you can either stack several suitcases on top of each other, or put one suitcase on legs, for example, on a stool or table.


6. Do-it-yourself cabinet from a barrel
A do-it-yourself bedside table from a barrel will look very unusual in the bedroom or living room. Round wooden barrel- ready-made cabinet. The main condition is that the barrel must be clean and free of foreign odors, such as wine. You can also cut a door in a barrel, put it on hinges, and attach a shelf inside. Another option - from one barrel you can make two bedside tables with your own hands, simply sawing the barrel into two even parts.


A metal barrel can also be useful as a cabinet, especially if it is old.

7. Bedside table with your own hands from a chair
Very often, a chair acts as a bedside table. We offer to improve it by turning it into a real bedside table with a drawer. To do this, it is advisable to choose a wooden chair without upholstery. Purchase in the store special fittings for drawers and the drawer itself according to the size of the chair. Attach the entire system under the seat. Also, under the box, you can nail another shelf from a square chipboard sheet.


8. Nightstand made of mirror and stool
If you have a stool as a bedside table, we suggest improving and decorating it. In the same way as in the case of a chair, you can attach a drawer or shelf between the legs of the stool, and you can use a framed mirror as a tabletop.

9. Bedside table from a ladder
A small ladder - stepladder or ladder for wardrobes - a great solution for a bedside table. Additionally, you do not need to do anything, if you wish, paint or age the stairs.


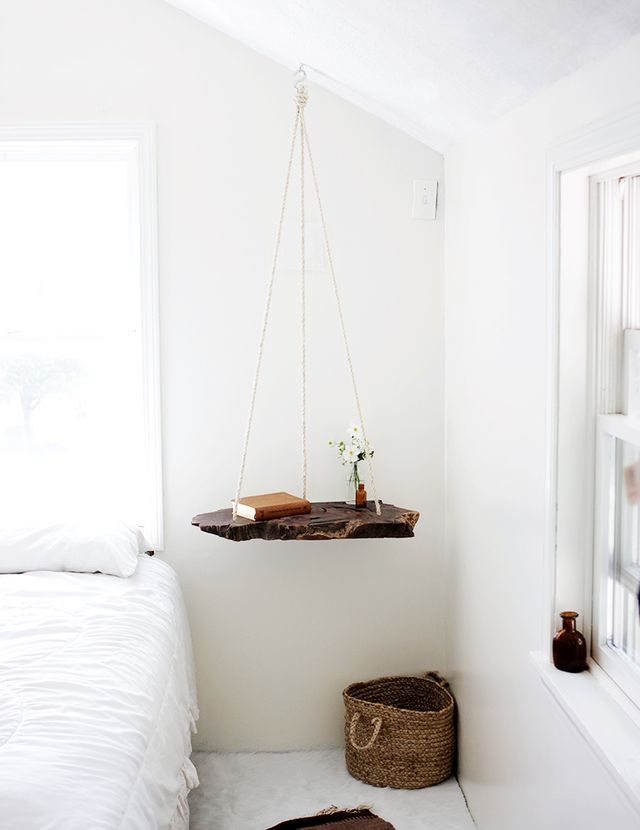
10. DIY hanging bedside table
A bedside table, or rather, a bedside table, can soar in the air! How to make such an unusual project for the bedroom - read.
Bedside table is a diverse concept. It can be a bedside container for newspapers and a tea mug or a huge TV stand with built-in speakers and an electronic rotary system to attract the viewer's attention. Such a simple concept - and an infinite number of options. A do-it-yourself bedside table is made quite simply, but it is important to decide on the necessary design. My friend needed a cabinet for the kitchen with one top drawer. Please.
The appearance of the manufactured bedside table
For the manufacture of nightstands are needed
Here I give a list of tools that it would be better to keep in constant readiness for everyone, along with a fishing rod, a favorite gun and chess:
- Drill driver. The battery will be optimal if there is also a puncher on the farm.
- Set of drills. In this case, wood.
- Bit set. If you want to assemble furniture with your own hands, the set should include a bit, which is a hexagon for confirmations.
- Cutter for hinges 35 mm in diameter.
- Iron.
- Roulette.
- Pencil.
- Carpentry tool called "right angle", with a measuring ruler.
- Sandpaper, dry cloth.
I’ll immediately note about the iron and other objects that are not clear from the first time. Since you will be forced to order sawing on the side (sheet Chipboard size 1830x2440 mm - this is the smallest), it makes sense to save on edge gluing. Now on sale is a 0.5 mm thick melamine edge in the color of the material, which is easy to glue yourself. Since it is with an adhesive base, it is enough to attach it to the desired end with the beautiful side up and iron it with a heated iron. With a dry rag, we press the still hot edge to achieve a good grip. Excess edges are removed with a blunt knife and the edges are processed with sandpaper.
Bedside table detailing
A do-it-yourself cabinet may differ in content, functionality and appearance. It largely depends on the amount you are willing to spend on fittings. Here I am writing the details of the simplest and cheapest pedestal. Drawer without skids, facades - laminated chipboard.
- 772x500 - 2 pcs., cabinet sidewalls.
- 368x500 - 2 pcs., bottom and shelf.
- 368x100 - 3 pieces, plinth and two upper strips.
- 480x110 - 2 pcs., drawer sides.
- 334x110 - 2 pcs., box front and rear walls.
- 150x395 - drawer front.
- 515x395 - cabinet door.
All dimensions are for chipboard 16 mm thick.
We take a special, kitchen countertop, 28 mm thick. Its size is 525x400 mm.
Fiberboard for the back wall of the cabinet and the bottom of the drawer:
- 670x395 mm - rear wall.
- 475x365 mm - the bottom of the box.
I have already written how to glue the edge, now it's time to prepare the parts for assembly. The main fasteners for us are confirmations, under which it is necessary to drill holes. We drill into the plane with a diameter of 8 mm, into the end of the parts - with a diameter of 5 mm. The figure shows which parts are drilled into the end, and which into the plane - simply based on the overall design of the pedestal.

Bedside table assembly scheme
List of required fittings
A do-it-yourself nightstand is also our calling card in front of everyone who doubted our abilities, therefore, even in an inexpensive version, fasteners should be taken as seriously as possible. We buy in the furniture fittings store:
- Confirmations 5x70 - 22 pieces. It is enough to fasten the clamping bars and the plinth by one confirmation on each side.
- Self-tapping screws 4x30 - packaging. They will come in handy for other jobs around the house, but specifically here they are needed in order to screw the countertop to the upper slats, and the drawer front to the front wall of the drawer box. All of this comes from within.
- Self-tapping screws 4x16 - packaging. These are fasteners for hinges and hardboard (DVP). You should buy with a secret hat, and also deepen it into the bottom of the box - so as not to scratch the shelf.
- Furniture hinges - 2 pcs. Since the milling cutter is 35 mm in diameter, we also buy the corresponding loops.
- Furniture handles - 2 pcs. On the front of the drawer, it is better to additionally buy screws for handles, 35 mm long.

Scheme of assembling the drawer of our curbstone
Making a bedside table
It is better to coordinate the manufacture of bedside tables of such a model with friends or acquaintances - simply because two and a half pieces can be made from a chipboard sheet. The assembly is so simple that you can start selling "extra" cabinets. For the full satisfaction of potential customers and your own, screw furniture legs, the so-called “hooves”, onto the sidewalls from below. They will help to set the cabinet on an uneven floor. Adjustable legs of this type can also be found in specialized stores selling furniture fittings.

Finished nightstand
We have already understood how to make a bedside table with our own hands in general terms - it remains to take into account two very important technical points.
- Selection for loops. One constant to remember: The distance from the front edge to the center of the hinge hole is always 22 mm. Naturally, for loops with a landing size of 35 mm. Above and below the door, it is usually marked at the level of 60-80 mm - this is not critical, if not design features. Then you can simply attach the facade with screwed hinges to the sidewall at the desired height and fix it to the body.
- Right angles. When assembling a drawer or cabinet box, always check the geometric correctness of the resulting parallelepiped. Otherwise, the product will turn out to be lopsided and with badly opening facades.
That's all, good luck with your work.
Everyone needs a bedside table, I can’t imagine how to live without it. Nowadays huge selection pedestals, but what if you didn’t like everything that you saw in the store, but you want exactly what you can’t buy on the market.
This is a great opportunity to make a cabinet with your own hands. Cabinets come in different sizes in width, height and depth, color and material.
The usual width of the bedside table is 500mm, the recommended depth of the bedside table is 300-350mm, and the height of the bedside table should be made according to the height of your bed.
How to make a bedside table with your own hands? Everything is very simple!
The material from which bedside tables are made can be different, but most often it is wood or chipboard saw (chipboard). In our example, consider the assembly of a bedside table made of 16 mm chipboard.
We have a cabinet with drawers, which is a little more difficult to manufacture than a simple version with one door and a shelf in the middle.
Any project begins with calculations on a sheet of paper and a drawing of the future product.
And so, after all the blanks have been made, we need a melamine or PVC edge on the ends of our parts, which will be visible when looking at the assembled product.
Why it is not necessary to hem the entire perimeter of the part, this is an extra waste of material and your time, for example, only one front side is edged at the shelf, since the sides and back are closed by the walls of the pedestal body.

The most important thing when assembling the bedside table is not to leave protruding bolts, you should make recesses with a drill with a diameter of 9 mm so that the head of the wood screw sinks a little inward and can be sealed with a PVC plug.

If you look closely, then a gap of 16 mm is left on each side for the side racks of the cabinet.

The cabinet stands themselves, they are attached to the decorative frame and base of the cabinet, we close all the places for self-tapping screws with special plugs.

Ready cabinet, but without drawer.

Install drawer guides

If you already have a bedside table, and you need to update the nightstand with your own hands?
Step one: I recommend taking it apart carefully.
Step two: iron to go over the melamine edge, for further removal.
important: As a rule, edges and ends wear out in cabinets, a budget way to update a bedside table is to remove the old edge and stick a new one, you can even use a different color. It will look very interesting.
Step three: edge removal occurs by smoothing the edges with a hot iron, the glue becomes liquid and dismantling can be easily done without damaging the workpiece.
Step four: clean the ends of chipboard from glue.
I was not the first to think that when using ordinary chairs and stools, a lot of the useful volume of the room disappears.
You feel it especially sharply in our small kitchens, in which it is often simply impossible to fit everything you need. Indeed, it is not necessary to use an ordinary stool as a seat - it will be no less convenient to sit on a small bedside table in which you can store kitchen utensils or products. Why not "a furniture product without a back and armrests for sitting one person"?
These reflections led me in the end and the decision to make something like a hybrid of a bedside table and a stool - a bedside table. And since I do not live alone, I decided to make two such products at once. Of course, this does not draw on a set, but a couple of identical things still reduce the furniture discord in the kitchen.
The choice of material for the manufacture of nightstands stools
I decided to make the body of the product from a pine furniture board. As a back wall, a sheet of laminated HDF fit perfectly. But the seat itself wanted to be made of more solid wood- for example, from birch.
For finishing, I planned a Sikkens water lane. I chose the same tone as the kitchen. Finally, the “kinship” with it was provided by such small details as handles: I picked them up with the same pattern as on all other kitchen handles.
I decided to varnish the seat in a lighter tone. I used corners, dowels and eccentric ties as fastening accessories.
doors
I decided to make the doors paneled - they were supposed to give additional "importance" to such a small object. I made the panel itself from a furniture board with a thickness of 18 mm, as well as strapping bars. Buying in a pine store furniture board, I noticed that several panels were glued not from lamellas spliced along the length, but from solid ones, and even a radial cut. Such shields are the best blanks for doors. Of course, they immediately ended up in my cart.
At the panel, he processed the figurine field not only from the front side, but also from the back. It's not that wide. For work, I purchased an assembly of CMT milling cutters, which allows me to simultaneously remove the “excess” from both sides of the workpiece. True, this is possible only with a not very wide
processing zone, but the productivity of the cutters is still very high: one pass is enough for processing. Of course, the router must have a power of at least 2 kW and be with the obligatory function of maintaining constant speed under load. This is very important, because working with cutters large diameters possible only at the appropriate speed - usually no more than 11,000-12,000 rpm.
And more about safety. If we turned the router over and fixed it to the table, the danger of this tool increased significantly. Never let your fingers meet the rotating cutter! For safety, for example, I always use a protective screen made of durable and transparent material. My screen is tilted to the side towards the operator so that a finger cannot fit between it and the workpiece. And in terms of shape, the screen is elongated in length so that the side of the palm also does not reach the cutter. Although, when working, the hands should not be on the side at the level of the cutter, but only in the area of the workpiece in front of the screen.
I also processed the strapping bars on milling table using a set of two cutters - for a profile and a counter-profile.
IMPORTANT
For each diameter of the cutter there is a limiting speed - it is dangerous to exceed it.
Bedside table - do-it-yourself stool: manufacturing progress
The panels were made by a powerful router fixed in the table. The protective screen is clearly visible.
Manufacture of body parts and assembly
There were no particular difficulties with cutting the furniture board. First, I sawed it with a circular along the guide along, then across. I planed the edges with a planer and chamfered with a low-power manual milling cutter.
After that, I polished the planes of the parts. This job is best done with an orbital sander. Since I planned to use a water-based varnish, I wetted the parts with water before sanding. At the same time, the fibers swell, the pile rises. When the parts dried, the "orbital" filmed it all. After such sanding, when applying varnish, the pile no longer rises, and the surfaces covered with varnish become smooth and pleasant to the touch - as it should be for furniture.
When I varnished the parts, I made sure not to paint over the places where glue would be applied during assembly: clean, varnish-free surfaces stick together more firmly.
The doors are pre-assembled and ready for painting. Wall and lid blanks are waiting for further processing. To make the racks look more like stool legs, drilling machine drilled two holes 0 35 mm in the bottom of the racks (like cups for hinges) ...
... after which he sawed out the excess with a jigsaw, moving the file in a straight line.
At the seats, I slightly rounded the corners with an allowance with a jigsaw. As a template, I used the first round object that came to hand. Then he brought the circles to the correct shape of the tape grinder. In conclusion, along the perimeter I removed a chamfer with a radius of 6.3 mm with a manual milling cutter.
After finishing the panels and strapping bars, I glued the doors in the rims.
IMPORTANT
Usually, in furniture made of chipboard, two attachment points are used per side (for example, by a shelf). But the glued furniture board in the transverse direction is not rigid enough, so it is better that there are more attachment points, at least three.
The seat was attached to the uprights with eccentric ties. I pre-marked the places for drilling holes in the end edges of the racks.
I drilled holes for the eccentric rods with a 0 7 mm drill ...
... and under the eccentrics themselves, I drilled cups 0 15 mm on a drilling machine (in its absence, this can be done with a drill fixed in the rack).
I fixed the lower shelves on dowels and corners (they are invisible below, so they don’t spoil the view). Under the dowels, I drilled holes on a home-made machine.
Then, from the bottom of the seats, I marked the center lines of the edges of the racks. Aligning the racks and seats, I found the holes for the eccentric rods.
I drilled holes with a 0 5 mm drill with a depth limit and screwed in the rods.
I connected the lower shelves with the help of dowels with racks ...
... and secured the corners. To attach the back wall to the underside of the seat, I screwed a bar with self-tapping screws in advance. In the racks, grooves are made under the back wall.
I attached the back wall with self-tapping screws to the bottom shelf, uprights and seat bar. It consists of two sheets of laminated (on the front side) HDF glued together and provides additional rigidity to the product.
The doors were installed inside the case on internal hinges. Therefore, to fix them in the closed position (so as not to fall through), I installed a mock rail. It remains to glue soft pads from the bottom of the uprights-legs - and you can sit down at the table.
The selected color of the finish of the product goes well with the tone of the rest of the kitchen furniture.
Do-it-yourself stool bedside table - photo
So that you can easily screw in a light bulb, wipe the cornice or get to the top of the kitchen cabinets, I made a convenient step-stool.
Previously, I cut out templates of all construction details from thick cardboard (see the figure on page 15) and transferred them to 20 mm thick plywood (you can use a furniture board or board right size). Then, with an electric jigsaw, I cut out the details of the stool along the contour, and cut out corner and semicircular holes and grooves on the side walls (1), the seat (2) and the back wall of the “liner” (8). I drilled holes d 6 mm in both side walls of the stool and at the ends of the base of the retractable part.
Started assembling. To the inner sides of the side walls (1) at the required height (depending on the size of the "insert" step), I fixed the strips (5) with a size of 20x25x60 mm. I attached the base (3) to the side walls with self-tapping screws, and the transverse strips (4) to the cutouts on the sidewalls. Top mounted seat (2)
Separately, I assembled the sliding part of the stool, connecting all the parts (6, 7.8) with dowels and glue, and fixed it to the base with bolts and bushings. To do this, on both sides at the junction in the holes of the base (7) glued metal tubes of suitable diameter with internal thread M6, placed the extendable stand and connected it to the base by screwing the bolts into the threaded bushings.
On a note
Before screwing in the bolts, I put washers under their heads.
The stool was processed with sandpaper and covered with a colorless varnish.
 AQQ 6/7/8/9/10/11 Speed Bicycle Chain Connector Lock Kit MTB Road…
There are a lot of things that should be at hand at the right time - for example, mobile phone, a cup of tea, a newspaper or a book, a pen, glasses, etc. For such things, the bedside table is intended, in which dozens of useful little things. How a bedside table is made with your own hands will be discussed in today's article.


If you choose the right bedside table, then it will go well with the bed, look like a single ensemble with it. Although we note that the color of the cabinet may contrast. In this case, the dimensions must be selected from special attention- it is important that the bedside table is not “squeezed” by the bed and the wall, because you should always leave enough free space. But if free space is in short supply, then it is better to give preference to a hanging pedestal- in this case, it will fit better.

On a note! For the bedroom, a cabinet with closed and open shelves is perfect, which will allow you to hide your personal belongings from outsiders, while a vase of flowers or different kind decorative items can be placed on open shelves. As an option - you can make a coffee table with your own hands.

A few words about the functionality of bedside tables
If storage is planned a large number small items, it is better to give preference to a cabinet with many drawers. If only a few books are stored there, then you can get a light non-standard design, abandoning the massive traditional "cube".

The optimal location of the bedside table is near the bed. It’s not even worth talking about the benefits of a bedside table - you can store books here, and put an alarm clock on top or, say, a glass of water. In addition, in the bedside table there can be a place for linen - both underwear and bedding - or a first aid kit, cosmetics and other irreplaceable Everyday life of things. And for the most convenient and ergonomic arrangement of all this “good”, the selection of a bedside table must be taken with all responsibility.

Obviously, it is the floor construction that is the most common. In addition, such a cabinet can be of two types:
- without legs;
- with legs.

 original version- open bedside table without legs
 A slightly less common option is hanging. It, due to its design features, looks weightless, as if floating in the air.

In any case, you will have to decide for yourself which cabinet to buy / do it yourself - it all depends on the interior features of the bedroom and your personal preferences. But note that the hanging pedestal still has a significant advantage over the floor one - it allows you to install some objects under it (say, a basket for various little things or a box).
Also, bedside tables are classified depending on the shape. Let's take a look at the most common options.
Rectangular/Square. Such designs are universal, and therefore easily fit into any design. In addition, they can be located anywhere in the room.

corner. The best option for small spaces.

oval/round. Of course, they look elegant, but they are not universal, so they will not be appropriate in every interior.

Important! There are also more exotic pedestals - such as a design in the form of a pyramid or a chest. Yes, such bedside tables can hardly be considered universal and functional - they are rather decorative interior items.

Another classification is based on the purpose of the cabinets. Special attention deserves medical, which should be in every home.
Features of choosing a bedside table depending on the style
Yes, each style of interior will suit its own kind of bedside table. And no wonder, because we are talking not only about a useful thing, but also about an interior element that can focus on the stylistic orientation of the room or, alternatively, nullify all efforts. How to organically fit a nightstand into the interior? Let's get acquainted with the most popular styles and find out which designs are suitable for each specific case.

East style . In this case, the ideal option is a nightstand with small legs made of rattan. Frequent weaving, natural colors, a traditional rectangular silhouette will look great.

Classic style. Here preference should be given to furniture made of natural wood. It is possible, for example, to use an overall and squat cabinet with curly handles as decorative elements. As far as color is concerned, classical style dark colors will look good. A bedside table that meets all these requirements will emphasize the aristocracy and fundamental nature of the classics.
Palazzo. The main thing in the Italian style is attention to detail (aged or varnished shelves, wrought iron elements, etc.).

Scandinavian. For him the best option there will be a white cabinet made of natural wood and not having unnecessary decorative elements. The design should be as simple as possible. A good option is a bedside table made of unpainted beech. Give preference to massive legs and narrow simple shapes.
 Interior in scandinavian style rational but very attractive
 Provence. For this style, wooden pedestals are suitable, preferably with graceful outlines and narrow figured legs.

Minimalism, high-tech. Obviously, for these styles, designs with metal frames. Glass doors are a great addition. It is important that a minimum of unnecessary details be used.

What material to use for the nightstand?
Most often in this matter, the difficulty is the choice of material from which the bedside table is made. Let's get acquainted with the most popular options.

Is there any way to save money?
Any repair work- this is, first of all, a blow to the seed budget. Yes, it is at least impractical to save on building materials, but the situation can be saved by making furniture with your own hands - even a non-professional can handle this, by the way, with detailed step-by-step instructions. Undoubtedly, this applies mainly to simple subjects. A bedside table, for example, can be quickly and inexpensively made by hand.

On a note! On materials for self-manufacturing you can't save. After all, everyone knows that the miser has to pay more than once. If you use low quality consumable the work may need to be redone.

Making a bedside cabinet - drawings and preparation
First you need to decide on the design of the future bedside table. You can draw a drawing on paper, although it is easier to use special computer programs (Google Sketch Up, T-FLEX Furniture, Astra Furniture Designer). In any case, you need to know exactly the design parameters - height, length, width ...
Blanks can be ordered at the nearest carpentry workshop. Here, of course, it is better to trust the experts, but you can still save money. So, you can glue the edge on the end of the boards with your own hands using a regular iron. To do this, you need to purchase a tape and, using an iron, fix it on the ends of the blanks. You can go even further - make blanks yourself using chipboard boards. But in this case, the workpieces will have to be further processed with a grinder to make their surface smoother. Also, all elements should be treated with a stain to protect against the harmful effects of the environment.


Now it remains only to assemble all the elements into one structure using glue and self-tapping screws. The blanks ordered in the carpentry workshop must be connected with hexagon bolts - for such fastening, it is necessary to first make holes of the required size.
At the end, the selected fittings are installed. By the way, when choosing it, you need to be guided by both external attractiveness and functionality. The edges must be glued.


On a note! Now let's take a closer look at the process of making a bedside table with our own hands. Below are step by step instructions for the manufacture of several simple options that may be of interest to you.
Video - Bedside table
Option #1. Simple bedside table with your own hands
This example will look at the assembly process from blanks ordered from a carpentry shop. So, for work will be used:
- 6 furniture corners (plastic double);
- 1 countertop;
- 2 drawer bottoms;
- 2 sidewalls;
- 1 back wall of the bedside table;
- 1 inner bottom shelf;
- 4 guides;
- 4 front/rear walls for drawers;
- 2 handles;
- 2 drawer fronts;
- 2 facades of the lower part.
We also note that for the manufacture of the lower shelf and drawers, sheets of chipboard were used, for the facades and sides of the drawers, wood (pine) for the countertops, and 5 mm fiberboard for the back wall of the structure.

After receiving all the required blanks, painting begins. There is nothing complicated in the process itself, so let's just get acquainted with the result of the work.


The lower shelves were not painted - even if this is not very attractive, no one will see them anyway.

To begin with, furniture corners are screwed to the inside of the sidewall - 2 in the lower part (100 mm from the edge), 2 flush on top, as in the photo.


An inner shelf made of chipboard is attached to the lower corners, and a countertop is attached to the upper corners. When 4 elements of the frame are assembled, the structure may be somewhat skewed - do not be afraid, everything will be aligned with the back wall.


Important! By the way, about the tabletop. Its width in our example is 600 mm, and its depth is from 430 mm (at the edges) to 460 mm (in the center). As a result, the front of the tabletop turned out to be somewhat convex to match the design of the bed.


After assembling the frame, the guides are attached.

In our example, they are screwed to the bottom of the drawers, but this is a bit wrong. It is preferable to fasten the guides to the middle of the drawers so that they do not touch the facades. In addition, the length of the guides should be less than the depth of the entire structure, about 5-10 cm. They must be fixed flush from the front.

Below you can see the handles that were chosen for the drawers.

After painting the facades with one layer, the places of future holes for the handles are marked.


This is how facades with handles painted in one layer look like.

And this is how they should look after applying the third layer of paint (handles, of course, must be removed before each painting).

Next stage This is a set of boxes.

The details of the boxes are fastened with self-tapping screws, under which holes were previously made with a thin drill.

Assembled crates should look something like this.

The bottom of each box is attached, for which a stapler is used. On one side, the bottom is fixed flush, while on the rest it is aligned so as to avoid distortions.

After that, the boxes are attached to the rails.


Facades are attached to the boxes. After that, a fixed facade is attached, for which a pair of furniture corners is used.


Option #2. Unique pine bedside table
Today it is not easy to find a truly original, but at the same time simple bedside table. And if you have previously dealt with wood, then we suggest making such a unique design with your own hands.

Table. Instructions for making a pine bedside table.
| Steps, photo | Description of actions |
|---|---|
 | To begin with, all the necessary tools shown in the image are prepared. |
| | The material will be natural wood (pine), which you can buy at a hardware store. |
| | Work begins on the inside of the future structure. |
 | The boards are connected to each other, as shown in the image. |
| | They are installed vertically. |
 | After that, the lower and upper parts of the bedside table are nailed. |
 | The result should look something like this. |
 | Here are the materials needed to make the box. |
 | First, the bottom of the box is created. |
 | Photo of the work done. |
 | After that, the guides are nailed. |
 | The second guide is nailed on the opposite side of the box. |
 | The finished box will look something like this. |
 | It remains only to insert the finished box into place. Everything, a simple wooden cabinet is ready! |
 | At the end, you can paint it (preferably white paint) or stain it. |
Option No3. Pallet bedside table
To minimize costs in the manufacture of bedside tables, you can take pallets from under building materials. They (pallets) can be not only wooden, but also metal, plastic.
Pallets have many standard sizes, but often only 2 are used:
As for the tools, you will need:
- pencil, square and tape measure;
- mount;
- screwdriver;
- a hammer;
- clamps;
- Circular Saw;
- holdfast;
- Sander;
- electric jigsaw;
- ballerina (or hole saw);
- screwdriver;
- electric drill.
On a note! If we talk about glue, then it is better to give preference to PVA - it dries quickly, the connection provides a strong one, and when squeezed out, it is easily removed.
Stage No2. Pallet removal
Of course, new lumber can be used instead of old pallets, but the cost of the bedside table will increase greatly because of this. Therefore, we begin this instruction with the analysis of the pallet.
To work, you need a hammer and a mount. In order to minimize damage to the tree, it is recommended to first loosen the boards using a chisel. By the way, an electric reciprocating saw is perfect for dismantling - its metal blade should be inserted along the connection of the boards to cut the nails connecting them. After that, the nails can be easily removed, while the wood practically does not deteriorate.
Drawing of a wooden bedside table
With the help of a circular saw, 10 boards 520 mm long each are cut (the length can be any). Strips are selected for the rear wall and those that are suitable for the side walls in terms of quality. Each set of boards is chipped together to measure the overall width. The resulting figure will be required when creating rectangular frames.

Each frame is made from 4 bars. When cutting bars, it is very important to observe all dimensions exactly.

Note! It is advisable to use for cutting blanks hand tool, and not electric - so the results will be more accurate. You will be surprised, but a hacksaw is ideal for this. If we consider power tools, then preference should be given to a tape jigsaw, but, alas, not every home craftsman has it.
Stage No4. Rectangular frames
When all the blanks are made, rectangular frames are assembled. In the finished cabinet, the latter will not be visible, and therefore you don’t have to worry too much about the aesthetics of their connection. The width of each blank is 7 cm. In the absence of screws of the required length, holes are made with a 12 cm drill to 1⁄2 of the width of the bar.

You need to make sure that the dimensions of both frames are identical.. When tightening the screws, it is recommended to clamp the lower and upper parts together so that they exactly match in size.
Stage No5. Planks under the table
At the end of the previous stage, blanks for the countertop of the structure are cut. Pieces of the required length are cut with a circular saw with a slight allowance.

Stage No6. Workpiece grinding
The boards are carefully cleaned with a grinder before starting to assemble the frame. Of course, you can try to do this manually, but using a grinder is both better and easier. The movements should be circular - this will create a beautiful texture.

Note! If you want, you can get an unusual effect - for this, the outer surfaces should be thoroughly cleaned (almost to a mirror finish), and then processed with coarse coarse-grained sandpaper to intentionally create defects and irregularities.
Stage No7. frame
For the final assembly of the body of the structure, only nails are used. Additionally, you can use glue, but this is not necessary - the frame will already turn out to be quite strong.
It is important that the wood be dry during work, otherwise it will dry out while already in the house, and its attractiveness will noticeably decrease. Yes, this can later be attributed to country style, but still it is desirable to pre-dry the tree.
First of all, a top cover is assembled on a rectangular frame. The ends of the boards that go beyond the structure are brought to the required dimensions with a grinder.

Next, the back and side walls are nailed. Let's make a reservation right away that this is quite difficult to do - the lower frame must be well fixed, otherwise the squareness will be violated when the nails are driven in. After that, the front surface is assembled.
Gluing plywood inserts

Due to the fact that it is the box that will be subject to the greatest loads, its walls can be additionally connected with iron corners - so its rectangularity and strength will be preserved.
Stage No10. shelf
When the box is ready (its front wall will be finalized a little later), you can begin to strengthen the shelf. A pair of rails is attached to the side walls with screws, after which it remains only to make sure that the box moves freely inside the structure. If so, then you can safely nail a shelf to the rails. By the way, to mark its position, you can first place the box inside to draw a couple of lines a few millimeters higher than the side walls.

Stage No11. Heart-shaped cutout
First, we note that the cutout on the front wall can have any shape - it all depends on your personal preferences. In accordance with our project, it will be in the shape of a heart, although you can simply make a simple pattern from a few small holes (they can be drilled with a drill).
- So, first a piece of board of the required dimensions is cut off.
- Next, a heart is drawn on the board, it must have the correct shape. If a hole saw is used for cutting, for example, 3.2 cm, then it can serve as a template.
- A pair of holes are drilled with a hole saw.
- All the pieces that remain are finally cut out with a jigsaw.
- After that, the front wall of the drawer remains to be completely assembled, which will require all the same nails and glue.
On a note! Cutouts of other shapes will also look great - these can be, for example, images of card suits. However, for this, the nightstand must have an appropriate number of drawers.
Stage No12. Finishing touches
After the assembly is completed, the cabinet can be coated with a clear varnish in order to protect the wood and reveal the details of its texture. Moreover, the varnish can be slightly tinted with a pigment (white or black) - this way you get a slight gray haze.
So what do you need to do:
- clear the tree;
- sand it with No150 sandpaper;
- clean again;
- cover with a layer of varnish, then wait at least 4 hours;
- lightly sand with #200 sandpaper;
- clear again;
- apply a second coat of varnish.
Note! The finished bedside table will look great if you treat the surfaces with a stain before applying varnish. By the way, instead of stain, you can use a solution of potassium permanganate or iodine, diluted tea, and so on.


Video - Provence style bedside table
small bonus
In the absence of experience or necessary tools a bedside cabinet can be made using improvised means.
5 /5 (7 )