
How to decorate the interior of the kitchen with beautiful crafts of your own making. DIY kitchen decor - original ideas, photos DIY kitchen decorating ideas
The decor of the kitchen, the photo of which is nice to show to friends, can be done independently. Of course, you will have to take into account many nuances, correctly combine colors, show imagination. But independent design is original, beautiful and, best of all, interesting. Taking on this difficult task, you can try yourself as a designer. About everything in more detail later in the article.
Possible style
To make the kitchen look good, you can’t immediately run to the hardware store, choose the finishing materials that you like there. This is a bad decision, because the result will be nothing to match with anything. But it is harmony that is the main property of a beautiful interior.
First of all, you should look at the styles. Each of them is a harmony, time-tested, in which you will not be able to make a mistake. The most popular kitchen styles can be divided into two groups.
Modern
The first are modern. The main advantages are that synthetic cheap materials are easily accepted and allow you to create a feeling of spaciousness. The main disadvantage is that not everyone likes it.
Among them, for example:
Already from a short memo it is clear what modern styles are. You can use any of them or choose one of the traditional ones.
Traditional
Traditional styles are expensive but cozy, reminiscent of the atmosphere of specific areas. Among them:
- Russian. The colors are wood, the material is also wood. As a contrast, it allows inclusions of white, red, black, yellow, but in small quantities. The furniture is wooden, upholstered. Accessories in the design of folk crafts.
- English. Better suited, of course, for big house than for a kitchen, even a spacious one, but it can still look good. On the floor is a laminate or linoleum under it, which is covered with a carpet. Wallpaper or wood paneling on the walls. On the stove imitation of a fireplace. Beams, wooden or cushioned furniture, as dishes - aged kitchenware. Textiles to a minimum. Colors are wood with undertones, plus brown or deep red.
- Provence. Colors - white, cream, blue, pink. Laminate on the floor, wallpaper in frivolous flowers on the walls, plaster the ceiling. Light furniture, natural materials. Cafe-style curtains that cover only half of the window. There is a vase of flowers on the table.
Of course, the list of existing styles is much longer. But the general idea can be made in this way. It is not necessary to choose one of them, you can take it as an idea, and then modify it, remake it for yourself.
Stages
The repair process as a result is divided into stages:
- Concept drawing. At this stage, you decide which colors you like and which you don't. Do you want minimalism or country music - or will you generally refine the style on your own. What materials attract you and what you do not want to see in your home. As a result, draw a sketch of what you want to get.
- Refinement of details. The drawn sketch needs to be checked for errors. Did it happen that there was suddenly wallpaper above the stove that could catch fire? Have you forgotten to think over the furniture, have you decided what kind of curtains you want? How much will all this cost, do you fit into the budget?
- Purchase. You can order with delivery, you can carry the materials yourself.
- Finishing. Consistently, first the ceiling, then the walls and the floor, carry out the plan. You can hire builders, you can work on your own - as you like.
- Arrangement of furniture and accessories. When the kitchen is ready, you need to furnish and decorate it.
If the concept was drawn up correctly, the resulting kitchen will look something like the picture from initial stage. But it can also happen that in the process the concept changes ten times. It does not matter - the main thing is that as a result everything is combined with everything.
How will we decorate the ceiling?
The ceiling is a good start to think about finishing in general. It can be very different:
- plastic tiles. They are rare, it is better not to finish the space above the stove with them, because they are sensitive to temperature. Moisture is not afraid, they look good and simple. Nice temporary solution.
- Wooden planks (possible with imitation of beams). They are expensive, but they look chic and are well suited for classic interiors. They do not like moisture, they burn, but if you take expensive and well-crafted woods, these shortcomings can be avoided.
- metal tiles. They are very rare, they are usually not used to cover the entire ceiling, since the roads and washing them are a real torment. But they can trim a part - above the kitchen apron, for example, since they are not sensitive to any impact at all.
- Stretch ceiling. They are not afraid of moisture, they are easy to clean, therefore they are well suited for the kitchen. One minus is that they react poorly to high temperatures, so the space above the stove will need to be covered with something else.
And, of course, materials can be combined, getting beautiful ceiling from two levels, for example.
From interesting solutions for finishing:
- painted- looks good, especially in ethnic styles;
- a photo- allows you to simulate the sky, the sea and anything else;
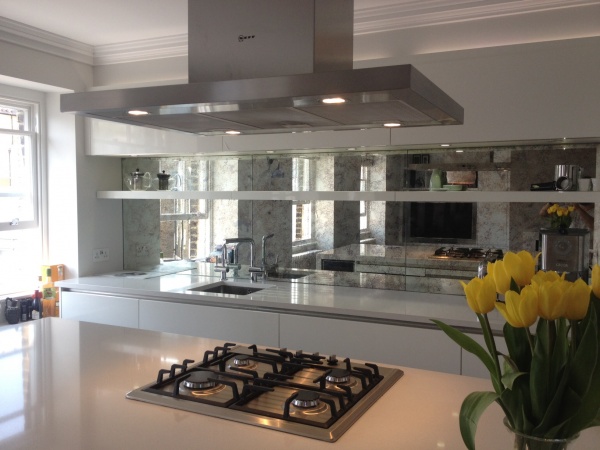
- mirror- looks interesting, unusual and allows you to seriously increase the size of the room visually.
Advice
Two-level ceilings - suitable solution in order to divide the kitchen into two zones.
wall decoration
Walls can be decorated with different ways. Among them:
- Plastic panels. Suitable for modern democratic styles. There are very different colors, with different textures, glossy or matte. They tolerate temperature changes and moisture well. But they crack easily at the slightest impact.
- Wooden panels. Suitable for traditional styles. At kitchen apron they cannot be placed, but they look good and the conditions of the kitchen as a whole endure well.
- Tile. The most common finishing method. Does not burn, is not afraid of temperature changes, looks beautiful. Relatively easy to crack - but still harder than plastic. Easy to clean, not afraid of aggressive chemicals, with which both wood and plastic do not get along very well.
- Dye. Common and simple, besides beautiful. Allows you to paint the walls at will, does not require much experience in work. Does not suffer from mechanical stress, from moisture and temperature changes. But you need to carefully choose it - cheap paints are toxic.
- Plaster. Or relief plaster. It has its own texture, usually matte. Allows you to create waves and patterns, give the kitchen an original look. Not afraid of water, temperature changes, but not suitable for all styles.
- Brick. Like any stone, brick tolerates everything well. It cannot be set on fire or broken. It looks, however, specific.
- Wallpaper. If you do not take paper, but take glass or non-woven, they will not yield to paint in terms of quality. True, it is better not to fasten them near the stove - they can melt from the heat. In addition, they are difficult to glue.
- Steel. It is insensitive to nothing at all, but it looks very specific and makes the kitchen more “cold” and “strict”. Does not require special care, but expensive.
Of course, you can combine different materials. So, metal goes well with glass tiles, and a tree with wallpaper.
Advice
The main thing is not to try to finish synthetic materials interior in traditional style. The combination will look sad.
Floor finish
If the ceiling and walls have a lot of finishing materials, then the floor does not have such luxury.
There are very strict requirements for him in the kitchen - after all, something constantly spills or wakes up on him - and only a few materials correspond to them:
- Tile. Of course, the first thing that comes to mind when trying to imagine the floor in the kitchen is tiles. Whether from a real stone, whether from artificial - in any case, it will look good and serve for a long time. To wash off something that stuck on top is very easy and you can use any chemistry. In addition, it wears out for a long time. The only negative is that if you drop something heavy on the tile, it will crack.
- Linoleum. The second most popular solution. Linoleum looks beautiful, can imitate wood and is easy to clean. It does not have gaps like tiles that need to be cleaned separately. It wears out, however, many times faster and fades over time. In addition, if you put something hot on it, an ugly melted mark will remain.
All other kitchen solutions are not suitable if you do not want to spend most of your time cleaning.
How to post content?
The kitchen has two main areas - working and dining (unless, of course, you have a separate dining room in your house). They need different materials. Suitable for work area:
- On the floor. Both tile and laminate are both durable enough to be used.
- On the walls. Only materials that easily survive wet cleaning are not afraid of aggressive chemicals and do not suffer from temperature changes. This is either tile, or expensive paint, or natural stone. You can go the original way and use metal.
The combination of color and furniture
Finishing colors and furniture arrangement are, in fact, work in the same direction - this is work with the perception of space. Some objects make it visually larger, others smaller, some interior solutions will expand it, others, on the contrary, will narrow it.
So, if you have a narrow kitchen that looks like a corridor, you need to remember the following tips:
- The ceiling must be light. Otherwise, the kitchen will become not only narrow, but also low.
- The walls are also light in color. Otherwise, the kitchen will decrease even more. A good solution would be to decorate them with vertical stripes or place them on a side long wall. large mirror or wallpaper. You can also paint the far wall in bright color to draw attention to her and distract him from the rest.
- The floor can be either light or dark. The main thing is that it has either a diagonal or a transverse pattern - this will bring the far wall closer.
- Work zone . It can be placed either in one line, or in two, or with the letter "G". All solutions are not bad, the main thing is that there should be a passage of at least eighty centimeters.
- The ceiling should be light. The higher the room, the bigger it seems.
- The walls should also be light. cold shade will make the room more spacious than warm. You can place photo wallpapers or mirrors on one of the walls, but wallpaper with a pattern is immediately prohibited - they will further reduce the room.
- The floor can be both light and dark. Light - in a small but relatively low kitchen. Dark - in a small but high.
- Work zone. Compact. It is important to use the space not only on the floor, but also on the walls - cabinets, shelves will help you rationally equip your life.
- Dinner Zone. It can be a great continuation of the work. Combined bar counter, dinner table, serving as a "second level" to the worker. In a very small kitchen, you can limit yourself to making a table from a windowsill. An original, fresh solution will help save space.
- The ceiling is dark. It is undesirable to use cold colors, it is undesirable to use completely dark shades. Something bright is better.
- Walls too. The best thing - warm shade. You can make them light, but with a repeating bright pattern, especially small ones.
- The floor is dark. You can also add drawings to it, you can do without it.
- Work zone. Capturing almost the entire space.
- Dinner table. Taste.
- Main color and shades. In this case, the shades act as accents that emphasize any interior elements.
- Two main colors. It looks good if the colors are contrasting and, as it were, are at war to capture the kitchen. You can make the working and dining areas contrast - this is a solution for modern styles that fit well with brightness.
- Main color and accents. There can be many accents, they can be contrasting. The difference from several main colors is that accents do not color something big, only accessories.
- Island table. The most standard of the possible, placed on its own, surrounded by chairs. It takes up a lot of space, therefore it is not suitable for all kitchens.
- bar counter. Tall, narrow, takes up less space, can be a great work surface if needed.
- Folding table. Attaches to the wall and reclines if needed. Good decision for small kitchens.
- Mobile table. Small, compact, more like a magazine than a dining room. The same solution for small rooms.
- Attached table. It is attached to the kitchen set, acts both as a work surface and as a dining one.
Dividing into zones using a bar counter
If the kitchen is just small - not narrow, but small - a different approach is needed:
If the kitchen seems too big for you:
The colors in the kitchen must be combined:
Doing everything in one color, without shades, is a bad idea. As well as putting a simple island table in the kitchen, without thinking that there are other solutions.
Tables are different:
To complete the decor of the kitchen, it remains only to take care of the decorations.
Often there are situations when the kitchen seems to have new furniture, and fresh wall and ceiling decoration, but something is missing. Some soulfulness and warmth. And it is the extraordinary beautiful decor and crafts for the kitchen can change the whole atmosphere of the room, making it more cozy and comfortable.
Even just one picture or an unusual shelf can completely change the entire design of the kitchen, adding dimension and originality to it.
You can decorate any part of the room and appliances with decor, the main thing, of course, is to choose materials that are resistant to kitchen conditions, that is, they are not easily flammable and are not afraid of moisture, as they will be subjected to frequent cleaning.
Any decor or crafts for the kitchen can be done with your own hands, it is not necessary to buy them or use the services of professionals, it is enough to help your family members or friends.
wall decor
If the wall in the kitchen is a solid color, then stencils and ornaments are perfect for decorating it. It will be necessary to make a markup in advance so that the drawings are evenly spaced. The stencil is attached with adhesive tape, and then the necessary places are painted. After that, it is desirable to varnish so that the drawing retains its external qualities for as long as possible.

Self-adhesive tape works great. On the reverse side, the outline of the future figure is drawn and cut out. Stick the decor on the wall slowly, gently pressing rubber spatula to expel all the air.
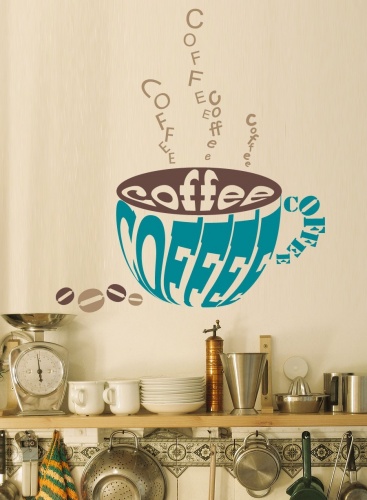
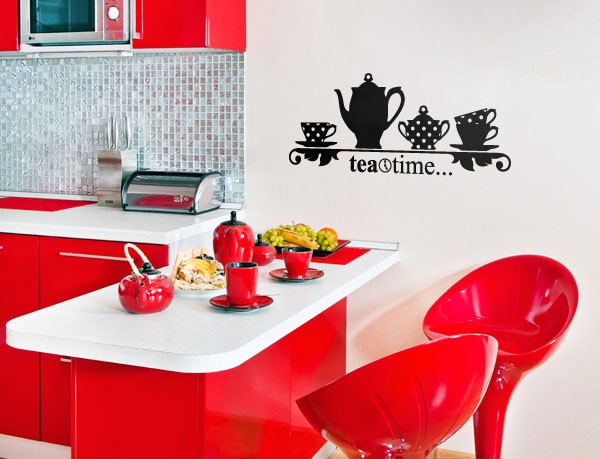
If you do not want to cut out, you can purchase ready-made stickers. Moreover, there are countless options for colors and patterns. Offered as the most simple and funny, and complex and sophisticated. Stickers can be made in the form of silhouettes, butterflies, flowers, berries, inscriptions or vignettes.
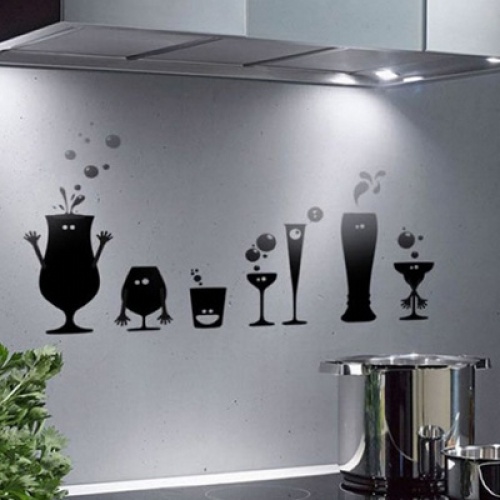
Their advantage is that it is easy to replace old ones with new ones.
For those who have the talent of an artist, you can draw a landscape or other drawing on the entire wall, for example, near the dining area. You can use both acrylic paints and decorative plaster. The latter is easy to use, you only need to breed and decorate. Moreover, it is suitable for any surface: metal, plastic, concrete, wood and so on.

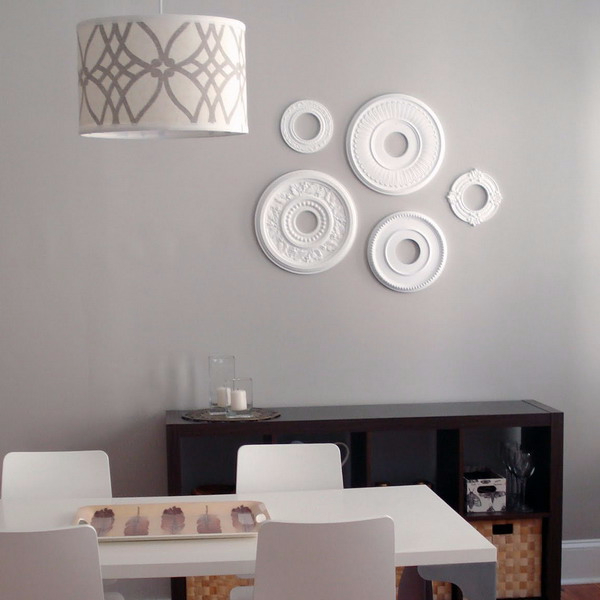
Many people use ceiling sockets as decor for kitchen walls. Color them in different colors spray paint and stick, putting in an interesting combination.
Important ! When choosing decor for the kitchen wall, remember that it should be combined with its overall style.
Great wall decor for any room Wall Clock. The range of designs and colors of clocks is huge, so finding one for a particular style of kitchen is not difficult.

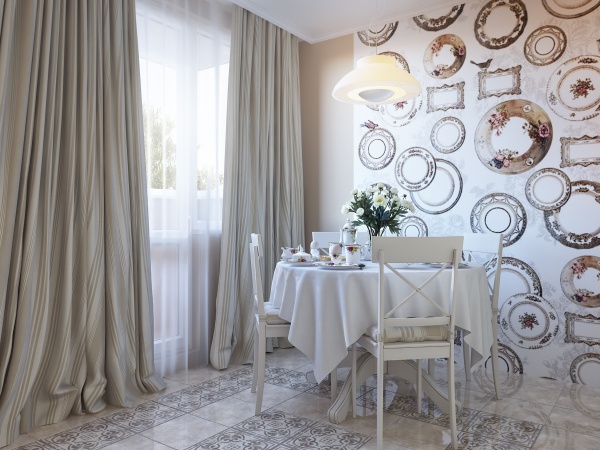
If the wall already has a pattern, for example, wallpaper with flowers, then it is better to hang pictures, panels or photographs. in the kitchen with classic design still lifes, landscapes, herbariums and the like will look great. For a neoclassical style kitchen, black and white paintings or photographs are best suited. Rooms modern style decorate with posters, signs or conceptual paintings.

But if the kitchen is small, then you should not hang it with a lot of pictures. It is better if only one of medium size or several small ones arranged in a vertical row. This arrangement will visually enlarge the room.
Rare dishes (plates, trays) or unusual colors are also ideal for wall decoration. Traveling around the world, buy dishes with a national pattern. The result is an interesting and original collection.
Wooden cutting boards look unusual. A small hole is drilled in them and hung on hooks.
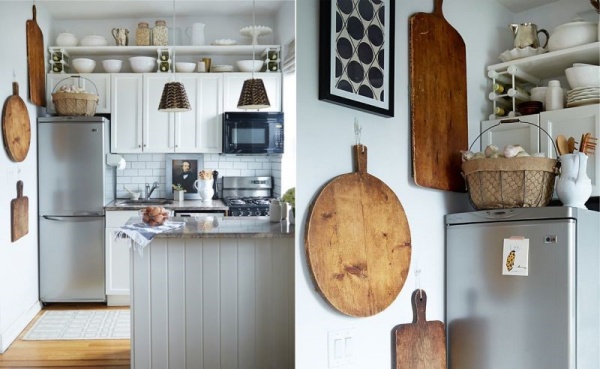
It is not necessary to decorate the entire wall, it is enough to decorate either an apron, or a dining area, or part of the wall behind the stove or sink. Tiles can also be used as decor for the kitchen. Moreover, the choice of material is huge, ranging from patterns and ornaments to drawings or mosaics.
Tiles can be laid in the form of a Christmas tree or combined in different sizes. In this case, you should draw a diagram in advance for error-free installation.
If the tile already exists, then it can be painted with special paints that are resistant to heat and washing.
It is not necessary to paint the entire tile, especially if most of in great condition. It is enough to paste over problem areas with vinyl stickers or other interesting things, such as magazine clippings or napkins. And the flaws are hidden, and excellent wall decor.
Another unusual way decorating is pasting with different wallpapers, in certain zones or emphasizing only one of them.
For example, the dining area is covered with wallpaper in a bright shade, and the rest of the kitchen is more neutral in color.
Photo wallpapers can also be decor. Most often they are applied to an apron or on a wall near the dining area. In addition, they visually enlarge the space.
And for those who like to write and draw a lot, you can use chalk wallpaper. You can paste over them both the whole room, and only a part, making, for example, in the form of a school board. Children will especially like this option. Or arrange in the form of pictures. Then inside it will be possible to draw or write something original. For example, a declaration of love to household members or write down an interesting recipe.
Chalk wallpaper is easy to clean and can even be re-pasted from one place to another.
You should not paste over the whole room with them if it has only one window or without them at all. The dark shade of the material will make it dull and boring.

Another way is decorating with mirrors. An unusual decorative mirror looks especially good, made in an original frame that matches the style of the kitchen. Or a mirror surface is installed on an apron. This method also increases the space, adding freedom and comfort to it.
window decoration
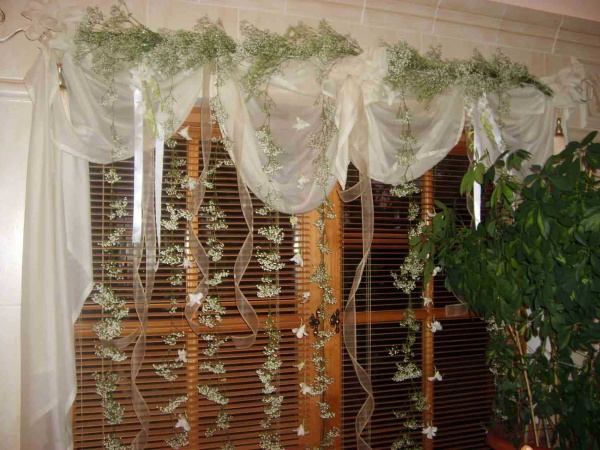
To decorate the window in the kitchen, you can use curtains and curtains. If the kitchen is small, then it is better to hang light and small curtains, but if it is large, then even curtains can be used, they will give the room a mood of chic and wealth.
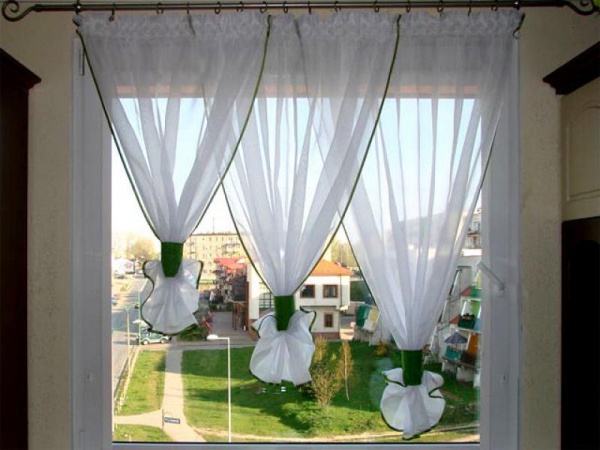
Advice ! Bright and light colors of curtains or curtains will make the kitchen more spacious and add more positive mood, and dark shades - calmness and luxury.
Sewing curtains or curtains with your own hands will take a lot of time, but it's worth it. You can decorate the fabric with original beaded patterns, butterflies, flowers, drapery, or add only fringe and lambrequins.

Decoration of furniture and appliances
If the furniture has lost its original appearance and looks completely dull, then it is quite possible to finish it with decor. For example, paint in a different color and replace the handles. How beautiful and unusual the cabinet will look, decorated with patterns or hand-made drawings.

The glass in the cabinets can be painted with stained glass paints or the doors can be completely removed, leaving the shelves open or with curtains. Especially this option is suitable for a kitchen with a small area, because closed cabinets reduce space.
Equipment can also be painted or pasted over with stickers. Special attention and thoughtfulness of details should be given to the refrigerator, as it takes up a lot of space and is an integral part of the kitchen.


Advice ! Before you start decorating, decide whether you are only dealing with furniture or appliances. Since if you decorate everything together, the kitchen will become too colorful and busy.
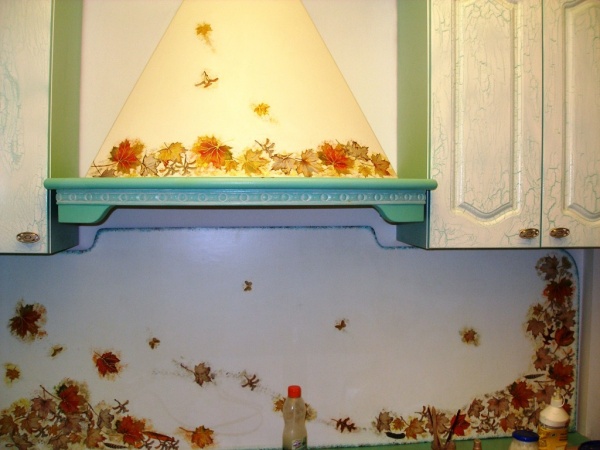
Don't forget the hood over the stove. It can be painted or painted with patterns. We also deal with gas stove, washing machine. Although, for the latter it is better to sew a cover.
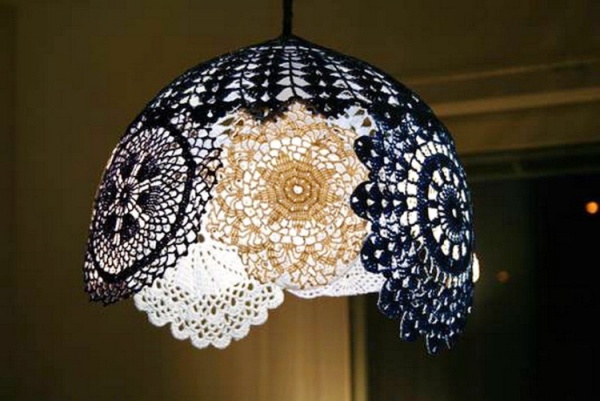
The chandelier is outdated, do not rush to change, try to make a new lampshade.
Accessories and kitchen stuff
If it is not possible to decorate furniture or appliances with decor, then various little things and fakes will help in this case.
Moreover, there are countless things that you can do with your own hands:
- potholders, napkins, tablecloths;
- heating pads;
- dolls;
- pockets, baskets, storage systems;
- bottlers;
- topiary;
- paintings;
- cutting boards and more.
To create something new, there are many interesting techniques, such as decoupage, knitting, patchwork, burning, sawing and much more.
The photo below shows DIY crafts for the kitchen.
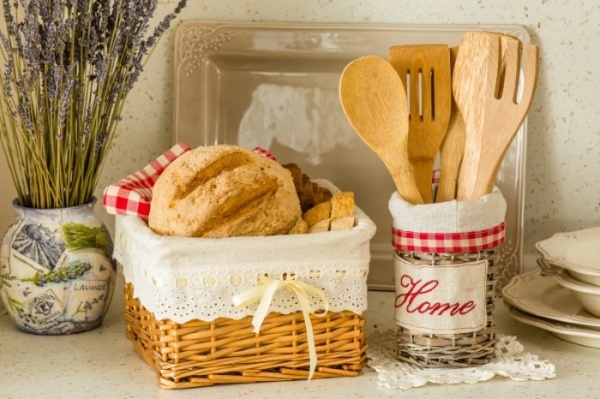
From the fabric using the patchwork technique, you can make pillows for chairs, tablecloths, napkins. Patchwork decor is great for a Provence style kitchen.

Any little thing can serve as a material for creativity, even toothpicks or matches, cereals, napkins, grains and much more. Everything depends only on the imagination.
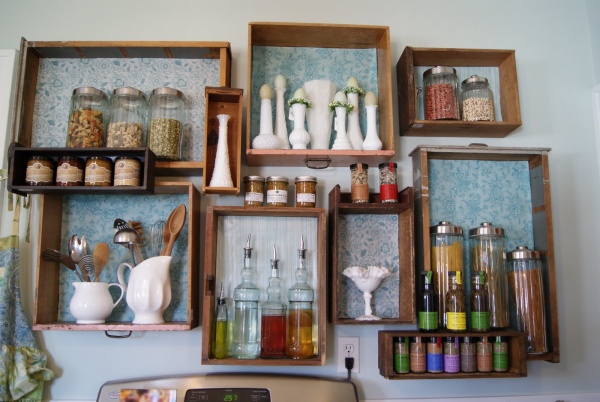
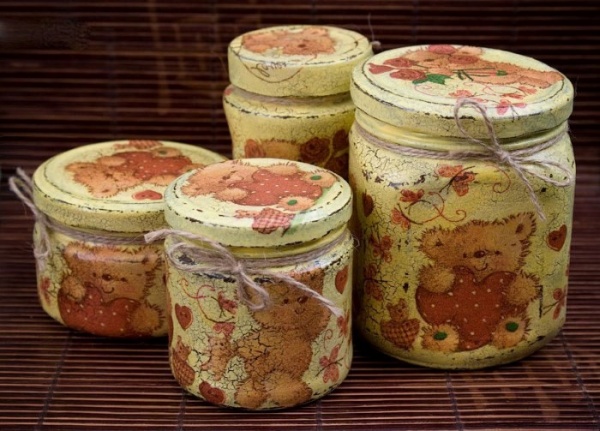
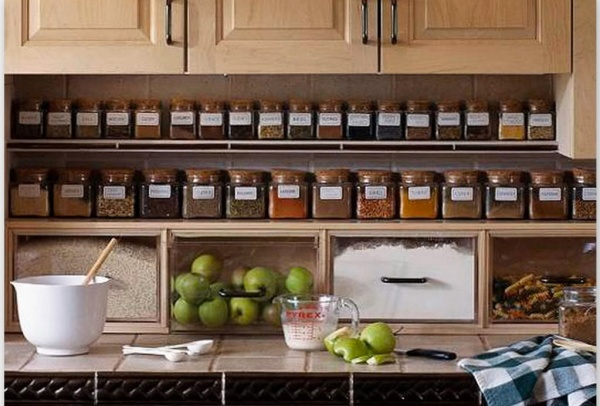
Jars with different spices, cereals and beautiful bottles will be a great decor for any kitchen. They are placed on open shelves. Dishes or jars with preservation are placed in the same way. Shelves can also be made by hand.
And if there are magnets, then with their help small jars of spices can be fixed to the wall, making a panel.
Banks can be made of wood and decorated in the desired style. Be sure they should stand in the most prominent places: open shelves, a table or hung from a refrigerator.
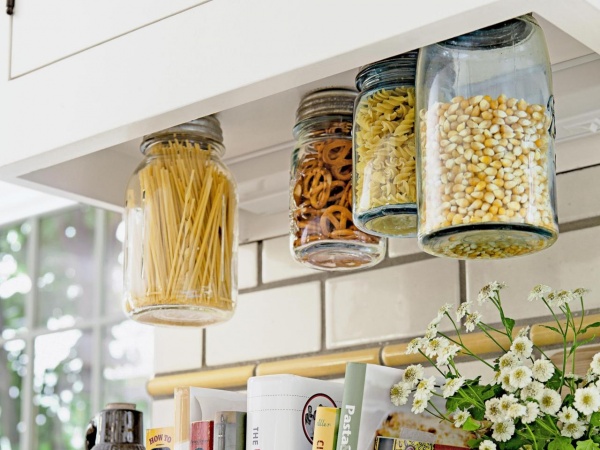
Transparent jars with bright cereals and vegetables can be filled with your own hands or purchased. In the latter case, they will retain their aesthetic appearance much longer, as manufacturers use special technologies to preserve them. In addition, all bottles with bizarre and unusual shapes are stacked.

Any hostess dreams of a comfortable, beautiful and unusual kitchen. Most people want to learn some secrets and subtleties of self-decoration of a room: decorating kitchen furniture, dishes, decorating walls, making textiles and DIY crafts.

Furniture decoration
There are many ways to decorate kitchen furniture. with my own hands. On the chairs, you can sew covers or bedding yourself. It is easy to give standard furniture a unique facade.

Original ideas will help to realize:
film application;
use of original fittings.
all kinds of overlays made of plastic, polyurethane, foam;
painting;

Sometimes you need to restore old shabby furniture. For self repair kitchen set, it is necessary to remove the doors, clean them with sandpaper, paint. For coloring, it is best to use paint cans. They do not spread and lay down in an even layer.

After drying, you need to cover them with varnish, stick suitable pictures. On top, once again, apply a layer of varnish. On sale there are ready-made curly borders and overlays that imitate woodcarving. During the restoration, you can use them.

Then it is desirable to attach new handles. If you decide to leave the old handles, then before painting the furniture, they should be carefully pasted over with masking tape to protect against paint ingress. You can make original handles yourself from cutlery or from miniature metal cups.

Often a finished print is applied to furniture. The stores have big choice bath towels. It is customary to place various patterns, contrasting stripes on the doors of the kitchen set. To give the furniture an "aged" look, craquelure varnishes with a cracking effect are used. You can choose the appropriate ornament to reproduce ethnic themes.

The countertop is usually updated by sticking a film on it. When distributing the film over the surface of the table, it is necessary to glue the ends well. This is where the separation can start.

DIY textiles
Properly selected textiles bring comfort to the room. With a needle, thread and fabric, you can create a unique style.

You can make the following products with your own hands:
tablecloth decorated with lace, ribbons, embroidery;


practical napkins;


chair covers and soft foam cushions covered with the same material;


tacks;


handbags and pockets for storing all sorts of little things;


curtains for windows sewn on a sewing machine;


patchwork panel.


It is desirable to sew all products from the same fabric. You can come up with a textile design yourself, as well as use various kitchen ideas found on the Internet. If you decorate an ordinary piece of fabric with coffee beans, you get a wonderful napkin.

bright and unusual interior it turns out if the patchwork technique is used to create kitchen products. You can make all textiles from shreds of beautiful fabric. And in the same style, pick up ceramic tiles for the “apron” over work surfaces and floor tiles. This technique should be considered carefully. She does not tolerate an overabundance, in which strong variegation can serve as an irritant to the eyes. Patchwork textiles look best against the background of monochrome interiors.

Original curtains or chair covers can bring novelty to the interior of the kitchen. It is recommended to make such sets for all seasons, especially since textiles require frequent washing. It is desirable to sew products from linen fabric, you can use thick cotton. Then the textile will absorb moisture well and wash well.
Compact curtains are best suited for the kitchen. The most varied decor is allowed. Curtains with photo printing are in fashion. Any model of curtains is suitable for its application. Modern looks romantic and country style. The trend is a curtain-skirt, which can also replace the doors of cabinets.
Napkins and chair pads can be crocheted, cutwork and macrame can be used, fabric can be used and embroidered on it with a cross.
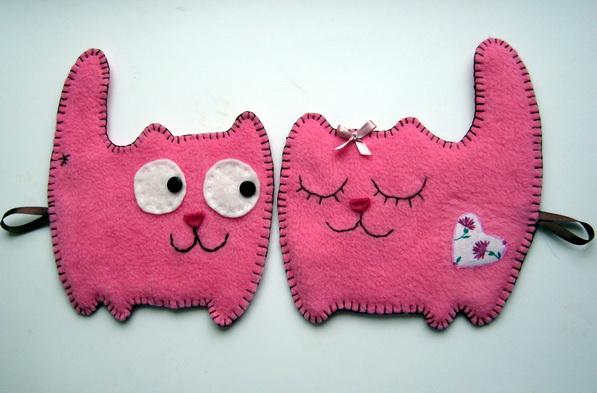
Any hostess can come up with unique crafts. Using a pattern, draw halves of the body of a piglet on multi-colored shreds, sew together, fill with filler. Then build two ears by placing triangular cardboard boxes in the fabric. Instead of a patch, you can sew on a button with two through holes. The tail will serve as a spring or wire sheathed with fabric.
The same technique is common for making soft hens and cockerels, which are considered the keepers of the family hearth. You can often see the silhouettes of chickens on kitchen towels, tacks.
Painting and decoration of dishes
Making saucers and cups to your own taste is easy. Any dish can be decorated by yourself. In stores for artists, you need to buy pens and felt-tip pens for ceramics. Acrylic paint is suitable, which, after drying, is covered with a glossy or matte sealant. There are special kits for painting dishes at home. Instructions for use are always attached to such a set.


Sold very comfortable stencils for painting dishes. The stencil can be made independently from very dense cellophane or cardboard. Before painting, the dishes must be degreased. It is enough to wipe it with alcohol.


It is not difficult to make a simple drawing with a brush: apply peas, stripes, stars, various strokes to the surface of the dish. You can make inscriptions on plates and cups. Mistakes are easily corrected with a napkin dipped in water. Some paint dishes with a sponge. It turns out original.
You can paint old plates by creating a collection of dishes of different sizes. Subsequently, they are recommended to decorate the walls. First you need to apply acrylic white or colored paint on the saucer. Then it must be primed with PVA glue and varnished. Place the drawing on the dried surface.


The effect of white graphics is achieved if a drawing or an inscription is scratched on a painted surface with a toothpick or a needle.
How to decorate the walls?
Empty walls can be filled with paintings, stylized stickers, plaster figurines. Sometimes beautiful vases, original dishes, a collection of porcelain are put on open shelves.

Collages, photographs, portraits, framed with clay or salt dough, serve as a wonderful decoration for the walls.
A wall clock gives a great look to the kitchen. Some housewives decorate kitchen walls pots with indoor plants or arrange pots with plants on open shelves, racks. Saintpaulia, chlorophytum, nolina, aspidistra and other plants with their foliage and flowers are able to purify the air, so they are recommended to be grown at home.

Gypsum stucco, bas-reliefs, decorative panel - the most unexpected solutions can arise if you want to use some kitchen tricks to hide uneven walls. Some of the hosts put up bizarre masks that can be brought from Africa, Mongolia, China, or any other country.
Pictures look great on the walls of the kitchen. Images of fruits, berries, vegetables, drinks and other food are perfectly combined with the kitchen theme. Photowall-paper and three-dimensional wall-paper bring uniqueness and singularity to an interior decision. Some people make panels of acorns, cones, autumn leaves, feathers with their own hands. Dense twigs are fitted under the towel racks, which are covered with copper and varnish.

It is good to hang mirrors in the kitchen. They visually increase the space of the room. Mirrors with convex edges will allow you to feel the reflections of sunbeams, will bring an unprecedented novelty.
The subject of wall decoration can be a set of knives, cutting boards, cutlery, potholders, kitchen towels. Beautiful cutting boards are hung along the wall, especially since every housewife must have at least four of them. Potholders in the form of fruits, butterflies, animals often take their rightful place on the kitchen wall.

Edible decor of dried vegetables, mushrooms, spices, dried fruits combined in a wreath or garland gives a special flavor to the kitchen. Often, the owners acquire artificial decorations that imitate garlic, onions, peppers, berries, fruits and flowers.
On neatly placed wall shelves, there are transparent jars with spices, cereals, canned fruits and vegetables. You can buy ready-made containers with seasonings, but it is better to collect a suitable collection of jars yourself and fill them with a loose mixture.

Sometimes peas, corn, beans, lentils, hot peppers, medium-sized apples, cherries and other fruits and berries are placed in transparent containers for beauty. An appetizing decoration is created using a glass jar, thoroughly washed and baked in the oven (about 7-10 minutes). Whole pieces are selected for decoration. beautiful fruits, which are neatly folded into a container, filled with formalin or ethyl alcohol. You can pour a strong saline solution. It is desirable to fill the lid with wax.
AT last years Vinyl stickers are very popular. They can be selected for every taste. Stickers are distinguished by durability, ease of care and affordable cost. A great way to decorate a wall with your own hands is to apply a pattern using a stencil, which is purchased at a store or made by yourself.

To create a stencil, you need to take thick cardboard or thin plastic. With it, you can apply any ornament or pattern. Stenciled or cut out of styrofoam, butterflies look wonderful on a kitchen wall.
The "apron" area is often decorated with decorative ceramic tiles, which should be glued to a perfectly flat surface. In the trend - a glass "apron" of the working area.

In recent years, it has become fashionable to decorate kitchen walls with slates or chalk boards. They are convenient in that you can always leave an important message or reminder to the household, fix the necessary recipes or write inspiring aphorisms. In addition, children have a legal opportunity to paint walls. Sometimes such boards are placed in the "apron" area.
Beautiful examples
Very often, the refrigerator and the hood are decorated with their own hands, sometimes they are covered with a special finished film. The theme is chosen according to your taste. A floral, marine, fairy tale motif can be an excellent solution for decorating household appliances. You can attach various magnets to the refrigerator.
Often, an ordinary refrigerator is turned into an original item. You can put any image on it yourself. It is easy to draw a giraffe, a zebra, a cat. People without artistic ability often transform old refrigerator vinyl stickers.


Sometimes some little thing can add unusualness and brightness to the kitchen. A bouquet of natural flowers can be stored in a glass container for at least six months. Flowers should be glued to the bottom of the jar, filled with a solution consisting of water and glycerin in a ratio of 1: 2, tightly closed with a lid.

Various jars, vases and bottles wrapped with thick threads and ropes are often an integral part of the kitchen design. Old CDs frame windows, furniture, paintings and walls. They create a mosaic from broken dishes and decorate tables, an “apron” over a stove or a window with it.
The cutting board can be easily converted into a tablet holder. It is necessary to glue a small wooden or bamboo plank with wood glue to the bottom of the board. On the reverse side of the stand, you need to attach a triangular support. Then it is desirable to paint the device.


Under the towel holder, you can adapt a regular grater by hanging it with the handle down. In the inner part it is recommended to make a wooden bottom. You can store spatulas or a bouquet of flowers in it, and hang a towel on the handle.
Unusual vases, jugs, artificial fruits and vegetables often decorate kitchen cabinets and tables. Models are purchased in stores and make up all sorts of compositions on their own. You can make your own fruits and vegetables from wax, plastic, or fabric with foam rubber.

Origami created by one's own hands fits perfectly into any interior. The whole family can be involved in the manufacture of paper fish, birds, animals, flowers. You can weave a small basket out of paper strips to store keys, matches or other little things in it.
Kitchen renovation is a time-consuming, nervous, doubtful process, therefore, when it ends with a positive result, every housewife has a desire to turn this hard-won decor into a unique and cozy nest. This can be done in many ways, but real needlewomen and keepers of the family hearth believe that there is nothing more unique than decorating the kitchen with your own hands. Only in this case, you can be absolutely sure that you will not meet a close friend of a similar beauty and convenience of the interior.
beautiful writing on the wall in the kitchen
The space of the kitchen allows itself to be decorated with a wide variety of techniques, however, in the process of transformation, such changes must certainly be made, such as:
- Changing the background of the walls and their additional decoration.
- Correction of the appearance of furniture.
- Kitchen apron decoration.
- Changing or decorating curtains.
- Decoration of the kitchen table and chairs.
- Home appliances decoration.
- Filling the interior with various decorative elements.
With this approach, the interior of even the most nondescript kitchen will amaze with its magnificence.

decor of an open wall shelf in the kitchen
How to decorate the kitchen with your own hands?
If you don't shine with special talents in needlework, then try decorating your kitchen with borders. They can be put on the edge of the tile or just on the wall. Borders can be different in their shape and color. Their beautiful pattern can decorate, for example, a window or lockers. Take small pieces of glass mosaic or multi-colored tiles and try laying out borders around the edge of a window sill or table.
Decorative elements of such a plan can also look like embroidery, so that they can also decorate tablecloths or towels.
Get your kids involved in the creative process. Toddlers will certainly enjoy creating a wall panel from colorful mosaic pieces or drawing something “delicious” on a sheet of paper, which you then turn into a real picture.

refrigerator decorated with a beautiful floral print
About floors
You can update the kitchen, make it beautiful, and simply restore the old floor. The option of replacing worn-out boards with new ones, made of hard and high-quality wood, is not affordable for many today. But after all, shabby floors are not at all aesthetically pleasing, and how to decorate the kitchen with your own hands in this case?
If the floor is not yet in a catastrophic state, then it can be sanded and stained, in other cases it is worth changing flooring. There is no need to be smart here. Use linoleum or laminate, by the way, the latter imitates wood mass with great success.
You can close the floor in the kitchen with carpet or hand-woven paths.

the inscription on the wall in the interior of a vintage kitchen
About the walls
In your kitchen, you are free to do whatever you want, so the walls in it do not have to be left plain either. You can decorate them with paintings, drawings, patterns. This is easy to do, even if you do not have artistic talents. You just need to pick up a stencil and paint, or even easier, use vinyl stickers.
If the kitchen was originally “dressed” in plain tiles, then this mistake can be easily corrected. To quickly and inexpensively transform it, a self-adhesive film with cheerful colors will help. Make a stencil on the existing tile and cut the blanks from the film. Now stick them on the tiles in random order. You can complicate the process and figure out how to decorate the kitchen with a do-it-yourself film drawing. This option will require much more time to implement, but the result will be amazing.

unusual solution: wall decor with chairs
About household appliances
A small restyling can also affect your household appliances. This will help to better fit it into the atmosphere of the updated kitchen.
Stickers and other textured materials will also come to the rescue here. The doors of the refrigerator, for example, can be hidden behind a wooden lining. This is a great way to remove metal surfaces from decor. In general, the free surface of the refrigerator body makes it possible to run wild fantasies. With certain skills, it can be painted with acrylic paints. For those who are very far from drawing, there are funny magnets, which can also easily decorate the surface of any household appliance. This move is incredibly uplifting.

the inscription will turn the most ordinary refrigerator into a unique piece of decor
About the tabletop
An old countertop is also not a reason to run to the store. Although it is covered with stains and scratches, you probably won’t change it, because you know exactly how to decorate the kitchen with your own hands in this case too. That's right, you can attach a plywood sheet over the countertop and lay it out in a mosaic pattern. You can laminate the damaged surface or hide it under a beautiful oilcloth. The last option is the least practical, but progressive. Frequent change of oilcloth will allow you to regularly update the decor.

beautiful kitchen utensils in the interior
About kitchen cabinets
That's where there is an opportunity to play out fantasies when decorating the kitchen, so it's on the surfaces kitchen cabinets. They are really the easiest to make. Put a little effort and old cabinets will find new life. Sand the facades, putty them and just paint them in some trendy color. Today, eggplant colors and shades of lime green are at the peak of popularity. New colors will add style to the decor of the kitchen.
How else can you decorate furniture in the kitchen with your own hands? Try using the decoupage technique. She will breathe new energy into an old set and give the atmosphere a special charm. You can decorate the kitchen using materials such as:
- Decorative photo wallpaper.
- Stencils.
- Self-adhesive films.
- Vinyl stickers.
- Textile.
The latter can also perfectly update the facade of cabinets and decorate the interior.

unusual handles for kitchen cabinets
About lighting
“When deciding how to decorate kitchen lamps with your own hands, remember the purpose of the room and use any “delicious” motifs.
For some, this may be a revelation, but lighting a room is also a way to decorate it. And in this case, the lamp has a dual role. It, of course, must have a presentable appearance, fit into the style, but above all, exude streams of light that are “correct” in terms of direction and power. For example, a bright directional light is needed in working area, but the table may well remain in the twilight. As you can see, the functionality and aesthetics of the kitchen space is directly proportional to the lighting.

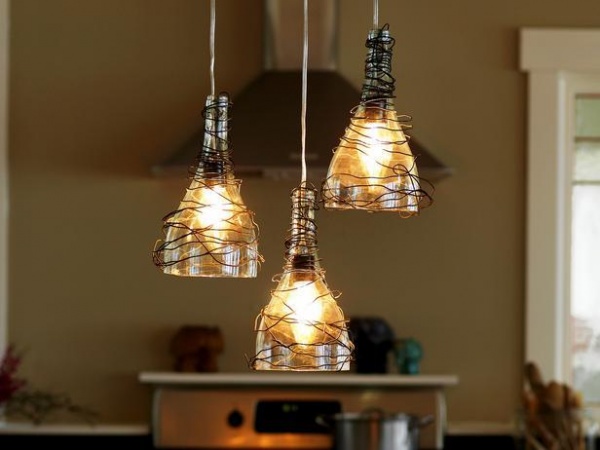
to create a creative kitchen, just hang lamps in the shape of a bottle
Any type of lamps in the kitchen can be used:
- Suspended.
- Embedded.
- Wall.
If possible, be sure to add additional lighting along the cabinets and do not refuse a pendant lamp. Without it, it will be difficult to create a single space in the kitchen.
When deciding how to decorate kitchen lamps with your own hands, remember the purpose of the room and use any “delicious” motifs. For example, cherries or a bunch of grapes may appear on a sconce, and butterflies and bees on a chandelier.

green patterned wallpaper
Stylistic changes in the appearance of furniture
Sometimes the situation does not give us the opportunity to throw away in one fell swoop old furniture to the landfill and furnish your kitchen with a trendy set. And is it necessary to do so? Can it be much more practical to give a rebirth to furniture that has served faithfully? It is quite real to saddle, and you can not only decorate the facades, but completely change the style of your furniture in accordance with general design decor.
Before you get started, look around and think about how you can decorate the kitchen with your own hands in the most stylish way.
If the country direction is clearly traced in the design of the kitchen, then decorate the furniture in the spirit of patchwork. Particular attention should be paid to color harmony. Are your walls pasted over with a film imitating a log house? Excellent! Furniture facades can be safely decorated with a film with a wicker vine pattern. The kitchen in a modern high-rise building will instantly look like a real village hut. In general, working with film is beneficial in all aspects. A wide range of patterns at low cost and ease of use is the best advertisement.

the print “revived” the monochrome facade of the white kitchen
Your kitchen shines with elegance french style? Make furniture fronts light, ideally white, and decorate them with gold and silver inlays. You can easily find everything you need for this in hardware stores.
How to decorate a very old kitchen with your own hands? Furniture can be turned into a stylish vintage accessory that will be indispensable in a Provence style interior. Just sand the frame and artificially add antiques by applying gilding or patina to the surface.
You can completely modify the headset with the help of decorative glass overlays. Glass inlays are often decorated with beautiful frost-like patterns. You can also use mirror inserts for the same purpose, which, in addition to the decorative effect, have the ability to expand the space, which will not be superfluous in any kitchen.

bright kitchen: decor of the kitchen facade with multi-colored pvc film
Decorative elements for decorating the kitchen
Decorative kitchen utensils are designed to fill the kitchen interior. These things include:
- Painted plates.
- Cutting boards.
- Wooden spoons.
- Themed porcelain figurines.
- Towels, etc.
All these accessories can be purchased in modern stores, and many of them will be really self made, but how do you want to decorate the kitchen with your own hands! Therefore, it is worth trying to make such items yourself using stained glass paints, then the drawing will be exclusive and you will definitely get pleasure from the process.

kitchen walls decorated with beautiful plates
You can decorate the kitchen with old forks and spoons. Try to bend the fork in an arc and make a rocker “goat”, a sign of victory or other compositions out of its teeth. By screwing such a “masterpiece” to the wall, you will get excellent hangers for potholders and towels.
After the visit of guests and happy holiday you are left with empty bottles of fanciful shapes - attach them to the case. Stock up on acrylic paints, twine, buttons, glue and create original inscriptions from all this. Give your kitchen a say, let it speak.
How to decorate the walls of the kitchen with your own hands, the old wallpaper will tell you. Cut out the flowers or interesting compositions drawn on them and make a panel out of them. Cover the resulting pattern with a thin cling film, and do it very carefully so that there are no wrinkles. We open the resulting semi-finished product with a thick layer of varnish and leave to dry. Then we repeat the process. Again we impose a ball of flowers, hide them under the film and fix them with varnish. You can make as many layers as you like. The resulting creation is framed.

panels in the interior of the kitchen
Let's return to the wine and vodka theme. In addition to bottles in the decor, you can also use corks from them. Natural corks are especially valuable, from which you can create a lot of useful devices. . How exactly can you use them to decorate the kitchen and what can you do with them yourself? Well, for example:
- Panel.
- Reminder board.
- Tray.
- Hot stand.
- Watch.
Cork can also be used for floor and wall finishing.
Tea lovers will appreciate the idea of making tea bag holders. This is a convenient, useful and eye-pleasing device that is easy to make using clothespins, paints and colored paper.

beautiful coasters for hot dishes
How to decorate windows
You can write treatises on options for decorating a kitchen window, but the lion's share of such proposals was developed by curtains and accessories stores. If you don't like trivial finishing methods and you're ready to get into making accessories yourself, then the following tips can help you a lot.
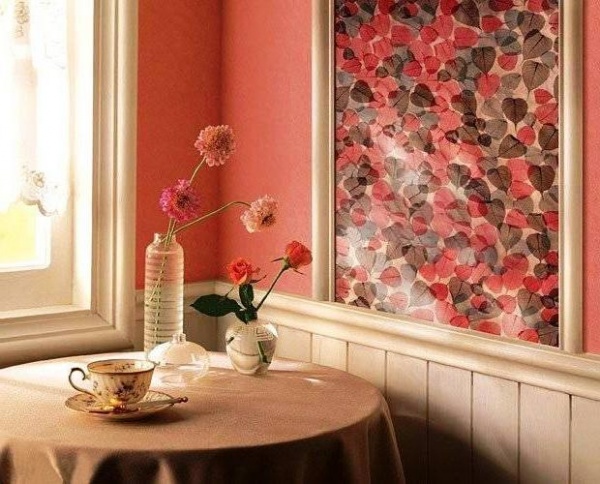
The most common way to design a window is its landscaping. Put on the windowsill houseplants in beautiful pots, which can be painted in an unusual way to decorate the kitchen, or generally do it yourself from the materials at hand. Old unsightly pots can be entangled with twine, decorated with buttons, shells, unusual pebbles, or pasted over with leaves.

window decor
In addition to plants, candlesticks, figurines, photographs in original frames and other eye-catching objects can be placed on the windowsill. Any accessories can act as these items. It all depends on your design plans. Old earthenware jugs, a great-grandmother's iron on coals, a copper samovar shining with polished sides, beautiful, but already somewhat worn-out plates, will look great in country or Provence decor. With such decor elements, your kitchen will turn out to be unusually colorful.
Particularly advanced decorators generally do not think for a long time how to decorate the kitchen, and with their own hands turn the window sill into a real ART object. They paint an old tree, use decoupage in their work and do many other unimaginable things that turn kitchen window into a bright accent interior spot.

textiles as table and chair decor
And how to decorate the kitchen with textiles in an original way and what can you saddle with your own hands? It is natural to create unique curtains, in ruffles and frills, with unusual tiebacks. For curtains, it is better to pick up light airy fabrics, such as chiffon. In addition to curtains, housewives may well sew bright potholders, cushions for chairs or covers for stools. The main thing is that the rest of the textile is in harmony with the main element - curtains.
AT modern decors modern curtains are required. Roman curtains, decorated with photo printing elements or ornate ornaments, are especially popular today. Such curtains do not "steal" the space, on the contrary, a successful drawing can make it endless, leading into the distance. In addition, the material of Roman blinds is easy to care for. It can be washed indefinitely, which is important for a kitchen.
There is no better way to emphasize the modernity of the situation, how to decorate the kitchen with hand-made items from specific textiles. To do this, you need to use fabrics of pearl or steel shades with a matte, smooth and certainly flowing texture.

Austrian curtains and a long tablecloth will create a cozy atmosphere in the interior of the kitchen
Of course, tablecloths will help to convey the spirit of the Renaissance. Delicate, in pastel colors, tassels, going to the floor, they look incredibly harmonious with the same curtains and furniture upholstery.
Having chosen the style of ancient centuries, you will have to take into account all aspects of the then situation and choose the right decor elements. In spacious kitchens, when trying to convey the features of the life of the eighteenth century, you need to make an extravagant and magnificent design. In small rooms - it is better to stop at the strict lines of Roman architecture. How to decorate too “correct” kitchen decor at no extra cost, with your own hands? Of course, arches and various columns, which will also change the visual perception of space.
When the kitchen furniture is dilapidated or simply no longer like it, do not rush to buy a new one, because, most likely, you can update it yourself. All you need for this is a couple of free hours or days, a thoughtful rework idea, some money and one of our instructions.
Method 1. Painting the kitchen with chalk paint
Do you want to update yourself kitchen set beyond recognition? The best way to do this is to repaint the facades with chalk (mineral) paint. Why chalk?
- The fact is that this type of paint has a thicker consistency and increased adhesive properties, due to which it fits perfectly on any surface - even on laminated chipboard / MDF. Moreover, chalk paints allow you to do without tedious sanding, and sometimes even without a primer.
Chalk paints are also good because they give the painted surface a texture similar to that obtained when painting. wooden surface. Therefore, even the most ordinary kitchen with film facades after such an “update” will look much more noble.
- In Russia and the CIS countries, you can buy chalk paints from designer Daria Geiler, foreign manufacturer Annie Sloan, Kazakhstan's "Vernenskaya Manufactory" and others. You can also make chalk paints with your own hands according to recipes that are easy to find on the Web.
Here are some photo examples of kitchens before and after restoration.
Photo of a kitchen with film facades before and after painting with paint by Daria Geiler. Here, the author of the alteration restored the peeling film on the facade near the stove, and then painted the furniture without removing or sanding the film.

An old veneered kitchen before and after Annie Sloan paint. By the way, in this kitchen even the tiled floor was painted with chalk paint, and the patterns on it were painted using a homemade stencil


Inspired? Then it's time for the master class.
To paint the kitchen you will need:
- Primer (special for chalk paints or alkyd if the furniture was painted with oil stain);
- Chalk paints (preferably with a 10% margin);
- Matte moisture resistant varnish (acrylic or polyurethane).
Helpful Hints
- The consumption of materials is calculated following the recommendations of the manufacturers. It is especially important to correctly calculate the consumption of paint. If it is not enough, you will have to repaint the remaining areas with paint from another batch, which, due to the nature of production, will differ slightly in tone.
- Which varnish is better - polyurethane or acrylic? In order for the kitchen coating to withstand extreme loads, it is more reliable to use polyurethane varnish. However, if you don't cook often and don't have pets, acrylic varnish is great, especially since it dries faster, doesn't have a strong smell, and is cheaper.
- Brushes: two synthetic brushes for primer and varnish, as well as one natural or synthetic brush about 4 cm wide (a natural brush gives a more pronounced texture);
- Degreaser, for example, white spirit;
- Sandpaper with a grain of 100-180 microns;
- Ladder;
- Film and masking tape (to protect non-painted parts);
- Screwdriver;
- Gloves.
How to paint a kitchen set:
Step 1. Preparation
First you need to remove the handles from the facades. The floor, walls, backsplash, countertop, glass inserts, fittings and other surfaces that you do not want to paint should be covered with film and masking tape. Next, clean all parts from grease (preferably with a degreaser), stains and dust.
- Should the facades be removed? It is not necessary to do this, but it is more convenient to paint this way.

Step 2: Priming and/or sanding
It is not necessary to sand the old paintwork, film or lamination, but it is necessary to prime it in 2 layers. In this case, each layer of the primer must be allowed to dry, and then the primed surfaces should be treated with sandpaper to level the coating and enhance the adhesion of the paint.
- However, if the lamination has a strong gloss, then it is advisable to remove its upper shiny layer with fine-grained sandpaper - this will make the coating even stronger.
- If you are not too demanding on the result (for example, if the kitchen is temporary, very old or got for free), then you can do without a primer. All you need to do is: wash the fronts of grease, then paint them in 2-3 layers and finally cover them with 1 layer of varnish.
- Do you want to achieve the most even and durable coating? Then it is worth sanding the surfaces after each layer of primer, paint and varnish (except for finishing layers).
- Before starting work, test the paint on any object.
- If you want to save money, paint only the facades and visible parts of the frame, and the inner walls and shelves of cabinets can be painted with paint cheaper or left unchanged.

Step 3. Coloring
Once the primer is dry, start applying 2-3 coats of paint, letting each coat dry completely (one coat of chalk paint only takes about 30 minutes to dry).
- It may take 5-6 coats to cover a dark white paint finish.
Step 4. Lacquering
When the final layer of paint is dry, you can start applying varnish in 2-3 thin (!) layers with a synthetic brush (not used). In this case, it is desirable to allow each layer to dry completely for about 24 hours.
Step 5. Finally, we return the fittings and facades to their places.
Voila, the old kitchen is as good as new!

Method 2. Pasting facades with self-adhesive film
The fastest, cheapest and easy way restoration of kitchen furniture - decoration of its surfaces with self-adhesive film (self-adhesive wallpaper). Unlike staining, gluing a film is also good because it allows you to return the look of the kitchen to its original state after a while. For those who live in rented apartment or just loves change, this way to update the kitchen will help out with a bang.
- The service life of furniture pasted over with a film will be 2-3 years in good condition.
- Most of all, this method of alteration is suitable for kitchens with solid facades without panels and relief details.
Below are photos of the kitchens before and after film restoration.


You can only partially cover the kitchen with foil. For example, one of the tiers, the back of the headset, plinth or panels. Examples of such a remodeling of the kitchen are presented in the following selection of photos.


If the facades of your headset have glass inserts, then you can only wrap the back walls of the cabinets with foil.

Patterns and drawings can be cut out of vinyl "self-adhesive".


By the way, you can update the apron, the table top of the headset or table and appliances with the film.


If the refrigerator is not built into the set and does not fit into the interior of the kitchen, just paste over it and the facades of the furniture with a film of the same tone


To remodel your kitchen you will need:
- Vinyl self-adhesive paper (with a margin);
- Sharp scissors and dummy knife;
- Ruler and centimeter;
- Squeegee for smoothing with a hard and soft side;
- Rags without lint.
- Screwdriver.
How to glue the kitchen with self-adhesive film with your own hands:
Step 1. Using a screwdriver, remove the handles from the facades, if you wish, you can remove the facades themselves - it will be more convenient to glue them.
Step 2. Wipe all surfaces, including the ends (!) clean and dry, paying special attention to greasy deposits - it is better to remove it with a degreaser.
Step 3. We begin to glue the film. Remove part of the substrate from the film and attach the canvas to the facade, leaving free 3-5 cm on top and side - we will wrap these excesses later on the edges. Take a squeegee and start smoothing the film, expelling bubbles, gradually going down and peeling off the backing. Movements should be smooth and slow. Having reached the lower edge of the facade, step back from it 3-5 centimeters and cut the canvas.
- If desired, you can pre-cut the canvas to the size of the facade with an allowance of 2.5-3 cm (for facades of standard thickness).
- The film fully sets only after a few hours, so do not be afraid to make a mistake - all flaws are correctable.
- If small bubbles remain on the film, they can be gently pierced with a thin needle and smoothed out again.
- Available in 2 colors for a stylish contrast: light top vs. dark bottom.
Step 4. Now that the facade is almost completely pasted over with a film, let's take care of the edges and corners:
- First, cut the corner part of the free film at 45 degrees as shown in the photo below. Thus, you will get two "wings" along the two edges of the facade.

- Now carefully wrap the free edge of the film on one of the edges and smooth it. Next, wrap the remaining corner on the adjacent edge of the facade as shown in the next photo, and cut off the excess.

- In the same way, decorate the second edge with a film, but this time cut the corner at a right angle.

- Finally, press the seams tightly and repeat the procedure with the remaining corners.

Step 6. In the described way, glue over all the front parts of the headset, visible parts of the frame and the plinth with a film. If desired, you can decorate the shelves and inner walls of the cabinets with vinyl. However, it is not at all necessary to do so.
Step 7. On last step put back the facades if you removed them, as well as the handles, by making holes in the right places with a knife or an awl.
Also, a visual master class on how to paste over the kitchen with self-adhesive film can be viewed in this video.
Method 3. Kitchen decoupage
Hand painting is very beautiful, but difficult or expensive. But even a beginner can decorate boring facades of a headset or hide local damage (scratches, chips, spots, etc.) with drawings created using the decoupage technique. In this case, the result is guaranteed to be excellent! We offer kitchen decoupage ideas in the next selection of photos.


Decoupage kitchen in shabby chic style


Buffet decoupage
Decoupage will help decorate not only the facades of the headset, but also other kitchen furniture and even appliances.


For work you will need:
- Three-layer napkins with a pattern or decoupage cards;
- 2-3 flat squirrel brushes (for applying glue and drawing on glue, as well as varnish);
- Scissors;
- PVA glue;
- Pencil;
- Acrylic varnish (matte, glossy or with craquelure effect).
- For do-it-yourself kitchen decoupage, decoupage cards are more suitable than napkins - the drawings on them blend perfectly with each other and can be large in size.
- The main thing in remaking furniture using decoupage technique is right choice drawings. They should fit into the interior of the kitchen in color and style.

How to transform the kitchen using decoupage technique:
Step 1. First you need to degrease the selected place with alcohol or a degreaser.
Step 2. Carefully separate the layer with the pattern from the napkin, then cut out the desired print from it. At this stage, the drawing can be “tried on” on the facade and at the same time make a note where it should be located.
Step 3. Now we grease the reverse side of the cut out pattern with PVA glue and apply it to the facade in the right place. Next, gently smooth the napkin with a brush, moving it from the center to the edges, and blot the excess glue and remove it with a slightly damp cloth.
Step 4. Glue all the remaining napkins in the same way.
Step 5. If desired, the decoupage of the kitchen can be finalized by hand painting. When the glue and paints are dry, the pattern can be sealed with acrylic or polyurethane varnish in 2-3 layers (let the pattern dry completely between layers).
Some more useful information
- Wanna turn minimalist kitchen with solid fronts classical? This is possible if you glue moldings or carved parts on them, and then paint them following our instructions.

Also, before painting, the headset, wall cabinets can be supplemented with curly brackets (you can buy them ready-made or cut them yourself), and the base with baluster legs.


- For the best result, it is worthwhile to approach the “update” of the kitchen in a complex way and, if necessary, change not only the color of the facades, but also countertop With apron , curtains, dining table and chairs.
- Sometimes the desire for change can only be satisfied by replacing / painting furniture handles.

- Of course, before painting the kitchen or pasting it with vinyl, it needs to be repaired: tighten / change the fittings, glue and iron the peeled film a little, polish the scratches, and fill the chips, cracks and holes from the furniture handles with furniture putty.