
Tips for making a floor vase with your own hands. How to decorate a vase with your own hands - decor ideas How to make a tall vase with your own hands
Of course, decoration plays the main role in the design of the room. But at the same time, do not underestimate the importance of decor. After all, with its help you can focus on the chosen style, give comfort to a particular room, or simply fill in the empty space. Decorative products of our own production look especially original in the room. For example, large handmade floor vases will help you show your individuality and sense of taste in decoration.


Floor vases: rules for choosing and decorating
Whether you buy a finished product or want to make it yourself, it is important to clearly understand what style you need to follow. After all, the room should be as harmonious as possible. And this is achieved not only by the choice of furniture, but also by a suitable decorative design.


 If you adhere to minimalism, then the most successful solution would be a vase with laconic forms with minimal decoration. Concerning colors, then it should be restrained. Classic white, black and red colors in this case will be the most suitable. However, if you have purchased a transparent vase, then you should not be upset. After all, it can be painted with acrylic paints.


Not everyone likes the classic style in the interior. But if you like it, then you probably know that the decor can be not only with a pattern, but also as concise as possible. Therefore, choose a vase that will emphasize your room or the house as a whole.


Not to mention the Art Nouveau style. This is a rather interesting direction, which is becoming more and more popular. In this case, you can safely choose a vase made of wood or with a metal finish. This design looks amazingly beautiful, but at the same time restrained.


Avant-garde lovers know that this style involves the presence of unusually shaped objects in the room. Take a closer look at the original designer vases. Often in specialized stores such options are presented. If desired, you can even turn a simple glass vase into a decor that fits perfectly into such a room. Just enough to color it. bright colors inside or outside. But in this case, you must definitely leave it for a day until it dries completely.
DIY floor vase decor
Of course, floor vases differ from the usual ones in their size. Often these are quite large items. Therefore, making them yourself can be difficult. In this case, we recommend paying more attention to the decor. This requires no less effort and imagination. But rest assured that the result is really worth it.


Perhaps the easiest way to decorate a vase is to paint it with acrylic paints. To do this, you will also need varnish, brushes and adhesive tape or stencils. Before work, it is imperative to protect the work surface, so we recommend placing sheets of paper or newspaper on it. Only after that you can start working.
First you need to paint the vase in White color. This will create a kind of background against which the pattern or decor will stand out much brighter. If necessary, two or three layers can be applied. Also, be sure to wait for drying, so as not to spoil all the staining. Next, apply a stencil to the vase or stick adhesive tape in vertical lines. Paint the intermediate space with a contrasting paint. After the stencil or tape can be removed, you will get a really stylish and original vase.
Recently, eco-decor has become quite popular. Absolutely everyone can decorate a vase in this style. To do this, you just need to prepare even cuts of branches. Treat them with sandpaper so that there are no rough edges. After that, you need to glue them on the vase in random order. Agree, the process is quite simple, but the result is worthwhile.


Enough unusual design floor vase always looks advantageous. In this case, we recommend using coins. Of course, you first need to prepare a vase. That is, paint in a suitable shade and wait for complete drying. Only then can you start next step. Using a small amount of hot glue, we fix the coins on the surface of the vase, making small indents.


In fact, pieces of a mirror, small pieces of wood, mosaics, shells, and more can be used for this. It all depends on your imagination and willingness to experiment.


If you are looking for a simple vase design option, then use twine or a not too tight rope as decoration. Just wrap a vase with it and fix it with glue. Despite the simplicity of execution, such products always attract attention and raise questions from guests.


In the cold season, thematic decor looks great. To do this, you can use an unnecessary knitted sweater. Depending on the size of the vase, cut off the sleeve or another part of the sweater. If necessary, you can sew the parts together. The result is a very beautiful, cozy decor for a floor vase with your own hands.


By the way, it is not at all necessary to decorate the vase from the outside. Fill the transparent product with sand, shells, various twigs, pebbles or even beads, wine corks. Each of the options looks original in its own way. Often sticks, artificial flowers or cotton twigs are placed in such vases. You can also decorate the composition with a garland. In the winter season, this indoor decor looks amazingly beautiful.


Floor vase in the interior


Absolutely everyone can decorate a floor vase with their own hands. It does not require special skills, experience or knowledge. Get inspired by ideas, view various master classes and be sure to try. This is the only way to create something truly worthwhile.
Tags:A floor vase can become one of essential elements home decor. At the same time, you can even make it with your own hands from different materials. If you know a few tricks, the product will turn out no worse than the store. Ready instructions and design examples - about all this right now.
A floor vase can become one of the most important elements of home decor.
Before proceeding with the manufacture of this interesting work, you need to carefully look at the house and try to imagine:
- in which part of the vase will look best;
- what tones and decor elements should prevail in the finished product;
- what flowers and others ornamental plants(twigs) are optimally suited;
- finally, how large a vase needs to be made so that it looks especially good in the interior.
In fact, it’s enough just to “see” the future vase well in your imagination. And to make it easier Here are some ideas for inspiration:
- First of all, it is better to determine the size in advance. A vase looks appropriate when it roughly matches the size of the surrounding furniture. For example, it should rise slightly above the sofa or chairs.
- You can choose between rounded and original versions. Calm, symmetrical edges are best chosen to create a peaceful atmosphere. And if you want to enliven the space, it is better to make a vase with an original, curved neck, interesting drawings and decorative elements.
- As for the color scheme, it is best to make sure that your masterpiece stands out well against the background of the floor, furniture, wallpaper. Otherwise, the vase will literally merge with the rest of the items.
Do-it-yourself floor vase from improvised materials (video)
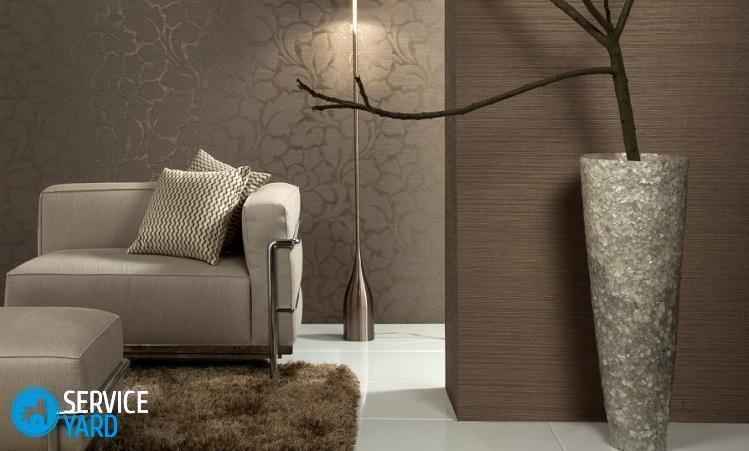
Choosing decorative branches for a floor vase
The main decor tool that can be put in a vase is decorative branches. A variety of decorations are used - and it is not necessary to choose branches of the same type. Can and often should be combined different variants for more original compositions. Here are a few of them:
- Combinations of black and light brighten up the space significantly due to the contrast effect. This gives a light, pleasant look and looks especially advantageous in combination with backlighting.
- It has long been a fairly common technique when decorative balls are attached to branches. Here you can choose exactly light products, because on occasion they can be painted in any color, and then the composition will take on a new life.
- Multi-colored, wavy branches, collected in a bunch, are in many ways similar to beautiful flowers, collected in a bouquet. And if you put them close to each other, it turns out very beautiful view- like fireworks.
- Finally, branches with leaves or small, bright flowers look very good. They will be appropriate in any kitchen, as they create a very cozy, natural environment.
ADVICE
To create your own unique interior, homemade branches are also perfect. If you collect a few dry branches, clean and dry them further, and then paint them with spray cans, this will not only reduce the cost of the process, but also create much more scope for creative imagination.
 The main decor tool that can be put in a vase is decorative branches.
 Making a floor vase from waste material with your own hands
Making a floor vase does not necessarily require special skills or special materials. Experience shows that even from waste material you can create a very decent product and decorate it so beautifully that it will be easy to confuse such a vase with glass or ceramic.
In the manufacture of a floor vase, you can even use improvised materials that can be found in any home:
- cardboard tubes;
- pipes from linoleum;
- PVC pipes.
In this case, it is better to take cardboard material because it is very easy to work with. Of course, you can’t pour water into such a vase, but it looks great as a decoration in the house. You will need the following materials and tools:
- actual cardboard tube;
- cardboard for the manufacture of the case;
- a piece of drywall or chipboard for the bottom;
- ordinary PVA glue;
- pieces of old newspaper for papier-mâché;
- paint for applying glue;
- knife and scissors;
- 7-8 egg yolks;
- putty;
- sandpaper;
- compass, ruler, pencil.
 Making a floor vase does not necessarily require special skills or special materials.
 - The most important thing is to determine the height of the finished product. As a rule, the vase should turn out to be at least half a meter, and usually a height of 60-70 cm is chosen. It is according to this landmark that you need to cut off a piece of cardboard tube - the basis of the future craft. It is better to do this with a sharp knife, and the incision must be taken obviously 2-3 cm more, and then simply trim the edges.
- Now you need to make a bottom. There are two options here - you can use drywall, or you can take plywood. But in any case, the surface must be sufficiently even so that the product rests confidently on the floor and does not stagger. The circle is first drawn with a compass, and then cut out. In size, it must be obviously larger than the diameter of the pipe (by 4-5 cm). Attaches to the base with glue.
- Now comes the most important and lengthy stage. You need to take several sheets of cardboard (they can be obtained by unfolding large carton boxes), which should be at least as long as the height of the vase. They draw a contour of identical blanks that will give the vase volume - that is, you need to cut out up to 20-30 identical parts that completely repeat the bend of the product.
- And 4 more blanks are cut out together with handles (if the craft provides for such an insert).
- Details with handles are glued on each side, 2 pieces, and the rest are glued at a distance of literally 1 cm from each other. This will provide an attractive appearance and reliability of the whole structure.
- Next, you need to wait a few hours so that all the workpieces adhere well to the surface. At the same time, it is better to check again how firmly they are stuck.
- In the meantime, you need to make a lot of newspaper pieces, smeared glues - you have to make a surface using the papier-mâché technique. It is important to keep in mind here that it is better to make several layers so that the paper lies as tightly as possible.
- Then the egg yolks are mixed with PVA and the entire surface of the workpiece is washed thoroughly, thickly.
- Now you need to wait again until it dries, and put a layer of putty.
- And when the putty also hardens, carefully treat the surface with sandpaper.
- The last stage of work is the most interesting and truly creative. You need to draw a picture or just put a layer of paint from an aerosol can. And now the masterpiece is ready to please the eye.
Gallery: floor vases (50 photos)
How to make your own fabric vase
Now you can consider another manufacturing option - a vase can be made from fabric. For this you will need the following materials:
- the basis of the design is a terry towel (a woven napkin is also suitable);
- cement and sand;
- two standard 10-liter buckets;
- water;
- polyethylene film.
NOTE
It is better to work in disposable rubber gloves so as not to damage the skin by the action of the cement.
The manufacturing technology is very simple:
- First, cement is poured into the bucket (literally half a kilogram) and water is gradually added until a consistency similar to liquid sour cream is obtained.
- A towel or napkin is dipped into this solution, and it is important that it is completely soaked.
- Now this napkin is placed on an overturned bucket to dry completely. First you need to completely cover this bucket with plastic wrap so that the towels do not stick to the surface.
- The bottom surface is carefully smoothed, and the falling folds can simply be straightened out.
- The bucket is taken out into the street or placed on the balcony to dry during the day.
In fact, the floor vase itself is already ready. However, you still need to try to make the surface really beautiful and attractive. To do this, we act as follows:
- They take 300 g of cement and sand, add one pinch of plaster and dilute the mixture with ordinary wallpaper glue (15%).
- Using a brush with this solution, you need to carefully cover the entire surface of the workpiece.
- And you can also initially add any acrylic paint to the solution and at the same time paint the craft with processing.
How to weave a floor vase from paper tubes (video)
How to make a large floor vase from burlap with your own hands
And another quite affordable option is to make a floor vase from burlap. For this, you can even take old stuff, and also You will need the following materials and tools:
- PVA glue or "Moment";
- rope (twine);
- cardboard tube;
- molar tape;
- scissors;
- ball pen.
The sequence of actions is as follows:
- In this case, the main product is also a cardboard tube. It is cut to the desired height, all edges are carefully aligned.
- On all sides, the surface is pasted over with molar tape, so that in the end each area becomes quite sticky.
- Twine is sequentially wound onto the tape - it is better to start from the inside. Then the workpiece will look very neat.
- And in the meantime, quite a lot of decorative elements need to be made from burlap: roses from circles with a diameter of 8-10 cm and leaves (also about 8 cm each, and it is better to highlight the veins and petiole with twine).
- Having presented and drawn a drawing in advance, paste over the vase with roses and leaves.
ADVICE
This craft turns out to be especially cozy due to the peculiarities of the surface texture. If you make a small copy of a vase, you will get an excellent case for combs, cosmetics and other pleasant things.
 Another quite affordable option is to make a floor vase from burlap.
 Decorating options for a purchased floor vase
If there is a purchased floor vase at home, this does not mean that the space for creativity is narrowing sharply. On the contrary, even a finished product can be decorated in such an interesting way that as a result of decoration it will look much more original.
How to decorate a glass floor vase
The glass vase offers a particularly rich range of creative possibilities, as the product is transparent and can be filled with different materials to create an original design. Here are some ideas for inspiration:
- spray paint coating - both in one layer and in several colors;
- decoration with artificial flowers;
- decorating with loose materials different colors(beans, peas, cereals;
- decoration with twine and textiles.
 The glass vase offers particularly rich creative possibilities, as the product is transparent and can be filled with different materials to create an original design.
 Unusual decor ideas for a finished floor vase
Here are a few interesting ideas for decorating the floor PS:
- decor using knitted clothes- by covering a vase or its individual elements with a sweater, you can create a very cozy atmosphere - such a vase looks especially good in the bedroom.
- Decorating with twine rope gives the same effect. You can not cover the entire vase, but only the neck or handles.
- You can stick roses, leaves, spirals, patterns and other decorative items made of dense fabric in warm colors on the twine.
- A vase covered with ordinary pasta looks incredibly beautiful and even mysterious, which then needs to be painted with an aerosol, stylizing the surface as metal.
- And if you want to stylize antique, you can decorate with coins, which are pre-painted in dark brown or golden tones - let such a vase attract wealth to the house.
DIY cardboard vase (video)
Thus, you can decorate the house with a beautiful floor vase in any case - both home-made crafts and purchased ones. The main thing is to have a good idea of the future look of the vase and, of course, stock up on inspiration.
Original do-it-yourself floor vases will help bring in surrounding interior a little personality and add to it a unique uniqueness.
You can make it from any waste material that is currently at hand.
Especially popular are high ones, made of cardboard, papier-mâché, newspaper tubes, plastic bottles, old carton box and so on.
Dry branches and artificial flowers will help to add elegance and originality to it.
It is such a decorative composition, which is complemented by branches or flowers, that will become a noticeable item in the house, it will definitely attract attention.
In the photos below you can see the most interesting floor vases, the manufacture of which is possible with your own hands from a wide variety of materials.
All that is needed to create a product is imagination, patience and, of course, an original idea, which the corresponding master class will help you find.
How to make your own floor vase
Before you start creating a floor vase from waste materials at hand, you should take a closer look at the surrounding interior and try to make it in exactly the same style.
After all, if this item harmoniously fits into the overall decor of the room, then it will sparkle with completely new colors, and the vase itself will not seem like some kind of foreign body.


So, for example, for a room made in a modern high-tech style, it is better to use an unusual style with a minimum number of colors and elements of additional decor.
For rooms in classical style Strict forms and similar shades are suitable, avant-garde design will complement the product in an original way with many curves and bright colors.
Very often, it is enough to simply change the design of an old vase, slightly change its decor with color - and this item will decorate the surrounding space in a completely new way.
In this case, you should show your imagination as much as possible and not be afraid to realize even the most daring ideas.
Of course, this requires finding old item and it is desirable that it be with a smooth surface.
Change the image of an old vase will help paints, coins, broken glass- in general, everything that can be nearby.

The main thing here is not to be afraid to experiment, because even the most unusual idea can help change an old object beyond recognition.
Some examples of the design of old vases can be seen in the photos above.
Well, if there is a desire to do something completely unusual and original with your own hands, then it is recommended to take a master class and begin to translate all your ideas and ideas into reality.
Probably everyone will find a lot of old and unnecessary newspapers in their pantry.
It is from this waste material that you can very easily make an original floor vase with your own hands, as shown in the photo below.

You will definitely need a lot of old newspapers, as well as paper glue, it is better if it is PVA, as well as a pot lid.
Such a decorative vase made of newspaper tubes, even though it is created in just a few hours, will become a real decoration of the surrounding space.
First you need to prepare a sufficient number of newspaper tubes. The bottom can be made from cardboard, or you can weave it yourself from newspaper tubes.
To do this, collect four bundles so that each of them has four bundles.
The photo below shows how to do it.

To do this, the bundles of newspaper tubes left from the bottom are bent up and braided in a circle with another bundle so that the leg is fully formed.
Now it is necessary to insert a lid from the pan between the formed racks and continue weaving. After about ten rows, the narrowing of the neck should begin.
At the final stage, it is necessary to carefully form the neck itself.
After the newspaper tube vase is fully formed, it must be covered with glue and clear varnish and allowed to dry. Next, you should carefully cut off the protruding remnants of newspapers.
To give a more original look to the finished product, you can make decor from any materials at hand. You can also use artificial flowers and dry branches for this.
Such a composition, which is complemented by artificial flowers, will give the floor vase a unique look.
The video below shows a master class on making a vase from newspaper tubes.
In the video above, you can see a kind of master class that will simplify the assembly of products from newspaper tubes with your own hands.
It should be noted that in exactly the same way you can make a floor vase from many other materials. So, dry branches, vine, rattan and so on are perfect for this.
Floor vase papier-mâché method
One of the most popular ways to make an original DIY floor vase is the papier-mâché method.
Surely, everyone took a papier-mâché master class at school at labor lessons, which means that there should not be any problems.
All that is required to create such an original vase is directly papier-mâché material (pieces of paper), glue, paints, clear varnish, and sandpaper.
So, first you need to take a blank that will help form the shape of the future product. It can be old boxes or plastic bottles of various shapes.

In this case, it should be remembered that each layer of papier-mâché should be thoroughly dried before the next one is laid on it.
After all layers of papier-mâché are completely dry, it will be necessary to process the frame of the future vase with a water-based base and let it dry well again.
For these purposes, it is better to use spray paint, which should be applied evenly in several layers.
After the surface of the papier-mâché floor vase becomes solid, you can start decorating it. Papier-mâché floor vase decor can be done in a variety of ways.
So, with the help of a sponge made of foam rubber and contrasting paint, original patterns are applied to its surface.
Also, to decorate the product, you can use broken glass or a mirror, various shiny objects, and so on.
At the final stage, you should open the vase with several layers of transparent varnish, which will help protect it from moisture. Give originality to the finished vase and dry branches.
More detailed master class how to create a papier-mâché floor vase with your own hands can be seen in the video above.
Interesting ideas for creating floor vases
You can create floor vases with your own hands from a variety of materials, there are no restrictions here.
For these purposes, dry branches, old cardboard boxes and even plastic bottles are used.
It is from plastic bottles that you can make truly decorative floor vases that will amaze with their originality.
A simple master class on creating a vase from this versatile material (plastic bottles) is presented below in the video.
To work, you will need two bottles of different sizes, glue, rope, toilet paper, and spray paint.
To begin with, you should carefully cut off their upper parts from both bottles, after which you need to put the smaller part on the larger one.
After that, several layers of toilet paper are applied to the resulting structure with glue. Then various ornaments are made from crumpled paper on a vase.
The finished vase should be opened with paint and make an additional decor. In order for the composition to have a finished look, dry branches or artificial flowers are inserted into the floor vase.
To create original floor vases with your own hands, you can also use empty cans, for example, from coffee, for example, as in the photo below.
Work should begin by cutting off the bottom from one of the cans, after which it is placed on top of the second can, and carefully fastened with adhesive tape.
The structure thus obtained should be tightly wrapped with a thin rope in several layers.

Everyone can independently perform this master class on creating an original floor vase.
In any case, a vase for the home can be created from absolutely any materials, for example, from branches, plastic bottles, cardboard, and even old dishes.
The main thing is to show your imagination as much as possible and not be afraid to realize even the most daring ideas.
Creating beautiful things with your own hands is a very exciting experience. By including handmade decor elements in the interior of your home, you will be able to decorate your home in an original way and save a lot on expensive items from designers. In this article we will talk about how a do-it-yourself floor vase is made, what is required for this, how it can be arranged.
The main rule that should be relied upon in the process of decorating the interior of a home is the correspondence of all details to one stylization. When making a vase with your own hands for a certain interior style, it is necessary to observe organicity and not spoil the overall picture.
Interior styles and their design
Today there is a wide variety of interior styles. Let's take a look at the most popular of them and look at how you can emphasize the individuality of a room with a DIY floor vase:
- Minimalism - you should give preference to laconic forms, modest finishes and restrained colors.
- Classicism - use symmetrical patterns, a light palette and traditional floral patterns.
- Hi-tech - apply modern materials. You can decorate a fancy-shaped vase with steel or glass.
- Kitsch - here you can forget about the rules and combine incongruous, different configurations and bright colors will help you with this.
- Modern - use abstract shapes and smooth lines, wood or metal will be appropriate for decoration.
- Art Deco - luxury style is created through the use of brown and gold tones.
- Avant-garde - think creatively, bright colors and unusual shapes will help you here.
Choose the size of the floor vase
Before you start making a floor vase with your own hands, you need to decide on its main parameters. One of them is the product size:
- The width can be chosen at your discretion, depending on the shape and style in which it will be performed.
- The height is in the range of 40-90 cm.
Important! A large vase placed on the floor is a spectacular addition to the interior. It looks unusual and is able to give the room a special charm.
Product shape
In addition to size, it is also important to choose a shape for it when creating a floor vase. The shape is chosen at your discretion, the main thing is that it is combined with the general style of the room in which the product will stand.
Designers call the following most popular forms:
- Round - such a product will succinctly fit into any interior. It is easiest to make it using the papier-mâché technique, taking an ordinary bottle as a basis.
- Square - will be appropriate in modern interior. The base can serve as a cardboard box.
- Triangular - it is better to make such a floor vase with your own hands using newspaper tubes.
Important! A vase can be oval, convex, elongated - its shape can be the most original and bizarre. Here everything will depend only on your imagination.
floor vase
Let's look at how you can make do-it-yourself high floor vases from a pipe. The master class will allow you to understand everything very precisely, how to create such an accessory. For manufacturing, a pipe made of hard cardboard (from linoleum) is used. You must determine the height of the future vase yourself.
So, you need the following to work:
- Cardboard tube.
- Silicone heat gun.
- Thick cardboard.
- Basis for a vase (a piece of OSB or fiberboard).
- Pen or marker.
- Putty.
- Scissors.
- PVA glue.
- Sandpaper.
- Acrylic lacquer.
- Old newspapers.
Sequencing:
- Measure and cut a piece of cardboard tube to the desired size. From a sheet of OSB or fiberboard, cut a circle that will serve as the bottom for the vase. Use a glue gun to glue the pipe to the base.
- Decide what shape your product will be, make a template. Cut out stiffeners from cardboard. Ideally, their number should be about 30 pieces.
- Using a glue gun, glue the cardboard blanks to the pipe. Try to glue in such a way that the distance between them is approximately the same.
Important! For convenience, markings can be made on the basis of a vase.
- Paste the resulting frame with pieces of newspaper in papier-mâché technology. Leave the completely glued vase to dry for 2-3 days.
- Mix PVA glue with putty to the consistency of thick sour cream, proceed to processing the product. Apply a uniform layer of putty to the frame, the thickness of which should be at least 0.5 cm.
- Thoroughly coat the entire surface of the vase. Try to make the surface as even as possible. Lubricate the neck no less carefully, processing also inner part vases to a depth of 5-10 cm - as far as the hand can get.
- Wait a couple of days until the product is completely dry, level the surface of the vase with fine sandpaper.
- Decorate the product at your discretion, paint, varnish.
Do-it-yourself floor vase is ready! Enjoy the results of your work.
Vase “Rope”
To make a decorative floor vase, you will need:
- Thick cardboard or plywood.
- Pipe from linoleum.
- Small deep container.
- PVA glue.
- Twine (any, most importantly - from natural material).
- Aerosol paint of any color, preferably acrylic.
Sequencing:
- Take a cardboard pipe and cut a piece of the required height from it.
- For the base, cut a circle out of plywood or thick cardboard. Make the diameter a couple of centimeters larger than the pipe itself.
Important! It is impossible to make a base of such a diameter as a pipe, because due to its height + the weight of the flowers in it, the vase may fall.
- Glue the base with universal PVA glue.
- Pour the glue into the container. Unwind the twine, dip it completely in the glue and wait until it is well saturated.
Important! It is undesirable to use synthetic twine, because it cannot be saturated with glue and will not be fixed on the product.
- Wrap the pipe with glue-soaked twine. If small gaps remain between the threads, it's okay, but it is advisable to wrap the pipe without them.
- Leave the product for a couple of days in a dry, warm place until the glue dries completely.
- Use a can of paint to paint the vase and leave to dry completely.
Important! It is better to work with paint outside of a residential building - on open balcony or street. Be sure to use rubber gloves and a respirator.
Vase with butterflies
From a piece plastic pipe you can also make a floor vase with your own hands.
To create such a product, you will need the following:
- Plastic pipe.
- PVA glue.
- Plastic cover for the bottom.
- Paper of different colors and weights.
- Paper napkins.
- Acrylic paint in black.
- Satin ribbon about 3 cm wide.
- Foam sponge.
- Acrylic paint in golden color.
Sequencing:
- Cut the pipe to the required height. If the size of the pipe suits you, then you do not need to cut anything.
- Using superglue, connect the main part to the bottom. Wait until the glue is well able to glue the parts together.
- Dilute the PVA glue with water (just a little, so that it is convenient to apply), and brush it on the surface with a brush. Quickly, before the glue has had time to dry, glue paper napkins.
- Wait until the first layer dries, then smear it with glue and make a second layer of napkins.
- While the napkins are drying, cut out butterflies from the ribbon, and leaves and blades of grass from colored paper.
Important! It will be much easier to cut out butterflies from a ribbon if you use a cardboard stencil. To do this, put the stencil on the tape, circle it along the contour and cut it out.
- When the layer of napkins is completely dry and you cut out all the details, proceed to fix them. Do this with PVA glue (not diluted). Glue the blades of grass with a slight slope, and place the butterflies in a chaotic manner.
- Wait until the product is completely dry. This may take approximately 2-3 hours.
- Take acrylic black paint and paint over the future vase well. For these purposes, it is better to use spray paint.
Important! If you use spray paint when decorating a floor vase with your own hands, then it is advisable to work with it on an open balcony or street.
- Take liquid golden paint, pour a little into an unnecessary container and use a foam sponge to apply the paint with dotted movements. Be sure to leave part of the black background - do not paint the vase completely with gold paint. But paint over everything with blades of grass (for this you can use a brush). After the paint has completely dried beautiful vase ready.
Important! It is better to put artificial flowers or dried flowers in such a product, but you can also experiment. Try using a quality adhesive and sealant to join the bottom and base of the pipe. If everything works out for you, then in such a vase you can draw water and put fresh flowers.
Vase “Gifts of nature”
You can also try to make a floor vase with your own hands, decorating it with decoupage elements and tree bark. Such a little thing can become a real decoration of your hallway or living room.
To make you will need the following:
- Plastic pipe about 70 cm long.
- Newspaper.
- PVA glue.
- Tree bark.
- Primer.
- Colored napkins for decoupage.
- Rope or rubber bands for money.
- Gypsum.
- Stickers - if they are not there, then you can print a color image on the printer and cut it out.
- Acrylic paint.
Sequencing:
- Take the pipe and cut it to the required size. Ideal Height for the product (if the pipe is weaving) it will be 60-70 cm.
- Tear the newspaper into medium-sized pieces (about 10 by 5 cm).
- Dilute the PVA glue with a little water, use it to glue the pipe with newspaper, let it dry a little. Then primer for strength and leave to dry.
- Decide what shape and size will be the area on which the picture will be placed. Cut out the area for the picture from paper and glue it on top of the newspaper.
- Peel off the bark from firewood or cut down trees and dry it for a couple of days. Glue the bark to the surface of the pipe. For these purposes, you can use both PVA (undiluted) and universal thick glue.
Important! If your glue is too liquid, then the bark must be fixed with rubber bands or ropes.
- When the bark is well glued, take colored napkins with a pattern and cut out the necessary elements from them. For example, flowers, butterflies or any other pattern that is depicted on your napkins.
- Take stickers or print a color picture on paper and cut it out.
- Glue the flowers to the decoupage area. To do this, use PVA diluted with a small amount of water.
- Glue the butterflies to the flowers, as well as to the empty spaces.
- Make a not very “cool” gypsum mortar, put the bottom of the vase out of it: put a pipe on a plastic board and lay the mortar on top. Leave to dry for a couple of days.
- Paint the bark with brown paint, and apply several layers of varnish on top.
- Let dry for a couple of days.
footage
As you can see, making a floor vase with your own hands is not difficult at all. To do this, you do not need to have special knowledge and skills, in addition, simple and accessible materials will be required in the work. This vase will become a real decoration of your home.
Creating handmade original products is a very exciting activity for everyone. And in the process of making home interior be sure to include in the number of decorative elements products made by one's own hands.
Thus, you can decorate your corner in an original way, as well as save the cost of buying such items that are currently not cheap.

An interesting element in the interior is a vase. But how to make a vase with your own hands so that it brings harmony and beauty to the interior?

Creating and decorating a vase
The most important thing is that the future element self made blended well into the interior of a house or apartment, so as not to stand out as superfluous. The design should take place in one shade, and the result should be the big picture.
Photos of vases that can be seen on the Internet have different shape and varied styles.

AT modern times There is a wide variety of styles in the interior.

Before you start creating a vase, you should consider and analyze each interior style, and understand how to emphasize the originality of this style with a vase made by yourself.
Choosing a vase for the style of the interior
Minimalist style. Choose concise and modest forms, the color shades of which are not saturated and restrained; The finish of the vase should be neat.

Classicism style. Symmetrical patterns and drawings are quite suitable here. Preference is given to light shades, and drawings of traditional colors that take place in the design of the entire interior.

Hi-tech style. The most modern materials are used to create a vase. It can be glass, and metal, and wood, and steel. Shapes and finishes are also variable, can have a bizarre and unusual character.
Kitsch style. Strict rules are not needed here, but, on the contrary, preference should be given to refined and non-standard elements. You can combine everything, even the most incompatible with each other. Colors should be saturated. You can also decorate a vase with bright colors and non-standard decor.

Modern style. Abstraction and the use of lines smoothly merging into each other - that's the piquant moment of creating such a vase. Decoupage of a vase is most often created on the basis of materials such as wood and metal.

Avant-garde style. Here you need a rich imagination and creative thoughts in the process. Bright, saturated colors and unusual patterns will be in place;

A beautiful vase in the interior not only complements a certain style, but also speaks of the perfect taste of the owners of the house or apartment, and also pleases the eyes of all guests.

Size and properties of the vase
Ideas on how to decorate a vase are very diverse and everyone is different from each other. But first you need to decide on the size of the future decor element.

The width of the future vase can be different, and, basically, it depends on the personal tastes and preferences of everyone.

Sometimes the width of the vase depends on the style in which the vase is made, as well as on the style of the interior for which it was chosen.
Note!

If the vase is outdoor, then its height should vary between 40 and 100 centimeters. The vase does not have to be on the floor, in most cases it can be placed on a bedside table or on a table.

But on bedside tables and tables, the vase looks beautiful when its size is not so huge. A vase with large dimensions is best placed on the floor, and put beautiful flowers in it.

The material from which you are going to build a vase should also be taken carefully. After that comes the choice of the form of the product. The form can be variable, and is selected at the discretion of the person himself.

The main thing is to turn on full fantasy and harmonize the form with the style of the interior.

vase shapes
The most popular forms that appear in the works of famous interior designers are:

Note!

Rounded shapes. Such forms are suitable for absolutely any style of interior, and it is easy to make it using the papier-mâché technique, taking an ordinary bottle as a basis.

Square shapes. Modern styles the interior will be in good harmony with such an element of decor. A cardboard box is taken as the basis;
Triangular shapes. The method using newspaper tubes is best suited here. This type of vase looks individual and luxurious;

After the base of the vase is made reliably and beautifully, you can already proceed to external decoration. Various ways decor applied at this stage.

Many initially cover the vase with paint or varnish. And then you can create handmade patterns on the vase, or attach some shapes or stickers.

You can decorate the finished vase by putting beautiful flowers, berries, branches, and everything else in it.
Note!


DIY vase photo


