
How to make a wooden rack correctly and easily with your own hands? Shelving for the collection Homemade wooden shelving
It is not difficult to make a rack with your own hands from wood. It is important to have a set of simple woodworking tools and have a small stock of knowledge and skills in working with wood. The choice of dimensions, design of the rack and its finish - it depends on the requests and capabilities of the master.
Do-it-yourself wooden shelving allows you to not only save money, but also take into account the features of the room. Before starting all the work, it is important to have answers to a few basic questions.
Criteria for choosing a design, dimensions and materials for the manufacture of a homemade rack
It is important to define here:
- goals and opportunities;
- the place where it will be installed;
- sizing;
- purchase necessary materials and fasteners for the manufacture of structures.
Let's analyze each of the points in more detail.
Design options depending on the purpose and location of furniture installation
There are several options here:
- If the rack is needed for installation in the basement for storing pickles or in the garage, you can make simple design from thick bars and boards. In this case, structural strength is important.
- Shelving is needed to accommodate books. Here you will need to use strong standing parts made of timber and shelves made of plywood or chipboard.
- It is required to make furniture for the kitchen or hallway. In this case, a large margin of safety of the structure is not important, it is necessary to make a beautiful, airy structure.

Structural sizing
Based on all of the above points, the size of the room where it will be installed and individual requests, you can determine the dimensions of the structure, make its drawing and complete the detailing of the entire structure.
In any case, it is required to prepare 4 standing parts, several longitudinal jumpers and material for the shelves, finishing the entire rack. To this will be added paintwork materials, possibly varnish and impregnation.
After completing all of the above operations, you can answer the question: how to make a rack for your home.
Step-by-step instructions for making a rack
For example, consider the manufacture of shelving with shelves for a room. This is not the most difficult, but not an easy option to work. Let's take arbitrary dimensions:
- width - 1220 mm;
- height - 2130 mm;
- depth - 440 mm.
Preparatory stage of work
Prepare for work:
- sidewalls 2 pcs 2130/440 mm;
- for the upper and lower fixed shelves we will prepare plywood 400/1180 mm;
- if you want to close the back, you can prepare fiberboard or thin plywood, 1220/2130 mm in size;
- we will have 3 shelves, for them we will prepare plywood 19 mm thick, 400/368 mm in size;
- we divide into 3 compartments, so we will prepare 2 partitions from plywood 400/1660 mm;
- decorative stops 38/1143 mm;
- details for closing the bottom and top of the rack 90/1220 mm;
- for fastening the shelves, you can use a wooden rail or a mounting furniture corner.
We need a sufficient number of self-tapping screws, decorative furniture nails, decorative clips that mask the heads of self-tapping screws.
Shelving assembly
Let's start with the main part of the work. In order to make a wooden rack with your own hands, you will need to perform a cycle of operations:
- clean all the details with sandpaper, Special attention we give to the front sides;
- on the sidewalls, we fix the furniture corners in the places where the upper and lower fixed shelves are attached and fix them on self-tapping screws and PVA glue;
- to give the structure greater rigidity, decorative finish, we fix a cut-to-size sheet of fiberboard or thin plywood on the back of the rack. Having placed the part at the same distance from the edge, we measure the diagonal of the rack. We fix the backdrop on furniture nails with washers;
- we install the cabinet in a vertical position and fix the brackets for fixing the partitions and fix them with self-tapping screws and glue;
- now we fix the upper and lower decorative rails with a size of 90/1220 mm, fix them with self-tapping screws and close the caps with clips;
- having marked the places of fastening of the shelves, we fasten the corners on the screws and install small removable shelves with stops in the front;
- in the middle we make a large gap for placement outerwear. We fix the tube for hangers on special fasteners.
Handmade wooden rack is ready. It remains to once again sand the surfaces, wipe off the dust and paint the furniture in the desired color. Can be used various options stain and varnishing of the structure. In this case, you will have to clean the parts with fine sandpaper several times.
It's better to just paint in any suitable color using various enamels or paints. We close all prominent hats of self-tapping screws with clips matched to the main color.
This is not the easiest option for furniture made of wood. If you need a simple option for a garage, you will need 4 timber racks fastened together with jumpers and fixed shelves. For manufacturing, you will need a simple hacksaw for wood, a hammer.
Having made a few simple ones for a cellar or garage, having gained experience, you can try to make designs with decorative trim, woodcarving. It all depends on your abilities and capabilities. Good luck.
In the household, over time, so many necessary things accumulate that the available lockers are sorely lacking. This problem is especially acute for owners of small houses and apartments. The rack will help out - a universal shelf design of any size and for every taste. We recommend ordering the wood-polymer composite that you need on the website https://mydecking.ru/.
Since you can put it absolutely everywhere: in the nursery, in the office, in the garage, etc., there are an infinite number of manufacturing options. The design of any rack includes vertical frames, racks, crossbars and shelves. You can independently build a simple rack in the basement for storing cans of blanks or in the garage so that all the available tools are neatly stored on the shelves. In addition to convenience and aesthetic appearance Shelving also saves a lot of space.

Of course, in the basement you can install a simple frame with shelves, and this will be enough, but to decorate home interior, will have to try. In rooms with high humidity(in the basement, garage) the use of metal will be more rational and practical, and wood is best used in dry rooms. Even when treated with an antiseptic, wood in conditions of constant dampness will not last long. Preference is given natural wood(pine, mahogany, oak), laminated chipboard, OSB board and plywood are suitable.
 Chipboard shelving with dimensions
  OSB shelving photo
 Shelving dimensions depend on its purpose, design - on desires home master. It is convenient when the structure is raised to the ceiling: the storage area increases and it will be possible to attach the rack to the ceiling for greater stability and reliability.

For “weighty” items: books, dishes, jars of pickles, the optimal depth of the shelves is 25 cm, for light items - up to 50 cm. You should not make the shelves wider, as it will be difficult to reach items placed against the wall. The length of the shelves also depends on the load: for light things they can be made up to 1.5 m, and for storing heavy items you will have to limit yourself to 90 cm, otherwise the shelves may bend or even break.
 Shelving drawing with approximate dimensions
 You will definitely need a drawing in order to beautifully and correctly plan the position of the shelves, taking into account the weight of the items that will be laid out on the shelves. The distance between them is from 30 to 60 cm; you can make the lower shelf higher if large items are stored there. The top shelves are designed for boxes with light items.
 Scheme for the manufacture of a room rack for aquariums
 Types of racks
The simplest standard rack consists only of shelves and side racks, it has no side and rear walls.

Much more interesting are racks-lattices of various configurations: they combine sizes that form original horizontal, vertical and diagonal weaves.
 In the photo a rack of water pipes
 Such racks can not only be installed on the floor, but also hung on the wall on hooks. The asymmetric arrangement of shelves or partitions, their rounded and zigzag shapes turn the rack into a bright element of the interior. But this is a job for experienced craftsmen. Under the rack, you can also take a free place under the stairs rising to the second floor.

With the help of a rack you can in any room, and if you attach the wheels, then it can be easily moved around the room. The rack can be built into a niche, then the task of its construction is simplified to a minimum or rotating. It can also be supplemented with doors and hooks. If the lower shelves are made in the form of retractable drawers, then they will become steps and help you easily get to the upper shelves.

The main elements of the rack and its installation
First of all, a solid foundation is constructed, for which a thick board is taken along the length of the future rack. Wooden racks are not wide apart, their usual step is up to 60 cm, when using metal corners of 50x50 mm it can be increased to 1 m. wooden planks, chipboard or OSB board. The back wall is most often not made; if necessary, it is cut out of a plywood sheet.
 A small wooden rack-rack with a reinforced frame of shelves with a transverse bar
 First, establish a solid foundation. The frame is fixed on self-tapping screws, the corners are reinforced with additional strips. When assembling, you need to use a level so that there are no distortions. The finished base is attached to the wall. The side walls are cut from chipboard, furniture board or plywood, cut grooves in them with a milling cutter, install shelves in them and fix them with self-tapping screws. The thickness of the shelves should be at least 2.5 cm.

The rack assembled in this way is installed on the base and securely fixed. If you drill plywood linings on the side walls and sew them up with laminated chipboard, the rack will become much more attractive. You can also finish the front part, and decorate the top and bottom of the rack with a wooden curly plinth.
It is also easy to assemble the structure: first, they mount the frames, then, using a level, align them vertically and attach them to the wall. If the load is assumed to be impressive, then the rack is tied longitudinal profile, which will create the necessary stiffening belt. The size of an equal-shelf angle is 40x40 mm, if we take a square tubular profile, then with a section of 254x25, with a wall of 2 mm.
In more detail with the process of creating different racks, various video instructions will help you to get acquainted, where all stages of work are clearly demonstrated.
Video: DIY rack
Making a new rack that will ideally fit the size and design of the room is a simple and doable task. Especially if the list of "pluses" includes considerable savings and the possibility of self-realization.
With the help of the new shelving, you can easily organize the space, zone the room, effectively and neatly place all the small things and accessories.

The main thing is to decide on the drawing and diagram, find the materials and proceed with the assembly.

Shelving Ideas
The design of the wooden rack is characterized by an abundance of identical through open shelves. The simplicity and versatility of the design determines its practicality, perfect match with any interior style and room.

In the children's room, the rack will accommodate all the toys, books and trinkets, while due to the openness of the shelves it will visually expand the space.
In the office, a semi-closed full-wall shelving with the maximum number of surfaces for placing books, folders or stationery is useful.

The most common place for shelving is the living room, where this item of time has more aesthetic tasks: spectacular accessories, photo frames, sets, and indoor flowers are symmetrically and organically placed on the shelves.

For dishes, jars of cereals or seasonings, they put a rack in the kitchen.

What are shelving
Just look at a few photos of the racks to see all the variety of their shapes, sizes and colors. However, all designs are divided into several typical groups:

Stationary racks
They are distinguished by reliability, strength and massiveness, however, their movement is impossible without dismantling the structure into separate racks and crossbars.
Mobile mobile racks
Complemented with wheels and made of lighter materials. This option is convenient for those who like permutations.

An original place to place frequently used items, such as condiments, personal care items or keys, will be a rotating design.

Hanging racks
Hanging racks consist of 3-4 connected shelves, which are popular in small areas, as they are compact and do not take up free space against the wall or floor.

Standard Shelving Requirements
Before you start cutting and assembling the rack, you need to decide on a suitable drawing. To begin with, it is worth accurately measuring the space and taking into account that for heavy objects the thickness of the shelf board should be at least 25 cm, length - at least 90 cm and not more than 150 cm, while the optimal depth of the shelf is 50 cm, height - 55 cm.

Necessary materials
A rack made of natural oak, pine or mahogany with a moisture content of no more than 12% will last a long time.
All materials a few days before assembly are sawn according to required dimensions and treated with antiseptics and other special woodworking agents.

As for additional elements, you will need plywood or chipboard, shelf holders, plastic or metal corners, clamps, legs on wheels.
Note!


To work with wood, you will need a standard set of tools: self-tapping screws, electric jigsaw, Sander, nails, level, electric drill, ruler, hammer, tape measure.

The list of necessary materials ends with paintwork materials and wood glue.
Rack Assembly Scheme
Making a rack with your own hands is easy if you follow a certain algorithm:
- On the side boards and the back wall, mark with a pencil for attaching the shelves;
- Start work from the ground up. On the lowest shelf, fix the back wall with self-tapping screws, and in its absence, fix the side walls.
- Fix in the marked places metal or plastic corners that will hold the shelves;
- When mounting the rack elements, it is necessary to carefully monitor the evenness of the structure;
- For greater strength, it is recommended to coat all holes with glue;
- At the end of the assembly, fix the cover on top of the rack with screws;
- If necessary, cover the product with varnish or paint, after sanding the surface.

Original racks
Often, a do-it-yourself rack made of wood is distinguished by its originality and originality. So, you can make a rack of 6 identical boards and 12 glass bottles.

To do this, at the ends of the base board, it is necessary to drill holes in a pair corresponding to the bottle bottoms, and on the next board - for the necks. In total, you get three original shelves, which must be securely fixed together with the help of a rail and self-tapping screws.

Note!

An interesting solution would be a rack with a rope frame that connects 4-5 shelves and is placed on the wall with hooks or nails.

True, heavy objects can break the structure, so use a place to store towels, photos or fakes.

When independently manufacturing the rack, all dimensions are taken into account square area, a suitable shape, color and texture is selected, which ultimately allows you to get an original and ideal design.

DIY rack photo


Note!


All photos from the article
Sooner or later, many owners of garages, workshops, sheds and basements make a straight and corner wooden rack with their own hands. And this is not surprising, since such shelves are an excellent solution that allows you to place tools, various things, stocks for the winter, harvest and other supplies in the required order.
Of course, you can purchase ready-made whatnots or order their manufacture in special organizations, but the price of self-assembled structures will be an order of magnitude lower. Moreover, homemade shelving can be adapted to the characteristics of the room in which they will be placed.

So, let's try to assemble a rack in a wooden garage with our own hands, but before that we will decide on the choice of lumber that is advisable to use during assembly.
Material selection

The basis of any rack, regardless of where it will be located, are the shelves. It is on them that the payload that is usually stored in various utility rooms will be placed.
Shelves are subject to such requirements as fracture strength, resistance to excessive humidity and low temperatures, typical for utility rooms in the cold season. On the other hand, shelves intended for use in residential areas must also be beautiful.
That's why best material for the manufacture of whatnots in the entire wall is a cut board. Characteristics edged board are presented in the following table.
| Type of wood used in production |
|
| with GOST 8486-86 and application |
|
| Edged board moisture |
|
| Standard sizes |
|
For the manufacture of the rack, dry boards should be used with the maximum width of what is on sale and with a thickness of at least 3 cm.
Tip: It is better to buy lumber unpolished, since their price is an order of magnitude more affordable than the cost of prepared lumber.
It will be possible to sand and process wood properly by yourself.
So, we decided on the choice of lumber, it remains to choose the appropriate drawings of the rack with our own hands from wood to make the necessary structure from them.
Shelving projects that you can assemble yourself

In this article, we will consider the features of assembling several types of whatnots, namely:
- modifications with metal sidewalls(relevant for garages and basements, where increased structural strength is important);
- modifications with wooden sidewalls(can be used both in utility and residential premises;
- modifications where the function of the supporting structure is performed by metal brackets attached to the wall.
The drawings proposed in the article show the structural features of the structure, indicating the main sizes. Let us consider in more detail how, according to these schemes, to make shelves for storing various things.
Scattered toys are the most common thing in a child's room. We, unfortunately, have only one room for everyone, but there are also a lot of toys in it, and they are also often scattered around the apartment. However, according to the methodology early development Maria Montessori teaching kids to order begins from early childhood. You just need to help the baby. So we decided to make a Montessori rack for storing children's toys, materials for creativity and activities with our own hands.
Rack for toys :)
The popular IKEA shelving unit from the Expedit series was taken as a sample. We downloaded the instructions for its assembly on the IKEA website, examined it in detail. Thanks to this, we saw how it is arranged, what parts it consists of and how it is assembled.
Then we measured the space that we planned to allocate for the homemade “Ekpedit”, and planned it first in mind and on paper. Then Kostya drew it in Corel Draw and 3Ds Max. Thus, we considered the most convenient configuration for us with 12 small and 3 large sections.
Drawings for a homemade rack:

Shelf layout options

Dimensional drawing


Cutting details
According to the dimensions obtained in the lumber and furniture fittings store, Kostya bought 1 sheet of MDF and fiberboard each and ordered cutting of the material into necessary details. In general, almost a rack came home :)
By the way, our shelving was made possible thanks to the advice and guidance of a professional furniture maker. Nikita Maksimova who lives and works in St. Petersburg. Thanks, Nikita!
So, how to make a rack with your own hands?
1. First of all, we draw a template for marking holes. This is done in order not to measure each label separately n-number of times. We got 3 marks: 2 at the edges, 1 exactly in the middle. On them we will drill holes for dowels and confirmations.
 We mark places for dowels
2. According to the marks, we drill 2 holes for confirmations in each corner of the structure. We twist the confirmations.

We drill holes for confirmations
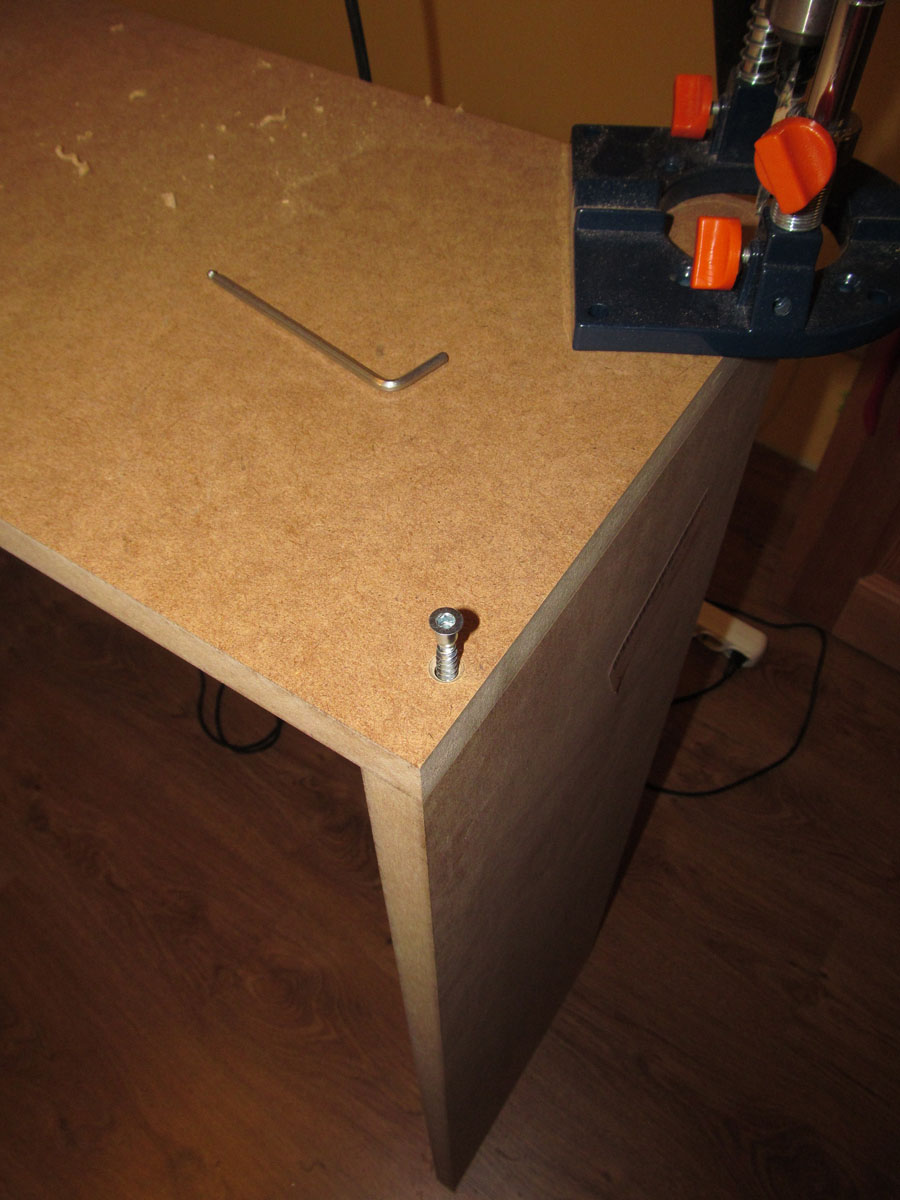
We spin confirms
3. With the help of an angle clamp, we fix the box of 4 longest parts during the installation of the shelves. This is necessary so that the structure has rigidity, does not fall apart and maintains a right angle.

Fixed the main parts of the rack
4. Picked up a drill according to the diameter of the dowels. Using the template, mark the places for the holes. We make recesses with a core. We drill holes. The dowel has a length of 35 mm, so at the ends of the parts we make holes with a depth of 25 mm, and in the planes of 10 mm.

Choosing the right size drill
We mark places for dowels

Marking for drilling

Setting the drilling depth

Drilling holes for dowels
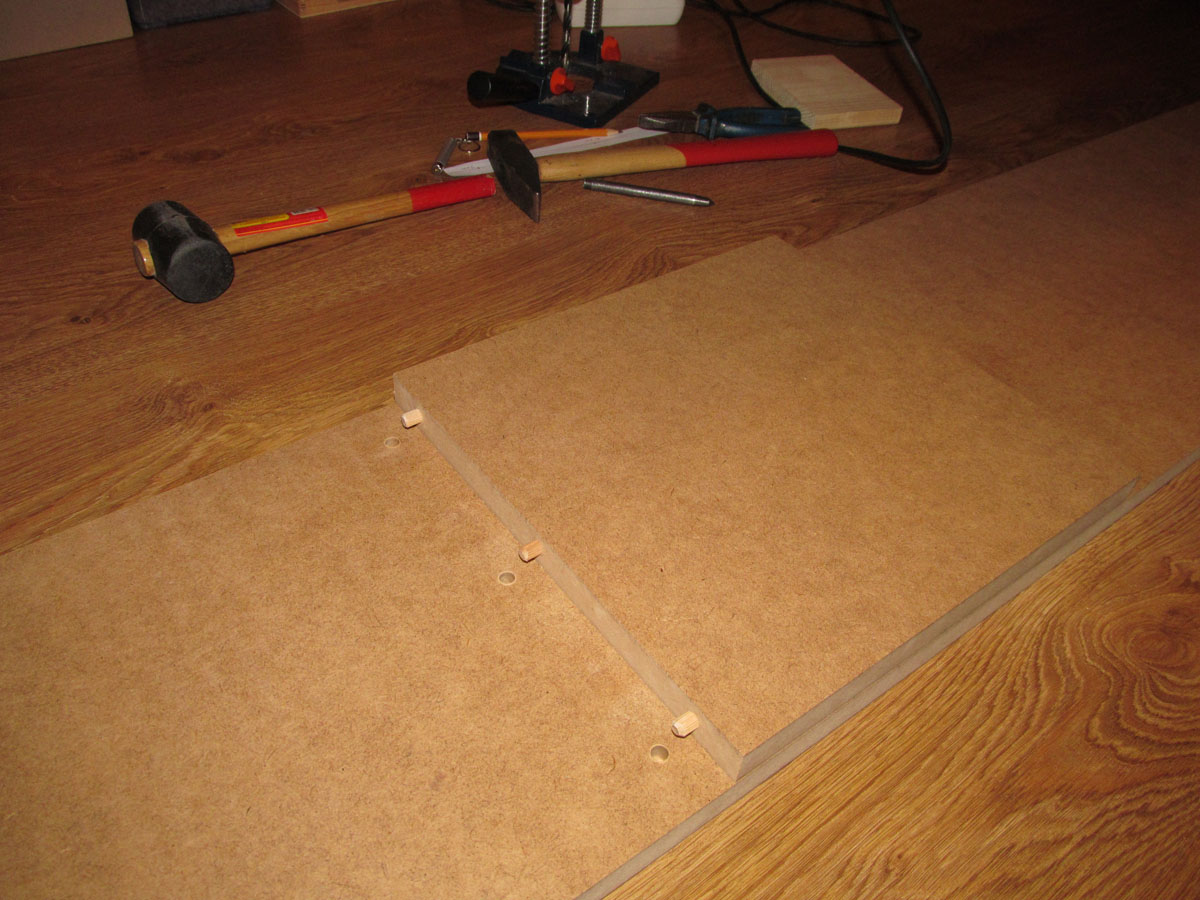
5. We insert not dowels into the holes obtained, but markers for dowels. With the help of them we put marks on the second part. This is necessary so that the centers of the two holes (in which the dowel will be placed) coincide. According to the received marks, we drill holes for dowels.

Insert dowel markers into holes

We use the shelf as a template
Apply marks by hitting the shelf from above

Marks are clearly visible in side light

We make indentations in the places of marks

Drilling holes for dowels
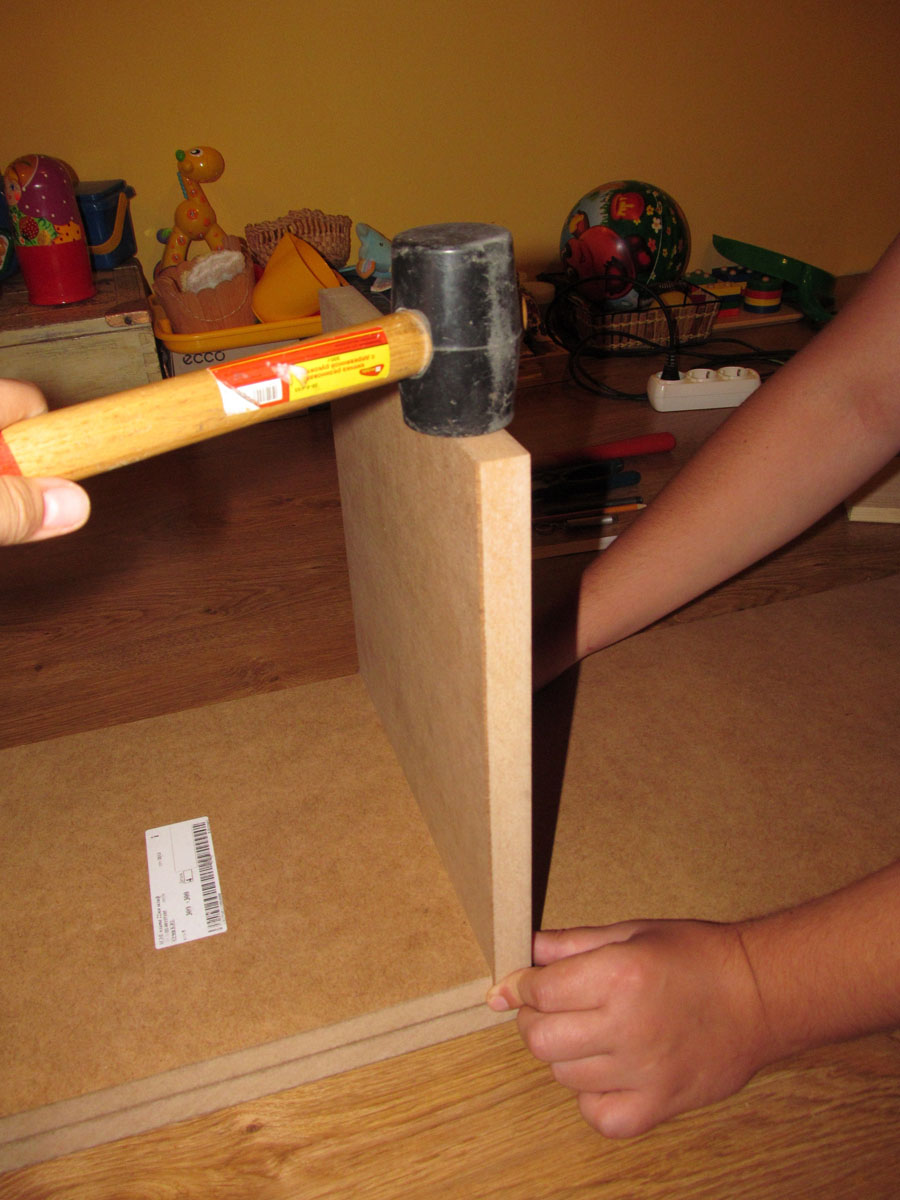
6. We hammer dowels. We put the part in place. By the same principle, we do the entire first row.

We hammer dowels into holes
Putting the item in place
Bottom row done
7. For the second row, we needed to drill holes 46 mm deep, so the drilling depth board was slightly improved with a paper ruler. The sponsor of the alteration is the free line of the construction supermarket Leroy Merlin :)
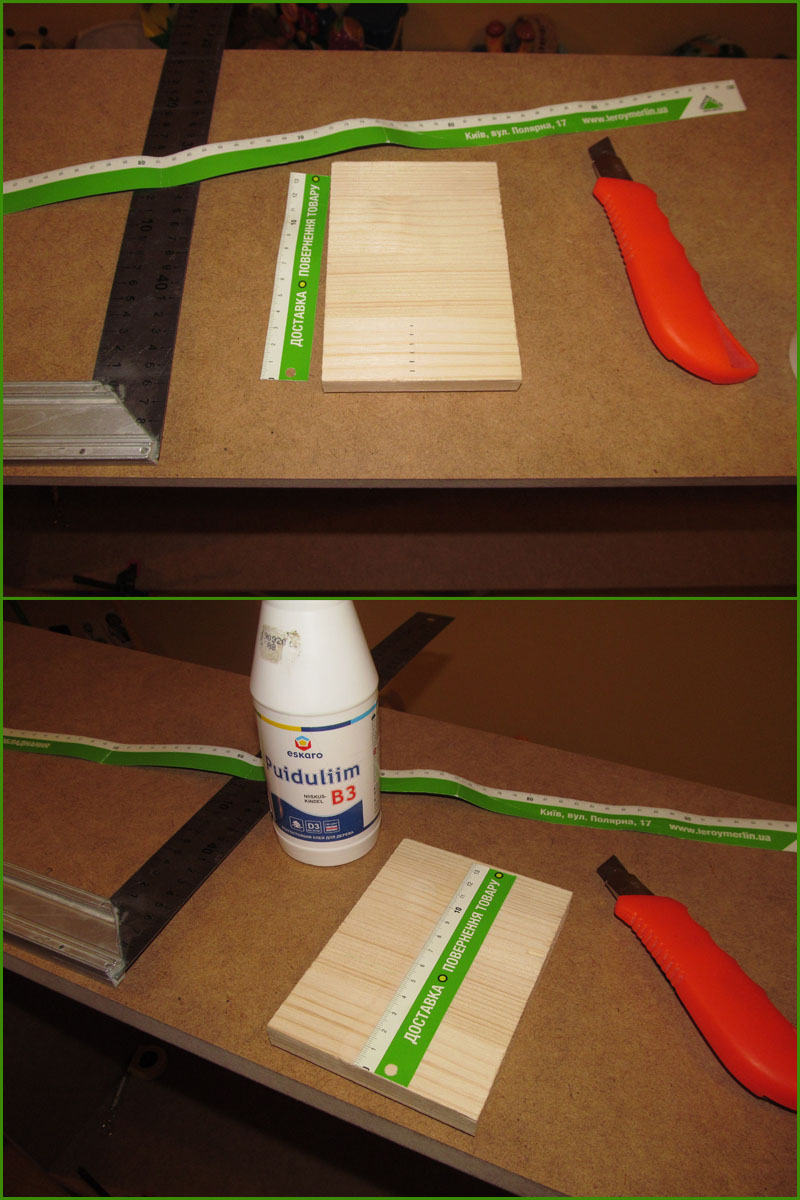
Gadget for measuring the depth of drilling :)
8. To connect 3 parts, we used 2 dowels. To do this, in the upper part, as before, we drilled a hole 25 mm deep. And 2 lower ones were drilled simultaneously (24 mm + 22 mm = 46 mm).
Sample connection of parts

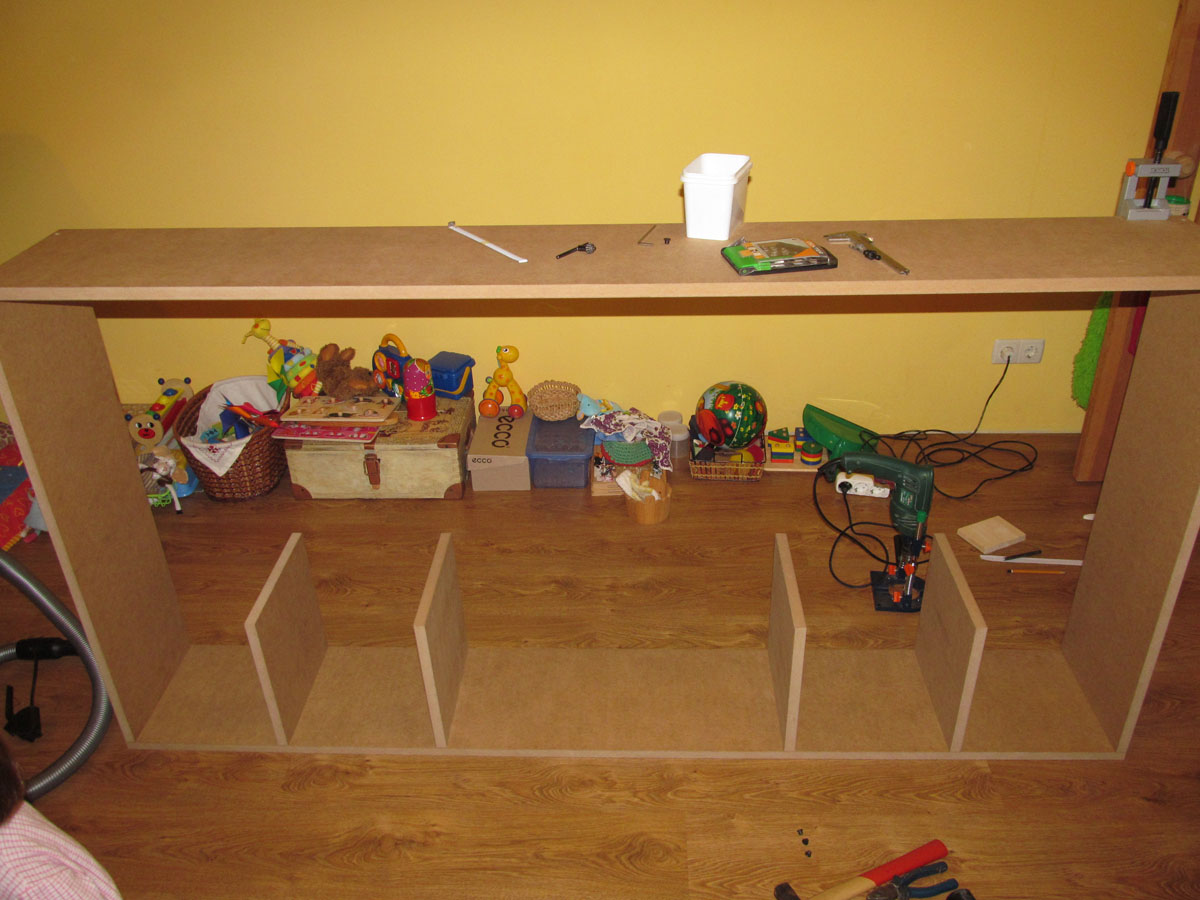
Second row completed
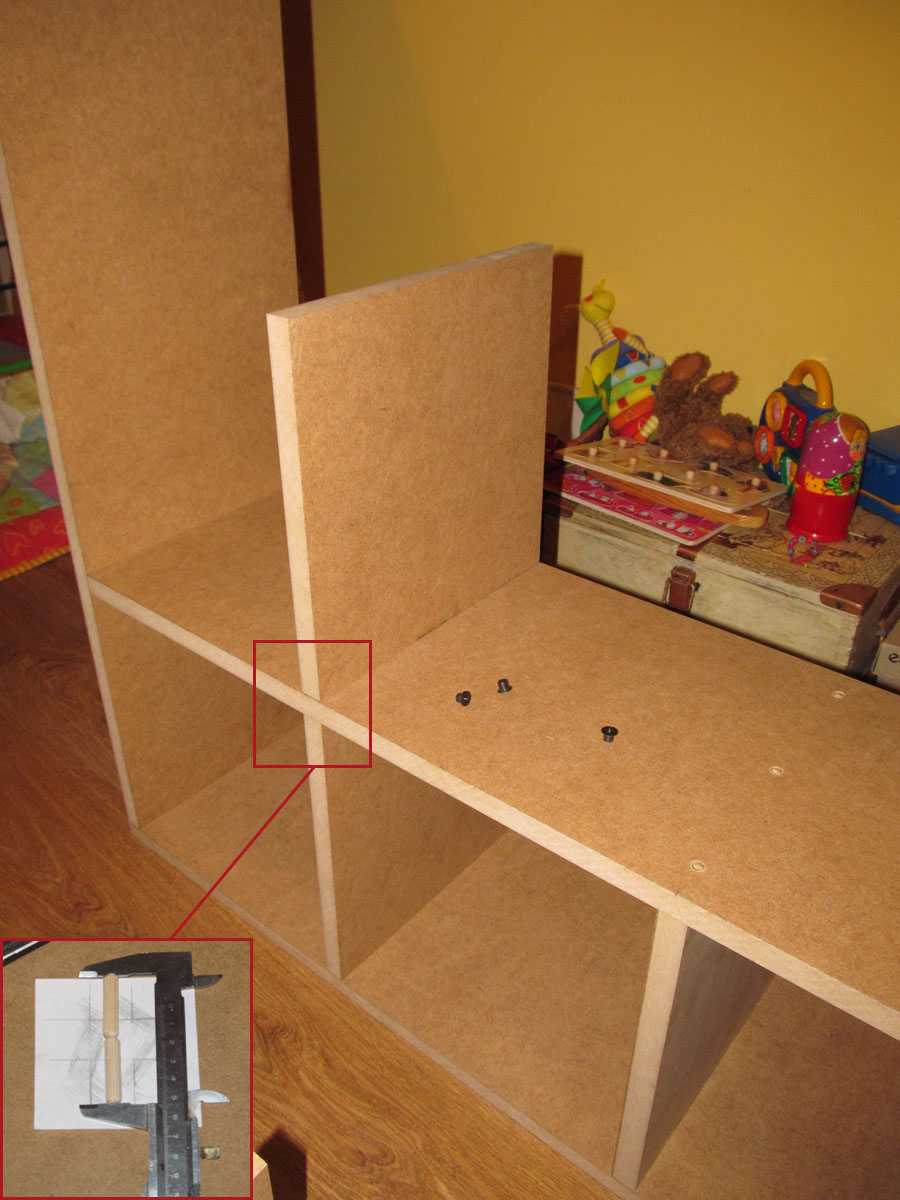
9. To assemble the last row, the upper parts 2 m long were removed. According to the principle of the 1st row, all the holes for the dowels were made, the dowels were inserted. Fasten the top piece in place.
At each end of the rack, 4 holes were made (2 per shelf) for confirmations, confirmations were twisted. This makes the whole structure stronger.

The rack is fully assembled
10. Getting ready for painting: we laid newspapers, put the part on jars to make it easier to paint the ends and nothing sticks. All parts were painted with acrylic paint (Komposit Enamel Profi) and acrylic varnish (Sadolin Celco Aqua), they are non-toxic. The windows were opened as much as possible so that the paint dries faster and the fumes do not linger in the room. All parts were covered with 2 layers of paint and 1 layer of varnish.

Preparing for painting

Acrylic paint and varnish
