
Plasterboard ceilings in the kitchen - from design to installation. Design and decoration of the plasterboard ceiling in the kitchen: nuances and ideas Painted plasterboard ceilings for the kitchen
The kitchen is a special place where the walls, floor and even the ceiling are exposed to steam, water, household chemicals, small particles of fat and much more, so the choice of materials for its repair should be approached with particular care. In this section, we will focus on finishing the ceilings in the kitchen with drywall.
GKL ceiling in the kitchen: pros and cons
In order to decide whether to make a plasterboard ceiling in the kitchen, consider its main characteristics.
| Advantages | Flaws |
| Sufficient strength | Weight: plasterboard ceiling is much heavier than, for example, stretch |
| Ability to level even the most uneven surfaces | Installation time |
| Ability to create original design(multi-level or figured ceilings), including combined with stretch ceilings | The complexity of the installation of the structure |
| Safety drywall can be fireproof enough for a kitchen. | Additional work: puttying and gluing seams, priming, painting or other decoration |
| Various finishing options (painting, wallpaper, texturing) | A plasterboard ceiling will reduce the overall height of the room by at least 10-15 cm due to its own thickness and the width of the profile on which it is attached. |
| Different lighting options to suit any design idea | Risks: Kitchens run plumbing and sewer pipes, sometimes connected washing machines, possible flooding by neighbors from above. In this case, the ceiling is difficult to dry, respectively, even moisture-resistant drywall can be deformed |
| No need to pre-level the ceiling under the drywall. | The ceiling is not hermetic, that is, if your neighbors flood you, there will be a leak |
| In the space between the ceiling and drywall, you can hide communications, lay insulation and / or soundproofing | A plasterboard ceiling cannot be washed frequently (with the exception of painted with special paint), which is unacceptable in the kitchen. Fat particles settle on the kitchen ceiling and the surface needs regular maintenance. |
What to separate?
Perhaps the most famous drywall belongs to the Knauf brand. The optimal thickness of drywall for the ceiling is 9.5 mm.
In the article we will describe how to mount a plasterboard ceiling for the kitchen with our own hands.
We will try to mention the main possible problems and errors during installation, and at the same time consider the main advantages and disadvantages of such a solution.
Features of the use of drywall in the kitchen
To begin with, let's find out what we can expect from the material we have chosen in the very room in which we are going to start work.
Advantages
- Drywall allows you to make the ceiling perfectly even, even if the floor slabs are laid with an inclination and offset.
Moreover, the amount of work to level the ceiling will not be prohibitive. - Plasterboard ceilings in the kitchen can have an arbitrarily complex shape and design. It can have different color zones, highlighted by shape and level, and does not have to include only straight surfaces.
- Moisture-resistant drywall, by definition, is not afraid of the high humidity characteristic of the kitchen.
Minor flooding from above (and we must not forget about such a possibility) will also not cause irreparable harm to our ceiling.
Tip: however, if flooding from above is not uncommon, you should still stop at a stretch ceiling that will hold water until you arrive from work.
More cheap option- ceiling made of PVC panels on a galvanized profile crate. After the flood, it is enough just to wipe it from drips.

- Suspended ceilings for a small kitchen can be equipped with spotlights located in any place convenient for you. In addition, they successfully hide from the eyes gas pipe, ventilation duct and other communications.
Flaws
- Significant temperature changes inevitable for the kitchen often lead to cracks at the joints of drywall sheets. However, reinforcing the joints usually helps to solve this problem.
- If stretched and washable by definition, due to the material used, then the plasterboard kitchen ceiling will require the selection of an appropriate coating. Soot and grease will be washed off from the water emulsion only together with part of the paint.
- Like any suspended ceiling, plasterboard will make the room a few centimeters lower. The use of drywall in Khrushchev or Brezhnevka with its already low ceilings is an ambiguous decision.
- Finally, if rack ceiling or it is easy to build a lining from a lining alone, then a plasterboard ceiling in the kitchen with your own hands will require at least one assistant. When marking and mounting on the ceiling, holding a wide sheet alone without breaking it is simply unrealistic.

Preparation for work
So, all objections are rejected, and we are preparing to make a plasterboard ceiling for the kitchen.
How to start preparing for this event?
- In general, ceiling material is purchased based on the area of the ceiling plus 15 percent for trimming.
However, a drywall ceiling will inevitably give more waste when cutting sheets: it is better to buy drywall with a total sheet area that exceeds the ceiling area by at least 25 percent.
Fortunately, in monetary terms, these costs will be small precisely because of the small area of \u200b\u200bthe kitchen.
- Purchased sheets should not be stored in an upright position: they are deformed. It is better to lay them on a flat floor.

- For a complex-shaped ceiling, it is better to use non-moisture resistant drywall: it is much easier to bend it, creating curved surfaces.
However, for a kitchen with its humidity fluctuations, this will mean a lot of unnecessary problems in the long run. Flooding from above can completely bring down such a ceiling. - Chipboard furniture should not be used as scaffolding.. It's just not designed to support the weight of an adult.
But a couple of stepladders or simple scaffolding, knocked together from boards, will be very convenient. - If your kitchen has rounded corners between the ceiling and walls, it’s better to spend a couple of hours working with a puncher and remove the fillets. This will allow you to mount a few centimeters higher.
Tip: as an alternative, you can build a multi-level plasterboard ceiling, which has lamps around the perimeter at a lower level. The center of the kitchen will be higher.

- If you have a stalin with external wiring, do not forget to dismantle it before installing the crate.
- Do not try to save on a galvanized profile by replacing it with a wooden crate. The high humidity of the kitchen and wood are incompatible: the crate will lead, and the ceiling will crack.
Work order
How to make plasterboard ceilings for the kitchen?
- We mark the level of the lower part of the frame. We put marks in the corners of the kitchen, we beat off the line between them with a masking cord.
- We fix UD profiles to the wall along the perimeter. Screws should be at least every half a meter.
Attention: if you want to make illuminated ceilings - BEFORE installing the profile around the perimeter, you need to make strobes for wiring.
- Having decided on the direction of laying the sheets, we mark the lines perpendicular to it, on which we will mount CD profiles. They should also be located at least every half a meter.
- Along the lines, again, every half a meter we fasten brackets-suspensions.
- We put the CD profile along the lines, while without fastening. Its edges are included in the UD profile laid along the perimeter.


- If lighting is hidden in the ceiling, we stretch the wiring. It is better to put it in a corrugated tube.
- We begin to hang drywall from the most even (in case of height differences) section of the ceiling. About 60 self-tapping screws 25 millimeters long should go onto a sheet of drywall.
- Suspended plasterboard ceilings, like any other, require fastening a seam between two sheets per profile. However, the room is small, and we can save ourselves time: just screw a section of the CD profile onto the edge of each sheet so that half of its width falls on the next sheet.
- The seams between the sheets are sealed with gypsum plaster and smoothed out with a grout mesh - first large, then fine.

- Plasterboard ceilings are painted with acrylic or latex paint. Before painting, the ceiling is primed with a primer or the same paint diluted 10 percent with water.
Finally, let me give you some tips that may be useful to you at different stages of work.

- In the kitchen, it is especially important to glue the joints of the sheets with a reinforcing tape - sickle. This is done after the joint is puttied. The tape will prevent cracks at the joints. From above, of course, the tape is also puttied.
- In order for a sheet of drywall to bend for mounting a curved surface, it is cut in several places along the outside of the bend. Non-moisture resistant drywall can be soaked, but this material should not be used in the kitchen.

- Plasterboard ceilings for the kitchen involve the use of built-in LED fixtures or energy-saving lamps. Incandescent lamps can melt wiring: heat has nowhere to go in a confined space.
Conclusion
As you can see, there is nothing prohibitively complicated in installation. All work can be done even as a person far from construction.
In modern realities, the plasterboard ceiling in the kitchen, regardless of the size and proportions of the room, remains the best option solving the problem of finishing the ceiling space. First of all, because of the perfectly flat and flat surface of the drywall sheet. Any, even the most fantastic design of the ceiling in the kitchen, thanks to the high stability of drywall, will retain its original shape, design and quality after 20 years.
Two-level plasterboard ceiling in the kitchen
The main advantage of drywall, which provided the material with unusually high popularity, was and remains the ideal geometry of the sheets. To get a completely flat and flat ceiling surface, you only need to fulfill two conditions:
- Properly plan and fix the suspension mounting system on the ceiling;
- Mount plasterboard ceilings in the kitchen and seal the joints between the plates as carefully and carefully as possible.
To achieve a similar quality with plaster, even on a gypsum basis and with mesh reinforcement, is an order of magnitude more difficult, and in addition, considerable experience and skills in working with ceiling plastering will be required. Whereas even a novice finisher who is familiar with the basics of assembling plasterboard structures can assemble a suspended plasterboard ceiling in the kitchen.

Pros of drywall on the ceiling of the kitchen
In addition, the construction of a suspended plasterboard ceiling allows you to solve a number of secondary problems:
- Improve sound and thermal insulation;
- Remove and hide kitchen communication lines behind the plaster screen, primarily ventilation, electrical wiring and pipes.

Advice! It is possible to build a suspended plasterboard ceiling only for kitchen rooms in houses aged three years and older.
In new buildings, before proceeding with the full-fledged finishing of the ceiling and walls, one has to wait for the complete completion of shrinkage processes. Otherwise, there is a serious risk of breakage and destruction of the suspension system.
If it were only about decorating communications in the kitchen, then it would be possible to get by with a suspended ceiling with tiles or plastic panels. This solution is simpler and cheaper to implement in practice. They resort to finishing the ceiling space with suspended structures if it is required to build a ceiling of a special design in the kitchen from drywall.

Varieties of plasterboard ceiling structures
Almost always, the design of the plasterboard ceiling in the kitchen, photo, is developed at the stage of planning the interior of the kitchen, determining the layout of the furniture set, arranging lighting and places to relax.

Designing a kitchen ceiling design is considered a rather difficult task, since it is necessary to tie together, at a minimum, decorative wall decoration, kitchen furniture design style and lighting system.
Formally, all false ceilings for the kitchen, assembled on the basis of sheet plasterboard, are divided into two large groups:


Box structures are widely used for masking ventilation pipes, laying tunnels for kitchen umbrella hoods located in a non-standard location, and redistributing lighting. As a rule, the lower level of the ceiling is located above the countertop, wall cabinets, in the area ceiling plinth. The upper level is usually located in the center and in the recreation area of the kitchen, which provides maximum comfort and a good supply of fresh air.
Figured plasterboard ceilings in two levels are used mainly as a decorative element. The kitchen space is usually planned as utilitarian, with the maximum level of functionality, so the number of decorative elements is not as large as in the case of a hall or a bedroom. Figured plasterboard ceilings in the kitchen make it possible to make the interior of the room more spectacular and relaxed.

Plasterboard ceiling design in the kitchen
Planning and designing a plasterboard ceiling in the kitchen, photo, requires considerable effort, since you almost always have to find a compromise between the shape and size of the tiers of the suspension system and the maximum thickness of the entire structure. Unlike stretch ceilings, drywall constructions have one serious drawback - each level “steals” 15-20 cm in height from the kitchen space.

Therefore, for small kitchens, they are limited to the simplest options for two-level ceilings. But even in such conditions, a two-level plasterboard cladding, in terms of interior design, allows you to “expand and elevate” the space of the room.
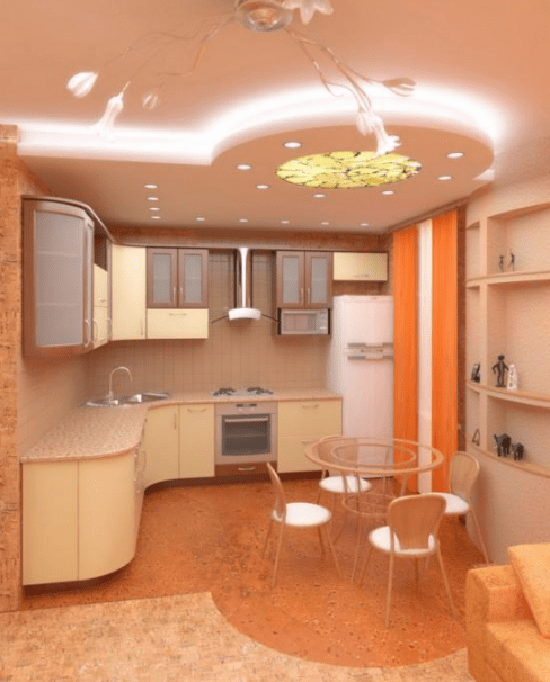
Simple and functional plasterboard box ceilings
The main advantages of drywall box structures include the two most obvious ones. Firstly, the box is ideal for almost any interior space. A small second level, which runs along the perimeter of the ceiling, is equally appropriate both in a large spacious kitchen with a corner suite and light tones of decoration, and in a small room.

Secondly, box-shaped decorative drywall trim is relatively easy to make with your own hands. At the same time, the simplicity of the design does not mean the primitiveness of the design.
For example, a simple plasterboard ledge with spotlights and internal illumination allows you to achieve the effect high ceilings in the central part of the room.

Wherein most of the ceiling surface remains under the upper tier, that is, the kitchen space practically does not lose in volume, as one would expect due to the use of a suspended decor structure.
The simplicity of box construction does not mean that its design is limited to primitive drywall frame constructions. For example, the skillful use of boxes with a podium in the center of the ceiling provides a screen effect when all the main colors of the kitchen interior are collected and concentrated on the ceiling.

How to enhance the design of box ceilings
Another technique widely used in the planning of gypsum plasterboard suspended box ceilings is associated with the simultaneous use of a stretch polymer ceiling and a standard gypsum board box.
The mirror surface of the polymer membrane, illuminated by the plasterboard frame fixtures, perfectly reflects the light, due to which the ceiling height visually almost doubles.

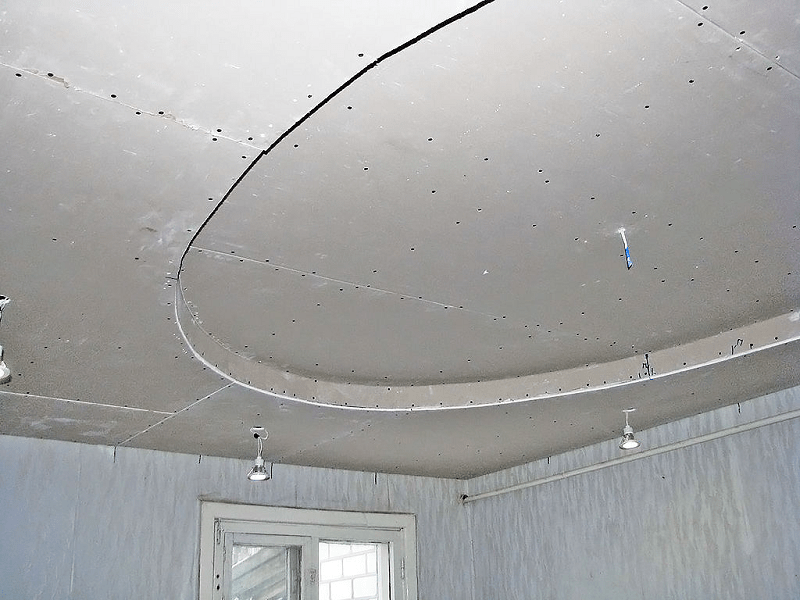
Similar effect visual magnification the height and volume of the kitchen space can be achieved using multi-level ceilings laid in steps, as in the photo. Due to the use of three levels, the peripheral part of the ceiling space loses in height, but in this case, such a loss does not play a special role, since the lower level occupies the corner zone.
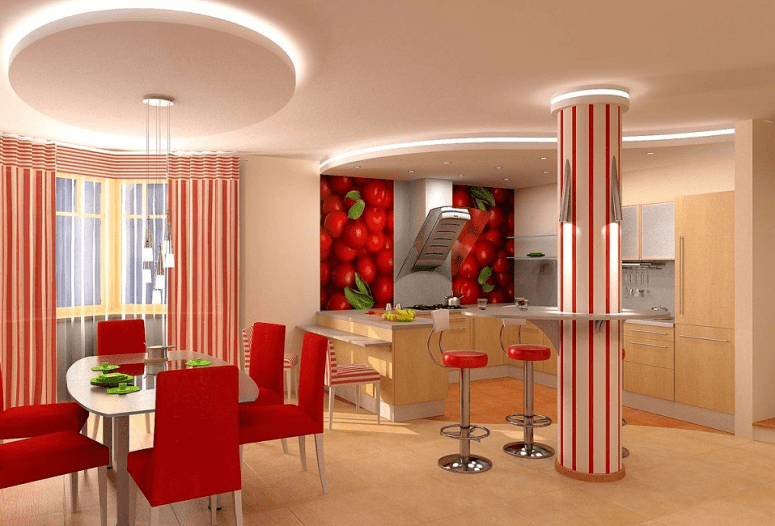
Figured plasterboard ceilings
A truly complex and original design of the ceiling surface can only be obtained with the help of complex figured constructions from plasterboard sheets. Compared to box-shaped structures, a figured ceiling is a real aerobatics in kitchen design, therefore, serious experience with profile and drywall is required to develop and install such structures.
Figured ceilings can be simply stunningly beautiful and look organic in almost any kitchen interior.

The concept of a figured ceiling allows you to implement two of the most popular ideas modern design:
- Zoning of the kitchen;
- Color saturation and addition to the interior of the kitchen.
Thanks to the use of curvilinear inserts of complex geometric shapes with the help of ceiling decor, it is possible to divide the kitchen into several important zones.
The cooking area remains dark and less bright, the location sector dining table illuminated more intensely and brightly. The resting place is equipped with the most comfortable type of lamp.

A few curvilinear and circular sections on the kitchen ceiling are able to soften the contrasting bright red color used in kitchen furniture.
The monochrome division into black and white plasterboard ceiling zones can not only enhance color scheme interior, but also helps to skillfully hide the details ventilation system hidden behind hanging decor.

A rather interesting and new solution is the use of inserts with stained-glass windows and photo wallpapers on the upper tier of the suspended ceiling.

Plasterboard ceiling with backlight in the kitchen
To a large extent, the expressiveness of the interior of the kitchen depends on correct location fixtures, their type and number of lighting points. Traditionally for suspended ceilings drywall uses three types of lighting.

The most common lighting option is the distribution of spotlights on the suspensions of the lower tier. This type of fixture creates a uniform background lighting throughout the kitchen.
More modern version illumination is built on the basis of two and three-color LED strips. The tapes laid in the upper tier of the plasterboard false ceiling provide soft diffused light, if necessary, you can change the color and saturation of the backlight, thereby enhancing the color background of the kitchen interior.

The third type of illumination is used for local illumination. It could be Entrance door in the kitchen, dining table or additional cutting table at the countertop.

Do-it-yourself plasterboard ceiling in the kitchen
Regardless of the characteristics of the room, only moisture-resistant green gypsum boards and UD and CD galvanized metal profiles are used to assemble a suspended plasterboard ceiling. No wooden crates or conventional GVL. All elements ceiling structure must be moisture resistant, as the kitchen has always been and remains the most big manufacturer water vapor and condensate.
Marking the future suspended structure
It is necessary to start work by applying marking lines for installing a supporting metal profile on the walls and ceiling surface. It is best to rent a two-beam laser level for these purposes.
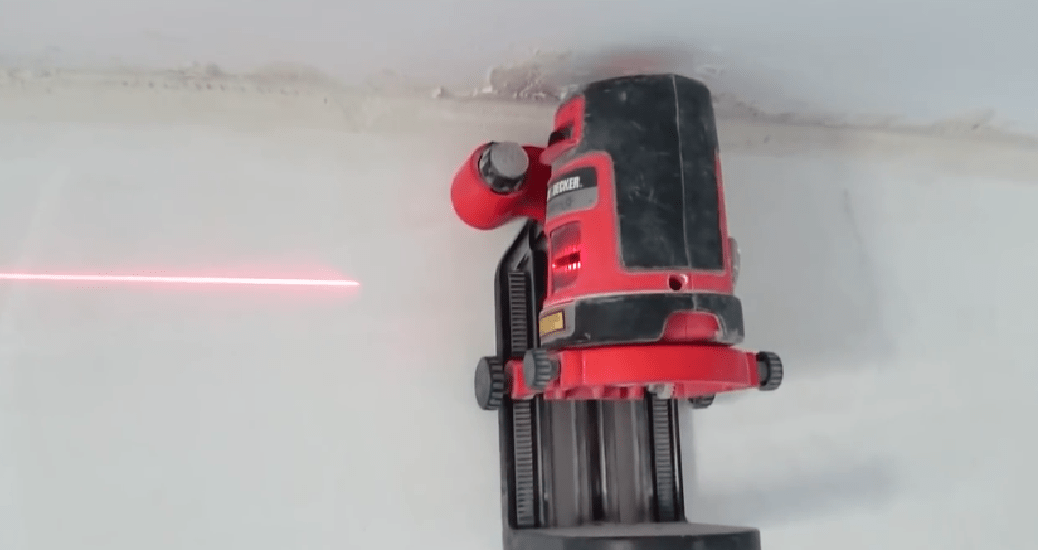
We fix the device on the wall, turn it on and adjust it, use a ruler or tape measure to measure the distance from the horizontal laser beam to the ceiling.
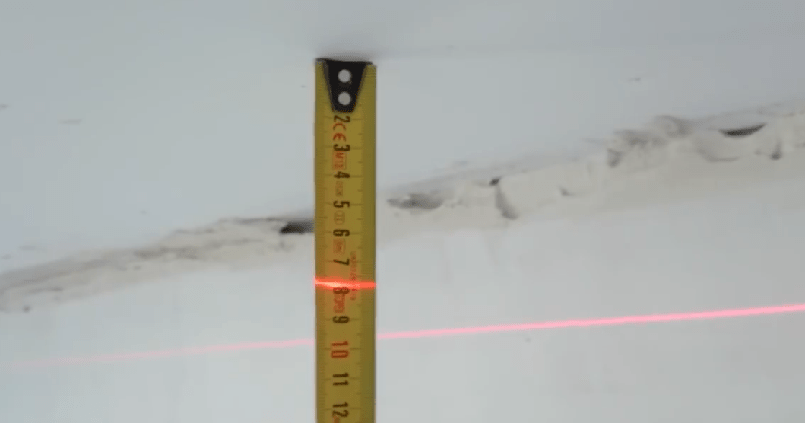
At the lowest point of the ceiling surface, the distance from the laser beam to the ceiling should be at least 4 cm, so we adjust and lower the marking line issued by the laser to fit at least 5-6 cm. After the final adjustment along the laser line, you need to pull the masking cord or duplicate the horizontal markings with a simple pencil.

For your information! In any room of a kitchen or other living space, ceilings always lie crooked, with a slope and a height difference on the walls of up to 5-6 cm.
After applying horizontal markings on the walls, it is necessary to draw the ceiling lines for installing the CD suspension carrier profile, in increments of 60-70 cm.
Installing a profile on the kitchen ceiling
First of all, it is necessary to install and fix the UD profile guides on the walls of the kitchen according to the horizontal markings. To do this, we drill holes in the wall and profile with a step of 30 cm, hammer in the plugs and wrap the mounting screws.

To install the galvanized CD profile, we mark the installation points of the U-shaped bar on the opposite walls of the kitchen. Each section of the CD profile is brought in and placed on the shelf of the UD frame. Until the crabs are installed, the CD strips remain "hanging" in the air, relying only on UD rails sewn to the walls of the kitchen.

This design obviously will not withstand the weight of drywall, especially if the kitchen ceiling is two-level, with numerous inserts and inserts. That's why next step assembling the structure from sheet drywall will be the installation of "crabs".
Each "crab" is a short perforated tape, which is wound behind a supporting profile and sewn to the kitchen ceiling. Further, the edges of the tape are bent and wound onto the “cheeks” of the CD profile.

Before fastening the edges of the ribbons under the profile, a marking cord is pulled between the opposite walls of the kitchen, along which the height of the installation and fastening of the CD profile is adjusted.
Strengthening the suspension system and installing drywall
Two-level ceilings in the kitchen with additional boxes and decorative elements always require reinforcement of the suspension system in places where additional loads are attached. Despite the apparent lightness, drywall, consisting of 98% of gypsum, has a significant weight, therefore, at the installation site of the boxes, it is always necessary to attach additional spacers and mountings that increase the rigidity of the supporting frame.

Be sure to put jumpers and spacers at the installation sites of lamps or ventilation elements.
If the kitchen ceiling design provides for additional hanging podiums or built-in niches, for each element you will need to cut out your own frame from a galvanized profile, which will subsequently be sheathed with pieces of drywall.
For fastening curved figures, the suspension profile is retrofitted with a mounting rail with split edges. Every 4-5 cm, a horizontal profile shelf is cut, which allows the carrier profile to be bent exactly along the curved contour of the drywall sheet.

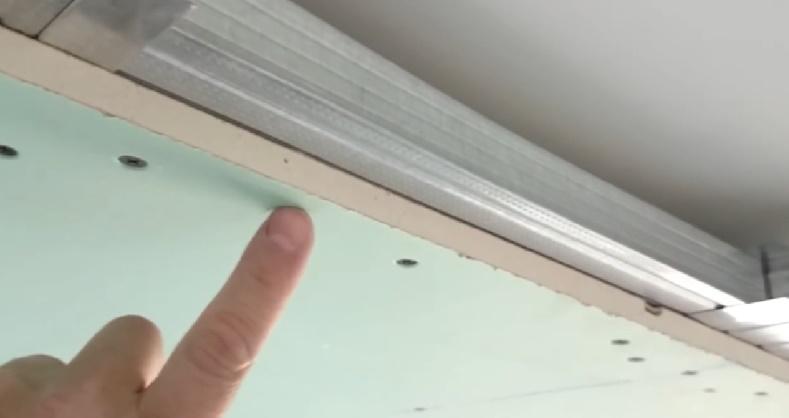
The lines of joints of drywall sheets are also strengthened. So that the seams between the details of the kitchen ceiling lining do not crack, both edges of the mating sheets must be attached to the backing CD profile.
The main part of the drywall is attached to the kitchen ceiling with self-tapping screws. At the transition points from the upper level to bottom material can be glued with acrylic glue, for example, "Moment" or "Liquid Nails".
Finishing operations for assembling the ceiling in the kitchen
After laying drywall, in order to relieve tension in the ceiling lining, first of all, the seams are cut at the transition points. After that, all joints are cleaned, primed and sealed with gypsum putty.
Then, in a similar way, the lower level of the ceiling is assembled, all the transition points to the upper level are glued with a mesh and sealed with putty. At the end of the work, the hanging decor is primed and painted with acrylic enamel.
Conclusion
Plasterboard ceiling in the kitchen de facto becomes the standard or standard solution problems with curved ceilings. The low cost of work and good decorative data make it possible to compete with the most expensive tension systems. In addition, the drywall construction is easy to maintain and repair, which cannot be said about more modern types finishing of kitchen ceilings.
To date, the plasterboard ceiling in the kitchen no longer surprises anyone, since this kind of ceiling has become known to the whole world.
Most, already on their own experience, managed to appreciate all the advantages of this finishing material, including strength, as well as ease of installation and aesthetics.

It is worth considering in more detail the design of the plasterboard ceiling in the kitchen, as well as all the advantages and disadvantages that may occur during repairs.

What is gypsum?
First of all, when deciding to learn how to make a plasterboard ceiling in a kitchen, it should be borne in mind that this material consists of gypsum, and is simply lined with additional cardboard.

At the same time, it is environmentally friendly. Installation of a ceiling of this kind takes in practice from one to three days. The time depends solely on the size of the room, as well as how complex the pattern was chosen.

In any case, this time is worth it, because as a result, the owners of an apartment or house will get a really smooth, durable and truly beautiful ceiling to be admired daily.
Advantages of a two-level ceiling in a plasterboard kitchen
If you want to protect the ceiling from sudden changes in temperature, as well as from possible humidity, then in this case it is better to choose the most moisture-resistant drywall.

By choosing the installation of such ceilings, you will have a unique opportunity to hide various kinds of communications like electrical wiring or terrible pipes.

Before installing ceilings, there is no need to level the existing ceiling, since in the end all the irregularities of the base will still be hidden.

If you want to zoning a room, then drywall can be a great helper.
Easy installation process. If desired, almost any design can be made from a material such as drywall.
Note! Kitchen set- 105 photo ideas for modern kitchen design

That is, any idea of an interior designer can be brought to life. In addition, it is quite easy to install built-in lamps in such a ceiling.

Easy to operate. If there is a desire, then in just a few days such a ceiling can even be painted in any color.

Resistant to various mechanical damage.

A few shortcomings
Installation must be carried out only by a true professional. This is due to the fact that any error in creating the frame structure can lead to the formation of cracks, even if they are almost imperceptible at first glance.

A neat finish is required when performing painting work. This is important so that in the future there are no noticeable seams.
It is best not to install plasterboard ceilings in an apartment purchased in a new house, since the building always shrinks, and after a year cracks may appear, or the frame will be completely skewed.


Thus, after looking at the photo of the plasterboard ceiling in the kitchen, we can safely conclude that it fits just fine for kitchen spaces.

Moreover, such ceilings can, if desired, even be combined with any other stretch structures.

Types of structures
Speaking about the type of fastening, it is necessary to keep in mind that there are various ways.

Firstly, this is a plasterboard suspended ceiling in the kitchen, when a suspension system is first attached in the form of, for example, brackets, and then the metal frame itself with sheets.

Secondly, as you can see, two-level plasterboard ceilings can be fixed in a special hemming way, when the frame is immediately attached to the floor slabs.


This allows you to make the design more durable and at the same time quite rigid.

Photo of a plasterboard ceiling in the kitchen


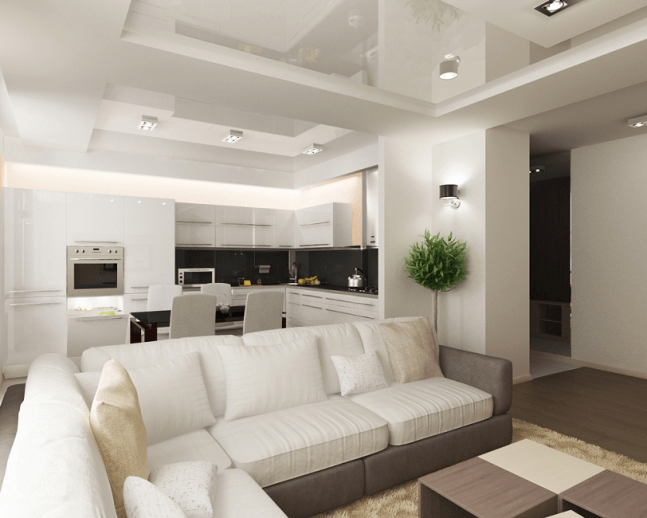
Plasterboard ceilings make it relatively easy to create the desired design in the living room or kitchen with different options decorative finishes. This material has an affordable price, is easy to cut with a knife, can withstand a lot of weight, and moisture-resistant varieties are well suited for kitchen conditions. Drywall is often used if you want to create a multi-level ceiling design, with built-in spotlights or communications hidden in a niche under it.

The advantages of plasterboard ceilings for the kitchen and living room are as follows:
- with the help of them it is possible to hide the irregularities of concrete floors and hide wires, pipes and other communications;
- provide additional heat and sound insulation;
- the material is easy to process, install and further operate;
- drywall sheets, durable, resistant to mechanical damage, there are moisture-resistant and refractory grades;
- such ceilings allow you to create several levels and appropriate zoning of the room;
- drywall is cheaper than many natural Decoration Materials, such as wood, polyurethanes, laminated chipboard and others.

Masters finishing works distinguish and disadvantages of plasterboard ceilings:
- there are seams between the sheets that need careful finishing to hide them;
- a drywall frame should be carried out by an experienced specialist, since cracks and other defects can occur at the slightest unevenness;
- in new buildings, it is not recommended to use such a finish, since the building is still shrinking, and the deformation of the walls can cause the destruction of the plasterboard frame.

The ceiling in the kitchen or in the living room is made of plasterboard using metal frame. For work, a moisture-resistant grade of this building material is usually chosen; it has a greenish surface color.

Varieties of designs
The simplest design plasterboard ceiling is a single-level, in which the coating occupies the entire area of \u200b\u200bthe room with one even layer. With such a simple design installation work are simplified, and the surface is perfectly smooth, various methods of decorative finishing can be applied to it: painting, gluing paper, vinyl or liquid wallpaper. Other advantages are the ability to integrate lamps inside, increased thermal insulation and noise protection.

Multi-level ceilings from drywall are represented by a variety of ideas and projects, but all of them have one rule: the lower the level, the smaller it is in area. This applies to options with right angles and lines, and complex curved shapes. Each next level is mounted on the frame of the previous upper one.

The most simple idea a two-level ceiling in the kitchen - 2 zones with a direct transition: a larger area above the main kitchen space, and a smaller one, lowered by 10-15 cm - above the stove, countertop and sink. In the living room, you can originally use two levels in this way: the lower level is in the form of a frame around the entire perimeter of the room along the walls, and the upper one is in the center of this frame. It turns out a kind of rectangular recess in the middle of the room, in the transition zone you can hide the side lights, which will create additional spectacular light.

Multi-level ceilings in the living room and kitchen should be designed in such a way that the individual tiers fit together and create harmony. An overly complex construction of heaps of three-dimensional figures may look absurd despite the high costs of repairs and materials. In the kitchen to create original interior two levels are enough, and in the living room a maximum of three.

Complex curly frames are good to use in large rooms, where there are several levels false ceiling won't take up a lot of space. Drywall is easy to cut along a curve, but rigid metal profiles are needed to install strong curved shapes. The curly frame can not only reduce the height in the room, but also visually enlarge a separate area in the room if the ceiling above it has a recess, i.e. more high level.

Kinds
Plasterboard ceilings with two or more levels are divided into simple and complex. The most common are 3 types of simple suspended structures:
- Frame - represent a one- or two-stage box with a width of not more than half a meter along the perimeter of the room. Built-in lights are usually installed on the lower levels, and hidden lights are installed in the side transitions. led backlight. The advantage of such ceilings is that there is no need to create curved profiles, all lines are straight.

- Diagonal ceilings, in which the transition between levels, most often wavy, bisect the room from opposite corners. Plots can be asymmetrical, different in area. It is preferable to make a higher level closer to the window, and equip the lower one with built-in spotlights.

- Zonal ceilings with their levels distinguish some zones in the room, in the living room it can be the sofa area, coffee table and sections, and in the kitchen there is a dining table area and a work area. The simplest example of zonal selection is the corner of a room, where the upper ledge is placed in the form of a triangle, its sides are adjacent to the walls.

Complex models suspended ceilings are also of several types:
- Figured with their lower levels form some kind of image, for example, a flower around the central chandelier. Most often they are located in the center of the room, but there may be various options.

- Ceiling abstractions form some kind of abstract figure with their transitions between levels. An example would be a spiral that radiates from the center of the room where the chandelier hangs, with a hidden backlight.

- Patterned ceilings represent a pattern of small elements distributed over the entire area. It is quite difficult to create such a drywall construction, but the result can be a spectacular unusual design.

- Floating ceilings contain individual elements suspended from the base at a slight angle, as a result, it seems that they are floating in the air. The effect is added by side lighting.


Complex curly models can be created both with built-in lighting and without it, in any case, the visual interior in the room will change dramatically. The ceiling is the part of the room that catches the eye in the first place, so you should not save on its decoration.


How to choose
Planning a plasterboard ceiling model depends not only on the desire of the owners to make lush unusual figures or on the ability to carry out complex installation of the frame. Important role play the size of the room. In a small kitchen with an area of \u200b\u200bno more than 10 square meters. m. you should not create a multi-level structure, even an option with one direct transition from the common area to the work area. The height of the premises in small-sized city apartments, in particular in the "Khrushchev" 2.2-2.4 m is not suitable for massive frames with several tiers. In such premises, it is optimal to make the simplest single-level model, which will hide the unevenness of the floors, provide additional sound and heat insulation.

Kitchen rooms with an area of 12-15 square meters. m. or more spacious allow you to show imagination and make two-level ceilings. The most popular options that are made in the kitchen are zonal, diagonal, frame. The first type is relevant if the countertop and the whole work zone located on the side wall. The second and third options are good for an island stove and a centrally located cooking area.

For a living room with spacious dimensions, nothing prevents you from creating a project of complex figured ceilings, soaring, abstract or patterned. But it should be borne in mind that such repairs in the room, including the installation of curved frames and additional lighting, require special professionalism. Therefore, it is better to use the help of experienced drywall specialists, which will not come cheap.

How to do
In the living room, you can use the usual grade of drywall, its sheets gray color, and for the kitchen you need moisture resistant - green. In any case, to mount the frame, you need rigid metal profiles that are attached to concrete base on strong screws with perforator dowels. The frame is installed strictly on a horizontal level, taking into account the weight of drywall sheets and finishing materials. Usually for standard sizes rooms, several transverse jumpers are installed.

For multi-level curly structures, metal profiles are cut and bent, such work should be carried out by an experienced specialist. Under their forms, sheets of drywall are also cut. All parts are fastened with ordinary self-tapping screws, which easily cut into metal and soft plaster.

Built-in lighting is mounted in holes cut out in sheets, most often small ones are used. LED lamp and ammo for them. The work of wiring power cables for fixtures and connecting them to a common network requires the skills of a professional electrician.

To create your own design of complex figured ceilings, you should turn to the services of professionals. Independent solutions and drawings often form an inharmonious interior with unnecessary tasteless heaps. And an experienced designer will tell you what shapes and lines are most suitable for a given room, how best to organize lighting and color combinations on the ceiling, how to arrange different levels among themselves. The specialist will sketch a drawing of the future floor structure, which can be further agreed and adjusted.

How to paint
AT modern finish the following types of paints are used:
- Acrylic types have many shades for every taste, matte and glossy. They dry very quickly, do not emit a strong smell when painting, like oil paints. Therefore, during the work, the master will not experience inconvenience, and upon completion, the room can be used almost immediately for its intended purpose. They have a high service life and protection against moisture, suitable for both the living room and the kitchen.

- Water-based paints have good resistance to moisture, pass air and do not harm health. By adding various pigments, you can independently change their colors.

- Water dispersion varieties are best suited for kitchens with high humidity. Their advantage is that the smooth surface can be easily washed with a wet cloth.

- Silicone-based paints also have the maximum degree of protection against moisture. They have many colors with a pleasant and even sheen, but of all the most expensive types.

It is worth remembering that before painting it is necessary to prepare the surface and protect the furniture, floor and walls from stains. Drywall itself has a flat and smooth surface. But at the joints of the sheets, and especially if the parts have curved curly lines, noticeably protruding seams remain. It is best to cover them with a layer of liquid putty and then, after it has dried, clean it with sandpaper. In addition, there is a special adhesive tape that covers these irregularities securely.

For effective adhesion of the paint layer to the drywall surface, it must be primed. An ordinary primer for interior work is suitable, which is diluted with water in a ratio of 1 to 1. It is best to apply the primer with a soft roller, and paint only after the primer has dried.

In addition to painting, wallpapering is used to cover plasterboard ceilings. Any options to the taste of the family are suitable for the living room - paper, washable, vinyl. To the kitchen because of her high humidity and high temperatures, it is recommended to use moisture-resistant washable wallpaper. Another finishing option kitchen ceiling- this is silk plaster or liquid wallpaper.

Interesting options in interior design: new items
Relatively easy to install, but effective appearance is a frame ceiling in the kitchen with spot lighting around the perimeter.
