
Chair repair. Do-it-yourself chair repair. Creative solutions for exclusive design
It's a shame to throw in the trash a thing that is included in the furniture set. Do-it-yourself restoration of chairs will help not to break the package. Also, do not be upset if something breaks down that plays the role of an exclusive, dear to the heart, memorable item. And here restoration can work wonders.
Chair paintwork
What is your favorite chair? These are wonderful moments of returning to childhood ... Or the memory of close person... Or even a chair can be passed down from generation to generation. Or something else, but so dear, with which you just don’t want to part.
But, unfortunately, a thing cannot be eternal. The furniture is scratched and peeling off. alas, it becomes unpresentable. However, restoring old chairs with your own hands will help keep the item for some more time.

Often, before varnishing, the chair must be completely cleaned of old paint or varnish. This process requires patience and perseverance from the master. But the pay for the work will be fully consistent with the efforts invested.
Chair decoration
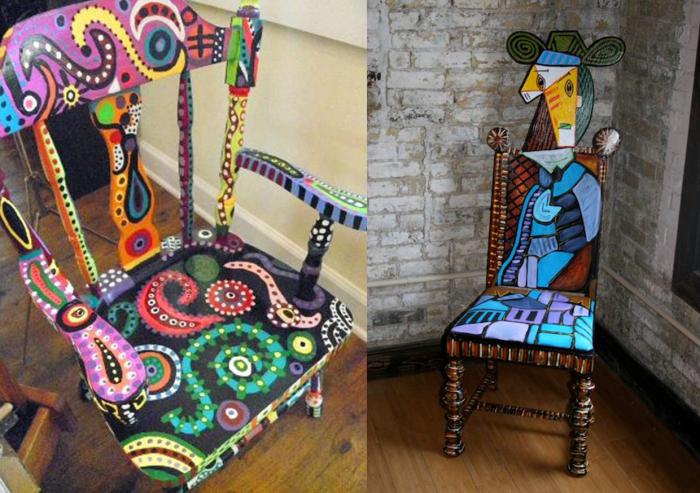
Sometimes it makes sense to radically change color solution furniture. Chairs painted in white or gold look very creative. Often craftsmen choose other colors for the wooden part of the chair: blue or light blue, pink or bright red. But then the upholstery should be pure white or with a golden ornament. The grace of this design takes people back to the time of Catherine II, reviving the palace luxury.
White furniture can be decorated with gilded ornaments, simply drawn or made in the form of a bas-relief. Blanks for this kind of jewelry can be purchased in stores or cast independently from plaster and glued. Do-it-yourself restoration and decoration of chairs in antique style will bring charm and originality to the design. Sometimes the edges of the upholstery are decorated with beautiful braid, tassels.

The image of the room will also be changed by chairs painted in a cubic style. And someone will like floral or vegetable colors more. In any case, the surface coating will protect the object from corrosion and increase its service life. Therefore, the practical benefits that such a restoration of chairs with their own hands will bring are also obvious.
Comprehensive instructions for replacing failed parts
In addition to the appearance of products, the owners of beautiful antique chairs are concerned about their functionality. Therefore, the restoration of wooden chairs with your own hands includes the replacement of some parts in the product. For example, it is difficult to carve a broken rail from the back of a chair absolutely identical to the remaining ones. Therefore, it is recommended to make the necessary number of rails of a different configuration, but of the appropriate size (height and thickness). You can even try to buy them in the store, although it will be very difficult.

Viennese chair repair
Very often, the slats simply fall out of their nests. Viennese chairs usually suffer from such a defect. Do-it-yourself restoration in this case occurs according to the algorithm described above. Only here it is no longer necessary to remove all the rails from the lower grooves. It is enough to clean the vacant hollow from the remnants of dried glue, fill it with an adhesive compound and strengthen the dropped part in it.
Soft chair repair
Furniture plays an important role in our life. For example, upholstered chairs look elegant and stylish in the interior. And they are much more comfortable to sit on than regular ones.
The most common repair is the restoration of chairs with your own hands, when it comes to upholstery that has lost its visual appeal. Spots or even holes that cannot be removed by anything often appear on it, ugly scuffs, burn out once bright colors. And sometimes you just want to change the entire design of the room, redo it in a different color scheme.
Restoration soft stool Do it yourself it won't take much time. Even an inexperienced master, a teenager or a woman can produce it. It is only important to choose a sufficiently strong upholstery fabric and professional furniture foam rubber.
Calculation of fabric when replacing upholstery
Often in the interior use a set of furniture. In this case, the upholstery is usually replaced on all chairs at once. Therefore, it is necessary to calculate in advance the size of the fabric required for the restoration.
First you need to measure the width and length of the seat. Do not forget to add a centimeter on all sides for the hem of the fabric. Most often, this part is square, measuring 50 by 50 centimeters, that is, 50 square centimeters.
Then, if the chair has a soft back, the same must be done with this part of the object. Having calculated the size of the upholstery needed for the restoration of one chair, you can calculate the amount required material for all chairs. By simply multiplying the result by the number of items (usually 6 pieces), the restorer will get the number of square centimeters. They need to be divided by the width of the upholstery fabric, which was looked after in the store. In the answer to this problem, the number of necessary "linear" centimeters will appear.

It is best to buy a little more material, with a margin, because otherwise, the master may have to sew the fabric, because a piece will remain in one strip when cutting, and a piece will also be in the other.
And to avoid this, the master will still need the ability to lay out patterns on fabric in such a way that there is as little unused fabric as possible. It will not be difficult to do this if you need to prepare the number of details from the newspaper in advance.
Upholstery replacement
If the restoration of old chairs with your own hands consists only in the fact that the master needs to change the fabric on the soft part of the object, then this will take quite a bit of time.
It is enough just to unscrew all the parts that require repair, that is, the seats and backs. Then the old upholstery is removed from them, a new one is applied, a hem is made, the edges are nailed with small furniture studs with wide hats. In the absence of such, small pieces should be cut out of cardboard or leatherette. Before hammering, you need to put them on nails so that they tightly hold the fabric, and do not slip through the holes punched in the fabric.
First fix the front of the seat. Nails are distributed quite often, after 0.7 centimeters from each other. If necessary, small folds are made, which are permanently fixed.
Then the second symmetrical side is punched, stretching the fabric. After that, work with the sides, leaving free corners. Before stuffing, they should be carefully stretched, straightening the fabric so that there are no wrinkles on the front of the upholstery.
The last step in this repair is fixing the corners of the upholstery with staples. With a thickness of plywood or fiberboard used for the frame of the upholstered part of the chair, equal to 3-4 mm, four-millimeter brackets will be required. Be sure to take this fact into account! Naturally, if the frame is made of a material 10 millimeters thick, then ten millimeter staples are taken.
Replacing the stuffing material in the repair of an upholstered chair
The calculation of the amount of foam rubber is carried out in the same way as for upholstery fabric. Only now it is no longer necessary to add hem allowances. Instead of foam, you can use batting.
Sometimes it makes sense to replace the packing incompletely. Then it is enough just to apply a “patch” in the place of punching, cover everything from above with a thin layer of batting or foam rubber.
If the padding is completely replaced, then all parts should be removed from the seat: self-tapping screws, staples, nails. It may be easier to cut a new part of the seat out of plywood or fiberboard, reinforce the padding on it, and cover it with new upholstery on top.
Gluing the joints of chair parts
Loose furniture can be repaired in two ways. One is to tighten the joints with self-tapping screws or bolts. They should not be screwed into the old grooves, but nearby, if possible. Sometimes the craftsman needs to use either a "patch" cut from soft metal.

The second way is gluing. Then the chair is disassembled into parts, the joints are cleaned of old glue. Having carefully missed the joints, the parts are connected and tightened with clamps.

Broken leg repair
The most difficult thing is if the “injury” of the chair consists in a “fracture” of the part. In an ordinary chair, you can completely replace a part by turning another one. But it is almost impossible to make a twisted or curved leg at home, which distinguishes, for example, Viennese chairs.
Do-it-yourself restoration in this case is carried out only with the help of glue. Moreover, the contraction of the part must be done not only in the places of gluing, but also at the ends of the leg, so that its size remains the same.

After drying, the joint is processed with sandpaper. For a more reliable fixation of the “fracture”, it is necessary to machine a groove on the inside, into which then glue the wooden plate, drowning it completely.
You can also use metal part, putting it on self-tapping screws. The excavation site is then carefully covered with putty or a mixture with sawdust, leveled, sanded and processed.
All photos from the article
No matter how carefully a person uses furniture, over time it becomes unusable. getting worse appearance, the upholstery fades and ceases to please with a riot of colors, the joints cease to be reliable. Usually in such cases, furniture has 2 ways: either go to a landfill, or fall into the hands of a master who will do everything perfectly, but not for free. But there is a third option - to do everything yourself.

Types of damage to wooden chairs
Repair of wooden chairs involves restoring not only its appearance, but also its strength characteristics. Specialized services often refer to this process as restoration.
Such restoration should not be confused with what experts do when restoring museum exhibits, in their case it is necessary to conserve the state of the object in the current state of time, which somewhat limits a person in choosing means. In the case of repairs, any methods can be used up to the replacement of individual parts.
During operation, the following defects may occur:
- damage to the paint / varnish layer, affects only the appearance of the chair;

- loosening of thorn-groove joints. The tree may dry out over time, and even under the influence of regular loads, such joints become loose;
- chips and cracks on the wood surface. Basically, most such defects can be eliminated without replacing the part;
Note!
The exception is large chips, which cannot be disguised in any way.
- the upholstery of the seat and back will definitely wear out after a few years, it can also tear or simply fade if bright sunlight constantly hits the chair;

- more serious damage (broken leg, back) can only be repaired by replacing them.
Repairing a wooden chair with your own hands is possible for all the types of defects described. Special equipment is not required, so absolutely anyone can handle the repair.
Repair technology
In order for the chair to be almost like new after restoration, it may need to be completely disassembled. But there are exceptions, for example, if you only need to update the paint, then you can do without it.
Fixing minor defects
Minor defects include those that do not require complete disassembly of the chair for their elimination. That is, updating the paintwork, eliminating small cracks, chips, etc.

If the chair does not please with its appearance, but still remains quite durable and not loose, then you can limit yourself to just painting / varnishing it.
In this case, the sequence of actions will be as follows:
- if there is upholstery, it must be removed so as not to stain the fabric with paint;
- then the old layer of paint / varnish is removed in any way;
- a new layer of paint / varnish is applied;
- after drying, you can install the removed upholstery in place.
The main problem with this is to remove the paint and not damage the wood itself.
There are several ways to accomplish this task:
- using a building hair dryer and a spatula. The whole instruction is that you need to carefully heat up the paint layer with a hairdryer, and remove it with a spatula;

Note!
You do not need to keep the hair dryer close to the wooden surface.
It is possible to spoil the plastic part of the body of the hair dryer itself, although it is made of heat-resistant plastic, it deforms when exposed to high temperatures for a long time.
- you can try to remove the paint mechanically. You can use a regular nozzle on a drill in the form of an emery wheel or a metal brush;
Over time, even the most reliable and solid wooden chairs fail. The most common problem is loose stool. As a rule, it can begin to stagger if the connection is unstuck in some place. Even a non-professional can repair chairs with their own hands.
Wooden chairs lose their gloss over time and become loose, as a result of which they need to be repaired.
The main feature of old wooden chairs is that they consist of many small parts that are glued together. Over time, wood can dry out and shrink. The joints in this case often diverge completely or become loose. Also, the connection may disperse due to the fact that the glue has dried out. At the same time, all elements of the chair remain in full working order, so it will not be difficult to repair it.
Basic repair rules
The simplest design for repair includes 4 legs that are inserted into the grooves in the lower surface of the seat, which is one continuous board of sufficient thickness. Stools are made according to the same principle. In this case, it is enough to remove the loosened leg, clean the glue from the recess so that the surface becomes clean. After that, a portion of the new glue must be applied to the leg and inserted back into the groove.

More complex structure are chairs with crossbars between the legs or a tsarga under the seat. This design contains a large number of spiked joints, which are fixed with glue. In order not to damage the parts of the chair, you need to disassemble it very carefully. If the adhesive seam diverges in only one place, then it is not necessary to completely disassemble the chair. You can make a hole in the damaged area with a thin drill from the inside (to maintain an aesthetic appearance) and pour glue into it. It is possible to use a syringe to inject glue.
If the trunnion (the spike at the top of the connection leg) is damaged, you can use a piece of paper to seal it. In this case, the strip of paper must be folded several times so that it is no wider than the trunnion. This will seal the connection. It is better to coat the paper with glue so that the connection with its use is more durable. After making such a kind of bandage, it is necessary to glue the leg into the nest in the seat.
Repairing a chair with curved legs must be done with particular care. In this case, it is recommended to glue the legs alternately. If you try to glue all the legs at once, then it will be quite difficult to get the correct position of the chair.
Features of work

If the trunnion is very dry, then it is necessary to insert a wedge into it. First, the part is removed from the groove, then its upper edge is split with a saw, and a wedge is inserted into the resulting slot. It should be thin and not very long in order to protrude just a little from the surface of the trunnion. It is best to use wood chips as a wedge. As a result, the trunnion will be expanded and the connection will become more reliable.
If the trunnion has dried out, but is firmly attached to the glue, then getting it out of the groove can be quite difficult. In this case, you need to try to push the details of the chair as far as possible and inject glue into the resulting space. However, it is recommended to remove the leg from the groove.
It may be necessary to soften the adhesive to release the glued parts. If a chair with crossbars between the legs is being repaired, then even strong seams will need to be disconnected. It is recommended to act on a strong adhesive seam with water vapor. Steam is effective even for well-closed adhesive seams. To create a directed steam flow, you will need a thin rubber hose (6-7 mm in diameter), 2 pieces of a metal tube of a suitable diameter, a cork and a kettle. Tubes must be put on both ends of the hose, one of them should be inserted into the hole drilled in the cork, and the cork into the spout of the kettle. Such a simple device will allow you to direct steam to the seam.
Before steam treatment, it is recommended to install the chair as close as possible to the stove, it is necessary to provide access to the treatment site. After cooling, the steam will turn into water, which is desirable to remove. It must not be allowed to fall on others. wooden details or upholstery. Steaming must be done with gloves. You need to put at least one on the hand in which the hose will be. This will protect against high temperatures. As a rule, 1-2 minutes of steaming is enough to separate the wooden elements. Re-glue them only after complete drying.
Repair of chairs with fixed corners

Methods for repairing common stool destruction: 1 - destruction of the leg; 2 - destruction of the tsarga; 3 - replacement of the destroyed section of the leg; 4 - replacement of the thorn of the side; 5 – screed of an elastic crack with reinforcement of the spike with an insert; 6 - sealing a wide crack with a bet.
Quite laborious is the repair of chairs in which the sides of the bottom of the seat are connected to the legs with a tenon joint. In such designs, additional corner fasteners are provided - solid wood chocks. They can be in the form of a trapezoid or a triangle.
With such a connection, it is usually not enough to separate 1 glue line. It is necessary to disassemble at least 1 corner, and in some cases, the entire frame. Force must not be applied to disconnect such a connection. In this case, you can damage or completely break off the spike of the tsarga. You can glue the parts using steam softening of the glue. When back gluing, it is very important to observe the angle. Small wedges can be inserted into the spikes on the sides to seal the connection.
In some cases, it is necessary to strengthen the frame of the chair.
This may be required if the seat panel is not firmly and securely fastened to the frame. To strengthen such a structure, it is necessary to fasten a triangular or trapezoidal chock on the inside of each corner joint. Over time, with high loads on the chair, even such reinforced joints can loosen. In this case, you will need to tighten the screws or replace them with new ones.
Sometimes you need to replace the chocks. This is necessary if they are cracked, split, delaminated or split. The new parts must be identical in shape to the old ones. In addition, it is very important to fit the side surface of the chocks to the frame. If the new chocks do not match the old ones, then the entire frame may be skewed. Chocks must first be glued inside the frame, and then additionally fixed with screws.
After gluing the frame, it must be fixed with clamps. In this case, it is not recommended to create very high pressure so as not to squeeze too much glue out of the seams. It will take about 12 hours to stretch. It is very important to comply correct angle for the chair and prevent it from warping. The tension pressure must be uniform.
Thus, even an inexperienced craftsman who will adhere to accuracy and accuracy in his work can do the repair of chairs with his own hands. Do not apply too much force to the frame of the chair, as this may damage its parts. Some adhesive seams may require steam to separate.
Regardless of whether each of us carefully or carelessly uses furniture, over time it loses its original appearance and becomes unusable. Worn upholstery, an unpleasant appearance, the joints of structures are loosened - these are signs of aged, unusable furniture. Throwing away, for example, your favorite chair or stool is a pity, but is it possible to make repairs with your own hands, and what are the ways to do this? Many masters believe that repairing chairs with their own hands will be a simple, reasonable and useful solution.
Natural wood and products from it do not lose their properties, while maintaining the quality of parts. If the wooden chair was in the room, the legs, individual elements and connections may loosen in it. Do-it-yourself repairs will allow you to bring the structure into an impeccable appearance and give new life. It should be noted that there are several types of damage. It is possible to restore the appearance and strength characteristics with the replacement of individual parts, for which the structure is disassembled in parts. During operation, defects may appear:
- damage to the paint or varnish layer;
- thorn-groove joints loosened under the influence of constant loads;
- the appearance of chips, cracks on a wooden surface;
- fading, damage to the upholstery;
- damage to the wheels, loose, broken legs and other problems.
The chair can be repaired with your own hands in all of the above cases, for which you do not need to purchase special equipment.
Steps for a simple chair repair
It is quite possible to transform a chair into a new state after repair and restoration at home. To know how to repair a chair quickly, you should determine the defect. A simple repair of wooden chairs with your own hands can be done without disassembling the product.
When a stool or chair is not pleasing to the eye, it can simply be painted or varnished. For consistent work, you need to perform several actions:
- remove the upholstery so as not to spoil the fabric during the painting process;
- remove the old layer of paint or varnish;
- we repair the surface of wood by grinding, priming;
- apply new paint or varnish;
- put the upholstery in place.
Carefully remove the leg from the socket. Remove old adhesive and apply fresh. Place a weight on the seat. Excess glue that comes out, remove
We pull the parts and inject fresh glue into the socket under the spike. A narrow wedge will expand the trunnion and the connection will be stronger. A close inspection of old chocks will help you determine if they need to be replaced.

We cover the cracks
It is important to properly remove the paint so as not to damage the wood. Cracks must be sealed, primed, allowed to dry, and then sanded. Repairing a chair with your own hands can be a rewarding and exciting experience.
Loose Chair Repair
Strengthening the corners on the frame of the chair How to glue the drawer side
It is important to understand that in the design of a loose wooden chair, there may be a drawstring under the seat, and crossbars in the leg area. Step-by-step instruction will allow you to repair chairs at home quite easily and quickly, which will require the installation of bars to increase rigidity:
- The first step is to replace the upholstery. You can do it yourself, but if it is complicated, then use the services of masters in the studio.
- If you replace the upholstery yourself, you will need to disassemble the old upholstery layer from the seat, replace the foam rubber.
- Inspect the surface for damage and repair.
- Put new upholstery on the surface, bend the edges, nail to the tree with carnations, or with a construction stapler.
- If the legs inserted into the seat are loose, you can pull out the rocking leg, remove old glue then apply fresh glue to it and insert it back. For a better understanding of how to properly repair wooden chairs in stages, if not only the leg, but also the back is loosened, you can watch the video.
- Chairs with a drawer side and crossbeams will have more difficult disassembly and repair due to the presence a large number spike connections. If the legs of a chair of simple solid wood construction are loose, it is necessary to pull out the loose legs, clean them of glue, and glue them back into place.
- If one seam diverges, drill a hole from below or from behind and inject glue into the damaged part into it.
- A damaged trunnion can be repaired with special thin pegs, or a bandage made of paper strips smeared with glue. The strips should be the same width as the trunnion.
Repairing wooden chairs and stools on your own does not require large investments, which every master and craftsman will like. And if the chair has wheels built into the legs that have become loose, you can also repair it yourself, without the help of a furniture repair shop.
How to fix wheels on chairs

Broken chair
The most common problem with modern chair designs, including office chairs, is wheel breakage. To make the chair on wheels last for a long time, you can also repair it yourself using a Phillips screwdriver, pliers and a hammer. The reason for the loss of the wheels may be.
In wooden chairs, one or the other joint is often unglued, and the chair begins to swing. Without spending special funds, you can fix old furniture before it completely crumbles.
Unlike modern plastic chairs, old wooden chairs consist of many parts connected with glue. Over time, some adhesive seam may disperse. The fact is that when it dries, the tree shrinks. As a result, the connections are loosened or even diverge.
In addition, the glue may dry out and no longer hold the parts.
In general, to make new beautiful chairs for his current interior from those dear to his heart, made by his father in his youth.
Read more: sdelaisam.mirtesen.ru
Unfortunately, over time, chairs, however, like all other furniture, deteriorate, scratch, rub and generally lose their appearance.
The swaying legs, the creaking seat, and the worn upholstery - oil painting, right? But often you don’t want to throw away furniture at all. And there are enough reasons for that. Do not despair if your favorite chair "let us down".
Restoring a chair with your own hands will help bring it back to life.
In wooden chairs, one or the other joint eventually becomes unstuck and the whole chair begins to sway.
An old chair can be repaired before it completely crumbles, without spending a lot of money on it. Wooden chairs are made up of many individual parts, glued together.
Fortunately, the chair itself does not become unusable from this. Skillful hands home master might well save him.
At minimal cost you can radically change the appearance of the furniture, everything will depend only on your imagination and the selected materials.
Before you repair a chair, you need to familiarize yourself with the detailed technology, this will prevent serious mistakes and do everything right.
Read more: MoyaGostinaya.ru
Time passes, and even good things wear out, lose their former gloss and simply break. But do not rush to send a shabby stool to the landfill, it can still become a stylish and functional piece of furniture. Restoration of the chair will take a lot of time and effort, but the result will exceed all expectations.
Read more: KitchenGuide
A little diligence and skills - and the scratch will become invisible. To put the furniture in order, you will need tools that are always at hand. First, carefully inspect the damaged surface, clean it with soft neutral detergents and wipe dry with a cloth.
It seems that loose chairs are not doomed in any way, to get into the queue for throwing away. In order not to disturb the interior, we will repair the chairs. And there is nothing complicated and terrible in this. Would free time, a tool and some knowledge and skills. And then your furniture will serve you for a long time.
Many things lose their attractive appearance over time, so they need to be updated. You can make some effort to restore the furniture and give it an amazing look. Especially often people remake old chairs. There are many ways to restore them.
Wooden chairs have long been present in our interior, which is not surprising.
After all, thanks to the material from which they are made, these chairs fit well into any interior and become, if not an ornament, then an attractive addition.
More: www.znaikak.ru
First things first, you need to disassemble the loose chair.
To do this, glued joints are heated with steam (as an option, you can use a freshly boiled kettle with a hose attached to the spout). The glue heats up and softens.
Master class and step by step photo will help to do it correctly and with the highest quality.
Chairs made of wood have not only an attractive appearance, convenience, exquisite design, but also high strength and environmental friendliness. Unfortunately, over time, such chairs tend to wear out, dry out, get damaged, or their legs simply loosen.
Now many people prefer to throw away broken things. Like, it's cheaper to buy a new chair. Yes, and some furniture manufacturers make their products "disposable" according to the principle - "They will use it, throw it away and come to us again for a new chair."

It is possible that this suits someone, but I think that in most cases it is not.
More: www.livemaster.ru
They say “time heals”, but this does not apply to wooden chairs, here the option is more suitable - “time cripples”.
No matter how strong this household furniture seems to be when buying, over time it also fails. The main problem is the loosening of the chair. This occurs as a result of sticking at any junction.
Repair old chair under the power of even a simple man in the street, which we are with you.
Read more: www.kakumet.ru
Beautiful and well-groomed chairs, like nothing else, decorates the interior of any room. But what if such furniture is already old and falling apart right before our eyes? It's simple, it needs to be fixed.
Do not immediately think that it is difficult and beyond your power. In this article, we will tell simple ways how to repair a chair, and you will see that you can easily cope with this task, saving the family budget and taking care of your home.
Now about everything in order.
Read more: serviceyard.
In this article, using the example of my kitchen stool, which began to creak and stagger in the fourth year of operation, I will tell you how you can repair a wooden stool at home with your own hands. It is possible that the design of your stool may differ from the one described, but this should not cause any special problems, since the principle of repair itself does not change.
Currently, part of the interior products are made of artificial materials.
But many prefer wooden furniture.
Therefore, in some cases in everyday life there is a need for restoration or repair. wooden products(e.g. chairs).
And it is not always possible to use traditional fasteners through nails, screws and other elements for connection.
Very often, during operation, such chairs loosen and break.
Before starting work, it is necessary to inspect the chair. If all the crossbars have begun to come out of the grooves or stagger in the grooves, then it is better to disassemble the chair completely.
Often the best option is the gluing of the necessary fragments.
The skillful hands of a home master may well save him.
For this reason, you need to know which glue is suitable for repairs. wooden structures.
Any type of glue should be chosen based on the specifics of its use.
Therefore, before buying, you need to get an idea of what properties it should have, that is:
- Drying time;
- Bonding density;
- Moisture resistance; By adhering to the instructions and taking into account all the requirements of gluing, everyone has the opportunity to achieve the desired effect with their own hands.
- Versatility of application;
- connection strength;
- The degree of toxicity. You must first familiarize yourself with the characteristics of a particular product in order to make the right choice.
- PVA: no toxicity, high speed, unlimited shelf life.
PVA glue is in demand in the furniture industry, the manufacture of interior items, if necessary, to connect any wooden parts.
- Epoxy: bonding strength, versatility of use.
Epoxy glue has become massively popular, because it firmly connects almost all materials and perfectly levels the surface.
- BF: fast drying, high moisture resistance.
BF-2 glue is suitable for gluing wood, it has an optimal range of qualities - it is not affected by fungus, oils, gasoline, and is waterproof.
- Syndeticone: high bonding strength, resistance to liquids and aggressive chemical compounds; high ability to withstand increased loads.
Syndeticone glue is great for gluing wood and gluing to it various materials.
- Polyurethane compositions: physical and chemical inactivity to different temperatures, ultraviolet, humidity, etc.
Polyurethane waterproof wood adhesive is considered the most resistant to stress and vibration.
To repair the chair you will need tools:
- Hammer; In order to avoid damage to the chair, it is better to use a hammer with a rubber nozzle.
- Sandpaper;Wood sandpaper is an indispensable tool in wood finishing.
- Adhesive;Adhesive for furniture should not only ensure the reliability of the connection. Sometimes improperly selected glue can significantly spoil the appearance of the product.
- Clamp; The clamp will help to firmly fix the glued fragments.
- Sharp knife; This type of knife is often used in the construction industry and in furniture repair.
- Chisel. The chisel is used for cleaning parts, trimming ends and removing excess.
- Upholstery of an old chair
- Removing the old coating
- Toning, painting, waxing
How to disassemble yourself?
Disassembling a chair with your own hands is not difficult, since its design is known to almost everyone. First you need to unscrew the back, and then the legs. And they assemble the product in the reverse order so that all the grooves take their places. If the high chair is fixed with glued spikes, the attachment points are moistened hot water or doused with steam from a steam generator.
Update baby chair happens on the same principle as an adult, but sometimes it needs to replace the hinges or the turning mechanism. Typically, children's designs consist of many parts that are designed to secure the position of the child. For greater strength, all connecting points must be glued.
To disassemble the folding chair, it is enough to remove the axial pins that connect the back and seat, and then remove the seat. Metal-based structures are easier to disassemble - you need to unscrew the seat and the soft part of the back.
If the seat of the chair is installed on a spring block, then it must be replaced with new springs. It is not necessary to remove the entire block for this.
Recovery process step by step
Each material is painted in a special way. For example, an anti-corrosion agent is first applied to the metal frame, after complete drying, it is covered with the main color. Transparent varnish is applied in several stages, and if a coloring composition is used, then it is better to resort to metal enamel.
wooden frame first treated with wax, carefully distributing it over all areas. Instead of wax, you can use an oil primer, which is applied with a brush. Then the product is covered with several layers of acrylic paint. These recovery steps allow you to quickly and easily renew your chair without the need for special protective masks and gloves.
Final stage The upgrade consists of creating beautiful upholstery. After removing the old upholstery, the base of the seat is cut out of the foam cushion, which is then attached to the surface using glue. For additional fixation, you can use paper clips. Having stretched the fabric well over the entire seat, it is fixed from below with furniture clips. Depending on personal preferences, the fabric may have a bright pattern or no pattern at all.
To remake a seat with springs, the batting is first fixed, and then the foam sheet layer. The fabric is attached in the same way as with a single layer of foam rubber, but it is pulled with more emphasis to smooth out the springy relief.
Many people think about what kind of paint is better to paint in order to maintain the effect for a long time. For wooden products, you can use a stain or paint and varnish, and for iron structures- enamel specially designed for metal.
Viennese
To restore an outdated structure, you need to prepare the basic materials and tools. To work, you need to get a hammer, a furniture stapler, a self-tapping screw, paints and varnishes, a solvent, brushes, glue, scissors, cloth and sandpaper.
The renewal process begins with cleaning all surfaces of the product from dirt and dust. After that, the disassembly of the chair begins. First, the seat and back are removed, which are usually held on with screws. Then, step by step, the rest of the details are removed. It is important to check the strength of all connections. If some attachment point is not holding well, then it is not worth disassembling it.
Details update
You can decorate the chair different ways. Any materials can be used: paper, fabric, laces, paints, napkins, etc. It all depends on the imagination of the master and on the level of his skill. Naturally, if a person does not know how to work with complex equipment, then you should not resort to it. We need to start with something more understandable.
With the help of sisal
For this method, you can use both a wooden and a metal frame. To work, you will need a large ball of sisal rope, a dense upholstery fabric such as velvet, a stapler, superglue, scissors, nails, a hammer, a pencil and a centimeter tape.
Having made a pattern of a new upholstery, you need to fix it on the seat. Small nails or a stapler are suitable for this.
wool yarn
To resort to this option, you need a construction on metal frame with mesh back and seat. For work, you need to prepare scissors, multi-colored woolen yarn, a crochet hook, a wooden plank, a screwdriver and screws.
Shabby Chic
Upholstery of an old chair
All photos from the article
No matter how carefully a person uses furniture, over time it becomes unusable. The appearance deteriorates, the upholstery fades and ceases to please with a riot of colors, the joints cease to be reliable.
Usually in such cases, furniture has 2 ways: either go to a landfill, or fall into the hands of a master who will do everything perfectly, but not for free. But there is a third option - to do everything yourself.
This chair has been given a second life.
Repair of wooden chairs involves restoring not only its appearance, but also its strength characteristics. Specialized services often refer to this process as restoration.
Such restoration should not be confused with what experts do when restoring museum exhibits, in their case it is necessary to conserve the state of the object in the current state of time, which somewhat limits a person in choosing means. In the case of repairs, any methods can be used up to the replacement of individual parts.
During operation, the following defects may occur:
- damage to the paint / varnish layer, affects only the appearance of the chair;
The appearance of the chair in the photo leaves much to be desired
- loosening of thorn-groove joints. The tree may dry out over time, and even under the influence of regular loads, such joints become loose;
- chips and cracks on the wood surface. In principle, most of these defects can be eliminated without replacing the part;
- the upholstery of the seat and back will definitely wear out after a few years, it can also tear or simply fade if bright sunlight constantly hits the chair;
Upholstery will sooner or later turn into something like this
- more serious damage (broken leg, back) can only be repaired by replacing them.
Repairing a wooden chair with your own hands is possible for all the types of defects described. Special equipment is not required, so absolutely anyone can handle the repair.
Repair technology
In order for the chair to be almost like new after restoration, it may need to be completely disassembled. But there are exceptions, for example, if you only need to update the paint, then you can do without it.
Minor defects include those that do not require complete disassembly of the chair for their elimination. That is, updating the paintwork, eliminating small cracks, chips, etc.
To repair such a defect, it is not necessary to disassemble the chair.
If the chair does not please with its appearance, but still remains quite durable and not loose, then you can limit yourself to just painting / varnishing it.
The main problem with this is to remove the paint and not damage the wood itself.
There are several ways to accomplish this task:
- using a building hair dryer and a spatula. The whole instruction is that you need to carefully heat up the paint layer with a hairdryer, and remove it with a spatula;
Removing paint with a hair dryer
- you can try to remove the paint mechanically. You can use a regular nozzle on a drill in the form of an emery wheel or a metal brush;
You can try to remove the paint and manually
- chemicals for removing paint and varnish coatings can only be used if it is possible to organize good ventilation in the workplace. And it is better to do the work on the street.
You can also use special washes
Also minor defects include small cracks in wood, as well as chips and holes made by insects. To repair such damage, you only need wood glue, small sawdust and a clamp / clamp;
- small cracks (with an opening width of not more than 0.5 mm) can simply be cleaned of dust, filled with glue and wrapped with ordinary paper tape;
- larger cracks are also cleaned, filled with glue, but in order for the edges to converge, a clamp is used (for a part of a square or rectangular section) or a clamp (for elements of a round cross section);
- chips and holes made by insects can be repaired with a mixture of wood glue and small sawdust. After painting, these places will be completely invisible.
The defects described above can be called cosmetic, they do not affect the ease of use of the chair. Much worse, if the chair is wobbly, this is a sure sign that a major repair is needed.
The chair needs to be dismantled for repair.
Repair of wooden chairs with such defects is that:
- the chair is disassembled. If the adhesive still prevents the tongue from being removed from the groove, then you can direct a stream of steam into the slot and, after the adhesive has softened, it is easy to disconnect the connection. Problems during disassembly can also arise with old screws, which are not so easy to remove. In this case, a couple of drops of oil and 10 minutes of waiting can help;
According to this scheme, you can soften the old glue
- then you need to examine all connections to identify loose ones. The tapered part (the one that fits into the groove) can be wedged to fit exactly into the groove. You can also simply wrap the narrowed part with a bandage soaked in wood glue;
The main steps in repairing a loose chair
- in some chairs, drawers are used under the seat; as a rule, crossbars are also located between the legs. This design of the chair can be easily strengthened without disassembly. All that is needed for this is the installation of small bars in the corners to increase rigidity.
Stool stiffening scheme
We change the upholstery
Of course, you can turn to specialists for help, but the price of upholstery replacement is unlikely to be lower than 500 rubles. With the same success, you can replace the upholstery yourself, the difference will be completely invisible.
For this you will have to:
- dismantle the seat from the chair and carefully remove the old layer of upholstery, it is also better to replace the foam rubber;
- next, the surface of the tree is inspected for possible damage, and their elimination;
- The removed upholstery can be used as a pattern. A contour is marked on the new fabric, it is necessary to make an allowance of 2-3 centimeters, this strip of fabric will be folded from below;
- upholstery is placed on a flat surface, a piece of foam rubber cut to the size of the seat and the seat itself are placed on top;
- the edges of the new upholstery need to be bent so that neat folds form at the corners, after which you can nail it to the tree with special carnations with a large hat. You can also use a construction stapler for this.
Fixation of tissue with a stapler
Summarizing
Self repair wooden chairs is quite real, especially since this requires a minimum of tools. As a result old furniture will receive a new life, and the owner will have a legitimate reason to be proud of the impeccably done work, and a small saving in the family budget will come in handy.
The video in this article shows an example of the restoration of a chair by the hands of a master.
You will need:
- nail puller;
- pliers;
- small nails and a hammer (furniture stapler);
- upholstery fabric;
- sackcloth;
- dense wide tape;
- dense fabric (canvas, tarpaulin);
- batting or synthetic winterizer;
- coconut fibre.
You can repair the chair, if it has not suffered much over time and has a quite decent appearance, by replacing the upholstery. The first step is to remove the seat, then use a nail puller to remove the old nails, carefully remove the fabric, remove the rest of the contents and springs.
It is important to remember the disassembly sequence - then it will be easier to assemble the seat again. Evaluate the strength of upholstery materials, those that are still in good condition, you can leave, and those that have already served their purpose should be replaced with new ones. In no case do not leave old nails - this will greatly complicate subsequent work, especially when using a furniture stapler.
Repairs begin with attaching a dense tape to the seat frame, it is best to do this with a furniture stapler. But not every family has such a tool, and it is not practical to buy it in order to repair a couple of chairs, so you can use short furniture nails and an ordinary hammer.
The tape is nailed in the form of a lattice, intertwining the verticals and horizontals with each other, you should get some kind of braid. The distance between the strips should not exceed 5 cm, the ideal option is 3-4 strips vertically and horizontally. In order to stretch the tape well, its end is wound around wooden block.
Burlap is nailed over the ribbon lattice, then springs are placed, sewn from below with a gypsy needle and strong twine, ordinary sewing threads are not suitable in this case. The main task is to fix the springs in such a way that they become motionless. After that, they start knitting, in front of each spring they hammer a nail (not completely), tie a tight rope on it (you can use linen or linen twine), drive the nail all the way.
Then each spring is tied from above, in this case it is easier to use a knot that is used for weaving nets. Knitting is performed vertically, horizontally and diagonally, at the end of each row the rope is tied to a driven nail. It is very important to choose a dense twine that is difficult to break, since the life of the new upholstery will depend on this.
A dense fabric (canvas or tarpaulin) is fixed on top of the springs, followed by a layer of coconut fiber, which is covered with batting or synthetic winterizer (can be replaced with furniture foam rubber), all this is fixed with another layer of fabric. Next, the upholstery is cut out to make a pattern; it is enough to wrap the seat with newspaper.
First, the upholstery is nailed in the center of one of the sides, then from the opposite edge. At the same time, make sure that the threads of the fabric are not warped. The corners are fixed last, if necessary, the fabric is collected in small folds. The edge of the upholstery can be finished with a cord or braid, the decor is glued with a glue gun. It remains only to return the seat to its place. On this, the upholstery of chairs with your own hands can be considered complete.
Regardless of whether each of us carefully or carelessly uses furniture, over time it loses its original appearance and becomes unusable.
Worn upholstery, an unpleasant appearance, the joints of structures are loosened - these are signs of aged, unusable furniture.
Assembly and hauling
Having updated the frame of the chair and dragging the soft parts with upholstery, all that remains is to assemble the product. Assembly is carried out according to the same scenario as parsing. The legs and back are inserted into the same sockets where they stood before the repair. Plywood is attached to the frame either with glue or with paper clips.
Having completed the restoration, you can get a unique object from old and dull furniture. You can simply paint a faded product in a delicate color, or you can resort to a more complex renovation technique.
This is the process of restoring an old chair on new way finished at home with my own hands. To create a more attractive and expensive piece of furniture, instead of dense textiles, you can use leatherette, genuine leather, as well as a variety of decor.
See below for how to restore a chair yourself.