Is it possible to build a bath inside the house. How to build a budget bath in the country. How to get a building permit
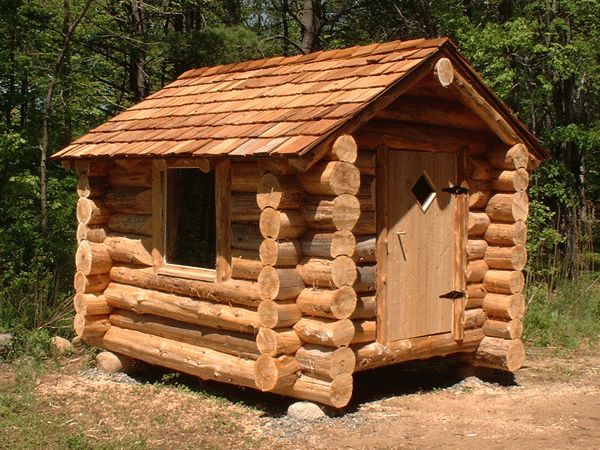
Frame construction is always chosen if for some reason it is not possible to put a structure from solid material. Timber and logs are well suited for the construction of a Russian bath, but over time, you need to do the finishing. And if you build a frame-type bath, then it will look no worse, and the cost savings will be 2-2.5 times. What is a frame bath, the pros and cons of the structure can be found by reading the article to the end.
The frame of the bath without finishing and insulation made of timber 100x100 mm.
 Finished frame bath artificial stone looks very presentable.
Frame construction comes to the aid of buyers who want to have a bathhouse or a house on their site, but cannot afford an expensive building. There is a lot of talk about such baths on the forums. A large number of positive reviews say that construction has inherent advantages, but there are also disadvantages. Why some of the buildings are criticized, we will find out below.
Advantages of frame construction of a bath
- All positive reviews about baths with a frame are mainly related to their advantages:
- The bath turns out to be light, so the lightest foundation is mounted under it.
- With proper assembly, it keeps heat no worse than timber or log.
- Construction is carried out in the shortest possible time, along with insulation and finishing.
- The bath will cost from 5,000 rubles / m².
- The assembly of a frame bath is 2–3 times faster than a similar one made of timber or brick.
The frame bath is assembled from timber and boards with insulation. The heaviest in the structure is a bar with a section of 100x100 or 150x150 mm. As a result, the load on the foundation is 5–6 times lower, which means that there is no need to make it massive.
Cons of frame construction of baths
 The frame bath is assembled, but without finishing it does not look aesthetically pleasing.
 The negative side of frame construction is mainly related to costs. Yes, at first glance, such a structure comes out cheaper. But if it is good to calculate the costs of insulation + finishing (external and internal), then the difference practically disappears. Of course, log baths also need to be finished over time, but they can simply be painted, and this is cheaper than panels or decorative plastering.
The second big minus frame construction It's a poor quality heater. If you use inexpensive mineral wool, then you should not vouch for the useful side of the bath. You can not use inexpensive foam, as it is highly flammable.
Third important point, this is the shrinkage of the bath. It is impossible to leave the insulated frame without finishing for more than 1–2 weeks, and shrinkage can last up to 2 years. And if you use a beam natural humidity, then the bath can sit down by 10 cm. In this case, the paneling will crack or deform it. This can be avoided by building a bath from chamber-drying material, but then the meaning of saving disappears.
In order to avoid trouble, the frame construction of the bath must be carried out in accordance with all the rules.
Construction of a frame bath
Since frame construction is lightweight, all work can be done by hand. You need to build a frame bath in the following successive steps.
Foundation for a frame bath
 Ready columnar foundation under the bath with top trim.
 The lightweight foundation of a frame bath is easiest to assemble from asbestos-cement pipes (with a diameter of 100 mm or more), reinforced with concrete. This is a columnar type of foundation.
The contour of the bath is marked and wells are drilled with a drill to a depth of 1–2 m. The depth depends on the proximity of occurrence ground water and type of soil.
Pipes are placed in wells and sprinkled with coarse sand. The sand is carefully compacted. The entire structure is poured from above with concrete, which should consist of:
1 part waterproof cement M200;
4 parts of sand;
7.5 parts of crushed stone of fine fraction;
3 parts water.
Pipes are poured alternately and they are allowed to dry completely. At the pouring stage, an iron plate is installed on top of each. The first link is laid on them in the future. Only after that you can do the bottom strapping.
Installation of the bottom trim
 The lower strapping from a bar under a frame bath.
 For the lower strapping, you can use a beam with a section of 150x150 mm, but in order to save money, you can take boards 50x150 and splice them with self-tapping screws. Before laying, the entire structure must be treated with an antiseptic and waterproofed. For waterproofing, roofing material is laid on the pillars in 2 layers.
After that, lags for future floors are fixed on the strapping. Between the lags and the strapping, roofing material should also be laid or smeared with mastic.
You can attach the harness to the pipes using special screws or brackets.
Installation of the frame walls of the bath
 Frame walls baths without truss system - assembly.
 All material including edged board before laying, dry and treat with antiseptics. Instead of timber, you can take all the same spliced boards as a basis.
They are selected according to the specified dimensions for racks and rafters.
Assembly is carried out next steps:
- Racks are installed in the corners, they are fastened together with an upper harness.
- Intermediate ones are mounted between the racks, they will strengthen the structure.
- The resulting structure is sheathed with boards or chipboard, using self-tapping screws.
- Install the remaining racks and are also sheathed with boards or OSB.
So, gradually adding the links of the racks, they assemble the whole bath. At the same time, openings for windows and doors must be taken into account; in frame construction, they should be done immediately.
Roof installation
 truss system roofs of a frame bath from a bar and boards.
 The rafter system for a frame bath is mounted in parts. Each is assembled at the construction site, gradually lifting and mounting on the roof. Each farm is attached to its own frame rack. When installing the last truss, an OSB is attached to it to obtain a pediment.
It is more convenient to assemble the roof by first laying a rough flooring from boards on the frame.
It is better to make the roof structure ventilated, for this, a vapor barrier is placed in the gap between the rafters and the counter beam, and the crate is mounted on the beam.
For the roof of a frame bath, it is better to use lightweight material: ondulin, corrugated board, soft tiles. After that, gables are installed using OSB or boards.
Warming and finishing
 The scheme of warming the frame bath - the main layers.
 The frame bath must be insulated and finished. Initially sewn on inner part ceiling OSB sheets or board, this will be a rough ceiling. It needs to be insulated in 3 layers with a fire-resistant insulation. The walls are insulated with 2 layers of insulation and glassine. In the steam room, an additional layer of foil insulation is made.
Only after that it is possible to finish with clapboard or imitation of timber.
A stove is being installed, which serves as a fireplace in the dressing room and, in the steam room heating element. To protect the frame tree from fire, a partition with a built-in stove is laid out of brick.
Do not forget about ventilation and holes in the ceiling for the pipe. It is treated on all sides with special fire-resistant compounds and laid with iron plates and asbestos paper.
If the bath is built without an attic, then a hatch is made into the attic and additional lighting is installed.
The ceiling in the firing compartment can be lowered to a level of 210 cm, this will make it possible to perform insulation and sheathe it with linden clapboard. All parts in the steam room are also best made from linden.
Bath building time
Frame construction is considered one of the fastest. But if you compare it with others, it becomes clear that the difference is small. Let's consider, for comparison, some stages in the form of a table:
It turns out that it will be faster to assemble a frame without finishing than other types, but insulation and finishing equalize the work period with the installation of a bath from a bar. The price for this will be lower, but the number of works more.
We have considered all the pros and cons of frame construction. It is up to the owner to decide whether to build a frame bath for permanent use or not. But we recommend using this for cottages or garden plots. It is better to equip residential private houses with baths from more massive structures.
In Russia, baths were called differently: firebox, lazna, soap. Healing properties water, steam, hot stones were known to Russian people for a long time, so baths in Russia were able to build everywhere. The love for cleanliness and healing bath procedures is still alive in us. Consequently, baths are an integral part in the construction of a country house.
In this article, you will learn how to properly build a Russian bath and what mistakes should not be made during its construction.
If you want to get a house or a bath in perfect quality, save time on learning technology, then order from an experienced company . Specialists are good at building objects of any level of complexity.
Useful information:
1 mistake - poor quality foundation
2 mistake - saw cut for a log house
Now most often you can find a log cabin for a bath made of pine or spruce. In Russia, it was the other way around, people cut houses from conifers, but baths were built from linden or aspen.
Conifers have a large charge of energy, well tone up and stimulate vital processes in the body. Baths, on the other hand, exist in order to relieve stress, and for this, wood species with an energy-negative or neutral charge, such as linden or aspen, are best.
Aspen wood does not prick or wrinkle, plus it is well preserved in water, and when dried, it does not crack or warp. There is very high humidity in the baths, so an aspen log house is very suitable for its construction. Over the years, the bath will not rot, it can only dilapidate and require minor repairs.
3 mistake - incorrectly erected log house
The log cabin of the bath is her body, so it is very important that it be made in accordance with all the rules. Logging trees are best harvested in winter, when sap flow is minimal. Logs from such a forest are strong as armor and cracks and cracks will not appear in them. Therefore, before purchasing timber for construction, ask when it was cut down.
The sauna stove is heated all year round and therefore it is very important to consider fire safety. It is necessary to have a chimney in the place where it passes through the roof. It should be noted that from the chimney to wooden parts must be at least 38 centimeters. The brick for the chimney must be of high quality without cracks, chips, lops. It is important that the pipe in the attic must be whitewashed. If cracks form, then this will be clearly visible on a white pipe.
5 mistake - poor-quality furnace fittings
All fittings for the furnace are installed during masonry, it is very important to check for quality before installation. A gate valve, a sheet with which it closes, a grate, that is, all cast-iron fittings are checked for sound by hitting it. The sound should be clear, sonorous, which means that the product is of high quality. At the furnace or blower door, we check the functionality of all the locks so that the door opens well and does not jam anything.
6 mistake - illiterate lining of the furnace
The surface of the stove can not be plastered, but it is even necessary to line it with porcelain or clay tiles. The brick very well absorbs the steam that is in the bath and, therefore, the furnace may be destroyed due to temperature differences. By putting the stove in a tile, you can avoid this, plus it will become more energy-intensive and will radiate soft heat.
Tiles are highly artistic (hand-painted) and simple. Glazed porcelain tiles are best suited for the oven, they absorb moisture well and are easy to clean. If you decide to use clay tiles, then you need to make sure that the clay was fired at a temperature above 1000 degrees.
7 mistake - the quality of the fuel for the bath
The fuel for the bath must also be selected. You can not heat the bath with conifers, they give a lot of soot, which settles on the walls of the furnace and becomes a fire hazard. For a good hot bath, a middle-aged oak is suitable (a young one will not give the desired temperature), a birch with a humidity of 25% or less, and, of course, an alder, it invigorates and heals from a cold. Firewood is harvested in hot weather, when it is dry, then you can see where the rot is present. You can also prepare in the cold, before tapping on the trunk. If the sound is deaf, then the trunk is rotten, and a sonorous and long sound will tell you which tree you need. Willow cannot be used - it is bitter. Ash wood burns out too quickly.
8 mistake - the contents of the heater
The contents of the heater, the stones on which we put water to get steam, are very important. The choice of stones is now huge, but there are subtleties that you need to know. The stone, before using it in the bath, must be checked. Before bath exercise, melt the stove, heat the stones and check them. After 500-600 degrees, soot begins to burn out of the stone. Pouring on the stones hot water 70 degrees (in no case cold - the stone will crack), steam will begin to be released. Here the main thing is to determine the steam is pure or with an admixture, for this you can hang a white sheet in front of the stones and after the steam dissipates, see if it is pure or not. If you find dirt, soot on the sheets, then it is better to remove such a stone, it contains a lot of volatile fractions harmful to the body. But if you decide to leave such stones, then it is better to test them several times, perhaps after 3-4 times the impurities will come out of the stones. After that, we select the bursting and crumbling stones and leave the most durable ones.
Advice for those who like to breathe aromatic oils. Do not pour oil on the stones - there is no effect. It is best to spray the walls of the steam room or add to the water with a broom, only in this case you will get the benefit and aroma of the oils.
9 error - incorrect ventilation system
It is necessary to ventilate the bath not like living quarters. Everything that we get rid of in the bath: dirt, sweat, various toxins falls to the floor, so the ventilation in the bath should be organized below. But the influx fresh air should be on top, preferably already heated. If the ventilation is organized incorrectly, then in the steam room you begin to inhale what comes out of you, and you begin to feel discomfort. In the bath you need to have fun, and not bring yourself to a semi-conscious state, therefore, proper ventilation is very important.
10 mistake - wrong door location
The door from the steam room must necessarily open outward. If you have over-vaporized, or because of a poor-quality stove or poor ventilation, you have received a dose carbon monoxide, then go outside at correct location doors can be a simple movement of the hand, pushing the door.
So, if you want to improve your health, get maximum pleasure, relax and unwind in the bath, do not make the mistakes mentioned above, and your bath will always charge you with joy, vivacity and health. Good luck.
tweet
Pin it
Like
Hello to all blog readers. This article is rather dedicated to those who have not yet decided on how to build a bath on his suburban area. Although some points will be very useful for those who have already acquired a bath, but as it often happens, something is missing. Also, using a specific example, let's see if it is possible to build a bathhouse alone, i.e. in one hand.
How do you imagine your vacation in the country without a Russian bath? Here I am all about the same. In it, you can completely relax, relieve accumulated fatigue and cleanse the body of toxins, and then sit down with the whole company at the table - drink tea, or maybe something stronger ...
My family asked this question as soon as we started talking on the topic: « Why don't we build a bathhouse? » Everything would be fine, but the word “what” included several concepts - “ what material; for how many people; how many and what sizes will be the rooms in the bath and most importantly choose under the bath?»
In search of solutions, I had to be guided by my (then still little) experience, as well as consult with neighbors, acquaintances and get to know the local conditions better. Well, we managed to learn something from books and magazines (then, unfortunately, there was no Internet yet). But the most interesting moment was that I had to build a bath alone, without help, relying only on his knowledge, hands and wife's "smart" tips.
At the family council, we clearly determined that the bath should be designed for 5-7 people. The second important issue was also adopted unanimously - - wooden beam . From which the design of the foundation was also determined - it was to be made of a shallow foundation, from ordinary (just left after the construction of the house) concrete blocks.
The base of the log bath - block
Doubts about creating three separate rooms in the bath: steam rooms, washing and changing rooms(part-time rest room) - no one had it. The addition of this ensemble will be a small open terrace.
How to build a bath in the country on your own?
Construction of the foundation for the bath
The soil at the site of the construction of the bath consisted of a layer of peat (in some places the thickness reached 0.5 m). And under it, sand of different grain size and water content was located in layers. Its upper layer, 10-12 cm thick, was distinguished by excellent strength and density, which is why it was decided to lay the foundation directly on it.
Under the frame of the bathhouse, six supports were prepared, each of which consisted of two concrete blocks (30 x 30 x 60 cm). Moreover, the lower blocks were laid flat, and the upper ones were standing right on them.
Such a design in terms of foundation stability did not raise any doubts. In the event of a draft of the building, due to its low weight, it could be corrected at any time using wag and several wooden linings. Looking ahead, I will say that in the ten years of service of this log bath, I have never had to do this.
Bath interiors
Dimensions internal separate rooms of the bath defined according to their functionality. Here, for example, a steam room at the same time (for a maximum of 10-15 minutes) can be occupied by 2-4 people. But in the rest room more often they gather all at once and for a long time. Based on this, the dimensions of all the bath rooms and their location were determined.
Steam room, shelves in two tiers with ventilation
In the steam room, the regiments were arranged in two tiers. The skeleton of a cast-iron stove-heater, lined with stones, also came out here. On the outside of the heater stove, there is a mounted tank for heating water. The furnace, thanks to its design, can be readjusted with the help of dampers - either in the Russian bath mode, or in the Finnish sauna mode. The firebox of the stove-heater looks into the washing room.
AT rest room(it is also a dressing room), in addition to the table, there are benches along the perimeter of the walls. Two of which have the width required for lying. To heat the water in the washing department, titanium was first used on wood with a shower unit. Later it was replaced with a closed shower with an electric heater. The booth, by the way, turned out to be the most suitable if you needed to take a shower without heating the steam room. Even in not the warmest weather, it is quite warm here and there is no need to melt the stove to wash or rinse.
Bath wall material
Bath walls collected from a pine bar. Inside and outside they were sheathed. But since all the work had to be done alone (and even under the strict control of the foreman-wife), each action had to be thought out and calculated in advance. Therefore, blanks from a bar (6 m long) for the construction of walls had to be cut according to the template with a chain saw, immediately for the entire bath. To facilitate the assembly of the log house, the joints at the corners were made in half a tree, fastening the bars along the length with a step of 1 m (also in the corners) with steel dowels.
Firebox exit to the washing room
Dowels a length of 1.5 beam heights was cut from a six-millimeter steel bar. After laying the next beam on the interventional insulation, through guide holes were drilled under the keys in it with the passage of two underlying beams. Further, the dowels were driven into these holes, sinking them by 1-1.5 cm - so as not to interfere with the laying of the next beam.
rafters(for the assembly of the upper parts of the bath) were assembled on the ground and already ready-made were placed in the required place. The ceiling was sheathed with linden clapboard, punching planks from below to the beams of the ceiling. On the insulation of the ceiling, I decided not to be smart, but to insulate with what was at hand - dried peat, and in some places (around chimneys) expanded clay and the remains of mineral wool.
floors
Floor in all rooms, except for washing, also insulated. First, a draft floor, and on top of it and the laid insulation, standard tongue-and-groove boards were laid, which were carefully selected (mainly for splinters and chips) under the strict guidance, correctly, of the same foreman-wife. All boards must be carefully and smoothly planed and not have external defects and flakes in order to walk barefoot without fear of getting a splinter.
The bath, in addition to its direct purpose, was used (and quite often) as game room first for our children, and later for our grandchildren, along with their cheerful gang of friends and acquaintances - especially in inclement rainy weather. There they had all the conditions for various board and outdoor games. Sometimes, when they were too annoying with their fuss, I told them: “But you wouldn’t go to the bathhouse ...” And they set off at full speed for their “bathhouse jobs”.
By the way, it turned out open terrace at the exit from the bath fenced with low railings. A great place to sit to catch your breath and recover after taking bath procedures. In the future, even then a small pond was outlined. But now, on the site of that bath from a bar, there is a chic one with a pool. But the dream of a small pond still remained.
At the exit from the bath - terrace
bath building mistakes
In conclusion, I would like to point out some flaws in the construction of this bath at their dacha, which crawled out already and in the process of construction, as well as its operation. So, for example, the width of the log house should have been made not 2.5 m, but all 3 m - there would be less waste of timber and veneer boards, firstly. Yes, and washing after
Some buildings on the land plot are subject to mandatory registration. First of all, these are capital buildings and large objects. But many are wondering whether it is necessary to register a bath on suburban area whether you need a permit to build a bath on the site. It depends on the purpose of the operation of the building, the size and dimensions of the object. Let's look at these issues in more detail.
When can I build a bath on the site
Before erecting a bath, you need to figure out whether it is possible to build on this land. Construction is allowed on the following types of sites:
- IZHS - plots for individual housing construction, which belong to a specific locality (cities, villages, towns, etc.);
- LPH is a personal subsidiary farm, where the construction of a residential building and other buildings is allowed. This land is also used for agriculture without the purpose of making a profit;
- Summer cottages allow the construction of residential and commercial facilities, gardening and livestock. They include SNT (garden non-profit partnership), dacha cooperatives, etc. Today, dacha plots are equated in rights with individual housing construction.
Other categories of land are not intended for construction. For example, there are territories exclusively for agricultural purposes. Then you need to design a future bath. The design and function of the building will determine whether a building permit needs to be issued and whether the facility needs to be registered.
We note right away that capital buildings with a second or attic floor, living rooms and connected communication networks require a mandatory permit for construction. Registration of a bath on your site is necessary if it is a capital construction object, you want to confirm ownership and in the future you plan to take actions with the object and the site (sell, insure, donate or inherit).
Bath building permit
On the land plot, it is not necessary to register sheds, temporary and outbuildings, gazebos and other objects that are not related to capital construction. Such objects are a light weight, absence engineering networks, residential premises and the foundation, or a lightweight shallow foundation is allowed with a laying depth of up to 1 meter.
You do not need permission to build a garage on your own site without the purpose of doing business and making a profit.
A permit is required for permanent buildings and buildings with residential premises. Standard compact lightweight bathhouse with a shallow foundation and without summing up engineering communications does not require a building permit. This is an auxiliary building that can be safely erected on the site of IZHS, SNT, LPH, and a dacha cooperative.
But today, spacious and comfortable baths with all amenities are in demand. They have a capital foundation, water supply and sewerage, electricity and other engineering networks. Two-story baths and projects with an attic include a lounge, several bathrooms and even a kitchen. Buildings like this require a permit!
In addition, you need to obtain permission for baths that are attached to residential building. In this case, the building plan is changed, which is then approved by the relevant authorities. Here, the increase in area, the effect of the extension on the strength of the foundation and walls, and compliance with sanitary and fire safety requirements are taken into account.
Thus, a building permit is required for capital construction projects, namely for a bathhouse with a second or attic floor and living rooms, with communication networks and a solid foundation. In addition, permission is required for a bathhouse attached to a residential building.
How to get a building permit
If a permit is required for the construction of a bathhouse, it is necessary to collect and submit the required documents to the authority local government where this land plot is located, or to the nearest MFC. The following documents are required to obtain a permit:
- Application for permission to build on a land plot (a sample and a form can be found on the Internet);
- A document that confirms the right to own a land plot;
- Plan land plot;
- Project documentation, which includes an explanatory note, information about engineering networks, a layout of buildings on the site, etc.;
- A positive opinion on the project documentation, if expertise is required.
If you submit documents through a representative, a power of attorney is required. The municipal authority considers the application for ten days and then makes a decision. The permit is valid for ten years from the date of receipt and is issued free of charge without state duty.
Bath registration
You need to register capital buildings, regardless of the purpose, if you want them to be owned. The right of ownership gives the opportunity to dispose of the property in full. In the future, you can easily sell, donate, leave as a legacy and even insure the built bathhouse.
Modern legislation allows you to register the ownership of objects located on the purchased or received land. It can be a bathhouse and a garage, animal enclosures, gazebos and utility blocks, garden and country houses, residential cottages.
Whether to register a bathhouse, a garage and other similar buildings, each owner decides independently. Note that if this is a light structure without a solid foundation up to 1 meter deep, engineering networks and residential premises, there is no point in registering. Moreover, for each registered object you need to pay a separate tax!
In this case, the bathhouse is one of the outbuildings that automatically become property along with the land. Of course, if the site itself is registered in the property. Therefore, whether an object needs to be registered depends on the type and purpose. You can choose a solid capital building or a compact building. You will find many interesting projects of baths with one and two floors, with rest rooms, a terrace and an attic in the MariSrub company catalog.
Registration is required for a bathhouse with communication networks, living quarters, a deep foundation, i.e. if it is a capital structure. Also subject to registration are baths attached to a residential building or buildings, the layout of which provides for a bath inside the house.
How to register a bathhouse on a land plot
You can register a bathhouse using a cadastral passport or a simplified declaration. For registration, you need to make the necessary measurements, registration certificate, tie the object to the land. Thus, in order to obtain ownership of the bath, you must provide the following documents:
- Application for state registration of property rights (a sample and form can be found on the Internet);
- A document confirming the ownership of the land;
- Passport of the applicant or representative;
- Cadastral plan of the land;
- Cadastral or technical passport of the object (for non-residential objects - a declaration, a sample and form of which can be obtained from the BTI);
- Receipt of payment of state duty. State duty for registration of real estate for individuals is 2000 rubles, for the registration of a land plot - 350 rubles.
To obtain ownership of a previously built bathhouse, outbuildings, garage or garden house according to the dacha amnesty, which is valid until 2018, it is not necessary to provide a building permit. However, if this is a new building, or you are only planning the construction of a capital facility, a permit is required.
If you submit documents through a representative, a power of attorney is required. Documents are submitted to the MFC or the Registration Chamber. The application is considered within a month.
Requirements for the construction of a bath
In order to obtain a building permit, issue a technical passport and project documentation for registering property rights, construction, technical and sanitary standards must be observed during construction. These are the following rules and guidelines:
- The bath is located at a distance of at least 3 meters from the neighboring site and at least 5 meters from the residential building. It is desirable that it be viewed from the windows of a residential building;
- The structure is installed at a distance of at least 20 meters from water bodies and wells to avoid water pollution;
- It is desirable to carry out construction on a slightly elevated and flood-free place;
- When erecting wooden bath wood elements must be processed special composition, which will prevent the spread of fire in the event of a fire;
- The ceiling of the object is insulated with fireproof materials. It is desirable to protect the area where the chimney is adjacent to the ceiling with a layer of sand with a radius of 70 centimeters in order to prevent fire in the event of cracks and damage to the chimney;
- Asbestos-cement pipes, which are quickly destroyed due to exposure to high temperatures, cannot be used to install the chimney.
- It is not recommended to use and metal constructions, as they get very hot and increase the fire hazard;
- The areas that border the stoves are provided with fire screens made of plaster, tin and metal sheets or other similar materials;
- A pre-furnace sheet with parameters of at least 60x70 cm must be laid in front of the furnace firebox. The wide side is placed along the furnace;
- Doors are installed so that they open outward;
- The room must have a fire extinguisher and ventilation openings;
- Grounding and insulation of wires are mandatory conditions for the installation and conduct of electricity in the bath.
When designing, it is important to take into account not only the layout and number of storeys, but also sanitary and fire safety requirements. Therefore, it is better to turn to professionals. The masters of the company "MariSrub" will perform a full range of work, which includes the creation of a project, the installation of a foundation and the construction of a log house, the installation and connection of engineering networks, finishing!
The company "MariSrub" necessarily complies with the requirements and safety standards of sanitary and technical rules. We provide technical documentation, process wood with protective compounds. Let's construct any kind of a bath, including capital constructions and compact courtyard structures. An experienced architect will create individual project or make changes to the standard version.
It so happened that the bath - essential attribute beautiful, well-furnished cottage. It’s one thing to hastily wash yourself in an uncomfortable and cramped shower stall, and quite another to comfortably take a steam bath in a cozy place, feeling like a real resident” Ancient Russia". It is not surprising that baths in summer cottages are so popular. Of course, you can order the construction of a bath in some construction company. But what if you yourself were engaged in the design of your dacha and now you don’t want to break the existing harmony with someone else’s interference? It remains only to build a bath yourself. Moreover, it is not so difficult. This article will highlight all the points that can cause difficulty, and you will get a wonderful bath without a foundation.
Why no foundation?
There are three main reasons.
- Building a bath with a foundation is much more expensive. If you do without it, the cost of construction can be well cut.
- Without a foundation, the building will legally be considered a barn, a change house. You do not have to coordinate the structure of the bath with numerous inspections, obtaining permits. No, the “barn” will also have to be issued, but it is much easier. Conventionally, this bath will be considered a mobile, collapsible building that can be moved somewhere at any time. But the time of her stay on the site is not regulated, so there is no need to worry about it.
- Sometimes there is simply no time to build a solid foundation. And then it will be a temporary solution. And then you can transfer the bath to the foundation, if you want.
Building Requirements
To avoid problems with inspections in the future, it is better to immediately ensure that your bath meets the following requirements:
- weight no more than four tons;
- area no more than 30 square meters. It is considered not inside the room, but outside, along the outer perimeter;
- there should be only one floor, the first one. It is impossible to build a second floor;
- the structure must be collapsible. Conditionally collapsible. Of course, no one will dismantle the bath to check this criterion.
Determine the type of soil
First you need to find out if it is possible to build a bath without a foundation on your site. Is it always possible to do without it? No. A lot depends on the type of soil in your area. Rocky, mountainous terrain is ideal, where the soil is quite hard. Soft ground will inevitably sag, and it will do it unevenly, causing distortions of doors, windows, and even the destruction of walls.
The soil must withstand a pressure of 12-15 kilograms per square centimeter. This is the minimum hardness required. If it is not there, you will have to make a strip or pile foundation, and this is a topic for another article.
clay base
If the soil is dense, not eroded by water, not prone to slipping and sliding, you can use this method.
- Level the site on which the construction is planned.
- Mark the outline of the future bath, and dig a trench around its perimeter. The depth should be about 30 centimeters, the bottom of the trench should be strictly parallel to the surface of the earth.
- Reinforce the trench with boards. They must be quite strong, that is, a rotten tree falling apart from old age will not work here.
- Fill in the gaps between the boards with clay. Do not dump all the clay at once, do it gradually, for example, 5-10 centimeters of clay at a time. Tamp it down carefully each time. You can use a special roller or just some kind of log that will need to be knocked on the clay, compacting it.
- The clay will dry out in a few days, and now you can build walls on it. It will provide sufficient density to the base.
Sand and gravel base
This still will not be a foundation, but a foundation pit will have to be dug. This option is suitable for less dense soil.
- Dig a pit. Its depth should be 90-100 centimeters. Theoretically, you can do with a shovel, but it is better to use a special technique.
- Dig drainage trenches. They should go as if down and at an angle from the pit. Their task is to divert groundwater from the pit, reducing moisture. The trenches will need to be filled with special drainage soil.
- Fill the pit with rubble. You can use something else, such as a broken brick, but it will be less effective. Crushed is better.
- On top of the rubble, you need to lay a waterproofing layer of any material that you like and meets the goals of waterproofing. Roofing material is well suited for these purposes.
Such a base is able to withstand much more weight than clay.
boulder base
As already mentioned, one of the most suitable areas for building a bathhouse without a foundation is mountainous and rocky terrain. In it, boulders and stones of various sizes and shapes can be found in abundance. Therefore, it will be cheaper and easier to make the basis for the bath from them.
Such a base will be very reliable and will withstand even a rather heavy structure. A bathhouse without a foundation, but on a stone foundation, can even be made of logs. Reliability and ability to withstand gravity is quite comparable to a real foundation.
Rubble pillow
Such a base is only suitable for a flat surface. If there is some slope of the soil in the place where you are going to put the bath, you will have to make columns.
- Dig a shallow (up to 50 centimeters) hole on the base of the future bath. Its bottom should be flat, parallel to the main surface.
- Fill the hole with gravel.
- Lay a waterproofing layer on top.
Bath features
Remember, the foundation is needed precisely in order to withstand the heavy weight of the building. No matter how beautiful the foundation you have obtained, it is still not the foundation. And it will not withstand really heavy loads. Therefore, the bath itself, which you will build, should be lighter than its “fundamental” counterparts.
Walls are best made of wood or plastic, heavy logs won't work very well, but if they're light and not too thick, they can be used.
How to raise a bath
What if you already have a bathhouse on the site, but you want to raise it. For example, for the reason that you noticed how the walls rot from below. How to raise a bath without a foundation? It's not as difficult as it might seem. You will need a jack (one is possible, but it will be easier with several), supports and posts on which the bath should eventually be installed. So how is it done?
Bring the jack under one of the corners of the bath, gently lift it up. Not too hard, five centimeters at a time will be enough. Place a solid base. Move to the next corner and do the same with it. So, the foundation is laid under the walls, now you can proceed to the props. Everything is the same: slightly raise the corners, put the supports one by one, remove the jack. If you have several jacks at once (preferably four), everything can be done much more conveniently: you set the jacks at once at all angles, raise them at the same time, and even then put the supports. So you can raise the bath not five centimeters at a time, but a little more. In addition, this way the load on each individual jack will be less, which means there is less risk that something will go wrong.
If the crown of the building looks unreliable and it seems to you that it may break, you do not need to follow the above instructions, because it is dangerous and fraught with injury, not to mention the dangers of the bath structure.
Buying a finished bath
If you are not sure that you can build a bath yourself, you can always purchase a ready-made version. Then the base must be done in the same way as described above. Technology will not change. You just have to focus on the dimensions of the finished bath, do not forget to clarify them properly and several times. In general, even if you want to buy a so-called “mobile” sauna on wheels, the base will not interfere with it.
It is always better for a building, even a mobile one, to stand horizontally, without distortions. Especially if you are not going to transport the purchased bathhouse anywhere. The weight of the building will still make it sag. Distortions will cause inconvenience during the operation of the bath, so a solid base will be a good way out. The only thing is that when buying a mobile bath, you can take care of waterproofing a little less. She will still rise above the ground.
So, if you are not afraid of difficulties, have ingenuity and some engineering imagination, it will not be difficult for you to build a bathhouse on your summer cottage on your own. The main thing to remember is that if something doesn’t work out for you, stop and ask for advice from more experienced friends and acquaintances. Also, qualified advice can often be obtained at some forum dedicated to construction. Of course, this is a very special pleasure - to bathe in a bathhouse built with my own hands, so overcoming all the difficulties on the way to this goal is really worth it.