
Options for making fences with your own hands. A strong fence to the country house with our own hands: we use proven and improvised materials. Making a wooden fence on your own. Step-by-step procedure
Each owner land plot, even a very small one, strive to mark the boundaries of their possession. In most cases, the owners erect fences that will hide the territory from prying eyes, intrusions from the street of strangers. And most often such a fence is a fence.
To build a high-quality and aesthetic fence, you do not need to immediately turn to specialists. With your own hands you can create a unique design that will become your pride. To do this, you should find a good consultant, which is our site, and clearly follow his step-by-step instructions. According to our recommendations, you will independently build a wooden fence, from which you are now a few steps away.
A serious step - the choice of material
A large selection of materials for building a fence sometimes puts the owners in a difficult position - which is better to choose? The choice depends on how you want to see the fence. Therefore, it is necessary to have at least a little information about each of the modern materials.
brick fences are solid durable buildings. From this traditional building material, a capital strong building is being erected, which will stand for more than a decade.
Particularly popular, recently, have become fences made of light, durable and beautiful corrugated board, which is universal for the construction of this structure. The result is an easy-to-install, lightweight and aesthetic barrier.

Fencing structures made of tree. Until recently, this is the most common type of building material, which is gradually, although undeservedly, being replaced by modern ones.
Quite often, in the construction of facade and internal fences, they use chain-link mesh. But this type of construction, unfortunately, will put your entire site on public display of the street.
Modern construction of fences involves the combined inclusion in the design different materials, using stone and brickwork. Companies specializing in the construction of fence structures in their price lists offer the most various options combined fences.
How to start building
Whatever material you choose for your fence, the beginning of construction always requires compliance with a certain order. The first is laying the foundation for the future fence - the foundation. This step is preceded by the definition of corners and precise marking around the entire perimeter, taking into account the boundaries of the site.
If you decide to install a temporary fence, and later build a capital one, then it is not necessary to mount a strip foundation, which then will need to be destroyed. It will be enough to install and concrete free-standing pillars, which will become the base of the fence.
To determine the boundaries of the frame of your fence, you need to dig holes in the corners into which the supporting pillars will be installed and concreted.
What you need to know about racks
When choosing or self-manufacturing racks should also take into account some points.
The most durable and stable are metal racks. They are able to maintain the structure for a long time without repair.

Wooden supports, as practice has shown, are less durable. Separate processing requires a part of the pillar, which is in the ground. Therefore, it is most practical to install wooden posts when building a temporary fence.
Exceptionally practical and durable are bases made of pipes of various diameters or a square metal profile.
For self-construction of the fence structure, you will need welding machine, with which you can assemble the supporting part of the structure and install fasteners for spans. The video provides instructions for correct installation and concreting of supporting pillars.
And now - we will mount the frame on which the fence will be installed
When the first stage of work on the installation of the supporting part of the structure is completed, it is necessary to mount the fasteners to which the spans will be attached. Here, too, there are several options for welding fasteners.
When installing wooden beams as guides, they are fixed on the "ears" welded to the support.

When a metal corner is used, it is also welded to the pole, fixing wooden bars on it.

guide out profile pipe ensures maximum strength and rigidity of the entire structure. The spans are quite easily mounted on the base using self-tapping screws.
Useful information! When assembling a metal fence, you must first calculate its cost, as the design may be more expensive than desired.
The pinnacle of your creation
When the frame of your structure is ready, the most important, but pleasant step remains - the installation of spans. Our recommendations are focused on corrugated board, although solutions can be very different - slate, wood, mesh.

To make the fence even, you must first stretch a strong thread along the upper edge, along which the sheet will be installed. To set the horizontal direction, you can use a laser level or level.
With proper preparation and assembly, even a non-specialist should not have difficulties with installation, connection and appearance structures.
Be proud - you are a jack of all trades!
We really hope that you consistently followed all our recommendations and built a unique fence with your own hands and enjoy the fruits of your labor.
One of the important elements country house is a fence. It defines the boundaries of the territory of the site and serves as a protection from prying eyes. Increasingly, the fence also performs a decorative function. In this article, we will look at how to make a decorative fence with your own hands, without asking for help from specialists.
Fencing materials
Decorative garden fencing can be made from many building materials.
Separately, it is worth highlighting wooden fences:
- The installation process is simple
- Material prices are quite reasonable.
- Such a fence can be painted in any color that seems appropriate.
Stone fences are no less popular. Such a fence after installation does not require special maintenance.
Note! The fence should not only be outwardly aesthetic, its main quality is strength and durability!
There are options for making decorative fences made of plastic, concrete, brick, bottles and more. Below we will take a closer look at each of the existing ones.
plastic fence

As a rule, plastic fences can be purchased ready-made in the market or in a specialized store. This material has positive technical specifications, especially thermoplasticity should be highlighted. Plastic fences can be used to fence flower beds, sidewalks, front gardens. Manufacturers of plastic fences use the most different colors and shades
Here are just some of the features and positive characteristics of plastic fences:
- There are tape and sectional fences. They are perfect for marking borders. garden path. In addition, they will be a great addition to a flower arrangement.
- Each section has pegs. Thanks to this, their installation is not difficult. Slightly pressing on the fence, the pegs must be completely driven into the ground. Installation is possible both on a flat and on an inclined surface.
- Thanks to modern developments, such a fence can imitate wattle, wooden picket fence, masonry and more. Typically, the height of the section is 130–200 mm.
Decorative wooden fence

Wood is the most common material used to make decorative flower railings and more. The tree does not create disharmony in the garden, they look at ease. The main advantage is the availability of the material. For the manufacture of decorative hedges can be used different lumber: branches, logs, slats and boards. However, regardless of the type of wood used, in the beginning it should be carefully processed. This is especially true of the part that will be immersed in the ground. For example, this part can be treated with liquid bitumen. The other part of the structure must be impregnated with a special solution that will prevent rapid decay and repel insects. Consider the features of the manufacture of three types of wooden fences:
- Boardwalk.
- Lattice.

Wooden fencing manufacturing. Consider an example of making a board fence with your own hands measuring 700 × 700 mm. To do this, you need to prepare:
- four bars 5 × 5 × 70 cm,
- eight boards 2 × 10 × 70 cm,
- 40 screws for wood or nails,
- hammer or screwdriver
- level.
The workflow looks like this:
- Supports are driven into the ground at a distance of 70 cm from each other. Using a level, the vertical is checked, and the height is also adjusted.
- Then the board is attached to the top of the bar so that its edges do not protrude beyond the edge of the bar.
- The second crossbar is set indented 10 cm from the bottom edge of the board.
- In this sequence, the entire board fence is mounted.

Manufacture of decorative railings. Such a fence is suitable for a small flower bed. You can also use it for fencing a recreation area. One section in our case will be 90 × 63 cm. For manufacturing, you need:
- two bars for support 3 × 3 × 95 cm,
- two bars for the crossbar 2 × 3 × 90 cm,
- twelve slats measuring 1 × 2 × 52 cm,
- four self-tapping screws 3 × 40 mm and 3 × 25 mm - 12 pieces.
The whole procedure for making your own hands is as follows:
- The assembly process of sections is carried out on a flat surface. It is necessary to retreat 3 cm from the top, and then fix the bars with self-tapping screws.
- Step back 50 cm from the attachment point of the upper cross, and then mount the lower bar according to the same principle.
- Reiki must be fixed from left to right with a 3 × 25 mm self-tapping screw. Stepping back from the support 15 cm, the first rail is fixed at the upper attachment point of the crossbar and support. Reiki are installed in increments of 15 cm.
- Similarly, each rail is mounted from right to left. Thus, a rhombus-shaped pattern is obtained.

To fence your site or flower bed, you should make the appropriate number of sections.
Note! If you decide to make a decorative fence of a rectangular or square shape, then the consumption of building material will increase several times.
When the fence is installed, it should be painted with paint or coated with a protective varnish that will protect the structure from decay. If desired, the fence can be painted in several colors, which will make the site more fun.
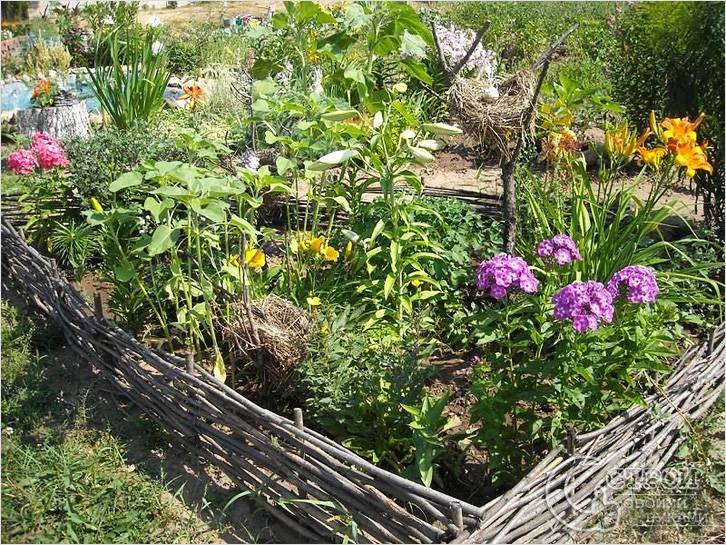
Decorative fence of wattle type. As for this option, it is done quite quickly. To do this, you will need to get willow, birch or apple branches. It is best to cut them in autumn or spring. The thickness of each branch should be no more than 20 mm. The consumption and volume of branches required will depend entirely on the size of the decorative fence. In addition to the branches, you will need to prepare the following material:
- wire,
- wood screws,
- bars.
Note! Some modernize this idea and use wires or multi-colored hoses instead of willow branches!

So, all work proceeds in the following sequence:
- With a step of half a meter, vertical supports are installed.
- As a rule, weaving should start from the first row. With the help of screws or wire, a vine is attached to the bottom of the support. Then it is horizontally stretched, bending around each subsequent beam / support. So that after a while, when the branches dry out, the structure does not fall apart, it is recommended that each ending be fastened with wire.
In principle, this is the whole technology for making a decorative fence with your own hands by weaving. Known and others interesting methods making fences, more on that later.
Decorative stone fence

In this option, you can use cobblestones of various shapes. The result can be a fence in the style of the Middle Ages. With delicate colors, the rough texture creates a great contrast. Such a fence will last for centuries, and this is no exaggeration. The plan for making such a fence is quite simple:
- The first row of stones is best deepened and laid on cement. It is preferable to use flat stones.
- Stones are selected approximately the same height. This will allow you to design subsequent rows without less problems.
- To make the structure durable, each stone is connected with a cement composition.

Note! During the laying process, the seams should not coincide; it is necessary to lay the stones apart.
metal fence

Each metal fence has one main advantage, which is durability. However, metal fences will require additional annual painting, otherwise their appearance will not be pleasing. A metal fence can be purchased ready-made and assembled according to a plan. You can think over the layout yourself and, accordingly, make a metal fence with your own hands. Consider brief instructions for the manufacture of a metal section measuring 90 × 55 cm. To do this, prepare:
- two fittings Ø1.2 cm 95 cm long for support,
- two fittings Ø1.2 cm 90 cm long for the crossbars,
- five rods Ø1 cm long 39 cm for the horizontal bar,
- decorative elements: six rods Ø1 cm 14.5 cm long,
- welding machine.

Works on the manufacture of a metal decorative fence look like this:
- From above, retreat 5 cm from the support, after which you weld the cross member.
- Next, measure 40 cm from it and mount the lower part of the frame at this distance.
- Fasten the horizontal bars in 15 cm increments.
- Weld decorative elements in a checkerboard pattern.
- Installation of the fence is carried out by pressing the supports into the ground.
Note! The distance from the bottom of the frame to the ground must be at least 10 cm.

Of course, work on the manufacture of this type of decorative fence will take you much more time. But such a fence will last much longer.
Decorative concrete fences

Often you can find a massive gray concrete fence, which can hardly be called decorative. However, thanks to innovative technologies, a concrete fence can be the most different colors and shades, and a pattern may be present on the front. You can make such a design with your own hands, you only need to purchase or make special forms. The work process is quite simple. Concrete is poured into the matrix for a day. After drying, the section is removed and installed. Everything is simple and consistent. Stick to the following tips:
- Before pouring concrete, each matrix must be lubricated with vegetable oil.
- Recommended brand of cement M250.
- To ensure that the product does not turn out dark, in total mass there should be less sand, and vice versa.
- Before painting the finished product, it is recommended to treat the surface with a deep penetration primer.
Decorative brick fence
The most popular material for arranging flower beds, lawns, lawns is brick. It has extremely positive properties. In most cases, it is placed in a rhombus, resulting in a jagged fence. But this is not the only styling method. You can lay out fences in the form of an oval or circle.

The second row is laid so that the seams do not match. Each level of brick is fixed cement mortar to keep the structure strong. So it will turn out to create a beautiful decorative fence with your own hands.
The construction of fences from corrugated board is a common method of fencing a site. This fence goes well with any landscape. Manufacturers produce canvases in various colors.
We will tell: how to make a fence from a profiled sheet with your own hands, let's talk about the features different designs, we describe step by step instructions. In the article you will find answers to the questions: how to make a fence from a profiled sheet with metal, stone and brick supports.
Construction materials
To install a fence yourself, you need to prepare certain building materials:
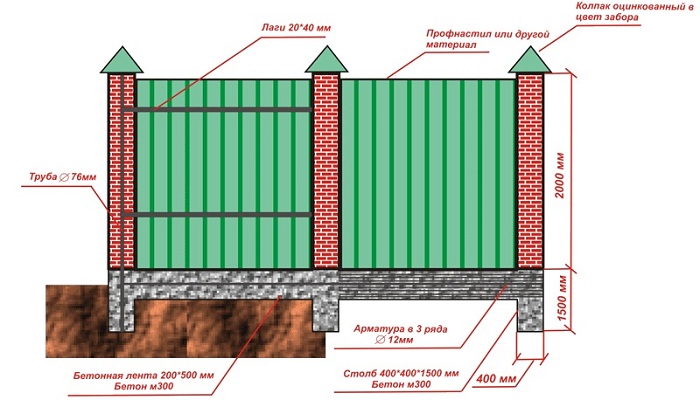
- Polymeric corrugated board. It can be painted on one or both sides. The material is covered with a polyester composition, which ensures a long service life of the product. Do not purchase galvanized profiled sheets. They have one advantage - the price, while galvanizing quickly becomes covered with rusty spots. On a sunny day, such a fence will further raise the temperature. If you plan to install a two-meter fence from corrugated board with your own hands, while the foundation will be installed as the base, subtract the height of the base from the planned height (2 meters). The difference is the height of the profiled sheets that you need to purchase. The distance between the posts is the width of the span of corrugated sheets. If you do not know how to install the poles, we advise you to place them at a distance of 2.5 - 3 m from each other.
- supports. Metal pipes are used, round, rectangular or square. Optionally, stone or brick columns are installed as supports. Brick supports look much more attractive than metal ones. To install non-metallic poles, decorative brick, stone, cement and sand are used. What pillars are needed for maximum structural strength? Metal supports should have dimensions of 40 x 60 mm or 60 x 60 mm. Then the design will withstand loads of various forces.
- metal lags- they are necessary for the transverse fastening of corrugated board. Logs of 20 x 20 mm will be optimal. The technology for building a fence with a height of 2 meters or more involves two rows of lags. Otherwise, the structure may be deformed under physical impact.
- Mounts(or dowel for mounting). With their help, you can fix the profiled sheet on the fence.
Stone, sand, crushed stone (screenings), cement - will be needed to create the foundation. To properly build a fence from a profiled sheet, you need to install it on the foundation. Without a quality base, the fence will not last long. Vegetation, soil erosion, animals can deform the structure over time, and the foundation will prevent this possibility.
We already wrote in more detail about what types of foundation exist in the article:, types and methods of pouring.
Tools for the job
When we build a fence from a professional sheet with our own hands, we need the following tools:
- Sledgehammer.
- Shovel.
- Roulette.
- Cord.
- Level.
- Apparatus for welding.
If the tools and materials for construction are prepared, we proceed to the construction of a fence from a profiled sheet.
How to build a fence?
Stages of work:
- Territory marking and calculation of materials.
- Installation of the foundation and columns (installation of supporting pillars in a fence without a foundation).
- Installation of corrugated board on logs.
Before building a fence from corrugated board, we mark the territory and collect site data. How to do it right, we wrote.
At the corners of the future fence we hammer in pegs, between which we stretch the thread. Along it you need to put marks where the poles or metal supports will stand.
The construction of fences from a profiled sheet in a territory with a slope involves a stepped structure. We check the height and evenness of the steps with the help of a level.
Calculate the number of columns to be set. To do this, divide the length from the corner to the next by 2 - 3 meters. These will be spans. It is necessary to make markings for gates, gates and take into account these additional supports during the acquisition of material.
According to the type of construction, the fencing from the profiled sheet is of the following types:
- Fence without foundation. The sheet of corrugated board is placed along the height of the fence.
- Constructions.
Building a fence from a profiled sheet without a base is less expensive. In addition, the installation is faster, but the second option looks more respectable, although it requires more costs for materials, tools, and labor resources.
Building a fence with metal poles
To properly place a fence made of corrugated board, where segments will be used as pillars metal pipes, we do the following:
- We put corner posts in the marking places. To properly make a fence from a profiled sheet, we advise you to immerse the post in the ground by a third of the length, in which case maximum wind resistance is created. The recesses are filled with concrete.
- We organize formwork. In this way, a board is created that connects adjacent columns. The width of the formwork depends on the wishes of the owner, but the side looks aesthetically pleasing, about 20 centimeters wide. If we build a fence from a profiled sheet with formwork, it will last longer.
- Along the length of the structure, at a distance of 2 - 3 meters, we set markings. We stretch the thread between the corner columns.
- We dig in the columns according to the markup. Building a fence from a profiled sheet with your own hands involves the installation of pillars at the same distance.
- Pour the concrete mixture into the formwork container. Additionally, we compare the accuracy of the transverse, longitudinal and vertical columns. Leave the structure to dry completely.
- We weld the transverse strips to the finished structure. To put a fence from a profiled sheet correctly, you need to check the evenness of the structure with a building level.
- We attach the corrugated board to the transverse lags. For reliable fixation, we use self-tapping screws for metal. We advise you to select fasteners that match the color of the sheets.
Important: Special attention pay attention to attaching the first sheet. The appearance of the entire structure depends on how evenly it is attached. After all, each subsequent profiled sheet is attached to the previous one. It is necessary to overlap, the size of one wave.
Installation of brick and stone pillars
Construction metal fences from corrugated board with brick columns involves the creation of formwork for the future foundation.
The brick layer is built using reinforcement. Metal parts are arranged in a vertical position and lined with bricks.
Do-it-yourself fence construction from corrugated board with brick columns cannot be made without reinforcement. Brick is a fairly heavy material. Metal lintels will only reinforce the load on the foundation, which can eventually collapse under the influence of gravity. If we make a fence from a professional sheet with our own hands, it is necessary to reinforce the foundation layer.
- We lay out the pillars and intermediate lintels with bricks. If the height of the fence is standard, we install the brackets in the poles at a height of 20-30 and 1.50-1.60 m from the ground, where the horizontal strips will be welded. Periodically check the verticality with a level.
- We weld horizontal strips to embedded parts. expedient metal parts cover with paint. This will help prevent corrosion in the future.
- Using self-tapping screws, we fasten the profile structures. You can use rivets and attach them with a special riveter.
The peculiarity of building a fence from a profiled sheet with brick columns involves the creation of a roof for each column. The design will not be affected by precipitation and weather phenomena (snow, rain, wind).
More detailed instructions with video tutorials and images on installing fences with brick pillars presented in this article:
Video
You can see how to build a fence from a profiled sheet with your own hands in this video:
Designers advise to install a do-it-yourself fence made of corrugated board with posts for finishing the facade. It looks stylish and emphasizes the status of the owners. On the back side, it would be appropriate to build a fence with metal columns.
We determine which option will suit us more, and put up a fence. As you can see, building a fence from a profiled sheet with your own hands is quite realistic, and videos, photos and detailed instructions will help you achieve your goal.
It is not difficult to come up with a fence design, it is more difficult to realize the idea of \u200b\u200bhow to do exactly what you want. But when there is a desire to also make money on it, then you need to evaluate the attractiveness from the very beginning. consumable. After all, the overall design is often assembled from everything that is idle or sold for a penny.
From improvised materials
Now, it is on the territory of the Russian Federation and the CIS countries, that's what you can choose from:
- Pallets;
- Used slate;
- Plastic (various containers);
- production grid;
- Cutting from a sawmill (the most budgetary rural option);
- Shrub branches (gathered with their own hands, if there is one near the construction site);
- (for fence or barn, more budget option No);
- Dismantled wooden barrels(rare, but occasionally production shops forced to self-sell already broken barrels of strong wood);
- Scrap metal (if you have transport, you can visit retail outlets and collect poles, crossbars and even some handmade decor by weight);
- Professional sheet. The most inexpensive;
- Concrete, cement and decorative.
How to make a cheap fence out of all this? Let's analyze in detail.
Designer novelties
Beautiful photos with original ideas: 
Simple design layout. In the photo - a homemade picket fence from wire, hazel, willow. You don’t even need to nail anything on a simple fence made of branches with your own hands, it’s enough to make turns between the supporting parts, and a low fence will be ready very soon. It is a pity that such constructions do not last very long because of strong winds and precipitation.
A garden version of a decorative fence in a private house, assembled on its own. And the more paint residues are used in this version, the brighter the garden itself will look. Boards can also be selected from pallets, creating a simple decoration element. 
Worth noticing! Such a garden fence is also an impromptu bird feeder and drinker. Very original and inexpensive.
Brick, cement and glass. American novelty. The materials are not cheap and improvised, but it looks great. Unfortunately, such a design, most likely, will not stand for a very long time due to the rapid interest. In total there is someone who cannot repeat this. 
Copper or other metal at work. Of course, an element for an amateur. And yes, there is a lot of welding. But if you make, for example, from iron beds of past eras, then it will be original, free and forever. 
Plastic. Even greenhouses have been made from containers for a long time. And don't forget about fences. It is desirable, of course, to make small pieces of even material from empty containers, with which buildings or fences are then sheathed. But the above method is also suitable, just prepare a strong frame in advance. 
Europallet. Suitable everywhere: firewood, building a barn and a fence. Interestingly, the technology for creating the pallets themselves has a drying stage. It turns out that pallets from the warehouse are ideal construction material for an inexpensive fence. And often unloading pallets are sold simply by weight. On small-sized boards, there should be no knots and defects. 
It is not necessary to dismantle pallets for the construction of the fence. It is best to do as in the photo above - expose and fix each of them in turn.
Branches, tree and slab
Quite inexpensive, an example in the photo: 
You can’t imagine it easier - they insert or drive in something for support, and then weave the way the soul desires. Everything that lies under your feet goes to work. Even dry, crooked and heavy oak branches can be the end of the composition.
Below is a picture of a fence. From a thin branch such a design, of course, does not differ in strength. But you can fix a ready-made homemade fence mesh throughout. 
So (next photo) is much stronger, more economic and more beautiful. Livestock, pests from the forest or abandoned dogs will not violate your territorial space. Moreover, the grid can be installed not the smallest, and it is enough for one meter from the ground. Above, such protection is no longer needed.

Mesh combined with a wooden frame performed according to right technology(a tree under a cone, columns are processed by bitumen). Modest, not very expensive and reliable. You should not sin on a tree, because a fence made of absolutely any material will not last forever. And even monolithic structures are destroyed by atmospheric changes.

carved grace. This is a small work of art. Although earlier, when most of the population of our country lived in private lands, carved elements were in every yard. It had several meanings: prosperity, accuracy, skill and respect for traditions. 
Below - pallet garden fence treated with protective compounds. 
fence board blends very nicely With concrete base and pillar.
By the way, it is the “fence board” that comes in several varieties (grade 1-3). If there is a lot of crooked wood at the sawmill, then grade 3 fence boards will accumulate in cubic meters. Externally, of course, there are differences, but this is the same wood that is used in construction. There is more trouble with her, but for such a low price she is forgiven. And if grade 1 costs from 3 thousand per 1 cube, grade 3 will cost 1.5-1.8.
It is also interesting that cheap lumber is not bought quickly, so it is easy to find a dry inexpensive fence board in warehouses or squares.
Original wood processing
By Japanese technology now you can burn fence boards giving it a brown tint. Similar processing for natural material only needed once. Moreover, a thin layer of burnt wood is resistant to moisture, and natural processing can only be replaced by expensive paint, the service life of which leaves much to be desired. It is convenient, practical and original to burn several dozen boards with oxygen or a blowtorch.
Slate, profiled sheet, concrete and mesh
If you take a new slate into work, then it would be better to order it flat version calculated for 1 span. Such material is easy to replace in case of breakage, and it looks discreet, solid, more solid. 
Used slate more often with a wave. It is rarely used on the front part, except for visors. However, the back side of the site, closed from the eyes of everyone and everything, also needs to be fenced. That's where they find use for the old slate from the grandfather's house or barn.
Interesting fact! Slate, released in the 70-80s of the 20th century, is very fragile, but durable. If no cracks are made during transportation and installation, then it will stand in the fence for more than one decade.

Classical rules for working with your own hands on a profiled sheet and a metal frame. As shown in the figure, for a high fence (above 2 meters), it is more correct to make 3 logs. Well, the span is not more than 2.5 meters. 
Patterned grids. Long and hard work. It must be carried out according to the project or pattern. Of course, you will have to work hard, but you can sell such works. Or get hired for design, if there is interest in your ideas. 
Cheap, beautiful and original. Everything can be used in decorative elements: from forks to car hubs. And it doesn’t matter how it all will look exactly in the overall picture, because it’s impossible to ugly assemble different elements made of iron or other material into one design. 
Profiled sheet or corrugated board wooden frame . An option for those who do not know the welding craft. It is better to make the frame itself more stable, although sheets arranged horizontally will give the necessary rigidity. Wood should be treated protective equipment oil based.

Concrete or brick fences. There are a lot of shades, decorative elements and, accordingly, costs. It is more profitable to make only the base from stone, placing it in the center of each span wood, forging, decking or even factory plastic.
Estimated cost
Let's take a look at the example of a standard 6 acres of a summer cottage:
| Type of fence | materials | Number of materials | Cost per unit, rub. | Amounts, rub. |
| Wooden fence with concrete base | Cement (concrete); | 11 cubic meters; | 3 thousand; | 33 thousand |
| pillars (logs); | From 50 pieces; | 450; | 22 thousand | |
| logs (beam); | 40 pieces; | 150; | 6 thousand | |
| fence board (grade 2-3). | 200-250 pieces. | 60. | 15 thousand | |
| Result: 76 thousand for building materials. | ||||
| Mesh with concrete base | Concrete; | 11 cubic meters; | 3 thousand; | 33 thousand |
| Pipes for the frame; | 89X40; | 1500; | 78 thousand | |
| Logs made of wood; | 50 pieces. 200-250 pieces; |
108; | 3.7 thousand | |
| Grid. | 170 square meters. | 60. | 9.4 thousand | |
| Bottom line: material without delivery 124 thousand. | ||||
These are prices for the central region. And if you call to count the fences of the above materials on a turnkey basis, then you need to add up to 50 thousand for work and delivery.
Results
Fences made of stone, brick and a decorative component cost twice as much as a fence made of mesh or wood.
It is easy to guess that it is most profitable to do what you have planned with your own hands, using the same euro pallet or used pallet. After all, at quality installation they look much more original. The price of the work is cheap, the material itself can be ordered from 100 rubles apiece. 1 element is a whole meter of an almost assembled fence. Consider for yourself what is better for a conventional fence.
Video instruction
Ivan Galkin tells how to make an inexpensive fence.
The fence of the site plays not only a protective, but also a decorative role. Due to the variety of materials on the modern market, it is possible to build a fence not only from wood or chain-link mesh, but also from brick or corrugated board.
You can find instructions, ideas and drawings for building a fence with your own hands in this article. It contains useful information for those who want to make a strong and beautiful fence for the site.
DIY fence
Permanent fences are subject to both general and statutory requirements. Among the common ones are:
- Reliability of supports, their resistance to wind loads, as well as to rain and melt water;
- Lack of shading of residential buildings and green spaces;
- Neat appearance;
- The erection of deaf fences is allowed only from the side of the street.
Guided by these requirements, you will be able to independently create a project and build a fence on the site, choosing the most suitable material for this.
How to make a wooden fence
Recently, wooden fences are becoming less and less common, because wood is being replaced by more modern building materials of high quality. However, a picket fence structure is often erected on summer cottages, because it combines ease of construction with an attractive appearance and low cost.
Installation materials
For construction wooden fence from the picket fence you will need the following materials:
- Wooden poles for supports;
- Trimmed or planed boards, the length of which depends on the estimated height of the future structure;
- A beam, 2 - 2.5 m long and 40x40 in section;
- Cord and stakes for marking;
- Construction nails (screws);
- Crushed stone (concrete) for mounting pillars;
- Ruberoid (roofing felt) for waterproofing supports.
In addition, you will need an antiseptic or bituminous mastic to process the pillars. Without this, the supports can quickly fail, and the integrity of the structure will be compromised.
Construction of a wooden fence
With the budget cost of a wooden fence, it can serve its owner from 10 to 15 years. In addition, its construction does not require special building skills, so it is quite possible to do all the work yourself without spending money on the services of professional builders.

Stages of building a wooden fence
Consider the sequence of work in the construction of a wooden picket fence:
- Performing markings with determining the locations of the pillars (2-3 meters apart);
- Preparation of wooden poles for installation in the soil: treatment with an antiseptic and bituminous mastic. Alternatively, wrapping the ends of the supports with roofing paper or roofing material can be used;
- Digging recesses for supports in accordance with the markings. In this case, the depth of the submerged support must be at least a quarter of the total height of the structure;
- Arrangement of a sand and gravel cushion at the bottom of the recesses. Its thickness should be from 10 to 25 cm. It is mandatory to spill the layer with water and thoroughly compact it;
- Installation of supports and their concreting;
- Fastening wooden beam to the installed supports after the concrete has set;
- Fastening shtaketin to transverse bars. Wherein minimum distance from each picket to the ground surface should be at least 5 cm.
At the final stage, the wooden structure is treated with colorless mastic, impregnation or oil paint.
How to make a chain-link fence with your own hands
In the conditions of small summer cottages, due to the risk of shading, it is impossible to build fences from corrugated board, slate or brick. In this case, the chain-link mesh becomes indispensable, the fence from which does not prevent the sun from entering the site and passes air well.
In addition, the netting is inexpensive, but it lasts a long time. Let us consider in more detail the features of the construction of a structure made of this material.
Construction of a chain-link fence
by the most in a simple way construction of a chain-link fence is to fix it between posts made of various materials(metal, wood, concrete). Wherein optimal distance between the supports is 2.5 meters, and their height is calculated in a special way.
To the width of the grid add the height of the clearance from the fence to the ground (5 - 10 cm) and an additional meter and a half. The resulting number will indicate the average height of the column. At the same time, the length of the corner posts exceeds the rest by 20 cm, since these supports carry a large load, and therefore they need to be buried deeper.
If you are using wooden posts, be sure to treat them with an antiseptic before installing. It is also recommended to concrete the bases of all installed supports for greater stability.
Further, hooks for mounting the mesh are attached to the supports with the help of screws, nails, wire, welding. The grid begins to be installed from the corner post, straightening it from post to post and hanging on hooks with a rod. Then, reinforcement is threaded into the grid from above and below, located horizontally, at a distance of 5 cm from the edges, and the rods are welded (attached) to the poles. Construction work is completed by bending the hooks and painting the supports.
Stages of work in the sectional construction of the fence
Another option for building a chain-link fence is to attach it to sections. As in the case of the tension model, work begins with the marking and installation of pillars. Then proceed to the manufacture of the frame. For him, you need a corner measuring 40/5 mm.

Chain link fence construction plan
Next, you need to calculate the desired dimensions of the frame. To determine the length of the section, it is necessary to subtract 10-15 cm from the distance between the posts, and to calculate the width, the same number is subtracted from the height of the support above the soil level. In accordance with the calculations, the corners are welded into a rectangular structure and the mesh is fixed, forming sections. Then, between the pillars, it is necessary to fix metal strips, 15-25 cm long, 5 cm wide and 5 mm in cross section. Finished sections are welded to these strips. The work is completed by painting metal elements.
How to build a fence from corrugated board
Fences from a professional flooring enjoy wide popularity thanks to a number of advantages. Profiled sheets are reliable and durable, and their color range and various sizes can satisfy even the most demanding consumer. Such a fence protects well from dust, wind and noise, it is easy to install, and the service life is quite a long time.
This material is great for building a stepped fence on a site that gives a slope. With some building skills, it is quite possible to build such a structure from corrugated board on your site. Let's see how it's done.
Fence Installation
The construction of a fence from a profiled sheet begins with precise marking and installation of pillars. You should know that in this case, the supports are installed at a distance of no more than 3 meters from each other. For these purposes, pipes with a square or round section can be used. In the first case, their size should be 50/50 mm, in the second - at least 76 mm. The upper holes of such supports must be welded to prevent moisture from entering them.

Stages of erecting a fence from corrugated board
To install the pillars, you will need pits with a depth of 1 to 1.5 meters and a width of 15 cm, which depends on the height of the fence and the diameter of the supports themselves. The bottom of the pits must be covered with gravel of the middle fraction, then the pillars must be strictly vertically installed and concreted. In the case of soil, where ground water come too close, to install the pillars, you will have to build a strip foundation. It consists of a box, 20 cm high, the boards of which are fastened with bars or wire. The walls of the box are covered with a layer waterproofing material and filled with concrete. After the solution has completely solidified, they proceed to the installation of the lag - transverse strips, to which the profiled sheets will be attached. As a log, you can use a profiled pipe with a cross section of 40/25 mm. At the same time, the number of logs depends on the height of the future fence: with a height of up to 1.7 m, you will need to install two logs, with a higher height - three.
The upper and lower lags are attached at a distance of 4 cm from the top of the sheet and the edge of the earth. mounted in this way metal constructions must be treated with a special primer to protect against rust. Sheets of corrugated board are attached to the logs with the help of metal screws. In this case, the joining of the sheets is overlapped.
What is needed for construction
For self-assembly You will need the following materials and tools:
- Sheets of corrugated board;
- Pipes for supporting pillars;
- Pipes for log;
- Cement, crushed stone, sand for the preparation of concrete mortar;
- Rope, level;
- Primer;
- Welding machine;
- Solution container;
- Drill and drill;
- Riveter with rivets or self-tapping screws
- Antiseptic and bituminous primer for wooden poles.
How to make a brick fence: video
Brick fences retain their popularity due to their strength, durability and decorative effect. However, this type of fencing is expensive and requires special construction skills. Therefore, most often the canvas is made combined using various materials.
Construction stages include:
- The choice of material and the calculation of its quantity
- Drafting
- Marking on the ground
- Foundation laying
- Bricklaying
- Plastering
Since the construction of a brick fence requires certain skills, we recommend that you familiarize yourself with the video, which shows the main stages of this process.
A foundation is needed to build a fence. At the same time, its appearance depends on several factors: the type of soil, the type of supporting structures, and the material of the canvas. It should be borne in mind that the foundation must withstand the loads applied to it from the side. environment, soil and the fence itself. Therefore, it is so important to choose the right type of foundation. For example, a tape type is required for brick and concrete fences. Under the fence of corrugated board, it will be enough to lay a point foundation at the installation sites of the supports. Let's take a closer look at the construction technology different types foundation.
Bookmark strip foundation preceded by marking along the perimeter of the site with the help of pegs and twine. This is followed by digging a trench according to the markings. At the same time, its depth reaches half a meter, and the width should not be less than the thickness of the future fence. The bottom of the moat is covered with a mixture of sand and gravel, after which it is rammed.

The main components of the foundation
This is followed by the execution of formwork from boards, the height of which above the ground is about 15 cm. At the same time, you should know that its inner surface must remain smooth, therefore all fastenings of the boards are made from the outside. Reinforcement is laid inside the box: cuttings of pipes, metal, reinforcing mesh. In the places where the supports are installed, the reinforcement should form a three-dimensional structure.
The next step is to fill the formwork with concrete mortar, level it and remove air bubbles. At the end of the concrete hardening (after 1-2 weeks), the formwork is removed, however construction works do not continue, since the foundation will still gain strength for about a month and cannot be disturbed. Only after the final installation, you can proceed with the installation of the fence itself.
For light types of fences, a pile foundation is used, erecting it in the following sequence:
- Site marking;
- Drilling wells for supports, with a depth of 0.8 m for the fence and a diameter of about 20 cm;
- Laying a sand and gravel cushion in wells, from 10 to 15 cm high;
- Installation of supports with their preliminary processing (if necessary), their fixing with props;
- Concreting of pillars from the outside;
- Concreting of wells from the inside to the ground level;
- Further construction of the fence after the concrete mortar has completely solidified.
fence posts
Support posts play an important role in the process of arranging any fence, because they not only increase the strength of any structure, but also complement it in style. Therefore, it is so important to choose the most optimal type of supports during the construction of the fence.
Types of pillars
Most often, wooden, brick and metal poles are used as supports. The choice of material depends not only on financial capabilities, but is also determined by the expected load that is created by the sections, as well as mechanical and wind loads.
So, metal poles are universal, since they can be mounted on both sections of a chain-link mesh, as well as a wooden picket fence and corrugated board. In addition, metal poles have a long service life (up to 50 years). Wooden supports, on the contrary, can last no more than 20 years even with proper processing due to the tendency to rot. Therefore, wood poles are recommended for use in the construction of temporary fences, front gardens, or low hedges. Brick (concrete) pillars are erected during the construction of heavy fences, however, in some cases they are used for decorative purposes.
Installation methods
The installation of pillars can be carried out in several ways, the choice of which depends on the design features of the fence and the nature of the soil. So, metal, reinforced concrete and wooden structures on soils with a low level of groundwater are mounted in a universal way. This means that a hole of the appropriate size is drilled (dug out) under each support, a pole is installed, and the remaining space is filled with concrete mortar.
The easiest and cheapest way is to drive poles with the help of the so-called "headstock". In this case, the supports are installed on a tape or columnar foundation. Another option is to use piles, which are easily mounted by hand and serve as a reliable support for heavy fence structures.
Materials for building a fence
As mentioned above, you can build a fence from almost any material. For small areas, a chain-link mesh is most often used, but if the design needs to be more reliable, preference should be given to wood products.
Brick fences are considered the most reliable, but their installation requires special construction skills or the involvement of specialists. One of the simplest and most modern is considered to be a fence made of corrugated board, which is easy to install, but has a long service life.
Calculation
Performing the calculation of the foundation for the fence is a rather complicated process and requires special knowledge. In addition, you should know the features of the soil on which the fence will be located, the prevailing direction and strength of the wind. Therefore, if you are building a fence yourself, it would be best to resort to a combined tape-point foundation, which is considered the most reliable. With this design, any type of load will be distributed over the entire length of the fence.
Let's give a simple calculation of the fence from corrugated board. With a span length of 2.5 meters and a height of 160 cm, the area of \u200b\u200bthe sheet of corrugated board will be 4 sq.m. Taking into account the value of the aerodynamic coefficient for flat vertical surfaces (1.4) and the value of the velocity pressure of the wind (about 40 kg), the wind load will be 224 kg for each support. Having distributed the load evenly over the entire surface of the fence, and taking into account the coefficient of resistance (225), we obtain the depth of the foundation, equal to 80 cm.
However, it should be noted that this calculation was made without taking into account the characteristics of the soil. Therefore, in practice, the foundation is buried to the depth of soil freezing for each specific area. Most often it is 120 cm and guarantees a solid installation of the pillars.
What boards to choose for sheathing
Most often, inexpensive ones are chosen as fencing cladding. unedged boards. They can be placed vertically or horizontally. The first option is considered the simplest. In this case, horizontal crossbars are attached between the supports, and pickets from boards are attached to them.
It is worth considering that a wooden fence can be through or deaf. In the first case, a certain distance is left between the boards, and in the second, they are nailed tightly on both sides of a horizontally located beam.
Before installation, the boards must be carefully inspected and cleaned. A width of 20 cm is considered optimal, since in this case the material will not dry out or crack.
Fence sheathing calculation
Main structural elements of any fence - this is the foundation, supports and materials with which spans will be sewn up. But if to calculate wooden planks the calculation is simple (the width of the span and the board is measured, and the distance between the pickets is determined), then for products from corrugated board it is necessary to calculate the required number of sheets more carefully.

An example of calculating materials for building a fence
First of all, you should decide how the sheets will be attached, and what brand of corrugated board you will use. The last point is especially important, since the sheets of different brands have different widths.
Consider a few common calculation options:
- Horizontal placement without gaps for supports: in this case, the brand of the sheet does not matter. The only thing to consider is the overlap on the poles (subtracted from the length of the sheet). This indicator should be half the width of the support plus 10-15 mm.
- Horizontal fastening with gaps for supports: with this arrangement, the calculation is carried out similarly to the first example, with the only difference being that no margin for overlap is left. In other words, you need to measure the width of the span, and buy sheets 10-20 mm less than the figure obtained. This will allow you to build an even and symmetrical fence, even if there are bumps on the support posts.
- Vertical fastening without gaps for poles requires careful calculations. First of all, it is necessary to determine the working width of the sheet, since the width of one span will depend on this indicator. Further, depending on this indicator, sheets of suitable width are selected and multiplied by the number of spans. For example, if 3 sheets are required for one span, then 15 sheets are required for a fence of 5 spans.
However, with a vertical mounting method, there is a risk of uneven material consumption and the formation of a large number waste, so when buying a profiled sheet, you should make a small margin.
construction tool
To build a fence, you will need a standard set of tools. First of all - a tape measure for taking the necessary measurements, as well as a drill for digging holes for supports.
In addition, you need to prepare a drill, a screwdriver and fasteners (self-tapping screws) to fix the structural elements together. It is better not to use a grinder for cutting profiled sheets, as it leads to heating of the metal and a violation of the integrity protective coating. For this purpose, it is better to use electric shears for metal.
How to make a budget fence
There are situations when the site must be protected, but there are no extra financial resources for the construction of a brick or corrugated fence. In this case, it is better to give preference wooden products or chain-link fences.
It should be borne in mind that a wooden fence needs to be painted regularly, and a mesh fence performs more decorative than protective function, and can only serve as a temporary structure or delimiter for several sites.