
Do-it-yourself door installation in the apartment. How to install an interior door yourself: repairs in the house. best manufacturers of interior doors
How to install yourself
For specialist installation interior door is not a problem. But if you are doing repairs yourself, you may have a question: how to install the doors yourself so that they reliably perform all their functions. This article will help you understand this issue. Immediately, we note that we will talk about wooden doors from the array.
The door installation technology differs only in that before selecting the recesses for the hinges, it is necessary to cut and remove the veneer layer with a sharp knife so as not to damage the coating. As for expensive interior doors, in the absence of installation skills, it is better to entrust this work to specialists. So, let's consider in detail: how to install it yourself.
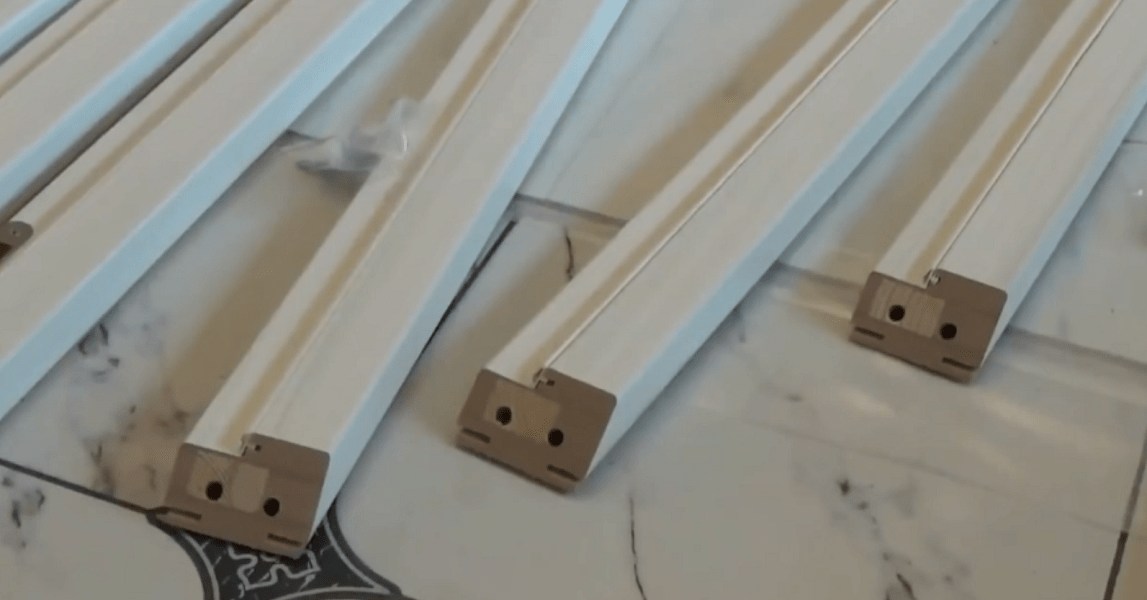
A wooden box and platbands usually come with the door leaf. If you bought only the canvas, you will need to separately purchase the door frame (see), additional elements, trim, and self-tapping screws for assembly.
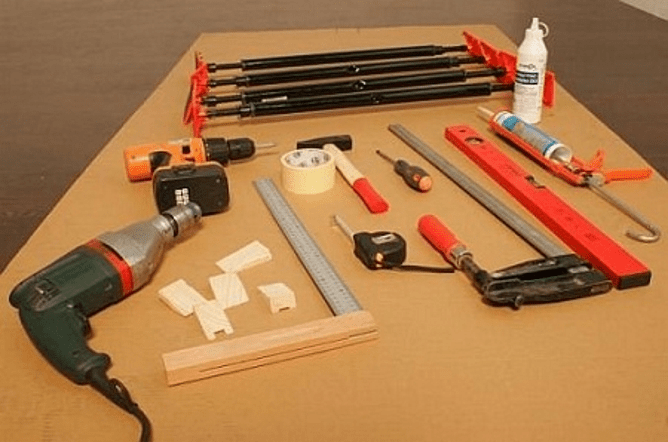
In addition, you will need the following materials and tools:
- Anchor bolts for attaching the box to the opening.
- Wooden or plastic wedges.
- Mounting foam.
- Building level.
- Drill or screwdriver.
- Wood saw, miter box and chisel.
Before starting work, carefully read the instructions on how to install an interior door yourself + watch a video that will help you better understand the details.
Installation steps
Determine the dimensions of the openings
Having decided which doors you want to install in your home, take care to fit openings in load-bearing walls and partitions for them. Or, if the extension is in bearing wall impossible, adjust your plans.
Having information about what kind of doors you will have - dimensions with a box - builders, when erecting drywall partitions, will be able to immediately build the necessary openings by installing metal profiles at a certain distance. It will not be difficult to comply with the specified dimensions when building walls made of bricks, concrete blocks and other materials.
It is more difficult to bring existing ones into line with the necessary parameters. But if this is not done, there is a high probability that the door with the box will not enter the opening. And repairs after installation will have to be redone, eliminating large gaps between the box and the wall, re-gluing the wallpaper or painting the walls.
What do you need to know to calculate openings?
Need to know:

For reference:
Thresholds are usually installed on front doors to prevent heat from escaping. But it is advisable to use them for doors to bathrooms to protect living rooms from accidental leaks.
Knowing all these data, it will not be difficult to calculate the parameters of the opening. For example, consider the following standard ones: box size - 25 mm thick and 40 mm wide; canvas size 800x2000 mm.
Adding to the width twice the thickness of the box and the dimensions of the mounting gap, which is usually 15 mm on each side, you get the width of the opening: 800 + 2x15 + 2x25 = 880 mm. If the platbands are wide enough, then this size may be slightly larger - the gap between the wall and the box will be blocked by the platband.
Attention! Be sure to install gaps of 5-10 mm in the lower part to ensure air exchange. If the house is supplied liquefied gas, then for kitchen doors the gap is increased to 15-20 mm to ensure ventilation.
So, the height of the opening into which the door we have chosen with a frame without a threshold (see) will be installed is calculated as follows: 2000 + 25 +15 + 10 = 2050 mm.
It is desirable to add to the data obtained the amount of gap that must be left between the door leaf and the frame, but since it is only a few millimeters, it can not be taken into account in rough calculations.
A few words about why we need box width data. The fact is that installation is possible only in an opening of the appropriate thickness. If it is less than the width of the box, then the latter will have to be sawn along so that it does not protrude beyond the plane of the wall.
And this inevitably leads to a deterioration in quality and appearance. In addition, not all boxes can be subjected to such a rough adjustment. If the thickness of the opening exceeds the width of the box, you will need to take care of purchasing extensions.
Installing the door frame
If the main repair work has come to an end, doors have been bought (the dimensions with the box correspond to the openings), and there is no extra money left or you just don’t want to wait for the master, then you can install the box yourself (see). After that, hanging them will not be difficult.

The assembly of the door frame is carried out as follows:
- Lay the vertical bars of the box on a flat, clean floor with the battens up and insert the door leaf into them. Insert pieces of packing cardboard or strips of hardboard between the ends of the canvas and the porch to provide a gap. Align the top ends of the bars with the top of the canvas.
- Attach the upper crossbar to the ends of the vertical bars, align it with one of the racks and mark the length of the element with a pencil along the edge of the second rack. Then saw off the excess with a hacksaw or jigsaw.
- Attach the crossbar to the uprights again and make marks on the inside of the front part. On the porch of the crossbar, make cuts according to the marks, using a hacksaw for metal, so that the cut is even and neat. Chip off excess wood and clean this place with a chisel.
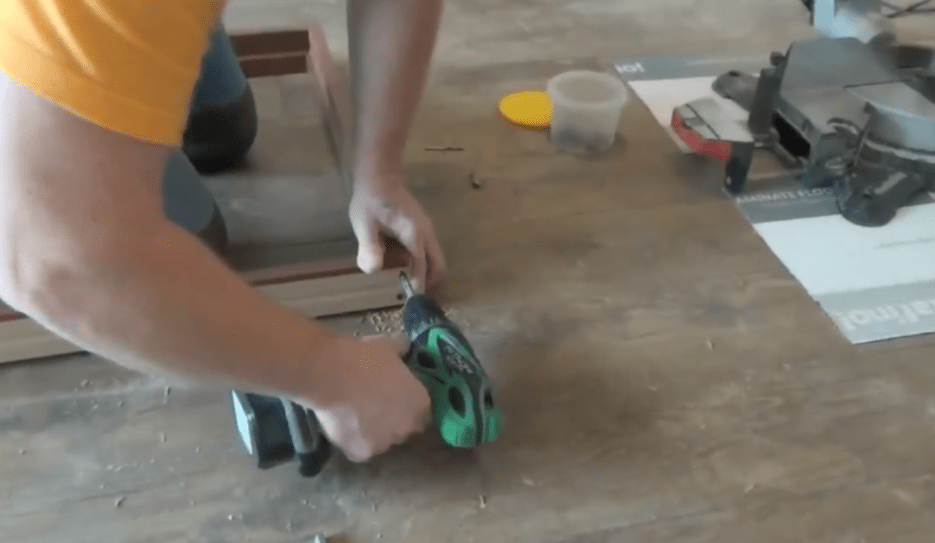
- With a thin drill, drill holes in the crossbar and screw it to the uprights with self-tapping screws.

Assembly door frame on one's own
Attention! The described sequence of work is applicable only for doors, the porches of the frames of which have rectangular section. To assemble a box with a complex curly section, the racks and the crossbar must be cut at an angle of 45 degrees.
- Saw off the racks of the box in height, taking into account the gap between the floor and the bottom of the canvas. At the same time, please note that the box should not stand on the floor, it is fixed at a height of 1-2 mm from the clean floor in order to provide it with moisture and thermal expansion.
- Install the box in the opening, fixing it with wedges, and align the posts and the crossbar with a level in two planes. To make sure the installation is correct, measure the diagonals - they should be equal.
- After the control fitting of the door leaf, fix the frame in the opening with anchor bolts.
Using expansion wedges
Door leaf installation
A lot of instructions have been written about how to install interior doors yourself, but there are nuances in this matter that come with experience.
- At a distance of 20-25 cm from the upper and lower edges, make a markup for the hinges (see) on the box and the end of the door leaf, accurately matching all sizes and not forgetting about technological gaps.

- With a milling machine or a chisel, make recesses for the hinges. The plane on which the hinges are attached must be perfectly flat.
- Disassemble the hinges and screw their lower parts (with a sleeve) to the frame, and the upper parts (with a leg) to the door.
- Lubricate the hinge legs with graphite grease or machine oil and hang door leaf.Check correct installation.
- Before filling the gap between the box and the opening mounting foam, place extra spacers just above the door handle and next to the hinges. Apply the foam in a thin layer, having previously covered the door with a film and moistened the opening with water from a spray bottle.
- After the foam has completely dried, cut off its excess and the protruding parts of the wedges.
The main stages of installation
The classic product installation technology includes several main stages, regardless of the chosen type of interior door:
- Installation of the box (installation in the opening).
- Installing the door leaf.
- Installation of additional elements.
The correct installation of interior doors with your own hands is carried out using power tools - a drill, a screwdriver, a puncher.
If you need to cut trim along, it is recommended to prepare a parquet-type circular saw. In addition, a wire saw or a hacksaw, a building level, a hammer, a pencil, a tape measure, a nail puller, a spray bottle with water, a mallet, a miter box, chisels and expendable materials:
- self-tapping screws, dowels;
- masking tape;
- mounting foam;
- wooden spacers and wedges.
Advice! Experienced craftsmen use a plumb line when installing the door and prefer a wooden mallet, as the rubber one leaves marks. To fix the box in the opening, it is better to use dowels, and for hinges - yellow-passed or galvanized self-tapping screws. Standard "regular" self-tapping screws, which are supplied with the product, are not recommended for installation.
Wedges for fixing the product are best made during the installation process from bars and boards. Pre-preparation of wedges of several sizes can be a waste of time, since the exact parameters of the products are determined “on a case-by-case basis” - during installation.
Step 1 Assemble the box
First, you have to assemble interior doors with your own hands - connect the parts with self-tapping screws. Before starting assembly, it is recommended to trim the gaps, taking into account floor covering. For residential premises, it is recommended to observe gaps of 10 mm.

Assembly order:
- Saw down the ceiling beam under the hinged: attach two beams, mark the line, make a cut and carefully chop off the end with a chisel.
- Connect the beams(hinged, lintel) in a right angle using self-tapping screws.
- Cut the hinges into the hinge bar.
- Connect three beams, put on the door and adjust the ceiling element.
Advice! When fixing the box, experienced craftsmen use pieces of cardboard or orgolite of the same thickness as gaskets. Thanks to this trick, optimal gaps of 3–4 mm are provided between the edge of the door and the frame (beams). The main thing when using this method is to control when screwing the screws so that the wedges do not “dangle” in the box.
The most important area of work at this stage is fitting fittings, the quality of which depends on the convenience of further operation of the door. Goats are a useful invention to help "homemade" - a device made of cardboard and pieces of wood that will hold the door in place.
Executed sequentially:

Useful advice: the chisel must be held at an angle of 45 across the recess and hit the tool with sharp blows. After the desired depth is formed, it is recommended to install the chisel on a vertical line and trim the edges - cut the canvas from the marks from top to bottom and clean out the recesses.
- Hang the door: first place the hinge in the upper slot, mark the hole for the screws and fix the hinges (see ). After that, it is necessary to install the canvas in the box, knock it out with wedges and mark the jamb. Final stage works - fastening of a leaf of hinges with screws;
- Marking the lock, spindle and keyhole on the end of the door. The marking height can be varied at your discretion, the main thing is to correctly apply the dimensions of the lock to the front sides and mark the position of the well;
- Drill holes for the well and spindle, lock socket, clean it and align the edges;
- Fastening of the lock with screws, installation of linings for handles and fastening.
The last stage of work on the tie-in of the lock is the fastening of the receiving lining:
- Close the door;
- Mark the position of the tongue on the joint;
- Hang the overlay and measure the distance to the front side;
- The markup must be transferred to the jamb, attach the overlay and circle with a pencil.
The last stage of work is to make a recess and screw the part to the jamb. Slots for the latch and tongue are made with a chisel, after which the stoppers can be fixed.
Step 2 Mounting the box
Fix the top of the box with wedges by installing wooden crafts at the level of the junction of the standing and transverse parts. To fix the lower part, it is necessary to align the hinge side and check the correct installation in two planes (vertically, horizontally) using a level.
Then fix the opposite side of the box and firmly install the spacer opposite the lower wedges.
Step 3. Installing the canvas
At this stage, you have to install interior doors with your own hands: hang the canvas and check the performance. The door must close smoothly, without spontaneous closing / opening in the ajar position.
The last stage is the application of mounting foam into the space of the box with an opening.

Note! Foam can damage the varnish of the door leaf, therefore, before applying the composition, it is recommended to glue the box with tape. In addition, when drying, the foam increases in volume several times, which must be taken into account when installing the canvas, strictly observing the recommended gaps.
At this stage, every millimeter is important, since if the opening is reduced by less than 2 mm, for example, to 1.5 mm, the door will not close, and if it is in a larger direction, a gap and part of the interior of the neighboring room will be visible. Since the foam, depending on the type chosen, can “behave” differently, it is recommended to reduce the risk of side effects- significant squeezing of the box slats.
To do this, experienced craftsmen apply the polyurethane composition as thinly as possible. The time for complete drying of the foam is indicated on the bottle, after which you can carefully remove the wedges or cut off the woodwork, remove the spacers and cut off the protruding foam with a knife.
Step 4. Installation of additional elements

Additional elements must be prepared: measure the distance to the wall, taking into account the groove and cut the bar using a jigsaw or hacksaw.
After that, you need to insert the bar into the groove and foam at several points. It is more difficult to install an interior door with your own hands if the standard width of the plank does not allow you to block the width of the opening. In this case, you have to connect several additional elements.
Step 5. Platband installation
The last stage of installation is beautiful design openings on the sides and top with decorative elements - platbands (see). After the do-it-yourself installation of interior doors is completed and the foam is completely dry, having firmly fixed the additional elements, you can begin to prepare the casing:
- Determine the desired length;
- Sawing the part at an angle of 45 using a miter saw;
- Drill holes with a diameter of 1.5 mm for nails;
- Fasten the part to the finishing nails.
If you have to install interior doors with your own hands with a platband with a “beak”, then the installation process is simpler: you don’t need to file the part, just remove the part of the “beak” at the top, insert the product into the groove and fix it on liquid nails. Upon completion of the installation is carried out - and the interior door is ready for operation.
The final stage of door installation
To make the doors look aesthetically pleasing, you need to do something else. If the thickness of the opening into which the interior door is installed turned out to be wider than the box, then it will have to

To do this, a quarter of 10x10 mm is selected in the box with the help of a cutter for attaching an additional board to it. Finally, the door needs to be framed with platbands.
Measure their length, cut the corners with a miter box at 45 degrees and nail the architraves to the box with finishing studs. Or glue them to the wall with "liquid nails".
The installation of interior doors has some subtleties, but only with the correct implementation of all stages of preparation and installation can a high-quality result be achieved. This is a difficult task that requires precision and accuracy, so you need to be patient and give the process required amount time and attention.
To perform the work, you should acquire a set of necessary tools in advance. In order to correctly carry out all the stages of installation, it is necessary to take into account the design features of the existing door and other important characteristics.
There are many types of doors on the market that differ in design. Often when making home interior the following types are used:
- single-floor swing;
- double swing;
- folding;
- sliding panel.
The most simple installation of interior doors with one field. More difficult to install, but no less popular are sliding interior doors. special attention Deserve folding designs that take up a minimum of space. They have a specific design, so some difficulties may arise during their installation.
Required Tools
Installation of an interior door is a time-consuming and demanding process, so before starting work, you need to purchase all the tools and materials. First you need to prepare materials, including:
- wooden wedges and bars;
- mounting foam;
- self-tapping screws;
- nails.

Hand and power tools that can come in handy in the process of replacing an interior door include:
- nail puller;
- a set of chisels;
- a hammer;
- screwdrivers;
- miter box;
- hacksaw;
- building level;
- Miter saw;
- a circular saw;
- perforator;
- screwdriver;
- electric mill.

It is necessary to purchase in advance the latches, hinges and handles that will be required when installing interior doors.
Preparatory work
To install doors in rooms with your own hands, you must first dismantle the old box and prepare the doorway. Many people who do not have experience in carrying out such installation work are negligent about preparatory stage, which most negatively affects the quality of the installation of the web or leads to the appearance of defects after the start of operation.

It is especially important to properly prepare if you plan to install non-standard interior doors. Since in this case there may be problems with the opening, which may not correspond to the dimensions of the purchased canvas and box. Thus, comprehensive preparation for installation work first of all, it involves the elimination of the old door leaf and frame. Be sure to take all the necessary measurements to install the interior door yourself.
Dismantling of the old
First, the old door leaf is removed from the hinges. Platbands on both sides of the opening should be removed. In older models, they were often fastened with nails, so a crowbar and a nail puller may be required to dismantle them. Bevel trim needs to be removed.
If previously a person did not have experience in performing such work, during dismantling, you can also study the procedure for installing interior doors. Considering that old door frames were fixed with nails and metal pins, this design can hold firmly.

You should first loosen it with a crowbar. This will create a gap between the opening and the box. It may be necessary to cut metal fasteners. After that, you need to disassemble the old door frame. If this part is made of solid wood, it may be difficult to dismantle it. To facilitate the process, you can cut out part of the box with a circular saw.
Be sure to clean off the old mounting foam from the opening. Often, to fit the dimensions, it is necessary to cut the ceiling beam at an angle and remove the chisel part of it. Replacing an interior door can be started immediately after dismantling the old canvas and box.
Opening preparation
After the old door frame and canvas along with the mounting foam are removed, you need to carefully inspect the opening. Often leveling is carried out with a layer of putty around the entire perimeter. In this case, you need to use the building level. This will allow in the future to correctly install the interior door in the apartment.

It is often justified to install wooden bars for strengthening in places where self-tapping screws for attaching hinges will enter. Older rooms often require refurbishment. doorways. The dimensions of the doorway should be adjusted to match the purchased door. If there are protrusions resulting from the application of plaster, you need to beat them off with a hammer.
How to install an interior door?
The technology for installing interior doors involves a phased work. Beforehand, the components of the box are unpacked on the floor in the apartment, taking into account the direction of opening. This will simplify the installation process in the future.
Marking is required to determine the location of the hinges on the box and the door leaf. After that, the box structure is assembled. If the doors are made of solid wood, it is recommended to make holes on the side of the hinges for their further installation. After that, the box is installed in the opening.
next step is the alignment and fixation of the box with pre-prepared bars and wedges. Installation of a double-leaf interior door begins in the same way as a single-leaf door. The next step is the installation of the canvas. Checking the performance of the door structure.
If the width of the box is less than the opening, the installation of extensions is performed. The last step is the installation of platbands and accessories. During the installation of an interior door, each stage of installation must be given the necessary attention in order to achieve a high-quality result.
Do-it-yourself box assembly and installation
The door frame can be represented by a U-shaped or closed rectangular structure made of wooden beams. The second option has a threshold, so it is often used to equip doors in the toilet and bathroom. In other rooms, a door without a threshold is used. Any version of the box can be assembled independently.

In most cases, both the ceiling strip and the side openings of the box are sold with unfinished top and bottom ends. They need to be filed by yourself. To do this, use a miter box to get even corners. First you need to make washed down long loot. The upper edges are sawn at an angle of 45 °, and the opposite should be left even. The top plank is sawn at both ends at an angle of 45°.
When fastening the elements of the U-shaped box, you need to use three self-tapping screws on each side. For fixing, the side holes are first applied to the top bar so that the corners match. After that, on the wrong side of the upper bar, you need to make 2 holes on each side. They must completely pass through the plane of the top bar and enter the end of the side holes.

After that, these elements are fixed with the help of self-tapping screws. Such a design would still not be reliable. To strengthen it, it is necessary to make 1 more hole, but from the wrong side of the loot, but so that they enter the end parts of the upper bar.
After that, the elements of the door frame are fixed with another 1 self-tapping screw. This will be enough for the structure to be securely fastened. When using 3 screws on each side, you can not be afraid that the box will loosen later. To assemble a rectangular door frame, all 4 edges are filed at an angle of 45 °. Each corner is successively fixed with 3 self-tapping screws. Be sure to make sure that the frame is fastened securely. Even if a double interior door is being installed, the box must be assembled in the same way.
After that, you should place the canvas correctly in the door frame and measure 20 cm from the lower and upper edges. Marking is performed for further installation of the hinges. It must be ensured that there are no large gaps between the frame and the door leaf. After that, loops should be attached to the inside of the loot and marked. The attachment points of the loops are carefully cleaned with a chisel. The end part of the door leaf, where the hinges will be installed, is also subjected to a similar treatment. In addition, it is necessary to pre-make a hole for the lock tongue.

After that, you can proceed to install the door frame in the opening. This is the critical moment of door installation. When placing the frame in the opening, you need to control that it is located in the same plane with the wall. The box is fixed first with wedges. Often, the use of bars is required to fix the box in the opening. All parts of the frame are checked by level.
It is necessary to make sure with a tape measure that the opening distance is the same in the lower and upper parts of the door. After taking all the measurements, you can fix the door frame in the opening with self-tapping screws. To prevent the fasteners from being visible, they cut into the attachment areas of the hinges and tongue. After installing the door frame again, the correctness of its location must be checked using the building level.

Additionally, the door frame is fixed with wedges. If necessary, additional boards are installed, they allow you to compensate for the lack of width of the box in comparison with the opening. Most manufacturers make telescopic boxes, that is, they immediately make grooves that allow you to increase the width of the door frame with an additional board.
If there are no grooves, the additional board is fastened end-to-end. When the board is wide, its additional fixation with self-tapping screws to the doorway is justified. After that, the quality control of the installation is carried out using the building level and the remaining gaps between the wall and the door frame are filled with mounting foam. You need to wait at least 45 minutes for it to harden. The remains of the mounting foam should be carefully cut with a knife.
loops
The next step in replacing the interior door is the fastening of the hinges. It is easy to carry out this procedure. First you need to separate the loops by removing the rod. After that, the individual elements are fastened to the door frame and the canvas. Fixation is carried out with self-tapping screws. When carrying out the procedure, it is best to use a screwdriver.

If you are going to install an interior door that will last for many years, you need to test hanging the canvas to make sure that it does not warp and opens without difficulty. If necessary, the hinges are corrected to avoid the appearance of unequal gaps between the door and the frame.
This is not the only option for installing hinges. Some models do not understand. The hinges are attached to the door jamb. In this case, when installing the door leaf, you will need an assistant to fix it. Screwing the door on weight is not a very convenient procedure.
Canvas hanging
Given that the door leaf is heavy, help from another person will not hurt. At the same time, hanging this element can be done independently. The installation scheme is simple.
![]()
The door leaf must be lifted with a nail puller from below and carefully hung on the hinges. Individual elements of the loops are fixed with special pins. It is necessary to check how well the doors open and close, and whether the gaps between the canvas and the box are the same.
The scheme for installing an interior door on completely non-separable hinges is somewhat more complicated. Before you screw the doors to the hinges, you need to make sure that they dock with them correctly. It is extremely difficult to do this on your own.
platbands
Before placing platbands, they must be filed. The side elements are sawn from one side at an angle of 45 °, and the top bar from two. To fix them on the door frame, you can use special nails without hats or glue. These fasteners are also suitable for telescopic door frames. In this case, on the one hand, the platbands are attached directly to the door frame, and on the other, to the additional board. When using glue, it is possible to achieve a good result, there is no risk of damage to the outer coating of the trim.

It is allowed to use special nails that have small hats. In this case, the defects will be minor. There is another way to fix the platbands, if you want no traces left on their surface. First, special nails are driven in about 1/3 into the dobor board or boxes, and then a trim is applied from above to the place of attachment.
In order not to damage the outer decorative layer, it is best to use a hammer with a rubber tip. You can put a soft dense fabric folded several times between the casing and the hammer. This will reduce the risk of damage to the top decorative layer.
Mounting and adjustment of the door closer
Closers are special mechanisms that are now installed not only on entrance doors, but also on interior doors to ensure their tight closing without human intervention. The body of such structures is mounted on the door on the upper part of the leaf. Its lever is fixed on the door frame. It is easy to calculate the place where the closer should be located, since a template is attached to such mechanisms. Mounting on wooden doors is made on long screws to ensure the reliability of the design.

Sliding door installation procedure
The process of installing a sliding door is different from installing a swing door. Despite the unusualness of the product, all the work can be done independently. There are several options for such structures, designed for different widths of the opening, but the principle of assembling such doors is approximately the same.
The opening must first be carefully aligned. The wall and opening must have a high bearing capacity. It is required to pre-plaster the opening and apply a decorative coating. After preparing and taking measurements, you can start assembling the doors.
In some types of such structures, the fastening of the rollers requires a distance indent of 1/6 of the width of the door leaf. Other systems are installed directly from the edge, as the mounting plates present allow for the necessary setback. After that, on the lower end of the canvas, you should set out the plastic in rough and mark with a marker the places where you need to make holes in the wood for self-tapping screws. The length of the fastener must not be less than 70 mm.
Supports for rollers are inserted into the installed plates. They are fixed with a dock cover. After that, roller platforms are wound onto the thread pins. Locks and handles are being installed. The most important stage is the installation of the supporting mounting beam and the guide. After taking measurements and cutting these elements of the required length, the guide is fastened to the 8 cm bar with self-tapping screws. Fastening is carried out with an indent of 10 cm.

After that, measurements are taken to determine the location of the beam with the guide on the wall. It must be borne in mind that the door leaf must hang so that the floor covering is not damaged. The minimum gap between the door and the floor must be at least 7 mm. After that, at least 4 holes must be drilled in the side of the beam for fastening to the wall. On the surface to which the fastening will be carried out, it is necessary to make markings and check its correctness with a building level.
After that, the interior door is placed on the canopy and the rollers are wedged. This will prevent the doors from dangling as they move. Then the installation of a bar with a guide and doors to the wall is carried out. To do this, use 120 mm self-tapping screws or anchor bolts. The last step is to install a flag roller and a decorative panel to cover the beam and guide.
Features of designs of different types
A variety of design options for interior doors allows you to choose the most successful for each home. Swing doors are considered classics, which open due to hinges mounted on racks.
Sliding doors consist of 1 or 2 leaves. Most often they are used in conditions of limited space, since the canvases in them move along the guide along the wall. Install interior door wooden house, if it has such a design, it is as simple as a city apartment. Folding doors play the role of a screen. Such designs are less reliable.
Do-it-yourself interior door installation is carried out in strict sequence, every moment, even the smallest one, is important. If you make a minor oversight, this will result in major problems during the further operation of the building. The main condition for installation is a perfectly even position vertically and horizontally.
Only if these parameters are observed will the normal opening and closing of the doors be ensured. Step-by-step instructions for installing interior doors will help you cope with the work. The first thing you need to pay attention to is the installation of the door frame.
Complete sets of interior structures
Installation of interior doors is carried out after finishing the ceiling and walls. At the installation stage, it is necessary to have a subfloor and a finishing coating. Installation of skirting boards is carried out after the installation of doors. Door set:
- Canvas without box and lumber. In this case, everything is purchased separately. Lumber is bought, planks are cut to fit the doorway and the corners are sawn. In the case of using a standard box, a canvas of the same size is used. Before buying, it is necessary to take all measurements so that you do not have to modify the elements. In this case, the installation of interior doors with your own hands will be the most budgetary.
- Box and canvas. In this case, both elements will fit together, you just need to buy lumber, make planks and assemble the structure. It may be necessary to install extensions on interior doors. This point needs to be considered in advance.
- Assembled block. All components are assembled and adjusted, it remains only to install the block in the opening, set it to the level and fix it.
If you know how to install an interior door with your own hands, then you can purchase any kit. For beginners, the latter is suitable, since it is the easiest to install. For more experienced craftsmen, the first one is best, it is also the most economical. Such structures are not subject to additional adjustment.
Door frame dimensions
Each country has its own standards, they differ and sometimes significantly. Width of swing doors according to standards in Russia:
- 600 mm;
- 700 mm;
- 800 mm;
- 900 mm.
The same standards in some European countries(in Spain, Italy). The French differ by 1 cm (690, 790, 890 mm). The choice of standard depends on the owner, but it is best to use Russian ones, since they have a clear advantage - a wider choice.
If you happen to buy non-standard doors, then it will be difficult to change them later. According to GOST, the width of the opening and the door leaf installed in it depends on the room in which the installation is carried out:
- For the kitchen, the height should be 2000 mm, width 700 mm.
- In the bathroom, the height is 1900-2000 mm, the width is not less than 600 mm.
- For residential premises, the width of the opening is 600-1200 mm, the height is 2000 mm.
But these are standards, in reality it happens that you need to adapt to a certain building. Sometimes it is better to give preference to a sliding door. To determine the dimensions of the box and canvas, you will need to measure the opening. After that, the dimensions of the block are selected. The size should be slightly smaller so that it is possible to mount fasteners and spacers. It is necessary to take into account these parameters before installing the interior door yourself.
At the stage of measurements, it is necessary to carefully examine the walls, if necessary, carry out repairs and strengthening. In this case, the door frame will be much better able to stay in the opening. Particular attention should be paid to the condition of the walls if you plan to install heavy doors. Need to attach wooden beam to the wall and plaster it, if possible. This approach will allow you to install interior doors without much difficulty in any opening. The thickness of the bar should be 5 cm. After such an improvement, installing the door frame with your own hands will be much easier, and the reliability of the structure increases.
Everyone can independently install doors from scratch with their own hands, if they understand the nuances and design parameters. One important parameter of the boxes is the depth. According to GOST, the standard is 70-80 mm, but if the wall thickness in the house exceeds this indicator (and this is in most cases), then you need to cheat. Installation of a door frame without a threshold is carried out flush with one wall, but on the condition that the slopes and the opening will not interfere with opening. The rest of the wall is plastered and finished like the walls in a room. But you can do it with extensions: a plank is mounted to match the canvas and trim. How to assemble the platbands, you can learn from the instructions for them.
Assembly of door frames
How to put the interior door correctly? The horizontal bar is the lintel, the vertical ones are the jambs (racks). These are the main elements of door frames. If you bought them separately, then you need to assemble them together. To do this, oilcloth, paper, cardboard are spread on the floor, lay out the planks. All elements are connected.
If the box and canvas are purchased as a set, then the dimensions will all match. In most cases, installation of an interior door threshold is not required. But you need to double-check so that you do not have to start all the work again. All elements are stacked on the floor of the box, between them there is a canvas, correct installation interior doors should be done that way.
Ideally, there should be the same gap around the entire perimeter of the canvas - about 3-4 mm. With such a gap, the normal opening and closing of the doors will be ensured. Similar requirements for double-leaf interior doors.
A separate story is height adjustment, regardless of whether you are installing doors in an apartment or in a bathhouse. The jambs of the box are 12-15 cm larger than the canvas. For correct installation racks rest on the logs. But during construction, such an installation is used extremely rarely, so door jambs are shortened to required size. Installation of the interior door frame is carried out using self-tapping screws.
But be sure to make a hole with a thin drill before screwing in the fastener. In case the planks are sawn at 45°, it is necessary to drill holes on the side plank. Then apply it to a horizontal bar and fix it with self-tapping screws. Similarly, do the installation of doors in the bath with your own hands. You just need to pay attention to the material - wood must withstand high temperatures and humidity.
And how to install an interior door yourself, if the edges are cut at a right angle in the box? In this case, the whole work is much simpler. But you still need to drill holes, especially if the box is made of MDF. Attach the top to the side beam, align the edges and make two holes.
In the upper beam through, in the side hole in the butt. After that, connect the strips, get a box. During construction, the lower bar is used extremely rarely. Make sure that the assembled box exceeds the dimensions of the canvas in length and width by 3-4 mm. Builders prefer a door frame without a threshold, so the racks have to be cut a little. When installing interior doors without a threshold, there are small advantages.
Quite often it happens that the shoals are larger than necessary. Measure the height of the opening, subtract 2 cm (for filling with mounting foam). This value will be the height of the box. Take measurements from all sides, set aside the values on the assembled structure and draw a line along which the cut will be made. The excess is cut off. The installation of interior doors with an extension is not much different. The differences are only in the details, which appear in a few moments.
Loop selection
Before buying accessories, be sure to decide which type you need - left or right. Stand near the opening in which you plan to install (the canvas should open on you). This condition is mandatory, try not to confuse the parties. Open yourself up and see where the movement is going - to the left or to the right. If to the left, then left loops are needed.
If the loops are right, then the canvas should open to the right. Try not to confuse the hinges, mark the places for their installation. Keep in mind that in some cases it may be necessary to remove the canvas (to remove furniture), so you need to be sure that this procedure will be painless and quick. Installing hinges on a door is a matter that requires special care, as a slight deviation can cost the canvas to be crooked.
When installing wooden doors, you need to outline the contour of the hinges and remove the layer with a sharp knife. Pay attention to the thickness of the loops. To make it convenient to make a cut, you need to make a vertical cut along the contour. If you make only horizontal, then the extra sections of wood will not separate well. The cut is made either with a chisel or special machine. Do the same with the door leaf. But sometimes a chisel cannot beautifully design a cutout. If the canopy falls on a knot, it is necessary to shift to the side. Installing the doors yourself will not cause difficulties, but this work is painstaking. Now you need to consider how the canopies are placed.
Insert hinges
Separately, you need to consider how the door hinges are installed. The requirements for them are not very serious, it is enough to withstand a distance of 19 cm from the edges. You need to know how to assemble an interior door with your own hands and what tools you will need for this.
To install or dismantle the hinges, you will need the following set of tools:
- Drills with a diameter of 1-4 mm.
- Drill and screwdriver.
- Cutter.
- Awl.
For MDF doors, 2 hinges are enough, as they are light. For heavy ones, you need to put 3 loops - an additional one in the middle. All hinges, regardless of type and price, consist of 2 parts. One half of them has a pin. Important condition: install in such a way that this pin is directed upwards. It will be wrong if it turns out to be directed downwards.
inset loops and door locks best done directly on the floor, prior to installation. Hardware fasteners are made after marking and cutting. Attach a loop, mark the contour and make notches with a chisel. Fasten the hardware first on the jamb, then lay the canvas and mark the position of the second part of the loop on it.
The installation of interior doors in a wooden house is simplified due to the fact that fasteners can even be made with nails. All recesses are made with a milling cutter in a matter of minutes, but in the absence of such a tool, chisels can also be used. When closing the hinges provide a gap of 4 mm. The installation of laminated doors is practically no different from the installation of wooden ones, there are only minor differences.
Final assembly of the box
In practice, it turns out that the assembly and installation of interior doors is a painstaking task. Racks and lintels are in the shape of the letter "P", install the assembled structure in the opening. Using the level, set the entire structure to zero. Achieve maximum evenness horizontally and vertically. Fix the position of the box with spacers and wedges, punch the level from time to time. Be sure to ensure that the jambs are parallel to each other, blockage in any direction should be avoided. The ease of use of the doors in the future depends on evenness.
After checking all the installation parameters, fix the box in the opening with self-tapping screws or dowel-nails. The distance between adjacent fasteners should be 0.25-0.3 m. There should be approximately 2-3 fasteners on the lintel, 7-8 pieces on jambs. In the box, you need to drill holes with a diameter of 4 mm, since the caps of self-tapping screws are usually 1-2 mm larger. If you installed a beam between the box and the wall, installation is much easier. Making interior doors in this case is simple, since the fasteners are more reliable.
If the walls are made of shell, brick or block, then installation is more difficult - you need to install dowel-nails. Please note that they must be in bricks and not in seams. Putting doors on the seams is not recommended. With a 4 mm drill, make a hole in the racks, leave a mark on the wall. Having finished marking all the holes, dismantle the box and check if it hit correctly. In order not to fall into the seams, pay attention to the open areas of the masonry, make marks on the planks. Only after making sure of the accuracy, make holes for the dowel-nails. This is how they install wooden doors with your own hands. The installation of plastic structures is done in the same way, only it is easier to work with them - all elements are fitted as accurately as possible.
Do-it-yourself doorway installation is done in the same order, so the manual can be used for this case as well. After you expose the box and make sure that the holes in it coincide with the dowels. Set the position horizontally and vertically, fix it with wedges and spacers, only after that fasten the box to the wall. It is not necessary to pull too hard, as this can damage the wood or bend the jamb. Since the canopies were installed in advance, further installation of the canvas will not cause difficulties.
Installing front doors with your own hands will significantly reduce the cost of work.
Foaming gaps
After the final fixation, you put cardboard between the jamb and the canvas, you need to install it on the foam. Close the door and install spacers and wedges to keep the box from arching. Fill the gaps between the wall and the box by 1/3 with foam, as the volume increases during the drying process. If there is too much foam, then it will bend the slats. Leave for a day to dry.
After you remove the spacers, cut off the excess foam with a sharp knife and proceed to further work - installing the trim or platbands on the interior doors. A layer of putty can be applied to the foam and covered with decorative elements. Do-it-yourself installation of interior door platbands will not cause difficulties even for an inexperienced master who has encountered such a procedure for the first time. Proper installation of doors is the key to a long service life of the product.
The use of fasteners and the subtlety of the tie-in
Together with door hinges self-tapping screws for sale. It is with their help that fastening is made. Before screwing them in, you need to make thin holes in the wood. This will prevent the wood from splitting while screwing in. Fittings are secret, their installation is a little more difficult - it is necessary to make deeper mounting holes. The hole is best cut with milling machine. Decide in advance whether you need to install the addition of interior doors; everyone can do it with their own hands.
When screwing in the screws, make sure that the loops do not go to the side, align if necessary. With the correct insertion of the loops, they will be located on the same level. If there is even a slight protrusion, you need to deepen it to required level loop pad. Using a ruler, check if the canopy is planted correctly.
Press the ruler to the loop and evaluate the position. If it protrudes strongly, then there will be too much gap between the door leaf and the frame. When the doors are set correctly, normal opening through an angle of 180 ° is ensured. In this case, the maximum load on the hinges should not exceed 50 kg. Next, insert the parts of the loops by lifting the canvas. This will allow you to determine as accurately as possible the point at which both canopies will be combined.
When choosing canopies, it is best to stay hidden. They look much better, and the fastening rules are the same. After installation, be sure to check the smoothness of the movement by interlocking the latch on the jamb and the striker plate. If necessary, move the latch. This is required if there is extraneous noise when closing the door. The metal tab should be adjusted a little, and the noise will disappear. In general, the installation of hinges on interior doors is quite simple, there should not be any difficulties. It is enough to act strictly according to the instructions and use the recommendations.
Advantages and disadvantages of sliding interior doors
Installing sliding doors with your own hands is quite simple and does not require significant costs, and the design is much more attractive than conventional swing doors. In total, there are 2 types of interior doors design:
- Swing, the installation of which is discussed above, are attached to the box using movable canopies. This is a traditional option, the range of models on the market is very wide, the view is rich, but one drawback is that they take up a lot of space. Installation plastic doors do-it-yourself does not take much time, but it will be problematic to use them in a small room: when opened, they need a lot of space.
- Sliding ones are much more convenient, since with their help the space of the room is used more rationally. And installing sliding interior doors with your own hands will not take much time, if you carefully study the features of the work.
In turn, sliding doors are divided into 2 types:
- Sliding doors built into the wall slide into it and are recessed. The design has a mechanism that allows you to move the door parallel to the wall. Rollers are mounted on the canvas, guides are mounted on the opening or on top of it. The rollers move along the guides, the opening is freed for passage.
- A good option would be to install an accordion door with your own hands. Structurally, they are made of plastic or wooden lamellas. Moving, they fold and release the opening. But one drawback - cheap products are extremely uncomfortable and impractical. Therefore, if the choice fell on such a design, then it is better to purchase an expensive and high-quality product.
Regardless of the design, all sliding doors have the following advantages:
- Non-standard and unusual, very original appearance.
- There are no dead zones, they do not interfere with the arrangement of furniture in the rooms.
- Complete safety, as there is no risk of hitting the corner of the door. But it is worth making sure that children do not stick their fingers between the door and the wall.
- A huge plus is that they do not open with drafts.
- Installing an interior door threshold is not required in most cases, only if you need to cover the guide at the bottom, a threshold is set.
But there are also significant disadvantages:
- The prices for installing a sliding door from the masters are simply sky-high. But if you do all the work yourself, you can reduce costs. Do-it-yourself installation of interior compartment doors will minimize costs and equalize them with the cost of installing swing doors.
- Low degree of isolation. It is necessary to install a felt gasket on the end of the door. This is the only way to get rid of the penetration of foreign smells, sounds, light into the room.
- The pencil case into which the door goes is quite difficult to care for. But if you manage, you can do the job with a vacuum cleaner. When installing cashiers that cover the holes, this is problematic.
- Repair of this design is quite complicated, therefore, when buying, be sure to take a few videos in reserve. Installation implies that elements that are rarely found on sale will be used. Sometimes people who install such structures begin repairs after a few years and do not find spare parts in stores. We have to redo the mechanism.
Sliding door components
The main difference between sliding and swing structures is the mechanism of their functioning (rollers or canopies). Sliding interior doors can be equipped with the following mechanisms:
- Intra-wall, which allow you to remove the door leaf inside the wall. But there is one caveat: the system must be started at the time of the construction of the walls, since they will need to leave voids. In this case, the thickness of the wall will be greater. Due to this, the area of \u200b\u200bthe room will become a little smaller, but the walls will be freed.
- External, which can be mounted at any time, no restructuring of the walls is required. In this design, the canvas moves parallel to the wall. A small drawback: you will need to clear a small distance from the walls.
Guides are one of important elements structures, skids, along which the door leaf moves on rollers. They are placed above, below, or on both sides. The sale and installation of such elements is carried out by stores, but it is better to do the installation yourself. Features of the location options:
- Only top guides are used - the most common way. It is used only if the weight of the door leaf is low. The advantage is that the risk of breaking the guides is extremely low and the service life is high.
- If only the lower guides are used, then during operation there is a high risk of damaging them. It is extremely difficult to achieve smoothness of the door without an upper support, and the constant clogging of the skids will make itself felt.
- Combined designs are assembled when using doors of large mass, or to improve smoothness.
Preparation for installation of sliding doors
Since the most popular type is the outdoor structure, it is worth focusing on it. Do-it-yourself door installation implies the following tools and materials:
- Door leaf, platbands, box.
- Accessories (rollers, guides, locks, handles).
- Bars measuring 50x30 mm for fastening guides.
- Hardware.
- Level, tape measure, ruler if necessary.
- Drill and screwdriver.
- Hacksaw.
- Chisels.
If the door weight exceeds 27 kg, 4 rollers must be used. For lighter structures, 2 is enough. To prevent deformation of the wall and damage to the wallpaper with handles and locks, use hidden doors cut into the canvas.
At the very beginning, you need to decide on the installation location and the opening side. If you plan to install 2 doors, consider how convenient it will be to use them. If necessary old door is removed, a new box is mounted. In living rooms, the gap should be maintained on the order of 10 mm. If there is no finished floor, then the laminate, screed, and leveling are taken into account.
- Measure the width and height of the sliding door. It is advisable to do this at several points (bottom, middle and top). The height of the door must be measured in the open and closed position.
- The beam is being installed. Draw a straight line over the top of the box. From the line to the edge of the box, you need to maintain a distance equal to the width of the guide. The beam is attached to this line. One caveat: the middle of the bar should be located above the right half of the box if the door slides out to the right.
- The upper guide profiles are being installed. The fastening of the runners to the beam is carried out with the help of hardware. Check how the rollers slide on the skids. If necessary, replace the latter, otherwise the functioning of the doors in the house will be accompanied by inconvenience.
- The bottom skids can be installed in several ways. You can remove part of the flooring, but this is for cases where installation of a structure with lower guides is required. You can mount the guide directly on the floor, you just have to use this design with thresholds. But builders actively use the installation of doors without a threshold, although they allow the guide not to collapse. But much more often they don’t put rollers at the bottom, they use only a packet knife. With its help, the door adheres and does not deviate from the direction of movement.
Doors with a threshold are used infrequently, without it it is much easier. The reason is the possibility of normal operation, the sliding doors of the compartment will be able to work without damaging the flooring. And this allows you to reduce the time required to care for the structure.
Sliding doors: assembly and care
Rollers are hung on the upper end of the web, and holes are made on the lower end, between which a groove is knocked out. It should be 2 mm wide - a little more than a knife. Depth as the height of the knife, in the range of 10-18 mm. The part in which there is no groove acts as a limiter. A door inserted into the grooves in the presence of a limiter is difficult to bring out of its limits.
Installation of fittings is the installation of a lock in an interior door, it is not difficult to do it with your own hands. Enough availability a simple tool- screwdrivers, pliers. After 1 of important points- installation of handles on interior doors with your own hands. All work is done carefully so as not to damage the appearance, otherwise the sliding compartment doors will look unattractive. If there is no experience, then it is better to entrust the work to specialists.
The final installation of sliding compartment doors is to get into the rails. At the end, rubber stops are placed, which will allow the doors not to fall out during operation and make the stop much softer. This design is much better than butterfly hinges, as it provides greater reliability and convenience.
For beauty, you can apply decorative elements - platbands, which are installed on the box and upper skids. How to mount them correctly, you can read on the label. It is not necessary to cash out, since the mechanism itself is already an element of decor. To care for sliding doors, you must:
- Do not allow water to get on the canvas and the sliding door mechanism, especially if all elements are made of wood.
- Carefully monitor the cleanliness of the runners, remove dirt in a timely manner. If debris gets on them, the door will move poorly and move apart.
- Try not to pull the compartment door and do not slam it, you do not need to apply force, as the rollers wear out more, sometimes it can “fly out” beyond the limiter. Putting them back in place can be problematic.
- Check the quality of accessories, change rollers in a timely manner.
- Re-installation of door locks should be done as carefully as possible.
It is clear that the installation of interior doors from MDF with your own hands or an accordion is a drop in the ocean. It is much more difficult to maintain them in good condition, prevent breakage and make repairs in a timely manner. In general, they are able to serve no less than simple swing structures. Do-it-yourself installation of compartment doors is a guarantee that an element of novelty will be present in your home.
Interior doors sooner or later become unusable and have to be replaced. This procedure is not too complicated, so it is not necessary to use the services of hired workers. To cope on their own is quite within the power of someone who has even the slightest idea about the saw, self-tapping screws and the level. In this article, you will learn how to install an interior door with your own hands.
Types of interior doors
The construction market offers a huge number of interior doors that are made from various materials. The most common are: fiberboard, MDF and natural wood. I would like to consider the advantages and disadvantages of doors made of such materials in more detail.
fiberboard doors
The frame of such a door is made of wood, and the sheathing is made of fiberboard sheets.
The advantages include:
- low price;
- lightness of the material, which allows you to easily bring the door from the store home;
- ease of installation.
Such advantages increase the popularity of these doors among the population. Hardware stores have quite big choice fiberboard doors, as they are in the greatest demand.
Of the shortcomings, it should be noted:
- Fiberboard material is not strong enough, so the doors can quickly become unusable;
- Poor resistance to moisture, therefore not suitable for installation in bathrooms.

MDF doors
Doors made from MDF material, is the most acceptable for the population and meets the price-quality ratio. Compared to fiberboard, such doors have certain advantages, namely:
- high resistance to moisture;
- high level of sound insulation;
- high strength material.
Of the shortcomings, only a higher cost can be noted, compared with fiberboard doors. At the same time, the quality more than justifies the means.

natural wood
Such interior doors have always been and are held in high esteem. The material is durable enough to use. The cost of a door will directly depend on the type of wood from which it is made. The classic interior and the author's design are perfectly complemented with the help of such doors.

Step by step installation instructions
For an example of how to install an interior door in stages, we will take doors from fiberboard.
Step 1
Before starting work, prepare necessary tools and consumables, such as: a saw, a screwdriver, an electric drill, a tape measure, mounting foam, dowels, a level, wood screws, a pen, drills and drills of the required diameter.

Step 2
Make a diagram for installing the door frame in the opening. It is worth paying special attention to the threshold. If you cannot hide it on the floor, then it is better to choose a box without it, that is, in the shape of the letter P. Such a box does not have a crossbar at the bottom, which will ensure walking without any obstacles.
Step 3
Box installation. Before attaching the door frame, make sure that there are hinges. The door must have a cutout for the handle and for the lock. Gather all the pieces of the box together and fit into the opening. For convenience, fold all the parts on the floor as they will be installed in the opening.

Step 4
Installation of the door frame in the opening. At this stage, the assembled door frame is installed in the opening and leveled.
Step 5
Landing the door on the hinges. This process is quite simple. The doors are hung on the hinges by hand, it is better to ask someone to help you at this moment.
Step 6
Foaming the gap between the wall and the box.

Step 7
Finishing doorways. The type of finishing of such an opening is selected taking into account the type of the door frame itself and the width of the opening.

In order to perform the installation of interior doors without the involvement of hired workers, it is necessary to consider some steps in more detail in order to avoid unpleasant consequences in the future.
Box assembly
The most painstaking and crucial moment in the assembly of an interior door is the installation of a box. But before you install it, you need to assemble it correctly. At this stage, the proverb about measure 7 times is as relevant as possible.
So, to assemble a U-shaped box, you need:
- Feigned rack or bar.
- Loop bar.
- Ceiling plate.
To carry out the assembly as accurately as possible, you need to measure the size of the opening and the canvas itself down to every millimeter. Next, it is worth calculating the dimensions of the racks and lintels, taking into account the dimensions of the gaps. After that, saw off the individual bars and connect them into a single whole. It should be noted that the thickness of the timber should not be less than the thickness of the canvas. When taking measurements, do not change the tape measure, use only one. By measuring the canvas with right side, measure on the left as well, do not rely on the accuracy of the match. All deviations will be necessarily taken into account in further work.

Calculation of the installation of an interior door
When taking measurements, consider the following:
- On the outer sides of the entire beam (ceiling, hinge and feigned), which are in contact with the opening, it is necessary to leave a gap of 1 cm wide for mounting foam.
- There should also be a gap on the inside of the entire beam, but a little less, 0.3 cm. If the box has a threshold, then such a gap is necessary around the entire perimeter.
- The lower plane of the door frame and the floor must have a gap between them. On average, its height should be 1 cm. For linoleum, 0.8 cm is enough, and for fleecy coatings, 1.5 cm.
If the opening is not enough in size, it should be increased and vice versa, reduced if it is too large.

Insert hinges
Usually, two hinges are enough for interior doors, but sometimes three may be needed. The hinges are installed at a distance of 250 mm from the edge of the canvas. If both the canvas and the box are made of wood, then the place for the loops must be chosen so that there are no knots. Initially, the loops are attached only to the canvas.

The stitching order looks like this:
- We select the places necessary for the loops and outline them with a knife blade.
- You can work with a milling cutter or a chisel, in which case the material must be matched to the thickness of the loop.
- We prepare the recess and install a loop in it, the plane of which should be flush with the canvas.
- The loop that is already inserted into the hole must be fixed with self-tapping screws.
When you have installed the hinges in the door leaf, it is placed in the door frame and the necessary gaps are set.
On the side of the hinges, the gaps should be 5 mm, on the opposite side and at the top 3 mm.
When the gaps are set, they are fixed with wedges. It is also necessary to set the canvas itself, exactly horizontally and vertically.
When everything is exposed, the location of the mating parts should be noted. Sometimes it is more convenient to remove the installed loop and then reinstall it. According to the markup, you need to make a recess. The depth should be such that the surface of the door frame coincides with the hinge.

Hardware installation
Installation of interroom doors cannot do without installation of accessories. According to all safety regulations, interior doors should always open outward. The installation of handles, as well as loops, begins with markings, which should be carried out very carefully. First, mark the level of its height. Usually it is 90 cm. On one side, draw a line with a pencil, stepping back from the edge of 60 mm. Using a ruler, draw a line on the end and make a similar marking on the other side of the door. All marks must be pierced with an awl.

Drill a hole half the thickness of the canvas. Do the same on the other side of the door. At the end of the canvas you need to make a hole with a pen drill. Make sure that all measurements match and do not allow deviations even of 1 mm. Take a chisel and with light taps make a deep cut for the latch. Screw it on with screws. Now it remains only to insert 2 parts of the product. Bring the parts on both sides and try to get into the holes with the guides, then tighten everything with bolts.

At the end, you have to install a metal plate on the end of the door frame. Cut out the cutouts for the plate. Make sure the frame fits snugly against the end and secure the frame with screws.
Box installation
How to install the box correctly? This process requires you to be extremely careful and patient. It is better if someone helps you, then the measurements and installation will be much more accurate.
Installing the door frame in the opening includes the following:
- The pre-assembled door must be carefully lifted, preferably with an assistant, and installed in the opening.
- In order to leave the necessary gaps between the wall and the box, you need to make wedges from the remnants of the material.
- Next, screw in the screws.
- We clearly align the base in all directions. There should not be any distortions and discrepancies in the gaps. But if there are any, they can be leveled by loosening or tightening the screws more tightly.
- We hang the door leaf on the hinges and check.
- Where the mounting foam will be poured along the box, we seal the canvas with construction tape. Insert cardboard into the gap and close the door.
As you can see, the process is not that complicated, however, it requires precise measurements and compliance in all sizes.

Foaming
This step is quite important. Filling the gaps between the box and the wall with foam should be carried out after the door is installed. Do not forget that as it dries, the mounting foam increases in volume. If you suddenly overdid it with its quantity, it may well pull out the screws and even bend the box, after which you will not be able to close the door. If this happens, then the installation of the door will need to be started again. During foaming, it is important to lay gaps between the wall and the box with something.

Applying construction foam for gaps is not hard work. The vertical seam must be filled from below. Be extremely careful with the amount of foam used.
Only a third of the opening needs to be filled. In addition to the deformation of the door, the foam can come out and spoil the appearance of the canvas.
Drying of the foam occurs in a day at a temperature of 20 degrees.
Finishing openings
When the door installation is completed, the openings require finishing to bring the overall appearance of the space in order. The type of finish should be selected based on the width of the opening and the door frame.
With a thin wall, when its width is equal to the width of the door frame, platbands can be used for finishing. This is usually how bathroom doors are designed. This option is the simplest and most common. A set of platbands is attached to all sides of the box and closes the building foam. If the platbands are made of wood, then first they need to be attached with screws and only then painted. If the platbands are laminated, then they must be fixed with nails without caps or with screws with caps.
If the doorways are wide, then you can trim them using the same platbands or an additional strip, which can be cut to the width you need. Such a bar is attached to the wall using building silicone. The plank and platbands may have different colour with a door. Recently, it is quite important to choose contrasting solutions.

If the door frame is made of wood, then it can be finished with slope plaster. Cement-sand plaster will perfectly emphasize the natural texture of your doors. But this method is not entirely suitable for finishing fiberboard boxes. This is due to their incompatibility with high humidity, which involves plaster work.
Thus, we can say that installing interior doors with your own hands will not take you as much time as it would seem at first glance. Detailed step-by-step instructions will help you avoid the most common installation errors. Correctly performed measurements will guarantee a successful installation of the door. In addition to your own efforts, do not forget to choose quality materials during the work being done, so that your efforts do not become a waste of time due to an unsuccessful choice of building foam or self-tapping screws.
The ability to handle carpentry and measuring tools is already a reason to try to solve such difficult task how to install interior doors with your own hands. The work is simple, but tricky in its own way. It will take scrupulousness, and even tediousness in marking and adjustment, otherwise it will not work to install the interior door with the box correctly.
Features of installing interior doors
At first glance, nothing complicated, but this is only a superficial impression. We are talking about not just installing the frame and the door leaf in the interior opening, but doing it beautifully, without distortions, scratches and sagging hinges. If this is the first experience, then it is best to make a detailed step by step instructions do-it-yourself installation of interior doors. It's not embarrassing for newbies. Even experienced craftsmen often make notes with their own hands - what not to forget and what to look for when installing a door frame on a specific interior partition.
During the installation process, you will need to solve the two most difficult tasks with your own hands:
- Correctly assemble and install the frame of interior doors, align and fix it so that the frame does not sag under the weight of the door leaf;
- With your own hands, mark and cut out the mounting grooves on the vertical rack of the box and on the end of the interior door leaf.
An experienced craftsman takes 2-3 hours to install an interior door, a beginner will need at least a day to fully install the frame and hang the door leaf.
Advice! It is not necessary to stupidly follow the instructions for installing interior doors, which recommend consistently inserting lock fittings, attaching hinges, and only at the very end to solve problems with hanging interior doors. The main thing is to install the box and the door leaf with a fresh head with your own hands, and the platbands, locks and handles with platbands can be postponed for the next day.
You will have to measure and cut a lot. All cuts are made by hand with a hand saw, therefore, in addition to fresh forces, you will need to stock up on high-quality tools.
Tools for installing interior doors
A day or two before the start of work, it will be necessary to assemble a working arsenal for working with lumber. It can be collected from friends or rented. Why two days before installation? Because ahead of time before the start of work, you will need to check with your own hands the serviceability and performance of each tool:
- Building levels - small, 70-100 cm, and large, 150 - 200 cm, with a working bubble indicator. Usually, they do not pay attention to the condition of the camera and the beacon, considering them to be in good condition, but at the box office, it happens that there are bent and even broken specimens, this is the most important tool in installing interior doors;
- Marking tool - a carpentry corner with a ruler, a tape measure and a meter metal ruler. We check the presence of marks of angles of 90 o and 45 o;
- Screwdriver or electric drill with a bit nozzle for cross heads of self-tapping screws. We check with our own hands how the cartridge holds, and the serviceability of the wiring - batteries;
- A cutting tool, you can cut the timber of interior doors with an electric jigsaw, but it is best to stock up on a pair of hacksaws - carpentry and metal. The first is used for cutting the details of the box, the second is used for thin cutting of the platbands.
In addition to the tool, you will need a hammer, a clamp, a carpenter's chisel, mounting foam in a can, adhesive tape and gloves. When installing interior doors, there is little dust and waste, but you still have to periodically clean it with your own hands so as not to spread it throughout the apartment.
In addition, it would be right to have a puncher with a spatula-bayonet in stock, because when installing the interior door frame, there may be problems with the doorway in the wall. Ideally, the gap between the racks of the box and the ends of the opening should remain 10-20 mm, for normal alignment and foaming of the cracks. In reality, the opening may be uneven, and you will need to use your own hands, a perforator or a hammer with a chisel, to knock down part of the concrete or stone.
How to assemble an interior door frame
The best option would be to buy a ready-made door kit, which usually includes:
In this case, the entire process of mounting the interior frame box comes down to transferring the second parts of the hinges to the frame parts with your own hands, assembling the loot with self-tapping screws and installing it in the opening.

The entire job will take less than two hours. One of the options for installing interior doors with your own hands on video

The only drawback of the above scheme is that not all manufacturers modern models interior doors produce their products in kits designed for do-it-yourself installation. Most often, the customer buys a door leaf, and platbands and frame parts are purchased in order to install an interior door with a frame on their own.

How to install an interior door with your own hands
First of all, it is necessary to lay out the door leaf on a flat area. Next, the selected pair of beams is laid to the left and right ends of the sash. With a tape measure, we measure the width and estimated height of the future carrier frame. Then, with the help of a building level and a tape measure, the dimensions of the interior passage are checked.
Important! This is done in order to determine whether the platbands will close the edges of the gap in the wall, and how thick the additional elements should be used.

If you “miss” with the height or width of the frame, you will have to redo the trim with your own hands or, even worse, you will need to raise the interior door in height.
We assemble the frame of the door frame of arbitrary size
In order for the installation of the interior door to turn out without distortions, it is important to choose the right distance between the left and right pillars so that the door leaf enters the frame with a small gap, no more than 2 mm per side. In this case, the door will open freely without wedging in the loot.

The easiest way is to assemble the frame with your own hands using a clamp, a saw and two blanks. Vertical racks, as in the case of preparation, are attached to the ends, aligned and fixed with clamps.
From the side of the upper and lower edges of the web, an allowance equal to the thickness of the beam is left on the blanks. At the same time, a cut line is applied to the left allowance with their own hands at an angle of 45 ° for further docking with the horizontal crossbars of the frame. Without disassembling the structure, they apply markings for cutting grooves for awnings, locks and handles.
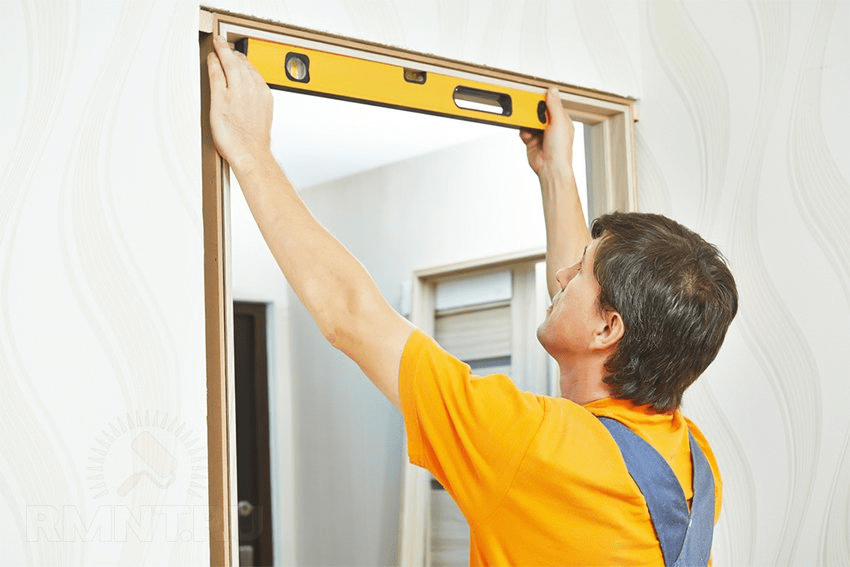
If the interior door is too wide or has a complex shape, then usually at this stage the conformity of the frame configuration with the door to the shape of the interior opening is checked. To do this, a pair of nails is hammered onto a wooden plank at a distance from each other equal to the outer width of the frame. The bar must be fixed above the opening, and a couple of construction plumb lines are hung on the nails. If the gap between the frame and the wall is 10-15 mm, then the calculation is correct.
Installing hinges on an interior door
After all checks have been completed, it is necessary to cut mounting grooves in the canvas for canopies using a chisel or a carpenter's knife and a hammer. The easiest way to mill a niche is with manual router, but, as practice shows, the work can be done with your own hands and without expensive power tools.

If this operation is difficult, then overhead hinges or models for drilling can be used for interior doors. For installation, you only need to drill holes for screwing fasteners.
Fasten the frame in the doorway
- We mark the level of the upper horizontal cross member of the frame with a marker on the steppe, this will help to perform the correct installation horizontally and vertically;
- With the help of wedges and a building level, we align the frame vertically and horizontally with our own hands. We fix the position of the frame in the opening with wooden plugs and wedges.
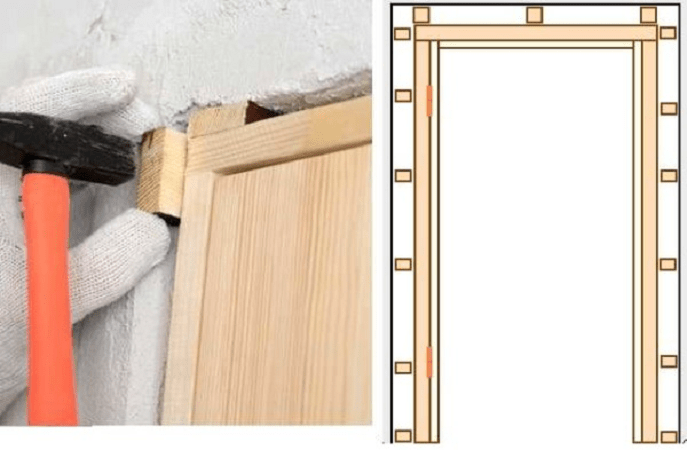
Advice! If the frame and door leaf are light, then the frame can be fixed with mounting perforated petals to the wall of the interior partition.

Next, it is necessary to blow out the space between the frame and the wall with mounting foam, while installation on the PPU is being carried out, it is necessary to check again and, if necessary, finally align it vertically using a long building level. We apply a small building level to the upper mark and, if necessary, knock the frame to the desired height.
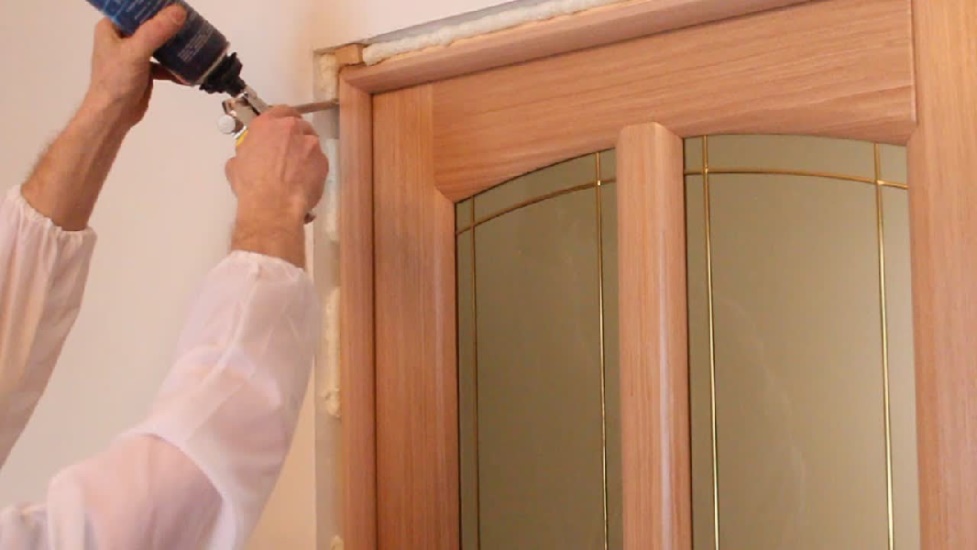
Door leaf installation
After the loot is firmly fixed with hardened foam, it is necessary to install the mating parts of the canopies. To do this, initially the door leaf is lifted with wedges so that a gap of 1-2 mm is obtained between the threshold and the lower edge.

It remains only to install the sash on the awnings, and you can proceed to decorative trim interior doors.
Installation of platbands on the interior door
Facing the frame with platbands is not particularly difficult. First of all, install the vertical strips of the platbands. The height of the bar is measured according to the mark made earlier, after which the casing is applied to the frame and the line is washed down at an angle of 45 °.
Advice! It is best to make an undercut with your own hands using a thin hacksaw blade for metal. Preliminarily, adhesive tape is glued to the cut line. The bar is nailed with wallpaper nails or put on glue.

In a similar way, install the second vertical platband. After the vertical parts have been installed, you can mark the cut line on the horizontal bar, and install it on the door frame in the same way.
What are the sizes of extensions for interior doors
Additional strips are used as an additional element to increase the width or thickness of the door frame. Most often, the installation of extensions on interior doors is required in a situation where the wall is much thicker than the canvas, and there is a gap between them that needs to be closed.

The width of the additional rails ranges from 10 mm to 200 mm, for interior structures, the most common size is 10-20 mm, and often, due to the non-standard profile of the slot, the extensions have to be ordered or cut out with your own hands from the trim strips.

How to install extensions on an interior door
If, after installing the box, the unpleasant fact is revealed that the vertical plane of the frame is recessed into the space of the interior opening relative to the wall surface, then the only way to correct the situation is to use additional strips.
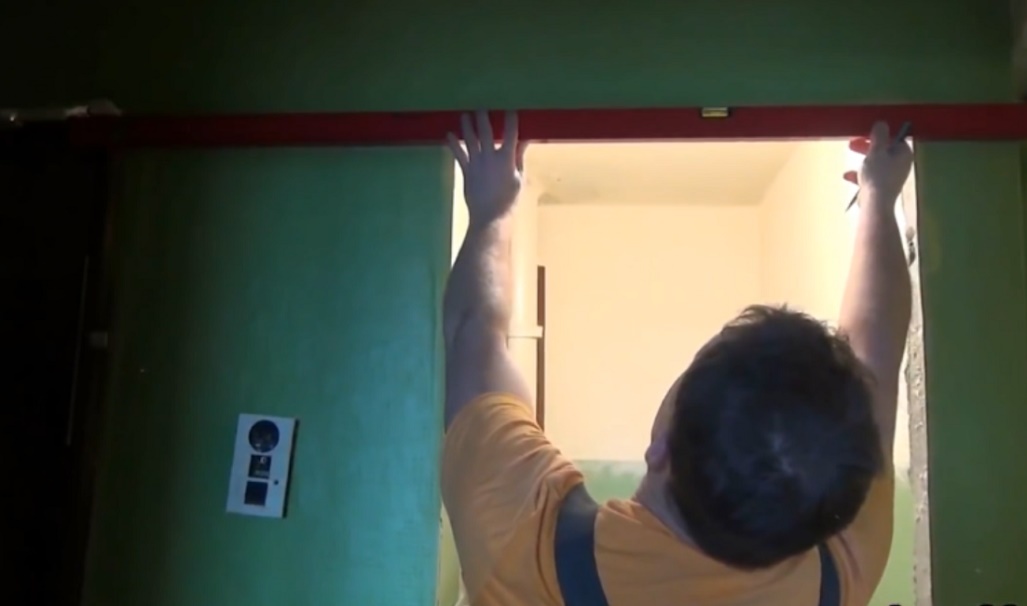
It is first necessary to determine the size of the extension, for this the building level is applied to the wall and the distance to the front edge of the box is measured with a ruler. Thin planks are nailed with wallpaper nails, wide extensions are glued to the frame.
Professional advice on how to install interior doors
Among the features of installing home doors, the following problem areas can be noted.
Before mounting the platbands, you need to make sure that the frame or additional plank is located in the same plane with the surface of the interior wall. Otherwise, even if you make the edges washed down with your own hands perfectly, a gap will definitely appear between the platbands.
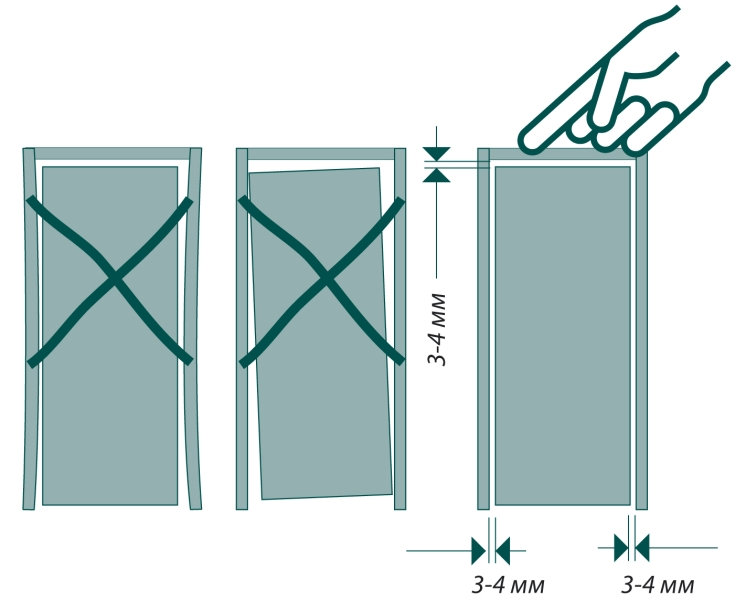
The second problem that one has to face is the sagging of the doors when installed incorrectly. To correct the situation, it is necessary to remove the canvas, put washers, or cut the edge and install the door in place.
Conclusion
Do-it-yourself installation of interior doors will require a little practice in installing canopies and extensions, but in general the work is simple, and with proper skill, the canvas can be hung in a few hours. Masters claim that with each installation, the quality of work with their own hands doubles.