
Mansard roof installation. We build a mansard roof with our own hands. Types and sizes
The mansard roof makes it possible to significantly increase the total living area, while financial investments will be minimal. The most common option is a gable broken structure, which is easy to build on your own.
How to make a mansard roof yourself
Under the mansard roof, you can equip rooms for housing. The shape of the building may be different, but in most cases the attic is equipped under a roof with two slopes. The optimal solution, which allows you to get a significant area of \u200b\u200bliving space, is a broken structure.
The sloping roof is the best option for arranging the attic
Drawings and calculations of a mansard type roof
The first step is to decide on the scheme of the frame. Rafters can be layered or hanging type. Sloped rest on the walls of the building. They are mounted in structures where the distance between the walls is less than 6.5 m. Hanging rafters are placed on fillies and Mauerlat. If the width of the spans is large, then the rafter system will need to be reinforced with auxiliary ligaments.
The main condition for the comfortable construction of the attic is the level of the ceilings - it must be above 2.5 m. To ensure such a height, the break line should be placed at a height of more than 2.8 m, taking into account the thickness of the layer of material for insulation and sheathing of the structure. It is also important to consider the thickness of the floor.
An example of a drawing can be seen in the image:
 Minimum ceiling height mansard roof is 2.5 m
 To calculate the expected snow loads, you will need to apply this formula: S \u003d Sg x µ, where S is the snow load, Sg is the weight of the snow cover per 1 m 2 of area, µ is a value that depends on the slope of the roof (1.0 - for flat design with a slope of 25°, 0.7 for a design with a slope of 25–60°).
The parameters Sg and Wo can be found in the relevant SNiP, in the "Rafter systems" section. If the roof has a steep slope, then the snow load can be ignored.
Roof device
The frame structure includes the following details:
- mauerlat - a support bar that transfers the load from the rafters to the walls of the building;
- racks - supporting parts that support the rafter system in a vertical position;
- floor beams - planks that form half of the attic and the ceiling of the lower floor;
- rafters - slats that form the main contour of the roof;
- runs - horizontal support parts for rafters;
- lathing - slats or plywood sheets that are intended for laying roofing material;
- filly - planks that are attached along the axis at the bottom of the rafter legs.
 The frame consists of a mauerlat, racks, girders, floor beams and other elements
 The sloping roof differs from the usual design with two slopes. The difference is that the slopes that are placed opposite each other have a special shape: they do not form a straight line, but consist of several slopes that are fastened to one another at an obtuse angle. The design is also symmetrical.
The extreme part of the rafters is mainly exposed at an angle of about 60 °. Racks for support, which hold the rafters, form the frame structure of the inner walls. The upper part of the rafters is mounted at a small angle, it can be from 15 to 45 °. This makes it possible to reduce the consumption of materials, while maintaining the functional properties of the roof and resistance to snow loads.
Vertical racks, which abut against floor planks, girders and crossbars fastening them, form a parallelepiped. The design limits the dimensions of the attic from the inside. To give the product additional rigidity, struts should be installed between the floor slats and the lower rafter legs.
 If the roof span is more than 8 m, then you will need to install struts
 After mounting the upper elements to fix the truss and prevent sagging of the crossbars, it is necessary to install suspended support elements - headstocks. For auxiliary fixation of the lower rafter legs, they must be pulled together with racks using tacks. Parts are fastened with nails and bolts.
Stages of self-construction of the attic
If it is decided to make such a design yourself, it is important to provide for the use of such materials in the project:
- roofing material;
- vapor barrier;
- waterproofing;
- material for insulation.
The choice of insulation affects such a parameter as the pitch of the rafters. To reduce the amount of heat insulator, it is best to place the rafters so that the slab or mat fits snugly between them. The type of lathing and its pitch will depend on the choice of material for covering the roof. You need to pay attention not only to the choice of high-quality material for insulation, but also to the creation of an effective ventilation system.
 Ventilation is equipped by preparing technological gaps
 The construction of the rafter system must be carried out using fireproof materials. All parts should be treated with fire protection. You will need to prepare the following elements:
- wooden blocks section from 100x50 mm;
- slats 50x150 mm;
- unedged boards;
- building level;
- self-tapping screws;
- nails;
- steel wire with a diameter of 4–5 mm;
- plumb;
- roulette;
- hacksaw;
- axe;
- a hammer;
- sharp knife.
Drafting a project
One of the most important parts of the job is drafting a project. It is very important to analyze the features of the layout of a private house. It is necessary to determine the dimensions and shape of the structure being erected, as well as to provide for the placement of windows and a balcony.
 The project should include all structural elements
 In the process of drawing up a project, the following requirements must be taken into account:
- It is important to decide in advance what height the attic should be. It should be remembered that the distance from the floor base to the highest point of the structure must be at least 0.5 m.
- It is recommended to take into account the heating area and the main elements of the interior.
- The attic scheme should be expanded. If you plan to install windows, then they must be indicated on the drawing.
Drawing up a drawing must begin with the choice of shape, determining the cross section of the rafter legs and the step of their placement. To determine the size of the rafters, the following parameters must be taken into account:
- slope;
- roofing material;
- climate features in the construction region.
It is also important to provide for the required number of rafters in the project. They can be layered or hanging type.
 Rafters can be hanging or layered
 At the end, you should determine the number of parts for fixing. In the figure below you can see some of the data needed for the calculation, however, drafting a project is a complex process. This work is recommended to be entrusted to qualified specialists.
Mauerlat installation
The device of the mansard roof rafter system should be selected based on the type of roof, as well as on the prepared project of the attic. A simple option is a design with two slopes.
The main details of the roof truss system with two slopes are:
- linear elements (column, bar system, beam);
- planar details (plate, flooring, panel);
- spatial elements (arch, shell, three-dimensional detail).
Before performing work, you will need to dry the wood thoroughly. The first step is the marking and installation of the Mauerlat. It is attached to the walls of the building. The part can be made from a bar or a powerful rail. If it is planned to build a roof with two slopes, then the Mauerlat is laid on the long walls of the building. The element is necessary not only for reliable fixation of the lower part of the rafters, but also for the correct division of the load on the walls and the main part of the building.
To fix the Mauerlat, metal studs should be used, which are mounted in a monolithic concrete beam.
 To fix the Mauerlat, you need to install metal studs
 The beam should be carried out in the upper part of the wall. It is also possible to use steel wire embedded in brickwork.
To fix the Mauerlat to the upper crown of the wooden wall, you need to use wooden dowels. auerlat requires high-quality waterproofing of timber timber. Therefore, it is necessary to use roofing felt or other material with a water-repellent property.
 Before installing the Mauerlat, the base must be covered with roofing material
 Mauerlat installation is required if it is planned to erect a roof frame, the rafters of which abut against the upper part of the wall with beveled ends or prepared cutouts.
If you plan to make an attic, the width of which corresponds to the width of the building, rafter legs must rest with their lower ends against the extended support parts. As supports, it is possible to use powerful beams laid across long walls. The number of supporting elements corresponds to the number of rafters. The beams must be fixed to the walls in the same way as the Mauerlat.
Sequencing:

Frame construction
 The frame of the mansard roof consists of floor beams, rafters, girders and racks
 Softwood bars 200x100 mm are often used as a material. Floor slats are placed on top of the Mauerlat with a 30–50 cm indent beyond the surface of the walls or in prepared grooves in the masonry. In the first case, the parts are fixed with the help of corners and self-tapping screws.
 Fixing the beam to the Mauerlat can be done using steel corners
 To make an even overlap, the strips should be installed in this sequence:
- First of all, the extreme details are laid according to the level.
- Next, pull the cord and install intermediate elements along it.
- The step of the beams should be from 60 to 100 cm. A distance of 60 cm makes it possible to mount insulation boards without sawing.
- To level the beams in height, they can be hemmed. Another option is to use plank linings.
- If the beams are inserted into prepared pockets, their extreme parts must be treated with liquid waterproofing and wrapped with roofing material.
Racks must be placed on the extreme slats:

After installing the racks, crossbars and girders, you can get a reliable design that will limit the interior rooms of the attic. To increase its strength, in the future it should be fixed with struts and tacks.
Installation of rafters
At this stage, the installation of the lower rafters is carried out:

After that, the upper elements are installed:
- The first step is to mark central part roofs. This can be done using a rack that was previously attached to the Mauerlat and puff from the end of the roof. The extreme part of the board should run along the center of the roof. On this board you need to align the rafter legs.
- Next, you need to prepare a template from a 150x25 mm rail. It should be applied to the extreme part of the mounted rail on required level and to the run on which the lower rafter legs will rest.
- You should mark the top and bottom cuts and cut out the template. The device is applied in turn to two sides of the roof. This will make it possible to check the accuracy of the layout of the central part. If the rows of racks are placed in parallel, then there will be no difficulties in fixing the upper elements - they will have identical dimensions.
- According to the preparation, it is necessary to prepare the required number of rafters. The parts are placed on the runs and connected in the upper parts with the help of overhead iron plates or scraps of planks. In the latter case, self-tapping screws are used as fasteners. In the run, the rafters rest against the cuts and are seized with iron corners. In order for the parts to stand straight, they are fastened with struts mounted on the bottom of the puffs. All rafters are installed in this way.
- Suspension racks are fixed - pieces of planks 150x25 mm. The upper part of the rail is attached at the place where the rafters are fixed, the lower part is attached to the tightening.
Video: mansard roof truss system
Installation of struts and gables
Sequencing:

Construction lathing
The crate is needed for:
- distribution and transfer of the weight of the roofing material to the rafters;
- fulfillment additional fastening rafter systems;
- grounds for fixing roofing material.
The crate can be made in one or two layers, solid or with a vacuum.
 The crate can be solid or with a vacuum
 The installation method depends on what material is planned to be used to cover the structure. If a roof of slate or metal tiles is being erected, the lathing should be made of slats, which are attached to the bars of the rafter legs with nails. In this case, the installation step of adjacent planks can be 27–30 cm.
A solid crate is used in the case of fastening soft material in rolls.
A solid crate is necessary for soft roof
In this case, moisture-resistant plywood sheets or particle boards can be used. It is allowed to use pine wood material- trim strips.
It is important to take into account the fact that when constructing such a crate, the material to be laid must follow the contours of the outer base. Therefore, the frame structure must be strong and leveled.
In the process of laying out the material, you should use a cord with which the slats or slabs will lie flat. Parts must be placed parallel to each other. Before fixing, the material must be treated with an antiseptic composition to protect it from decay, fungus and dampness. The blanks must be even and of high quality. It is recommended to give preference to wood grades 1 and 2. It should not have knots. To prevent the boards from warping, they must first be dried.
The sequence of actions for installing the crate:

Mansard roof waterproofing
Roofing material does not thermal insulation properties so you need to prepare quality material which will be environmentally safe for human health. Quite often, mineral wool or glass wool is used. Both materials have excellent sound and heat insulation parameters. It is also important to consider that if the roof is made of metal, when the insulation gets wet, all its qualities can be reduced to zero. Therefore, it is important to carefully consider the device design.
Insulate the attic without a gasket waterproofing material will not work, so the process should be considered as a whole. Walkthrough for waterproofing the structure:

Practice has shown that it is better to protect the insulation with modern materials, for example, Tyvek or Izospan. The use of ordinary polyethylene film gives a poor result, as condensation may appear. Experienced craftsmen believe that it is not necessary to waterproof the structure with roofing material.
Before proceeding to work, you need to decide on heat-insulating material.
 Mineral wool is a fairly popular material used for roof insulation.
 The most commonly used heat insulators are:
- glass wool;
- mineral wool;
- Styrofoam;
- foamed glass;
- wood shavings;
- straw.
It is necessary to choose a material taking into account four parameters.
- Thermal conductivity index. For roof insulation, 0.05 W/m*K or less is optimal.
- Water resistance. The higher the score, the better.
- Fire resistant.
- Environmental Safety.
Insulating qualities mineral wool get worse over time. Also, the material can be damaged under the influence of mechanical loads. However, mineral wool has a low cost, so the material is used quite often. Polyfoam is not afraid of water and has excellent thermal insulation characteristics. If you plan to build a house only from environmentally friendly materials, then you can use foam glass or straw.
Roof insulation step by step guide:

Laying roofing material and installation of window openings
As an example, the installation of metal tiles will be considered, since this material is used quite often:

The number of windows is determined by the ratio of the usable glazing area to the floor base 1:10. For example, if the attic area is 100 m 2, then the glazing should be approximately 10 m 2. When installing windows, it is necessary to take into account such nuances:
Attic decoration
Interior decoration attics can be made using wood or plasterboard sheets. If the latter option is used, then after installation, the sheets must be wallpapered or painted water-based paint. In some cases, the attic is divided into several rooms. This can be done using plasterboard partitions.
If you plan to use the attic often, then the floor and walls can be additionally insulated. This can be done using, for example, mineral wool.
Interesting design options for the attic room
The attic can be made cozy by symmetrically placing sofas on both sides In the attic, you can place a long sofa In the attic, you can arrange a place to relax by hanging a hammock In the attic, you can make not only a living space, but also a bathroom On the attic floor, you can even make a kitchen If on the territory there is no way to place a hammock, then this can be done on the attic floor One of the parts of the attic can be completely glazed The attic can be a great place to create a home library The walls of the attic can be faced with brick In the attic you can equip a full-fledged living room On the attic floor you can equip a relaxation room If the house is located in a beautiful area, then the roof can be made panoramic The bed can be placed facing the window In the attic, you can make a bedroom with high ceilings In the attic you can place hanging chair. This will make the roof more comfortable
Video: making a mansard roof
Last roof attic type is quite popular among owners of private houses. In order to feel all the positive aspects of living in a building of this type, it is required to pay due attention to the insulation of the building.
Attic in a private house - perfect solution for the expansion of residential or useful utility space without completing the upper floor. The arrangement of the attic in the attic space is an original and new exterior of the house, saving energy by reducing heat losses in the roof, and increasing living space. But the large size of the house is not a reason to start work on arranging the attic: you need to have a foundation with a sufficient margin of safety for the weight load, since the finished attic space will have to be thoroughly redone.
Features of the attic
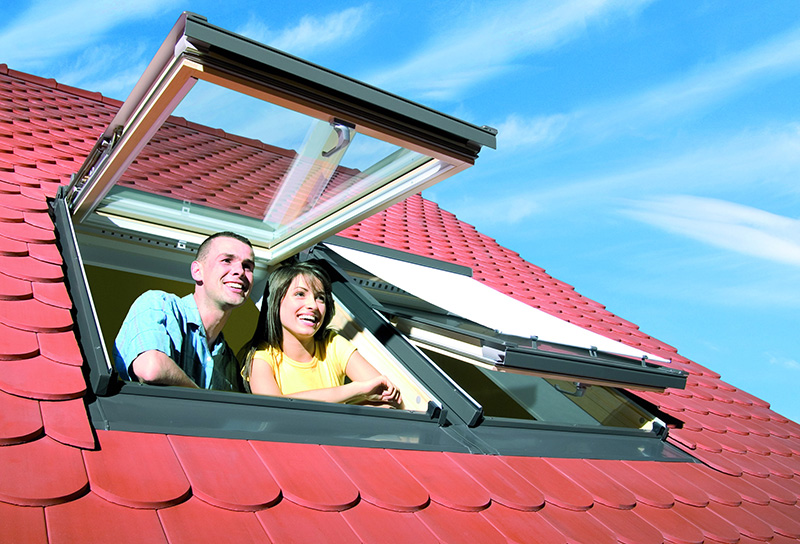
The main thing that distinguishes the attic from ordinary rooms is that it has almost no walls in the usual sense, since the walls are a modified truss system constructed from many inclined roofing surfaces. Therefore, the design of the window will be very different - it should not interfere with natural light, and should take on the load in the form of precipitation and strong winds - the impact of weather conditions on a sloping roof is stronger than on the massive elements of the building.
Important! The SNiP regulation stipulates that the area of the window opening should not be less than 10% of the floor surface in the common room. Therefore, when dividing the attic space with partitions, it is also desirable to make a window in each newly formed room.

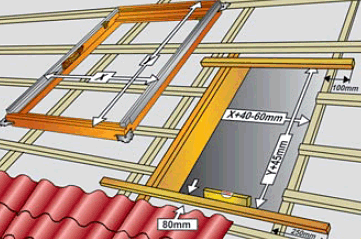
It is easier, cheaper and faster to mount an inclined window in the attic roof than to make a special vertical ledge under it, violating the design calculations. In any case, the window opening must be waterproofed or a window with reinforced glass and a reinforced metal-plastic profile should be ordered.
Benefits of installing an inclined roof window:
- A large stream of natural light, smoothing chiaroscuro;
- There is no need to radically alter the shape of the roof and change its relief;
- Simple installation, feasible for the owner himself.
The degree of illumination depends on the area of the opening, which is proportional to the angle of the roof. Therefore, the conclusion is obvious: the steeper the broken mansard roof, the wider and higher the window opening should be. The thickness of the metal-plastic profile should almost fit into the distance between the rafters, so that there is something to attach the window to without destroying the rafter system. If you order a wider window, you will have to make a reinforced jumper that fastens the rafters cut at the insertion point. If you need to install a wide window, you must first think about the option of installing two small adjacent windows so that the roof remains intact. 
When installing a dormer window (a vertical dormer window, it requires the frame to be moved outside the attic), the geometric shapes of the roof must be complicated by the installation of the upper and side valleys, and the laying or installation also becomes more complicated roofing. At the same time, it is much more difficult to remake a finished rafter system than to lay a new roof window in your individual one. Valleys must be carefully waterproofed, as their location and geometry relative to constant atmospheric influences make these places the most vulnerable to the penetration of moisture and cold. In regions with an average annual high precipitation, it is recommended to make snow retainers above the dormers. But the main advantage of a dormer is that you can stand next to him in full height- outweighs all eliminated shortcomings.
A window recessed into the roof is made if an exit to the balcony is organized through this window. In other cases, this is an unattractive option: poor natural lighting, unjustified complication of the roof geometry, high labor costs with a minimum of effect. 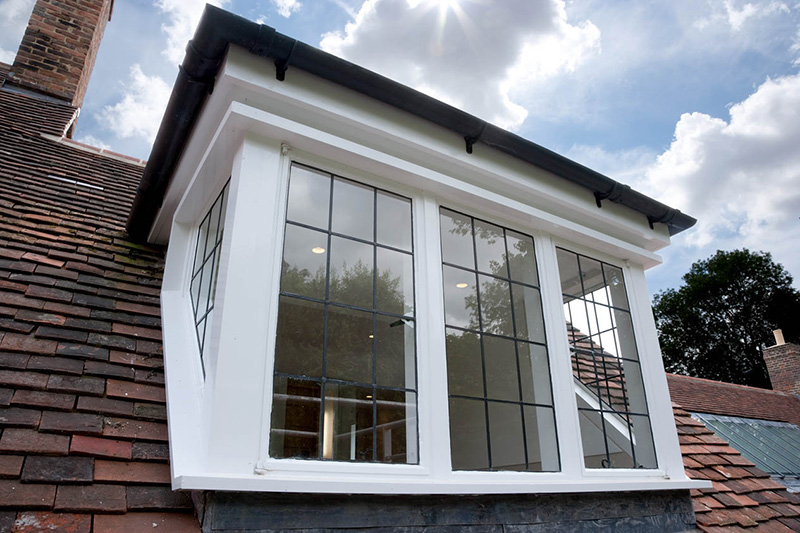
The most affordable option - a window at the end of the attic - is cheap and practical solution, which is fully realized without outside help.
Attic truss system
In individual construction, a house with an attic is often built with a sloping roof, although this is an expensive solution. Broken mansard roofs, due to their design features, greatly increase the useful area of \u200b\u200bthe interior of the attic. With the same width of the foundation of the house and the floor, the rooms in such an attic will have a larger area due to ledges and niches than rooms under the roof of a conventional design. 
The standard design of a sloping roof allows you to lower the overhangs of the eaves much lower, not only making the exterior of the house very original - such overhangs protect the walls and foundation of the house from wind and moisture, directing atmospheric precipitation away from housing.
The harder broken roof with your own hands, the stronger the dependence of the reliability of the structure on the materials from which the roof is made, on climatic conditions, on the thickness of the beams truss system and other factors. The classic do-it-yourself mansard roof, the drawings of which are given below, has a slope ratio of the lower slopes to the floor of 60 °, of the upper slopes - 30 °. 
SNiP stipulates a comfortable ceiling height in attic rooms - at least 2 m. Therefore, a scheme with a roof slope of 600 is fully justified, and structural reliability is ensured by thicker floor beams and rafters than when arranging a conventional gable roof.
With the classical construction of the attic, the force of the wind and the load from the weight of snow on the sides of the roof with a large slope are not taken into account. Snow will accumulate on the upper surface of the roof, made with a slope of 300-450. The greater the angle of inclination of the roof, the stronger the windage of the roof, therefore, in climates with strong winds, it is necessary to build roofs with a small slope, and this is a problem for arranging the attic - the area of \u200b\u200bthe house in such conditions should be quite large.
Broken roof schemes
The sloping roof frame is constructed from pine lumber of the first or second grade. For calculations, such parameters as the cross-section of timber and sheathing boards, the dimensions and weight of the roof from various building materials, snow and wind loads, and the rafter attachment step are regulated. 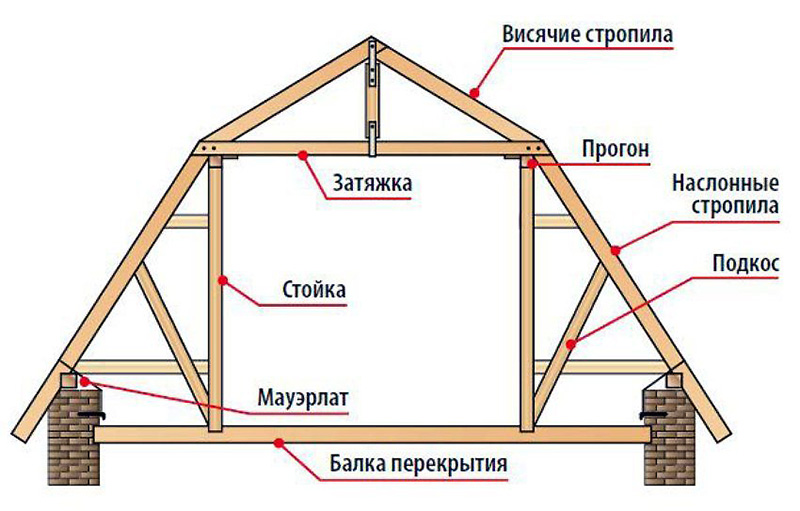
The design of the roof with a hanging truss system is justified if at the base of the triangle (in the upper figure) there is a size ≤ 4.5 m - this determines the width of the attic. If the width is greater, then layered rafters are equipped, which are mounted on the wall.
How to calculate a broken type roof
The step between the rafters is often determined by the width of the insulation - this solution allows you to save on rolled materials, and the distance between the rafters is chosen 2-3 cm less than the width of the insulation material. For example, with a mineral wool slab width of 60 cm, the distance between adjacent posts should be 57-58 cm. 
The boards of the rafter legs are also calculated in width, based on the parameters of the insulation. To ventilate the layers of thermal insulation, it is necessary to provide a ventilation gap of 20-30 mm, otherwise the accumulated condensate will cause the wood to rot, and then damage the insulation. For conditions middle lane the thickness of the insulation can be no more than 230-250 mm, therefore the minimum width of the rafter legs is 230 mm with a board thickness of ≥ 50 mm. The greater the wind, temperature and snow loads in the region, the thicker the rafters should be made. 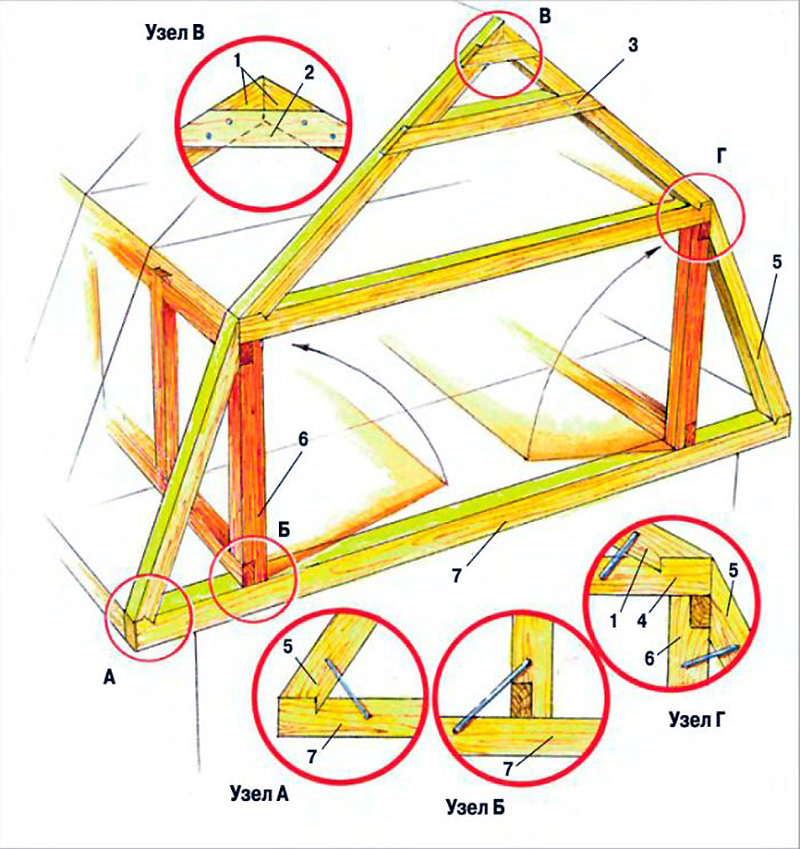
Recommended: To save lumber, the insulation can be laid in two directions: along and across the rafters, making a thin and rare crate between the layers. With a minimum stone wool slab thickness of 100 mm, a 50 x 150 mm board can be used, leaving 50 mm for the ventilation gap.
Mansard roof installation
Mauerlat on the mansard roof is equipped with standard techniques - fastening the beam to the wall with knitting wire, anchors or studs. If the house is timber or log, then the upper crown of the log house, impregnated with an antiseptic and substances that increase the moisture resistance of wood, can serve as a Mauerlat. 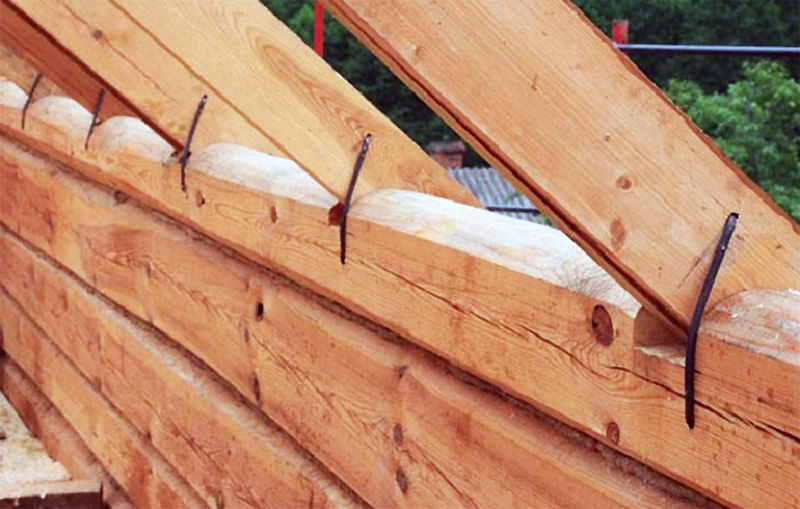
For a Mauerlat in a house made of cellular concrete, a monolithic reinforced grillage is poured on top of the walls, and the Mauerlat itself is attached to the rods concreted into the wall. For walls made of brick or reinforced concrete, such a concrete grillage is not necessary - the wall material itself is quite durable and will withstand any method of attaching the truss system. It will only be necessary to make a two-layer waterproofing around the entire perimeter of the house, and a Mauerlat beam with a section of 150 mm.

To assemble elements roof structure use long nails - 150-200 mm. Corners and intersections bearing walls With internal partitions at home it is better to make bolted connections, or use double-sided threaded studs. Also, all intersections of roof elements are recommended to be additionally reinforced with metal plates-overlays. 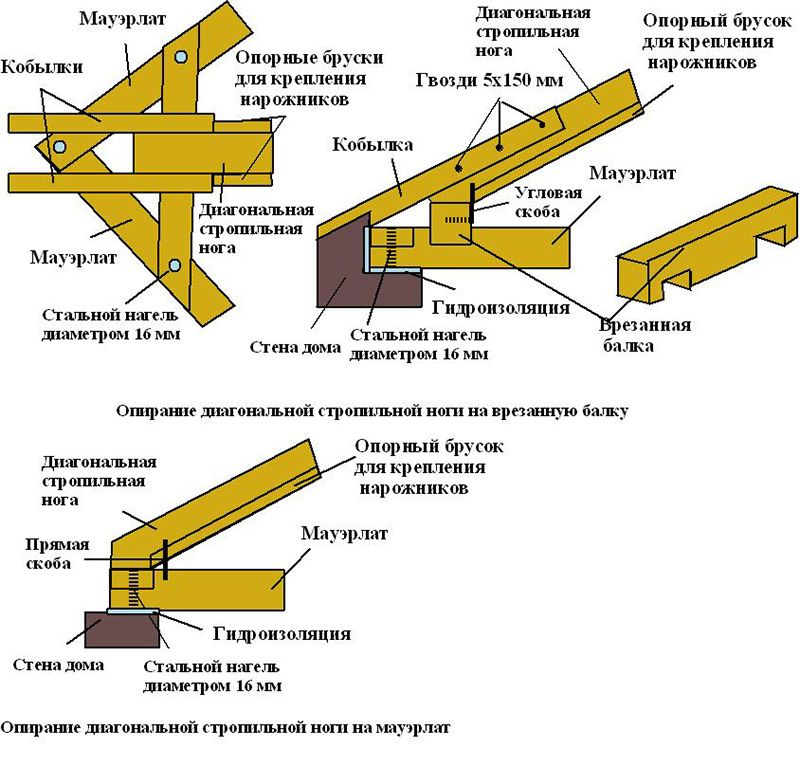
Installation of the attic truss system can be carried out in two solutions:
- Assembling the elements on the ground, lifting the finished structural units up. First of all, vertically corner elements are attached, which form future gables. The remaining elements of the roof structure are vertically inserted into the grooves made in the Mauerlat beam at a calculated distance and rigidly fixed. To give rigidity and correct geometry, you can temporarily fix the elements with spacers and braces, and after mounting the side beams, when the structure acquires the desired rigidity, the spacers can be removed;
- The second method is the sequential assembly of the mansard roof in place. It is more efficient and more convenient to work this way, because with a voluminous rafter system it will be problematic to lift the assembled roof manually - you will have to rent a crane. After assembling the structure, floor beams are laid, to which vertical beam racks are attached to the grooves, and temporary braces are installed to stiffen and make the system vertical. Then comes the assembly of the upper and side rafter legs, the jibs and struts are mounted in the same way.
Final stage- installation of the upper beams, which are made according to the template, and the grooves for the rafters are immediately sawn into them. Since the mansard sloping roof does not have a ridge, slopes are mounted on the beam in the middle, which are designed to fix the upper triangle of the attic roof.
With the help of the attic, you can not only increase the number of usable rooms. A building with a high roof slope looks more solid and presentable, while its construction is less expensive than the construction of a full-fledged two-story building. How to make a mansard roof with your own hands, read this article.
Choosing the type of roof and truss system
For the arrangement of the attic, two types of roofs are most often used:ordinary gable: the roof has two inclined slopes, its ends are closed by triangular walls - gables;
broken line: each of the slopes is additionally divided into two more, located at a different angle; while the angle of inclination of the upper is much smaller; the ends (pediments) have the shape of a pentagon.
Sloping and gable roofs
Construction gable roof is definitely much easier. But the attic rooms in it, unfortunately, will be cramped, and the ceilings will be too low. Therefore, for arranging a comfortable attic, broken gable roofs with a small (40-45 °) slope angle are more often used. Moreover, the smaller this angle, the more spacious the attic rooms will be. However, when erecting a more complex broken structure, it will be necessary to make additional connections between the rafters (inclined beams that serve as the roof frame).
There are two types of truss systems:
layered: rafters rest only on the outer walls;
hanging: additionally rely on capital partitions.
The first option is used only in the absence of such partitions. But, since the load on the load-bearing walls in this case is quite high, it is possible to build layered structures only with a distance between the main walls of up to 8 m. In other cases, it is better to use more durable hanging structures.

Overhead and hanging truss systems
On broken mansard roofs, they are most often mounted combined systems, in which the rafters coming from the ridge are made hanging, and the lower side rafters are layered. Such a device is especially effective for roofs with a slight slope.

Combined truss system

Gable sloping roof frame
To get a full-fledged attic with a ceiling height of 2.5 m roof height before breaking should be equal to 3.1 m. Recommended tilt angles- 60 and 30 ° (it is allowed to tilt the upper part of the rafters 15-45 °).

Mauerlat device
Mauerlat- the lower roof support, laid on the upper part of the load-bearing external walls:1. When installing a gable roof, the Mauerlat is attached on both sides of the building at the locations of the rafters. Thanks to him, the load from the weight of the roof is evenly distributed over the entire surface of the wall. With a small mass of the roof, it is allowed to lay it only under the rafters, but in our case it should be laid along the entire perimeter of the wall.

Mauerlat mount
2. For the manufacture of Mauerlat, a bar is used coniferous wood 100×150 mm. So that the tree does not rot, it is better to separate it from the wall. waterproofing layer. For these purposes, roofing material or bitumen is most often used.

Mauerlat waterproofing
3. Mauerlat is attached to the base with threaded studs for a wide washer. To do this, holes are drilled in it exactly the size of the fasteners. At the same time, their frequency should not be less than the number of rafter legs, but no more than 2 m.
4. In brick walls it is attached to wooden corks. To strengthen the fastening of the Mauerlat in the masonry, it is possible to provide special pockets where it will be placed. It is allowed to bookmark a special masonry wire (rolled wire), with which the Mauerlat is screwed to the base. During the construction of buildings made of aerated concrete or concrete slabs in the walls, an armored belt with inserted thick metal studs is provided for it. Their length should be enough to girth the Mauerlat and tighten the locknut.
5. AT wooden buildings as a Mauerlat, the upper log of a log house or timber is used.

AT wooden houses maeurlat can serve as the upper log of the log house
Installation of runs and struts
The most common way to build a mansard roof is the following algorithm:1. Mauerlats are laid first.
2. For ease of movement on the roof, a temporary flooring is being prepared, replacing scaffolding.

Installation of a U-shaped frame for the roof

Terms used in construction
Runs are called additional horizontal beams. They can be:
skating: the upper part of the rafters rests on such a run; they may not be used in broken mansard roofs;
lateral: are evenly distributed along the entire slope of the roof, their number can be different and depends on the size of the roof itself and its angle of inclination.
4. On finished frame rafters are laid from durable timber 50×150 mm. Additional rigidity to the rafter legs is given with the help of braces(diagonal beams that serve to reinforce the structure, installed at an angle of 45 °, sometimes they are called rafter legs).
Rafter leg attachment
There are two types of fastening rafters:tough: on metal staples, bolts or with a combination of wire and nails;
sliding (articulated): in the case of house movement, the rafters move along the Mauerlat along the "sled" provided in the mounts.

Rigid connection of rafters
The hinged version is more reliable, as it allows you to avoid displacements or even ruptures of roof elements during seasonal ground movements. When erecting wooden houses subject to shrinkage, such fastening also helps the roof to “adjust” to the new position of the walls.

Articulated rafter legs

Types of rafter fastenings
Advice. To determine the location of the upper rafters, a temporary rack should be made from several beams and nailed to the Mauerlat so that the upper part falls exactly on the center line of the roof. On it, you can easily align the upper rafters.
The upper part of the Mauerlat should be bevelled. To avoid mistakes, it is better to make a template from a thinner board, which is applied to the run and a washed down shape is drawn on it. If the lower part of the rafters is attached to the cuts, they are cut out already in place.
Watch a video on how to make a mansard roof with your own hands:
Attic device in individual house is a fairly common occurrence. This construction method reduces the cost square meter and create a rather interesting room in the roof space. To perform the device correctly attic floor, it is necessary to study the basic requirements for it and choose the right type of roof and its slope.
What is an attic
According to regulatory documents, the attic floor is the volume under the roof, which is used to accommodate residential and utility rooms. At the same time, the height of the outer walls should be no more than 1.5 m in the general case, otherwise the space will be considered a full-fledged residential floor.
A do-it-yourself attic is beneficial both during construction and during the operation of a private house. In the first case, costs are reduced due to the fact that the height of the vertical enclosing structures is reduced. The roof takes on this function without ceasing to fulfill its original purpose.
An attic is an under-roof space that can be equipped as a separate room for living.
In operation, cost savings can be as follows:
- Decreased space to be heated, consequently, there is a reduction in heating costs, which are an impressive item in the cost of utilities.
- After the construction is completed, the house must be measured by specialists from the BTI, after which a passport of the object is issued. It is on the basis of the area values \u200b\u200bgiven in it that taxes are calculated and payment is made utilities(subject to connection to centralized systems and the absence of metering devices, which is now practically not found). The area of the attic floor is included in the area of the whole house with coefficients of 0.7 or 0.8, depending on the height of the outer wall and the angle of the roof, which allows significant savings throughout the entire life of the facility.
Preparatory stage
It is worth starting construction with the development of a project or diagrams on which the future structure will be drawn. Most often, the roof that is used for the attic floor is gable, but it is also possible to use a hip four-pitched roof. The gable design makes it possible to provide full-fledged windows in the gables.

In the case of using a hip to illuminate the premises, it is possible to install only attic window openings. This option can become more time consuming in terms of installing roof elements and designing interiors. Cost reduction with a hip roof is achieved due to the absence of gables (especially savings will be noticeable in brick house, where the cost of materials and the installation of wall fencing is quite high).
Do-it-yourself attic construction begins with determining the geometric dimensions and shapes of the roof. Earlier it was already said about the choice of the type of rafter system at home (gable, hip), after which it will be necessary to decide whether the slope will be straight or broken. The broken structure has such disadvantages as increased cost and labor intensity. Its use is justified by the need to increase the height of the room by changing the angle of the roof.
At the design stage, the optimal slope of the roof is determined. Its choice depends on ergonomic considerations and the type of roofing material which imposes restrictions.
Before making an attic, it is also necessary to calculate all its load-bearing elements for strength and bending, select the composition of the roof pie, perform thermotechnical calculations and decide on materials. More on this later.
Main bearing elements
The design includes the following components:
- rafter legs, which transfer the load from the weight of the roofing and the wall to the walls of the house. The section is selected depending on the angle of inclination, span, step and design load. A professional can correctly perform a detailed calculation. For private construction, approximate values \u200b\u200bcan be used, while it is best to provide a small margin.
- Narozhniki- these are rafter legs, which, on one or both sides, are supported by slanted ones. The cross section is calculated in the same way as for rafters.
- Slanted legs- the design used in hip roof. This element serves as a support for the sprigs. The cross section is taken depending on the load and the span, in any case it should be larger than that of the rafter legs.
- Mauerlat- an element that serves as a support for the stops and transfers the load from the roof to the walls, evenly distributing it. It will be correct to choose a section with dimensions of 100 by 100 or 150 by 150, depending on the complexity of the object. Mounting of the Mauerlat is not carried out during the construction of frame and wooden houses, since in this case we play the upper crown of the walls or the strapping in its role.
- Rigel- a beam, which is also a support for the rafters, but already in the upper part. The crossbar is installed in the ridge of the roof or at the break of the slope, in case of a broken structure. The cross section should be taken depending on the conditions, as a recommended value, dimensions of 200 by 200 mm can be given.
- Struts, racks, fights- additional elements for unfastening elements. Used to reduce cross section load-bearing structures. Their cross section is most often chosen constructively. At the same time, it is important to take into account the convenience of making connections.
A do-it-yourself mansard roof should be built starting from the selection of sections of all elements of the roof frame. The material for manufacturing is selected taking into account the following conditions:
- wood must be coniferous (pine, spruce, larch);
- material grade - first or second;
- humidity not more than 15%.
Be sure to treat all boards and bars with antiseptic compounds before starting construction.
Thermal engineering calculations

To keep the heat in the house, you will need to choose the thickness of the insulation. Most often, mineral wool is used for attic rooms (more often in slabs than in mats). It is also possible to use polyurethane foam, polystyrene foam, extruded polystyrene foam and ecowool. Having determined what to make the heat-insulating layer from, select its thickness. It is important to consider the height of the rafters. It must always be equal to or greater than the thickness of the thermal insulation. For mineral wool, it will also be necessary to provide a 50 mm ventilation gap between the upper surface of the heat insulator and the roofing. If the cross section of the rafters is small, then in order to fulfill this requirement, a counter-lattice is installed.
Before you build a mansard roof with your own hands, you can calculate it according to heat engineering manually, guided by the Joint Venture "Thermal Protection of Buildings". But it is better to turn to special programs for help. In order to correctly calculate the thickness in the Teremok program (freely available on the network), you need to know the thermal conductivity of the insulation and the area of \u200b\u200bconstruction of the house, the program will find the rest itself.

Do-it-yourself mansard roof is different from the usual pitched roof only with thermal insulation. More layers are also added to the cake to protect the insulation. Below step-by-step instruction will allow you to correctly install the elements of the mansard roof.
The procedure is as follows:
- fastening the Mauerlat to the wall;
- installation of rafters and systems of struts and racks;
- installation of waterproofing and wind protection;
- crate;
- roofing;
- warming;
- bottom trim.
Assembling the roof frame
Installation begins with a Mauerlat. It is laid on the inner grant of the outer wall. Fastening depends on the material of the load-bearing walls, but in general it can be done in several ways:
- on staples;
- on studs;
- on the anchor.


For fragile materials of the walls of the house, such as aerated concrete and foam concrete, along the edge, perform monolithic belt, which will prevent the destruction of the walls. For wooden and frame houses Mauerlat is not provided.
Next, you need to install the crossbars, if any. After the supporting structures are laid, the rafter legs are laid out. The fastening of the rafters to the Mauerlat can be rigid and articulated. It is better to do it with the use of cutting and fixing with metal corners on both sides.

This is a fairly old album, so nails are used as fasteners in all the drawings in it. It is better to replace them with studs. The design of the roof of the house in this normative document shown in great detail, so it is recommended that you familiarize yourself with it before starting work.
Before starting the installation of insulation in the house, it is necessary to ensure its protection from negative influences. environment. To do this, a moisture-windproof membrane is spread over the surface and the crate is fixed. After that, the roofing is mounted, taking into account the recommendations for the selected material. For example, bitumen shingles require a solid crate, which is most often made of moisture-resistant plywood.

Installation of thermal insulation
To perform the insulation of the house, you need to install a heater without gaps and cracks. For mineral wool, it will be easier to install if the distance between the rafters is 580 or 1180 mm clean. This will allow you to lay the material with a slight expansion, which will prevent cracks.
When using expanded polystyrene, the distance between the plates and rafters is filled with sealant or mounting foam.
After laying the insulation, you need to fix the vapor barrier to it from below. After that, the lower crate and ceiling lining are mounted. Best for attic suitable trim two layers of drywall 12.5 mm thick along the frame, followed by finishing.
Mansard roof is the best way to increase the usable area of the house. This will keep costs to a minimum. With this design, you can equip one or more living rooms. Often in the attic they arrange children's rooms or an office. A comfortable room in the attic can serve as a living room.
When arranging the attic, it is important to remember a few principles that will help create a comfortable and practical room. The mansard roof is a specially equipped attic. When creating such a structure, it is important to carefully approach the stages of thermal insulation, redevelopment and ventilation of the room on the roof. A video of building a mansard roof with your own hands (step by step) can be found at the end of the article.
Advantages and disadvantages of the solution
When deciding to equip an attic room, you need to know the features of its construction. The advantages of attic rooms include:
- There is an extra room in the attic. It can be equipped depending on taste preferences and purpose.
- Small costs. The construction of an attic room will not cost a large amount. Such work will be equivalent to the construction of an extension near the house. At the same time, the useful area of \u200b\u200bthe house is expanding.
- Great view from the window. Attractive landscapes outside the attic window will not leave anyone indifferent.

If we consider the disadvantages of the attic device, we should remember the need for additional heating of the room.
Types of mansard roofs
When designing an attic floor, it is important to take care of choosing the type of roof. It is necessary to understand not only the choice of the appearance of the structure, but also the methods of its arrangement. There are several options that are most acceptable when creating a mansard roof. They can be selected only taking into account the features of the house:


It is important to deal with the device of the mansard roof, which it was decided to make.

Attic device
Each roof has its own design features. However, attic structures have a number of common features with simple pitched structures. It is important to know them before starting work:

Knowing the structure of the roof, you can start the main work. A photo of the construction of a mansard roof with your own hands (step by step) will help you deal with the stages of the process.

Attic construction technology
Often, when designing a mansard roof, architects do not take into account the errors in the ventilation system and the insulating layer. If there are such errors, the result can be disastrous. Within a few years, the roof will begin to leak. Since the attic is quite close to the wall inside the room, it is quite difficult to ensure the optimal level of heat transfer. The design of the attic must necessarily include elements such as thermal insulation and ventilation.
Important! Elements of the truss system should be pre-treated with various means of protection that will reduce the impact of fire and microorganisms.

The heat-insulating layer is made 20 cm thick. This is due to the cold climate in most regions of Russia. In addition, when creating good thermal insulation in summer, it will be cool under the mansard roof. The advantages of this solution indicate the need to select a high-quality protective material.
In addition, you will need to create a roof ventilation system. In summer, when the temperature is quite high, the roof will get very hot, which can make staying in the attic quite uncomfortable. With a properly equipped air supply and exhaust system, being in a room will become much more pleasant. The same solution will protect the roof from destruction. A layer of sound insulation is laid to create a quiet and comfortable environment inside the attic. At the same time, rain, hail or strong winds will not be heard much.

Advice! when laying insulation materials, it is best to work with an experienced installer. This will avoid mistakes.
Stages of construction of the attic
Step-by-step instructions for arranging an attic floor involve the implementation of a number of subtleties of technology. For the construction of the attic, you must have at least minimal experience construction works. The construction of an attic space will be significantly more difficult than in the case of a conventional roof. This is due to the need to comply with the desired angles of the slopes. You can figure out how to build an attic in a private house with your own hands after studying the construction plan.

You need to start with the drafting of the attic floor. For this purpose, it is better to invite a specialist who can accurately calculate the load and install required dimensions elements. If you have certain knowledge, all calculations can be performed in a special program. You will also need to calculate the slopes of the roof and the expected loads. For error-free work, you will need to study the book "loads and effects on buildings and structures."
The construction of the truss frame
When performing this stage of work, you will need to invite 2-3 workers. It is better to start the roofing device with the laying of Mauerlat bars. They are fixed around the perimeter of the house. For Mauerlats choose bars 100x100 mm.

Then they mount the frame of the future attic room. Its vertical elements will serve as support posts for the truss system. First, vertical supports are installed on both sides. They are fixed to the longitudinal beams. For connection, you need to use metal corners and self-tapping screws.
Advice! In the process of such work, it is better to use a screwdriver. This will speed up the work considerably.

As a result of such actions, two arches are obtained. They should be connected with a twine. It must be strictly horizontal. Even with a slight slope of the tow, one of the arches will have to be shortened. Then, at a certain distance from each other, other arches should be installed. To fix the jumpers, use stamped corners.
Then the upper rafters are installed. This kind of work is quite difficult. Rafters should be mounted in such a way that they are installed at a certain slope. First, a template is made from the boards. It is necessary that they correspond to the connected rafters. When using such a template, you need to cut the rafters that are on the ground. Then they are installed in the right place. Installation of rafters is carried out taking into account the construction of the internal attic room.

The installation of the truss structure ends with nailing the crate. Usually it is made of plywood or chipboard.
Attic roof insulation
After completing the installation of the truss system and the crate, you can create an insulating layer. The vapor barrier film is laid from the inside of the roof. It is fixed to the rafters on building brackets. After that, thermal insulation is performed. It is necessary to monitor the density of laying the insulation on the surface of the rafters. There should be no gaps due to which problems with condensate and thermal protection of the room may arise in the future. the construction of the crate is attached to the thermal insulation with a gap between the boards of half a meter.

Waterproofing is laid on top of the rafters. It will protect the attic from moisture. Roofing is laid on top of the waterproofing layer. Such a roofing pie scheme is optimal when constructing an attic.
Attention! During construction, it is important to take care of compliance with safety requirements.
As you can see, building a mansard roof is a serious job. The durability of the structure depends on the degree of seriousness with which to approach the work. You can find a lot of examples, which design and appearance may have an attic. Among its various types, you can choose the most suitable option. If you want to create optimal daylight, you should install a window large sizes. Often its shape is chosen round or square. In any case, before work, you should carefully prepare and draft a future building.
conclusions
When building a mansard roof, some features of the work should be taken into account. For example, it is important to create proper insulation and waterproofing the cake. In addition, you need to take care of the choice of roofing. Thanks to this, the mansard roof will be reliably protected from the weather.
Before work, a draft of the future building is drawn up. It is created taking into account the design loads and materials used. The construction plan reflects all the subtleties of the process. It is important to follow the mansard roof construction technology - this will ensure its reliability and durability.