
How to build a bath with your hands step by step instructions. How to build a bath with your own hands. Construction of a turnkey bath from the foundation to the roof. Russian bath: features of its action
Bath, built in Russian traditions, is considered an ideal place to cleanse the soul and body. Regularly visiting it, it is possible to maintain health, preserve youth and get real pleasure. It is not surprising that many decide to build a Russian-style bathhouse with their own hands.
Features of the Russian bath
The Russian bathhouse, which was built by our ancestors, includes two sections: a dressing room and a steam room. The largest size of this room is 2.3x4 m, the smallest is 5x6 m. Baths with such dimensions are again popular.
1 - dressing room; 2 - steam room and washing; 3 - shelves; 4 - oven
The device of a primordially Russian bath implies:
- creation of unburied column foundation on the basis of boulders, devoid of a base;
- the assembly of a log house from selected wild logs, that is, material that has not been subjected to any treatment other than removing the bark and drying;
- construction without the use of nails;
- plugging cracks with moss and tow;
- installation of a floor ceiling;
- floor insulation and ceiling coverings moss and peat;
- waterproofing the structure with resin and shoe pitch;
- making a sod or shingle roof;
- building a brick oven.
Preparation for construction: drawings and dimensions
When drafting a bathhouse, one should not forget that several people will use the steam room and the washing room at once. Therefore, the area and dimensions of the bath should be determined without making serious mistakes.
The second version of the bath differs in the arrangement of the shower
To make it convenient for each user to be in the bath room, he needs to allocate at least 1.8 m² in the dressing room and 1.5 m² in the steam room. The average indicator of the total useful area of a bath for a family is 10 m². At the same time, most of the space should be in the dressing room, and less - in the steam room and washing department.
In order to wash in Russian people of any height could, the ceiling should be built at a height of 2.4 meters.
When determining the height of the ceiling, take into account that the building will soon sit down
At the planning stage of the building, it is necessary to reflect in the drawing the area for arranging the vestibule. This room may be needed as a place to block the path of cold air from the street.
For a vestibule, 2.32 sq. m
Adherents of traditions are advised to build a bath from high-quality coniferous wood. This material is not fragile, and most importantly - it lasts a long time. And the needles are also environmentally friendly and have low thermal conductivity, that is, they do not release heat and at the same time interfere with air exchange. The unique property of this tree is considered resistance to various manifestations of the climate.
Such a wooden building should stand on a solid foundation.
For construction, you can take one of two types of coniferous wood:
- round logs;
- whole bars.
Experienced builders advise building a bath from beams, since this material is cheaper, and it is much easier to build walls from it. In addition, the timber construction perfectly manages without a bulky foundation.
The timber structure looks simple, but it is easy to assemble
If you opt for rounded logs, then you can be severely disappointed: a log structure settles for a long time, which is why it will not be possible to put it into operation earlier than a year and a half after construction. Unlike a log bath, a timber building can be safely used six months after the completion of construction work.
When buying beams, you should use a tape measure to check the material for compliance with the specified dimensions, and then make sure that the building materials are of good quality. To do this, do the following:

List of materials and tools
To build a Russian bath, you need to stock up not only with beams and bricks, but also:

To carry out construction tasks, you should arm yourself with:

Do-it-yourself step-by-step construction of an object
Construction is taking place in stages:
- along the perimeter of the future structure and under its load-bearing internal walls, pits are created for the formation strip foundation;
- sand is poured onto the bottom of the trench, the finished “pillow” is pressed and watered;
- the pits are filled with reinforcing bars and liquid concrete, the layer of which is smoothed with cement mortar;
Before pouring concrete from the boards, formwork is being built.
- concrete forms the base for a brick oven;
- several layers are placed on the platform waterproofing material processed with bituminous mastic;
- they assemble a log house, connecting the beams according to the method “at the corners into a paw, and the ends into half a tree without a trace”, laying a heater between them and setting each row at a distance of 20 cm from the edge of the dowel;
The corners are connected in 4 steps, and the ends in 3 steps
- prepare a platform for the floor, that is, pour a 10 cm layer of sand, press it, and then cover with a 10 cm layer of crushed stone;
- crushed stone is covered with sheets of roofing material, adjoining edges for several centimeters;
- cement is placed on the roofing material, creating a screed with a slope, thereby equipping the drain of waste water in the direction of a pit built into the ground and leading to a separately dug pit sewer pipe;
- glued onto a hardened cement screed facing material, on top of which a wooden crate is placed;
Wooden crates on the floor keep your feet from touching the cold floor
- floor beams are attached to the upper bars of the walls in a horizontal position;
- the installed beams are connected with iron brackets to the rafters - thick bars;
- fasten the rafter legs to each other using ridge bars;
- the rafters are covered with a rolled waterproofing sheet and wooden flooring - the basis for roofing material;
- create a ceiling, that is, not bearing walls boards are laid out every 2.5 meters;
- a vapor barrier film is laid on top of the ceiling ceilings and heat-insulating material is laid.
Finishing
To finishing work start after the shrinkage of the structure. First of all, all surfaces inside the bath are covered with an antiseptic composition.
Interior decoration includes the following tasks:
- installation of the crate directly on the walls and ceiling;
- laying in the gaps of the crate of insulation and vapor barrier material;
- flooring lining or other facing material.
Lining is laid on the ceiling and wall
If only lining has become the most popular building material for the interior decoration of the bath, then many materials are in demand for facing the exterior walls of the building:
- vinyl or metal siding;
- plastic lining;
- block house imitating the look of a log house;
- edged or unedged boards, characterized by a low price.
The material extends the life of the structure
Search for stones for a bath room
In the steam room, it is customary to use igneous rocks. Formed during a volcanic eruption, they are resistant to extreme heat. The igneous rocks that positively affect the energy forces of a person include:
- polished or chipped jadeite, main feature which is beauty;
- talc chloride, which is able to absorb moisture and, evaporating it, create the necessary steam in the bath;
- basalt that can withstand high temperatures.
In addition to the benefits, this stone gives aesthetic pleasure.
Metamorphic rocks can be laid on the stove, which tend to normalize blood composition and improve well-being. We are talking about such stones as:
- white quartz, called hot ice, which releases ozone when cooled sharply;
- crimson quartzite, the second name of which is the royal stone.
Such a stone is ideally combined with brickwork.
To create steam in the bath, you can use full-crystalline rocks, for example:
- dunit;
- serpentinite.
These stones are able to regenerate cells nervous system, increase immune strength and have a beneficial effect on the functioning of the thyroid gland.
The length of such a stone is about 20 cm
If you want to move away from traditions, then it is better to use cast-iron stones - balls produced by industry - as steam generators in the bath. They instantly heat the room and keep warm for long hours. True, cast iron stones rust after short term services and carry no useful properties for humans.
Definitely it is impossible to put stones of sedimentary and siliceous rock on the stove. Their structure is porous, which means that, when cooled sharply, they become covered with cracks and small particles scatter in a zone of one meter.
Exploitation
The main requirement for using a bath is to create the right temperature. In the steam room this physical quantity should be within 55-77 degrees. The temperature indicator is selected individually, that is, it depends on the preferences of the owner of the bath. It is customary to heat the washing room up to 40 °, and the rest room - up to 20 °.
In order for the bath to serve for a long time and properly, you need to use it according to the rules:
- put into the furnace only any dry fuel, except for firewood from coniferous wood;
- keep the combustion chamber door closed, thereby avoiding the escape of hot sparks;
- do not allow the chimney to glow until it turns red;
- do not touch hot surfaces, including the walls of the tank for heating water;
- keep the bathrooms clean;
- ventilate the bath sectors after each firebox for four hours;
- try not to splash water on the glass surfaces in the room (windows and doors);
- clean and inspect the chimney for holes at least once a quarter.
The owner of the bath will have to carefully look after wooden surfaces. Elements inside the bath, made of wood, are supposed to be covered twice a year special means to protect against fungus and decay. External processing wooden walls buildings are recommended to be carried out after two years of operation. To do this, it is better to use antiseptics, which include wax.
Wood deteriorates over time and therefore needs careful maintenance.
In order for the stove of the Russian bath to give the right amount of heat, one must be able to regulate the traction force. To do this, more or less open the door of the chamber for the accumulation of ash. Excessive draft will cause the furnace to heat up too much, and this will bring the equipment out of service. If the force that causes air to enter the furnace is normalized, then the stones in the bath are heated to a standard temperature.
During the combustion of the furnace, the operation of the chimney should be monitored. Firewood consumption can be minimized, and the efficiency of heat supply can be increased, just not completely covering the chimney damper. But this is allowed to be done only after the absolute closure of the ash chamber.
Video: building a bath from scratch
You can get real joy from the construction of a Russian bath. It is clear that this work is impossible without skills and labor, but the result causes pride. This feeling is even stronger if the object was built on its own.
For a Russian person, a bath is not a luxury, but a vital necessity. Even historians are convinced that love for a bath broom and good heat is literally in our blood, and even in the poorest villages nearby, next to rickety dilapidated huts, new steam rooms were regularly built every five years (the old ones burned down). And Peter I, during a trip to France, could not stand two days without his native steam, urgently ordering the construction of a Russian bath right on the banks of a foreign river, which shocked the natives a lot. But what to do if it is so expensive to build today, and not everyone likes public steam rooms? And if rest in the steam room is not just useful procedures, but also valuable communication with friends, barbecue and the opportunity to breathe fresh air? Then we will learn the cunning tricks of modern Russian masters who manage to build their steam rooms literally for vacation pay.
So, let's look at the most successful projects for the construction of baths and their implementation, where the main task was to save as much as possible, but at the same time not lose the comfort of bath procedures. After all, as they say, the most budgetary bath is the vestibule of a summer commuter train.
What can and cannot be saved on when building a bath?
Agree, not a single saving is worth the loss of health, property or life. But the saddest situations occur when the issue of cheapness is thoughtlessly approached: such baths first slowly poison their owners with the release of hazardous substances, and then either burn or quickly deteriorate. But this does not mean that it is better to give up all your hard-earned money to the conscience of the construction team - it is better to simply refuse from the dangerous use in construction from the very beginning:
- Non-certified materials and fakes, for which unscrupulous sellers ask many times less. And at the same time, they convince the buyer that “there is no difference with expensive material, there is simply no markup for the brand, my brother / matchmaker / son-in-law has had a bath with this for half a century, and nothing.”
- Materials that are categorically not intended for the construction and decoration of baths. So, if it is impossible to insulate the walls in the sauna with foam plastic, then it is impossible, and this is not a whim of the manufacturer. Again, a neighbor who, at his own peril and risk, insulated in this way and now boasts is not an example.
- Unsuitable components for conducting electricity in the bath (wires, sockets), unprotected lamps or cheap Chinese products.
- Homemade stoves and water heaters that no one tested for fire safety.
- Combustible materials and those which are not indicated that they can be used under conditions high humidity air and heat.
If you are building a bathhouse with your own hands and are forced to save on materials as much as possible, calculate your every step well, consult with experts and do not disregard anything “it seems to work”. And finally, save limited budget better on cubic meters of the steam room, but not on the materials of its decoration. Such is the advice.
Let's look a little at affordable heaters. So, basalt wool is made from stone (basalt). Its main advantage is that the fibers inside the insulation are connected not by a chemical method, but by a different technology, and therefore, even when placed behind the foil, hazardous substances will not be released into the steam room. This insulation is not combustible and well insulates the firebox. For a bath - the best option. If you want to save money, then put one layer of basalt wool and a couple of layers of another, cheaper material on the ceiling.
Penofol is also used as an economical option - porous propylene with a polyethylene film and foil spraying. You can buy it in roll form, and mount it directly on a bare wall. This material is a good bridge of heat between the wall itself and the insulation.
- Buy a stove without an external firebox - this way it will take much less firewood to heat the steam room, and such a unit is inexpensive.
- Be sure to install a water tank - this is the fastest and most economical way.
- Make a cheap removable foundation for a bath: it is much cheaper and easier to carry out with it later repair work and change to another.
- Pay maximum attention to the insulation of the bath - the less you “heat the street”, the more economical the heating itself will be.
- Stick a wrapping film with bubbles on the window in the rest room in winter - this will retain at least 50% heat.
- Instead of an ordinary shower or shower stall, put a traditional Russian tub. Yes, and healthier, by the way. And it is not at all necessary to pour only ice water into it.
- When purchasing lining, take bars of short sizes - they are cheaper and look no worse.
- Build a low roof near the bath, no more than a ratio of width and height of 1: 3. Such a design will take much less materials, and the chimney will also not need to be made high.
Project #1 - a compact sauna at a minimum cost
So the step by step process:
- Step 1 - foundation. We will make the foundation columnar. To do this, you will need to get a 2 meter auger drill. As a casing pipe, take ordinary cheap 110 mm sewer pipes. Insert reinforcement from two connected rods.
- Step 2 - strapping. Place 500 mm long studs under the harness. Assemble the harness 150x150, and prepare the frame racks with a height of 2200 mm. Treat the frame with Neomid 440 or some other suitable for the same purposes.
- Step 3 - walls. You can finish the walls right on the strapping, and just lift them. We sew CSP. To do this, pre-drill the plates, and then fasten them with self-tapping screws with a semicircular head.
- Step 4 - the roof. The roof is covered with eight-wave slate. Let's save!
- Step 5 - warming. Now we put any inexpensive insulation that is suitable for a bath. In this project - Linerock Light.
- Step 6 - oven. We put an inexpensive stove, you can make it yourself. But under any, we must additionally lay out a brick corner.
- Step 7 - finishing. We fasten lining, plinths, cashers.
So a compact and inexpensive steam room is ready.


If the walls, due to economy, are not too strong, then the smaller the bath, the better - so its structural properties will be higher.
Project # 2 - wood concrete is used
But good example construction budget bath from wood concrete - at a price it comes out not much more expensive than frame technology. So, the outer walls of the steam room will be 20 cm thick, inside - a brick partition from the stove.
Here's what the build process looks like:
- Step 1. Digging drain hole dimensions 1.2x1.8x1.4 m. On both sides we fill up the OPGS with stones, make the formwork, fill it.
- Step 2. We dig a foundation 30 cm wide, up to 50 cm deep. We fill it with sand and ram.
- Step 3. We put the formwork, we reinforce two rods at the top and bottom. We put vertical bars through the meter. We pour the foundation.
- Step 4. We put EPPS, mesh in the washing and steam room and fill the floors. In the washing room, we additionally organize a drain.
- Step 5. We put the blocks, check the evenness of the walls with a level.
- Step 6 We make a roof using 50x100 boards. Optimal distance between the rafters - 55-80 cm. We cover.
- Step 7. We cook the oven or buy a budget ready-made one. The ventilation scheme is suitable as follows: from the outside, the air goes to the gap between the stove and brick wall where it is heated.
- Step 8. We install a shower tank in the attic.
- Step 9 We finish the walls from the inside. If possible, use Izospan FB - a material special for baths, plus heat-resistant tape. Isolon is good for the ceiling, which can withstand temperatures up to 150 ° C.
Such a budget and quite successful bath turns out.
When choosing wood concrete, pay attention: in terms of its density, it can be heat-insulating and structural. The first has a density of 400-500 kg / m, the second - 500-850 kg / m. This material is used for the construction of self-supporting walls and has good heat and sound insulation.


Project # 3 - a miniature bathhouse made of timber in the national style
And if you can’t imagine a Russian steam room from another material, like timber, you can build such a relatively budget option.
- Step 1. We level the platform for the foundation from screenings, put together the “formwork” and leave only an opening for draining water from the washing room.
- Step 2. Lay out the EPPS, knit the reinforcing cage. We fill it with concrete, make a slope for water and the foundation is ready.
- Step 3. We lay the log house. Under the first crown we put a board treated with an antiseptic, which we close with roofing felt on three sides. You can put moss on the board itself - it has antiseptic properties, and therefore the crown of the bath will last even longer.
- Step 4 We build the walls and leave it for several months to shrink.
- Step 5 We fix the rafters and cover the roof. We make a pipe passage through the ceiling - it is easy to make it from a metal corner and a stainless steel sheet.
- Step 6. Between the steam room and the dressing room we make a frame partition, insulate it with mineral wool and sheathe it on both sides with clapboard.
- Step 7. We lay out the floor in front of the stove with porcelain stoneware. We leave a special hole in the floor - for forced ventilation.
- Step 8. We bring the pipe from the furnace through the roof. The passage is made of Master Flush rubber, which is resistant to temperature. Joint with roofing sealed with MS polymer.
- Step 9 We fix the shelves in the steam room and conduct electricity.
Remember: the first step to huge savings when building your own bath is to build it yourself!


Project #4 - a steam room on a light frame from improvised means
Bars for the frame of the bath can be made even from the collected firewood, if desired. The main thing is to choose from them without defects and knots, and be sure to treat with an antiseptic.
So, we are building a budget bath from improvised means:
- Step 1. We make bars for the frame, process and dry.
- Step 2. We build a pile-rubble foundation: we tear out the soil with a drill for a meter, forget the thick pine stakes there and make a backfill of concrete and stones on top. Next, fill the pillars already to the top.
- Step 4. We assemble the frame.
- Step 5. We dig a hole under the drain, insert a barrel with broken bricks and rubble inside, and bring the ladder out there. This is a summer version that is not insulated, and for winter, you can lay a heater or a heating cable.
- Step 6. and the ceiling, put a film on top of the insulation. On the walls and ceiling we put Finnish sauna foil paper.
- Step 7. We put the oven. Take it with a register, because. you need water heating for washing - in order not to purchase a boiler separately. So, it has proven itself - inexpensive and warms well.
Such a bath surprisingly lasts a long time, steam pleases and spending time in it is a pleasure. And you can always find cons.


Mini-baths: cheap and cheerful
But if there are no funds at all for the construction of a steam room, you should not despair - today there are many options to build a steam room literally from nothing. Let's take a closer look.
Barrel bath
This is the most common, only more solid sizes. Part of it is covered by a wooden lattice screen, behind which the stove is hidden. There is a small bench in front of the screen. Even three people can steam at the same time in such a bath. But this option is only summer: they rolled it out onto the site, put it horizontally, threw firewood into the stove and you can pour water on the stones. But as a low-budget option - very much even nothing.
Camping bath
Such a bath is taken mainly on a hike, but in the absence of another alternative, it can also be used on the site. It will be inexpensive, because it is an ordinary tent in which they put a stove or an electric one. This is no longer the same soft Russian bath, but as a temporary phenomenon it also has the right to exist.
Built-in mini sauna
There was also a fashion to do in the bathroom. So, we transfer the washing machine to the kitchen, and in its place we build something similar to a closet. This is a small structure, about 1.5 m high, made of a frame and upholstered with clapboard. Inside - one shelf for the seat and a built-in steam generator. The person sits down, closes the door, turns on the appliance. But his head remains outside - for safety's sake. When using special aromatic oils and other SPA elements, it is quite a good way to improve your health. We can say that this is the smallest and cheapest bath in the world.
Baths in the car
If you have the opportunity to get a non-working minibus or a car with a body, you can build a small bathhouse right in them. Our website even has detailed master classes how to do it, and such an undertaking will turn out to be much more profitable than starting the construction of a steam room with pouring the foundation. Experiment!
Modern man needs a bath to cleanse the body of impurities and at the same time spiritual peace in the ease of his being. And for some types of diseases, a visit to the bath is included in the mandatory main course of treatment.
There is different types baths, according to the national customs of individual peoples, with their own design features: Russian bath, Roman bath, Turkish bath, Irish bath, Japanese bath.
In this article, we will look at how to build a bath yourself. Let's take a look at an illustrative example.
Let's leave in the past a bath in a black way, where the stove-heater was without a chimney and the smoke went into the room, which is why the walls were covered with a thick layer of soot. We will build and heat a bathhouse in a white way with smoke exhausted through a chimney.
It is worth noting that the event is not cheap. You can order a project and experts will build it for you. Such a bath with dimensions of 4 x 4 m will cost you within 800,000 rubles.
But there is another option - to build a bath partly with your own hands. For example, pour the foundation yourself and order and buy a finished log house according to the size of the foundation. It will be brought to you disassembled, and you yourself will assemble it on the spot according to the marks. You also do the roof, floors and trim yourself.
There is a third option - to build a turnkey bath from the foundation to the roof completely with your own hands. This option is energy-intensive, time-consuming, and if you correctly assess your strength, then it is quite possible. You build a bathhouse yourself without hiring "shabashniks" and only attract relatives and friends as assistants.
We start building a bath
When choosing the location of the bath, try to take into account the direction of slanting rains in the area in order to establish front door baths on the opposite side. Otherwise, you will have to build a vestibule to protect the door from getting wet and swelling.
Before building a bath, we determine the comfortable conditions and our desires to have a dressing room (dressing room), a washing department and a steam room in the bath. An acceptable ratio of the sizes of these rooms is 2: 1.5: 1. In addition to these three rooms, you can make another rest room.
In the picture we see that the rest room is combined with a dressing room and this is a good option for preliminary planning of premises. You can undress and go through the washing room to the steam room.
The washing room is connected with a steam room by a light partition.
Heat, heat and moisture from the steam room do not get into the locker room on clothes, but when entering and leaving with the door opening, they enter the washing room and this is good.
If space allows in the washing room and there is a forced water supply to the bath. then install a shower stall. Connoisseurs of bath procedures can plunge into the cold after the steam room, relax, drink tea, kvass and go back to the steam room.
During the second run, soaring with a broom begins, and this is a whole science.
If funds do not allow such a level of comfort, then they do it differently: the steam room is combined with a washing room, and the locker room is combined with a rest room. See an example in the article below. This option also has a place to be in our life. A person does not always bathe, but bathes regularly once a week and even more often. AT this example in the rest room you can dry your body from moisture and dress calmly.

There is a very simple bath in its design and it consists of one room with an area of 6 m2, combining a washing room, a steam room and a dressing room. Our family had such a bath in the 50s. It is viable - we grew up with it. There is no comfort in such planning.
Bath foundation
After you have decided on the external dimensions of your bath, you can begin to build the foundation for the bath. The foundation for a bath is the most important structure and is designed to transfer the load from all bath structures to the ground. The durability of the bath depends on the reliability of the foundation.
The construction of the foundation consists of a series of successive operations. First you need to conduct a survey of the soil, then dig trenches under the walls, equip the formwork, tie the reinforcing cage and pour concrete. When the concrete sets. it is necessary to remove the formwork and wait until the foundation settles. Then make a blind area and a base.
- To survey the soil, you can contact a specialized organization. And you can think and decide for yourself how dense the soil is and under load it will not give precipitation. Look at nearby buildings, talk with neighbors, communication is useful.
Soils are:
- Continental or rocky ones are the most reliable and do not swell in winter. They have a gravel-sand mixture. The foundation can be deepened by 50 cm;
- Sandy soils - sag under load. The foundation must be laid to a depth of 70 cm;
- Clay soils - shrink, erode and swell when freezing. The foundation is laid to the full depth of freezing.
There are two most common types of foundations that are used for the construction of a bath - tape and columnar. If the bath is located on a slope, then a columnar foundation is needed.
Let's consider a more expedient tape monolithic reinforced concrete foundation of shallow depth. The site selected for construction must be cleared of vegetation and the surface carefully leveled. The width of the foundation for the bath is calculated based on the structures of the future walls. And it is taken as the width of the wall + 10 cm, if you wish, you can do more - albeit more expensive, but stronger.
With the help of pegs and a cord, we transfer the do-it-yourself bath foundation plan from paper to the site.
 Dimensions are given here as an example. First you need to knock down three thin long boards into a right triangle. We put it on the ground and remember the Pythagorean theorem. When the plan of the bath was marked on the ground in the form of a rectangle or square, you can make sure in separate sections that there is no skew in size. Two intersecting diagonals must be equal.
Then you need to take the posts with nailed boards and carry out a cast-off at a distance of 1 - 2 m using a level.
When the contours of the outer and inner sides of the foundation are ready, you can start digging trenches. At the bottom of the finished trenches, sand and gravel 20 cm thick are poured and compacted - this is a pillow for the foundation.
2. Next stage- installation of formwork. Edged boards with a thickness of at least 25 mm and at least 40 mm for posts can be used as formwork. Fix the side walls of the formwork with horizontal braces. The formwork must be tight so that cement milk does not leak out of the solution. It is possible to upholster the formwork with roofing material from the inside.
 Bars 40 mm thick are placed at the bottom of the trench and lowered onto them. finished frame from reinforcement to create a protective layer of concrete. The reinforcement should not come into contact with the formwork - leave 50 mm.
 Accept horizontal reinforcement bars with a diameter of 16 mm, vertical jumpers can be made with a diameter of 14 mm or 16 mm. Take the distance between the vertical jumpers 300 mm. The fittings are tied together with a soft wire.
Make the height of the formwork, and hence the foundation, 30 - 40 cm from the surface of the earth - for arranging the blind area and the basement.
3. Foundation concreting is a laborious and difficult process. Invite relatives and friends to help. Concrete can be mixed manually or with a concrete mixer. Gravel, sand, cement are poured and mixed, then water is poured. Concrete must be used within an hour.
After 2 - 3 hours after completion of work, the foundation should be covered with shavings, poured with water and covered with plastic wrap. In summer, water the first 3 days after 4 hours, then once a day - 7 days to do daily. Within 28 days, the built foundation for the bath will gain 80% strength.
After the concrete has set, the formwork is removed, and the foundation itself is coated with waterproofing on all sides. Then the sinuses are filled with soil and rammed. The foundation of the bath is protected from atmospheric moisture by arranging a blind area around the entire perimeter. It is made with a slope from the foundation wall 600 mm wide from concrete, gravel, sand.
It would be more correct if you put 2 layers of roofing material on the foundation and lay out 2 rows of masonry on cement mortar from ceramic red solid bricks (perforated and silicate cannot be). See the picture below and pay attention to the products - they are definitely needed. The foundation is ready.

Wall construction
The walls of the bath can be built from various materials: wood, brick or aerated concrete blocks. If you have building skills with a trowel, build walls with bricks and blocks, but interior decoration must be wood.
Baths with wooden walls are considered the best baths. Log or block walls keep the warmth and scent of the wood. Inside such a bath is warm and dry. Being in log bath we feel closer to nature. In this article, we build walls from wood.
The service life of wooden walls depends on the correct harvesting and shrinkage of wood. Logging should be carried out in winter from December to March, when the tree and its juices are "sleeping". A felled tree and cleared of branches should be aged for 1 month and only then it is cleaned and turned into a log or timber.
2 weeks before the heat, the forest must be cleared of bark. At the same time, bark belts 10-15 cm wide are left at the ends of the logs so that the ends do not crack. The diameter of the logs is better with a thickness of 180 - 200 mm. The log house should be 220 - 240 cm high, taking into account future shrinkage. As a result, 14-16 logs will be needed on one side of the log house.
Lay the cleaned logs in stacks with a distance between logs of 5 cm, with a distance between rows of 10 cm, with a distance from the ground of 20 cm. From above, cover the entire stack with slate or roofing felt from rain. There should be a distance of 5 cm between the slate and the logs, which means we also put bars 50 mm thick. The stack should be blown by the wind from all sides, and the logs should dry.
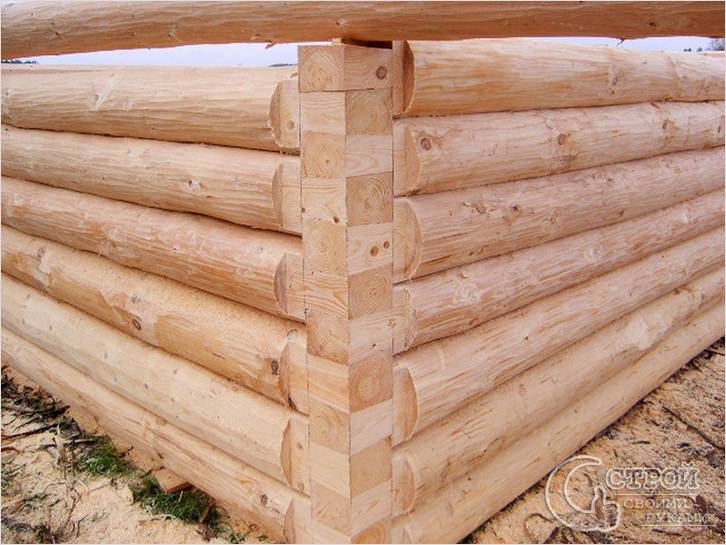
 The chopped walls of the bath are collected in the same way as the walls of houses. The cutting of walls is carried out by successive laying of crowns. Crown - four logs connected at the corners, forming a rectangle. From the bottom side they are hewn to one edging.
On the logs of subsequent crowns, grooves are chosen, preferably semicircular. The lower crown is a salary, made of thicker logs of pine, oak or larch and strictly according to the level. The lower crown must be treated with an antiseptic, dried and covered with a layer of waterproofing mastic.
Between the foundation and the lower crown it is necessary to put 2 layers of roofing material. On both sides of the bath, a gap is formed between the salary and the foundation, it is laid with a brick with cement mortar, having previously covered the logs with two layers of roofing material.
The crowns are fastened together with wooden spikes. Spikes are placed every 1 - 1.5 m in length in a checkerboard pattern along the height of the wall. From the corners of the walls, the spikes are placed at a distance of 200 - 250 mm.
Corner cuts (nodes) during the construction of walls are performed in two ways:

- Cutting into the “oblo” (into the bowl) is strong and durable. The log house is more stable, and the protruding parts of the logs well protect the corner of the log house from rain. If the bowl is down, then the walls last longer.
- More difficult cutting corners "in the paw." It needs a professional carpenter. This connection requires accuracy and accuracy of fit, otherwise the corners of the log house will turn out to be cold and no insulation will help.
It is easier to build the walls of the bath from the finished timber with your own hands. With an average winter temperature in the region - 30 degrees. use a bar 150 x 150 mm, at - 40 degrees. timber 180 x 180 mm. For the internal walls of the bath, a beam of 100 x 150 mm and 100 x 180 mm, respectively, is suitable. It is quite possible to cut the corners of the walls from a bar yourself.
In the process of building walls between logs or beams, a layer of insulation is laid: dry moss, tow or hemp. Caulk both from the outside and from the inside. After caulking, the height of the log house increases by 10 - 15 cm. A year and a half after shrinkage, the caulking is repeated.
The assembly of wooden walls is completed with the upper crown - Mauerlat. Its function is to support the ceiling and roof. It must be made of high quality from slender and strong bars or logs.
Roof
The roof of the bath can be made single-pitched or double-pitched with an attic. Installation of a gable roof is not too complicated and is available to a non-specialist with their own hands. It is necessary to prepare and ensure safety during work at height.
More common gable roof with a ridge at the top and at the ends on both sides - gables. The roof is built from a series of isosceles triangles. The upper point of the triangle is called the ridge, the lower part is called the puff, and the horizontal bridge connecting the sides of the triangle (rafter legs) is called the crossbar. This whole structure is called a farm.

Sometimes the truss design is done differently and a vertical stand with rafter legs (struts) is placed under the ridge. The rafter legs are also attached to the Mauerlat in different ways. In the picture above, they rest against the beam attic floor(puff).
 In the picture on the left, the truss legs of the truss are supported and attached directly to the Mauerlat. Fastening metal elements can be purchased at the store, the choice is large and now this is not a problem.
In order for the roof of the bath to have an overhang (cornice) necessary to drain rain, the rafter legs are released beyond the wall line.
When installing attic beam trusses or ceiling beams must be thought out and already mounted by you. They make temporary flooring and walk during the installation of farms. Sometimes when installing rafter legs cutouts are made on the Mauerlat in it and fastened with iron staples. Usually the cross section of the rafters is 50 x 150 mm. The initial installation of all roof trusses begins with fastening 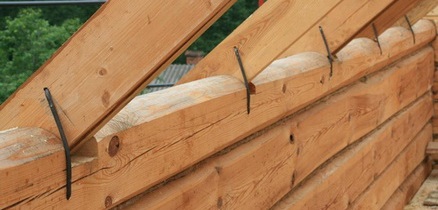 them on the fronts. A cord or ridge board is pulled between them. Farms on the gables are installed perpendicular to the wall and strictly according to the level. After that, other trusses are evenly mounted in increments of 600 - 800 - 1000 mm. Between themselves, the farms are connected by temporary wind connections and props. The eaves with boards from below can not be sewn up. And if sewn up - make ventilation grilles. The roof must "breathe".
Before installing the rafter legs (rafters) are determined with the angle of inclination. The more unreliable the material and the more precipitation falls, the steeper the slope. The height of the ridge depends on the slope of the rafters, the steeper the roof, the higher the ridge. The height of the ridge can be calculated if half the width of the bath is multiplied by a coefficient depending on the angle of the rafters (slopes). The tilt angle is measured in degrees. In the Urals, it is accepted from 30 to 60 degrees.
Accordingly, for an angle of 30 degrees. — slope factor = 0.59; for 35 deg. = 0.79; for 40 deg. = 0.86; for 45 deg. = 1.0; for 50 deg. = 1.22; for 55 deg. = 1.45; for 60 deg. = 1.78
You can calculate the angle of inclination on paper, but you can also on the ground. Lay out your farm on the ground in the form of a triangle and begin to determine the angles between the slopes and the puff. Determine the height of the vertical beam (rack), if you will do it. The height of the skate is in front of you, the angle of the slope is in front of you. Practitioners recommend making a skate template from boards to fix the chosen angle at the skate.
The next step is the crate. The crate can be solid or in a discharge, it depends on the type of roofing material. The discharged (discharged) crate is suitable for steel roof, sometimes for slate. However, in any case, a continuous crate must be made at the ridge and along the cornice overhangs. The crate on the roof of the bath is made of bars 50 x 50 mm or 60 x 60 mm. The distance between the bars is 200 - 250 mm. The joints of the bars on the rafters are made apart.

The crate for rolled materials is made in the form of a continuous flooring of edged softwood boards with a thickness of 25 mm and a width of 100 - 140 mm. The boards are joined on the rafters in a checkerboard pattern.
When laying the batten, remember to chimney and immediately install the embedded parts for its fastening. The crate is not made close to the pipe. When the crate is ready - everything wooden structures roofs are covered with an antiseptic solution and fire retardant (flame retardant).
There are a lot of roofing coverings now: roofing material slate, galvanized sheet steel, profiled galvanized sheets (painted and unpainted), ondulin, tiles.
The roof ridge is covered with a sheet steel cap = 0.7 mm thick, with sides = 300 mm.
The final photos of the bath, built with their own hands
You, the readers of the article, are offered to view simple different baths, with the possibility of building your own hands.


Nuances, with the independent construction of a bath from the foundation to the roof
When you build a turnkey bath with your own hands, you need to know some of the subtleties that are rarely found in the literature, and the one who knows, he is silent about it.
- It is better to cut down a log house for a bath near the installation site, dry it (without tow) and assemble it with a heater on the foundation after 6-9 months.
- If the logs have been dried in a stack for 1 year, they can be cut immediately onto the foundation and caulked.
- The log cabin of the bath should be laid out immediately around the entire perimeter. Logs in a log house are folded alternately with butts in different directions so that the horizontal rows are observed.
- You can not caulk on one wall of the bath - this will warp the structure. It is necessary to caulk the log house from the bottom up sequentially around the entire perimeter of the log house. After the log cabin of the bath is re-caulked, after 1 - 1.5 years, from the inside and outside - you can start lining with clapboard.
- When arranging the formwork and pouring the foundation, install boxes of boards upholstered with roofing felt or iron on each room and on each wall for future ventilation - this is important.
- Make a formwork, independent, in no way connected with the wall formwork, for a stove-heater, or maybe you will have another stove, which means there will be two foundations. Also create a frame with strapping reinforcing bars and fill with concrete. Decide the need to install embedded parts in concrete - this is important.
- Decide on the discharge of wastewater in the washing room and their exit outside the bathhouse (in future articles this issue will be discussed). Make a box for the hole and the passage of the sewer pipe in the foundation wall.
I hope this article has helped you decide on your capabilities in building your own bathhouse with your own hands, and the process of building it on a turnkey basis has inspired you. Look forward to the next articles. Good luck!
A small do-it-yourself bath is a great option when the area near the house or in the yard of the cottage is limited. In addition, with such a solution, you can significantly save the budget, but as a result, get a full-fledged vacation spot that will not only allow you to relieve stress after a hard day, but improve your health and have a good time with family and friends.
Project examples
Ideally, the bath includes 4 rooms in its design:
- dressing room;
- restroom;
- washing;

You can expand the functionality of some rooms by combining them with each other. At the same time, the comfort of the stay is not lost. The overall size of the building will largely depend on how many people will be inside at the same time.
- 1.20 mx2.50 m Very compact solution. In this case, the bath consists of only two rooms: a steam room and a dressing room. The dimensions of the first are 1.20 m × 1.50 m, the second - 1 m × 1.20 m. There is no rest room, and you can change clothes in the dressing room. Washing can be combined with a steam room. This size will be enough for one person.
- 2.50 m × 2.50 m. By the number of rooms - like the first option. The size of the steam room is 2.50 m × 1.50 m, the dressing room is 1 m × 2.50 m. At the same time, it will be possible to organize additional space for storing firewood. In such conditions, two people can easily fit.
- 3 m × 3 m. This option can be planned in different ways. If there is a desire that three people fit in the steam room, then it can be made 3 m × 1.50 m in size, the washing room can be made separate by putting a shower stall there. The size of this room will be 1 m × 1.50 m. There is also a dressing room 2 m × 1.5 m. You can combine a washing room and a steam room, then there remains a space that can be used as a rest room, which will also serve as a dressing room.
- 4 m × 3 m. In this case, 4 m 2 can be separated for the steam room (for example, 2 m × 2 m). The washing room will occupy 1 m × 1.50 m, 2 m × 3 m remains for the rest room. In such conditions, four people can easily fit. They will be able to stay in the steam room at the same time, as well as enjoy communication in the dressing room.
- 4 m × 4 m. In such a territory it is already possible to turn around well. The steam room can be left 2 m × 2 m in size. Make a separate dressing room 2 m × 1.50 m in size. In this case, the relaxation room is 4 m × 2 m (one of the sides will be 2.50 m). The washing room can be combined with a rest room, for this an electric boiler and a shower cubicle are installed. They can be placed in one of the corners of the room, which does not take up much space.


These are indicative examples. You can easily vary the size of the rooms within the available limits. You may want to make the steam room smaller, as there is no need for 4 people to be there at the same time. At the same time, it will be possible to expand the space of the rest room.
Note! All measurements are given in ideal values without taking into account the thickness of the partitions. This was done for greater clarity. In the case when the bath is adjacent to the house, then it can be made in the form of one steam room. At the same time, the bathroom will act as a washing room, and the rest of the territory is available for relaxation.
Choosing a material

Can be used to build walls various material. Much will depend on which project you have chosen, as well as the planned amount of money. For example, you can use ordinary brick. How to build a brick bath, you can read. In this case, the following points will be positive:
- availability;
- ease of delivery;
- relative ease of construction;
- long service life (with proper care- up to 150 years);
- ease of maintenance;
- the possibility of combining with the main structure;
- when using a new brick, there is no need for cladding;
- freedom to choose the form of construction.
To negative sides can be attributed:
- the high cost of the material;
- the need for good ventilation, tk. brick has poor vapor conductivity;
- kindling such a bath takes more time than wooden buildings;
- high costs for interior decoration.

Along with brick, foam block is often used. This is a more progressive material; it has properties characteristic only of it:
- light weight with large size;
- high laying speed;
- ease of fitting block shapes;
- good thermal insulation;
- relatively low price;
- excellent sound insulation;
- environmental friendliness;
- subject to the recommendations - a small consumption of glue.
There is also a fly in the ointment:
- uneven pores can be a problem when hanging furniture;
- shrinkage may occur within a few months;
- poor bending stability.

The most favorite way of manufacturing is rounded logs. There is a lot to be said about its benefits, here are just a few:
- high environmental friendliness;
- pleasant appearance;
- low heat capacity;
- no need for interior and exterior decoration;
- nice interior atmosphere.
The negative side is:
- unprofitable to use in small buildings;
- some complexity of construction;
- the high cost of the material;
- long shrinkage time.

One of the cheapest and quick options is the construction of a frame structure. This method will require minimal building skills. The advantages are:
- no need for a massive foundation;
- availability of materials;
- relatively low cost compared to other options;
- ease of care;
- very fast heating of the steam room with good insulation;
- ease of laying communications;
- seismic resistance;
- no shrinkage.
Of the minuses, one can note the need for good sound insulation. High level booming - the transmission of various vibrations, which can cause inconvenience. It is also important to take care of good ventilation so that moisture does not accumulate inside, which will lead to the development of fungus and mold.
Strip foundation

In the case when a really small bath is planned, it makes no sense to sink the foundation to the level of soil freezing. This will only increase the overall cost of the project. With proper manufacturing and waterproofing, you don’t have to worry about the walls being cold. This type of foundation will be relevant for any of the listed building options.

At the stage of laying the foundation, the necessary communications are provided. This may be a water supply and a sewer drain for water from a washing.

Note! If you know that soils in your area are highly mobile, then an unburied foundation is a poor option, as it can easily collapse under the pressure of the layers. In this case, it is better to evaluate the possibility of installing piles.
pile foundation

There are several ways to build a foundation. Piles can be bored and driven. In the first case, a well is drilled, formwork is made, reinforcing rods are lowered, and the entire space is poured with concrete. In the second option, ready-made concrete, wooden or metal posts with a pointed end are immediately clogged. The most suitable options for a small bath will be screw. They consist of a metal base in the form of a pipe and blades, which contribute to the immersion of the supports into the ground. You can buy them or make your own. If you chose the second option, then you need to act like this:


In each of the options described, separate support elements for the stove should also be provided, especially if you plan to use a heater. This is very important, because its weight can be large, which can damage the floor and lag.
Note! Such a foundation will ideal solution for frame structures, log buildings, as well as small foam block baths. If the soil in the area where construction is planned is sufficiently strong and rocky, then something in between a pile and strip foundation can be used - columnar. In this case, individual pits with a size of 50 × 50 cm are dug out every meter to a level below the freezing of the soil. A formwork, a metal crate is installed inside and a solution is poured.

Building brick walls
For a bath, it is better to use red brick, which has undergone heat treatment and has a lower thermal capacity. To calculate the amount required material, you need to calculate the area of \u200b\u200beach wall. To do this, the width is multiplied by the length. Then you need to divide this number by the area of \u200b\u200bone brick. The area of the masonry seams can be neglected, because you still need to make a reserve in case of a fight or marriage.

The wall can be built using several methods:
- in two bricks with external insulation.
- with air gaps, they are about 6 cm;
- with a layer of insulation between two rows of bricks.
Work begins with the construction of corners. This is an important process because it is they who will subsequently ensure the correctness of the entire structure. To maintain the vertical level of future walls, two metal profiles 5 × 5 cm and a length equal to the height of the future walls are dug in at the corners. They are leveled and secured with braces. Between them, a fishing line is stretched to the height of one row. After it is laid, the fishing line is rearranged to the height of the next one. The thickness of the seam should be about 20–25 mm. It must be applied at a distance of no more than a meter so that it does not have time to dry. Additionally, the plane is checked using a bubble level. If the second and third type of masonry is chosen, then it is necessary to provide a dressing between the two walls. This is ensured by the transverse laying of two bricks opposite each other at certain intervals. Also, each row should go with an offset of half a brick, so that the overall weave of the entire plane is ensured.

over windows or doorways a jumper must be installed. Usually it is reinforced concrete. You can buy it ready-made or fill it directly on the spot. It should go beyond the openings by at least 25 cm. Supports are installed, mounted on them wooden plank. Two rows of bricks are laid out on edge. Between them are reinforcement bars, which should also go beyond the opening by 25 cm, while it is better to bend them in order to intertwine with the existing masonry. Concrete is poured inside. After complete solidification (usually 10-12 days), the lower supports can be dismantled and the logs removed.

Walls made of foam blocks
The general principle of laying will be the same as in the previous case. You should also start from the corners, which must be accurately and clearly set.

In the same way, guides are made of profiled pipes. But there are some nuances:
- In order to achieve the best adhesion, the row-base is laid on cement mortar. The ratio with sand is better to make 1:3. It is very important to maintain a horizontal plane so that all other rows also lie correctly.
- All other rows are fixed with special glue.
- The thickness of the adhesive layer should not exceed 5 mm. Only in this case will it be possible to achieve ideal thermal insulation.
- Every 3 rows, a metal mesh is placed in the seam, which serves to give additional rigidity.
- Foam blocks are placed on the edge.
- Lintels over doors and windows are made in the same way as in the case of brickwork.
Log walls

It is this option that pops up in the imagination when it comes to the bath. For its manufacture, you will need to stock up on rounded or profiled logs. It is better to make external walls from this material. Because the design is small, it is good if the partitions are frame.

After the construction of the walls is completed, the primary caulking is performed. During which the hanging insulation is simply hammered into the joints. Complete shrinkage of the building can last more than 1.5 years.
Frame walls
After the foundation has been erected, an additional foundation is made for such a structure. It is performed according to the example of the grillage, which was mentioned above. For the corner posts, we need exactly the same beam as for the base. In addition, it will be necessary to stock up on an edged board with a length equal to the height of the future walls, a width equal to the width of the grillage and a thickness of 5–10 cm.


Roof erection
For small buildings, the ideal solution would be shed roof. It is necessary to plan its production at the design stage. It is very important to be able to raise one wall higher than the other. When this is done, then in the case of a wall of brick and foam block, waterproofing from bikrost or roofing material is laid on the upper end. Additional beams are mounted on it, which will serve as a Mauerlat. They are attached to the base with anchor bolts or immured studs. Beams are laid on top, on which the crate will be stuffed. They can be fixed to the Mauerlat using metal corners.

In another version, the walls are made the same. Ceiling beams are laid on the Mauerlat. On one side, vertical boards are installed that will form a pediment, rafter legs are lowered from them to another wall. At the junction with the Mauerlat, they are cut to the required angle. Fastened with metal corners. To make it easier to support the roof in one plane, two extreme elements are first installed. A string is stretched between them, which will serve as a level.

The ceiling must be insulated. A vapor barrier is attached to the ceiling beams from above. In this role, dense foil can act. Insulation is placed in the space between the beams in the form mineral wool. Additionally, it is covered with plastic wrap. From the inside, filing is done using wooden lining or polished edged board. Read more about the insulation of the ceiling in the bath.

Note! For a house made of timber, when attaching the rafter legs to the Mauerlat, it is better to use floating corners. This is necessary so that during shrinkage the roof does not skew.
finish line
An integral part of each bath is a stove. You can make your own from sheet material or metal pipe large diameter. In another version, it is laid out of brick, but in this case it can take up a large space. For a small space, it is better to use electric options that are purchased ready-made.

Shelves are mounted inside the steam room. For him, it is better not to use coniferous wood, because. when heated, it may release resin, which will cause burns. Good material for her there will be aspen, larch, linden or oak. With a small space, a width of 40 cm will suffice, it is more convenient when there is a footrest. The fixing material must be recessed flush so as not to burn the skin (it must also be made of stainless material). It is better if the whole structure is assembled on dowels.

For wiring, a double-braided cable must be used. It is better if it is non-flammable (usually there is a prefix “ng” in the marking). Be sure to lay the conductor in the corrugation. Switches are not mounted in the steam room itself. Luminaires are used waterproof with index IP68.
Take care of good ventilation. To do this, you can install an adjustable supply valve, as well as anemostats with an outlet to the gable through the roof. This will be enough for all the moisture to be removed after taking a steam bath.
As you can see, there are no limits on what you can build small bath. Choose the option that best suits you.
Scheme
 Frame-panel bath with a porch
Having your own plot of land gives you an excellent opportunity to acquire your own bath or sauna.
In order for the installation of such a building not to cause problems, we will consider in this article the stages of building a bath with our own hands.
Installation progress
The first step is to choose a place for the future building. If your plot is small, then it’s quite simple: the foundation should be laid where a residential building will not be built.
For a larger area, make your choice based on personal preference. However, compliance with the rules must also be adhered to.

Foundation
The construction of a bath in stages with your own hands begins with the installation of the foundation. The bath is not a large multi-storey building and does not imply the presence of a heavy stationary furniture. Therefore, it does not make sense to pour a monolithic reinforced concrete slab and you can get by with a pile or strip foundation.

Although the pile model comes out somewhat cheaper, it is recommended to resort to it only in cases where the terrain for construction is sloping or low-lying.
The best choice would be the implementation of a strip foundation, because it:
- Has higher strength. It will come in handy in case you want to attach an attic in the future.
- Creates additional thermal insulation. For a couple, this is an important advantage.
- Provides the possibility of organizing a subfloor or cellar.
- We remove the vegetation layer from the site selected for construction.
- With the help of pegs and a cord, we mark the future foundation.

- We dig a trench around the entire perimeter and in places where they will pass. Depth - 50 cm, width - 10 cm more than the expected walls.
Tip: in order to save money, it is allowed to lay a foundation under the inner walls flush with them.
Since they still do not have a bearing load.

- We fall asleep a pillow of gravel 15 cm thick and carefully ram it.
- Lay a layer of waterproofing in the form of a polyethylene film.
- We mount on the sides of the moat a formwork from knocked down plank boards, which should rise 20 cm above the level of soil freezing.

- We mix the solution: gravel, sand and cement in proportions of 5: 2.5: 1. Water is added according to the situation for ease of kneading and bringing the mass of fluidity.
- We are waiting for 28 days, after which you can proceed to further work.
log cabin

Although the price of a tree is higher than many modern building materials for a bath the best option can not found. Traditional wood with its warmth, smell and aesthetic appearance it is impossible to fully replace with a cheap cinder block or foam block.
For the construction of the sauna body is best suited wooden beam section 15 cm by 15 cm.
There are two assembly methods:
- In the paw.

- Into the bowl.

During installation, the following nuances are observed:
- The optimal height for walls is 250 cm.
- Thermal insulation materials must be placed between the crowns.
- Wood is treated with antiseptics to protect against decay processes and pest attacks.
Tip: for lower rims it makes sense to specifically purchase more durable and reliable tree species, such as oak or larch.
They will be able to more successfully resist the dampness coming from the earth.
Floor
- To comply with the waterproofing, we lay a layer of roofing material on the foundation concrete.
- From above we install wooden beams.

- Stele on beams unedged board 15-20 mm thick, fixing with nails or self-tapping screws. This is how the rough layer of the floor is obtained.
- On the draft base we mount the logs.
- Between lags.
Which is great for:
- Styrofoam;
- extruded polyurethane foam;
- basalt wool;

- expanded clay.
- The insulating material on top must be covered with a waterproofing layer in the form of a polyethylene film three millimeters thick.
- We make the finishing layer from a grooved three-centimeter board.

Tip: when installing the floor structure, provide a distance of a couple of centimeters between the insulation and the finishing coating for better air ventilation.
Ceiling
Now the phased construction of a bathhouse with your own hands is approaching the arrangement of the ceiling, which has its own characteristics due to the presence of the most aggressive environment. After all, especially when operating in winter time From below, the strongest heat, gathered from the entire steam room, affects the ceiling, and from above, severe frost.
Most suitable for bathing conditions hemmed construction, which is executed as follows:
- Are installed. As in the case of the frame, you can use the methods in the paw and in the cup.

- From above we lay and fix the unedged board.
- From the inside, standing on a stepladder, lay a plastic film for waterproofing with a release on the side walls, closing the beam openings.
- We install insulation sheets between the beams:
- mineral wool;

- felt;
- penoizol;
- Styrofoam;
- polyurethane foam.
- Next, we close everything. It serves as a vapor barrier and reflects heat radiation. We fasten it with a film to ensure sealing.
- We nail wooden planks through the foil to the beams.
- We fasten tongue-and-groove boards to the installed rails.
Wherein:
- We leave two centimeter gaps between the ceiling lining and the wall to provide air conditioning.
- For fixing we use clamps.

Roof
The roof structure can be used as a double-pitched or single-pitched roof. Shed is of course economical, but also less practical. If you want your bath to serve you for a long time and reliably, it is recommended to install gable system. Moreover, it will also allow you to equip an attic utility room.

The roof consists of truss system, battens and insulating coating material. If you do not have experience in relevant work, then it is advisable to invite a specialist to carry out this stage.
Metal tile is perfect for covering. And if the slopes on one side of the building are taken out half a meter, then you can equip a wonderful woodpile.
Internal work
At this point, the ceiling and floor are already ready, therefore, the stages of finishing the bath now consist in wall cladding:
- We stuff parallel strips on the inner surface.
- Between them we install insulating materials. Basalt wool, felt, foam plastic and extruded polyurethane still remain in demand.

- We cover the insulation with foil to reflect thermal radiation.
- We sheathe with a tongue-and-groove board using kleimers. This will get rid of the protruding caps of the screws, which can later cause burns.

Everything, the bath is ready. It remains only to install furniture and a stove, after which you can begin to operate the bath.
Conclusion
Building a bath with your own hands is, of course, troublesome. But the result is worth it. It is not possible to single out the more important ones among all the stages of construction, all of them, one way or another, affect the quality of the future bath.
- The wood that is used for the construction and decoration of the bath is vulnerable to dampness and therefore it must be protected as much as possible by creating good ventilation and treating it with antiseptics.
- The steam room will only be of high quality and economical in terms of fuel consumption, when maximum thermal insulation is provided. Therefore, take Special attention building insulation.

The video in this article will introduce you to additional materials on this topic. Happy building work!